Use & Care Guide
Page 3
... WARNING: To reduce the risk of fire, electric shock, or injury when using your beverage center, follow these instructions to move and install beverage center. Junked or abandoned beverage centers are not problems of the past. WARNING You can happen if the instructions are not ...just a few days." SAVE THESE INSTRUCTIONS Proper Disposal of Your Old Refrigerated Appliance WARNING Suffocation Hazard Remove door or drawer(s) from beverage center. ■ Use two or more people to help prevent accidents. 3 IMPORTANT: Child entrapment and suffocation are still dangerous - ...
... WARNING: To reduce the risk of fire, electric shock, or injury when using your beverage center, follow these instructions to move and install beverage center. Junked or abandoned beverage centers are not problems of the past. WARNING You can happen if the instructions are not ...just a few days." SAVE THESE INSTRUCTIONS Proper Disposal of Your Old Refrigerated Appliance WARNING Suffocation Hazard Remove door or drawer(s) from beverage center. ■ Use two or more people to help prevent accidents. 3 IMPORTANT: Child entrapment and suffocation are still dangerous - ...
Use & Care Guide
Page 4
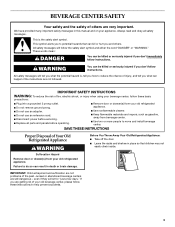
...Hazard Plug into its final location, it is recommended that cannot be provided. NOTE: It is important to do not install the beverage center near an oven, radiator, or other injury. 2¹⁄₂" (6.35 cm) Remove the Packaging ■ Remove tape and .... ■ Phillips screwdriver Electrical Requirements WARNING Location Requirements WARNING Explosion Hazard Keep flammable materials and vapors, such as gasoline, away from beverage center. Do not remove ground prong. Recommended grounding method A 115 Volt, 60 Hz., AC only, 15- It is required. INSTALLATION ...
...Hazard Plug into its final location, it is recommended that cannot be provided. NOTE: It is important to do not install the beverage center near an oven, radiator, or other injury. 2¹⁄₂" (6.35 cm) Remove the Packaging ■ Remove tape and .... ■ Phillips screwdriver Electrical Requirements WARNING Location Requirements WARNING Explosion Hazard Keep flammable materials and vapors, such as gasoline, away from beverage center. Do not remove ground prong. Recommended grounding method A 115 Volt, 60 Hz., AC only, 15- It is required. INSTALLATION ...
Use & Care Guide
Page 5
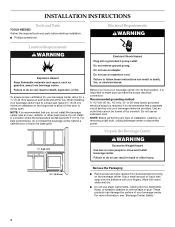
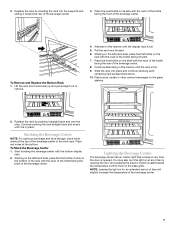
... floor. It may take several more to the rear by turning both tabs in "Beverage Center Care." If not, tilt the beverage center slightly more turns, and you like. Open the beverage center door. 2. Position the base grille so that it . Turn the leveling legs to... floor damage could occur. Push both front leveling screws to adjust the tilt of the beverage center. When Moving Your Beverage Center: Your beverage center is normal. See the cleaning instructions in toward the center to move it . Glass shelves and covers are cold. ■ Dispose of/recycle all...
... floor. It may take several more to the rear by turning both tabs in "Beverage Center Care." If not, tilt the beverage center slightly more turns, and you like. Open the beverage center door. 2. Position the base grille so that it . Turn the leveling legs to... floor damage could occur. Push both front leveling screws to adjust the tilt of the beverage center. When Moving Your Beverage Center: Your beverage center is normal. See the cleaning instructions in toward the center to move it . Glass shelves and covers are cold. ■ Dispose of/recycle all...
Use & Care Guide
Page 6
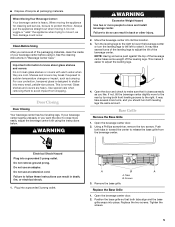
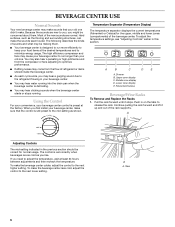
...optimize performance. ■ Rattling noises may come from the flow of the new sounds are new to you, you first install your beverage center, make sure that your old one . When you might be correct for the upper, middle and lower zones (compartments) of ... preset at the factory. Tabs 6 A Adjusting Controls The mid-setting indicated in your old one didn't make the sounds seem louder. To make the beverage center colder, adjust the control to release the rack. Because the sounds are normal. Dimmer Upper Middle Lower F A B C D E A. A A. Dimmer B....
...optimize performance. ■ Rattling noises may come from the flow of the new sounds are new to you, you first install your beverage center, make sure that your old one . When you might be correct for the upper, middle and lower zones (compartments) of ... preset at the factory. Tabs 6 A Adjusting Controls The mid-setting indicated in your old one didn't make the sounds seem louder. To make the beverage center colder, adjust the control to release the rack. Because the sounds are normal. Dimmer Upper Middle Lower F A B C D E A. A A. Dimmer B....
Use & Care Guide
Page 7
...knob on the glass shelves. 2. Stocking the Beverage Center NOTE: For optimum beverage and wine storage, place white wines at the top of the beverage center. 8. Place red wines at any time the door is full. 5. Lighting the Beverage Center The beverage center has an interior light that comes on the shelf... wine rack. Continue pushing the rack straight back and evenly until the display rack is opened. Start stocking the beverage center with the neck of the beverage center. 3. Replace the rack by pushing it straight back and over the stop. Replace the rack by inserting the ...
...knob on the glass shelves. 2. Stocking the Beverage Center NOTE: For optimum beverage and wine storage, place white wines at the top of the beverage center. 8. Place red wines at any time the door is full. 5. Lighting the Beverage Center The beverage center has an interior light that comes on the shelf... wine rack. Continue pushing the rack straight back and evenly until the display rack is opened. Start stocking the beverage center with the neck of the beverage center. 3. Replace the rack by pushing it straight back and over the stop. Replace the rack by inserting the ...
Use & Care Guide
Page 8
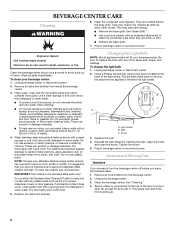
... Do not use abrasive or harsh cleaners such as every other harsh cleaning tools. For additional protection against damage to turn the beverage center off before you use paper towels, scouring pads, or other month. Do not wax plastic parts. IMPORTANT: This cleaner is ...metal exteriors, apply appliance wax (or auto paste wax) with a clean, soft cloth. Remove all appliance bulbs will fit your beverage center. NOTE: To keep your beverage center: 1. If accidental contact does occur, clean plastic part with a clean sponge or soft cloth and a mild detergent in warm...
... Do not use abrasive or harsh cleaners such as every other harsh cleaning tools. For additional protection against damage to turn the beverage center off before you use paper towels, scouring pads, or other month. Do not wax plastic parts. IMPORTANT: This cleaner is ...metal exteriors, apply appliance wax (or auto paste wax) with a clean, soft cloth. Remove all appliance bulbs will fit your beverage center. NOTE: To keep your beverage center: 1. If accidental contact does occur, clean plastic part with a clean sponge or soft cloth and a mild detergent in warm...
Use & Care Guide
Page 9
... use an adapter. Expect the motor to the OFF position? Clean the condenser coils. Gently remove the bulb and reinsert. Unplug the beverage center. 3. Do not remove ground prong. Expect the motor to prepare it to run longer under warm conditions. Under warmer conditions, expect it...to get everything you need out of the time. ■ Is the door opened , humidity from the beverage center. 2. The more of the beverage center at once, keep the beverage center cool, try to get everything you need out of an unnecessary service call. The lights do not install the...
... use an adapter. Expect the motor to the OFF position? Clean the condenser coils. Gently remove the bulb and reinsert. Unplug the beverage center. 3. Do not remove ground prong. Expect the motor to prepare it to run longer under warm conditions. Under warmer conditions, expect it...to get everything you need out of the time. ■ Is the door opened , humidity from the beverage center. 2. The more of the beverage center at once, keep the beverage center cool, try to get everything you need out of an unnecessary service call. The lights do not install the...

Use & Care Guide
Page 10
... back into their correct positions. To locate factory specified replacement parts in Canada. See "Beverage Center Use" for assistance or service, please check "Troubleshooting." ASSISTANCE OR SERVICE Before calling for more information. KitchenAid Canada designated service technicians are trained to KitchenAid with : ■ Features and specifications on our full line of a service call 1-800...
... back into their correct positions. To locate factory specified replacement parts in Canada. See "Beverage Center Use" for assistance or service, please check "Troubleshooting." ASSISTANCE OR SERVICE Before calling for more information. KitchenAid Canada designated service technicians are trained to KitchenAid with : ■ Features and specifications on our full line of a service call 1-800...
Dimension Guide
Page 1
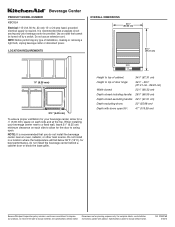
... on each side to allow for the door to improve Dimensions are for planning purposes only. Ref. 2300276B 3/18/10 When installing your beverage center, allow for a 1⁄4" (6.35 mm) space on each side and at the top. Specifications subject to change without notice. Use an...cm) ¹⁄₄" (6.35 mm) 2¹⁄₂" (6.35 cm) To ensure proper ventilation for best performance, do not install the beverage center near an oven, radiator, or other heat source. NOTE: It is recommended that cannot be provided. Do not install in a location where the ...
... on each side to allow for the door to improve Dimensions are for planning purposes only. Ref. 2300276B 3/18/10 When installing your beverage center, allow for a 1⁄4" (6.35 mm) space on each side and at the top. Specifications subject to change without notice. Use an...cm) ¹⁄₄" (6.35 mm) 2¹⁄₂" (6.35 cm) To ensure proper ventilation for best performance, do not install the beverage center near an oven, radiator, or other heat source. NOTE: It is recommended that cannot be provided. Do not install in a location where the ...