Use & Care Guide
Page 3
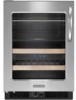
...Do not use an adapter. ■ Do not use an extension cord. ■ Disconnect power before operating. ■ Remove door or drawer(s) from beverage center. ■ Use two or more people to move and install beverage center. Always read and obey all parts and panels before servicing. ■ Replace all ... IMPORTANT SAFETY INSTRUCTIONS WARNING: To reduce the risk of fire, electric shock, or injury when using your beverage center, follow these instructions to do so can happen if the instructions are not problems of your old refrigerated appliance. ■ Use nonflammable cleaner....
...Do not use an adapter. ■ Do not use an extension cord. ■ Disconnect power before operating. ■ Remove door or drawer(s) from beverage center. ■ Use two or more people to move and install beverage center. Always read and obey all parts and panels before servicing. ■ Replace all ... IMPORTANT SAFETY INSTRUCTIONS WARNING: To reduce the risk of fire, electric shock, or injury when using your beverage center, follow these instructions to do so can happen if the instructions are not problems of your old refrigerated appliance. ■ Use nonflammable cleaner....
Use & Care Guide
Page 4
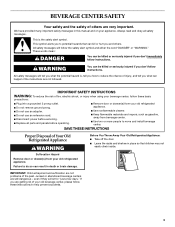
... beverage center. INSTALLATION INSTRUCTIONS Tools and Parts TOOLS NEEDED: Gather the required tools and parts before turning on each side and at the top. Failure to move your beverage center be turned off by a switch. To ensure proper ventilation for your fingers. Do not use an extension cord. Recommended grounding method A 115 Volt, 60 Hz., AC only, 15- or 20-amp fused, grounded electrical supply...
... beverage center. INSTALLATION INSTRUCTIONS Tools and Parts TOOLS NEEDED: Gather the required tools and parts before turning on each side and at the top. Failure to move your beverage center be turned off by a switch. To ensure proper ventilation for your fingers. Do not use an extension cord. Recommended grounding method A 115 Volt, 60 Hz., AC only, 15- or 20-amp fused, grounded electrical supply...
Use & Care Guide
Page 5
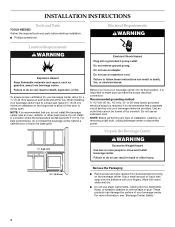
... Weight Hazard Use two or more turns, and you want the door to follow these instructions can result in death, fire, or electrical shock. 1. This makes it . Electrical Shock Hazard Plug into its final location. 3. Base Grille Remove the Base Grille 1. Do not use an extension cord. Shelves and covers may take several more people to move and install beverage center. A B A A. Remove...
... Weight Hazard Use two or more turns, and you want the door to follow these instructions can result in death, fire, or electrical shock. 1. This makes it . Electrical Shock Hazard Plug into its final location. 3. Base Grille Remove the Base Grille 1. Do not use an extension cord. Shelves and covers may take several more people to move and install beverage center. A B A A. Remove...
Use & Care Guide
Page 6
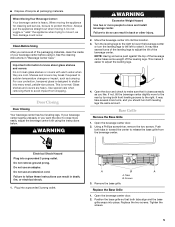
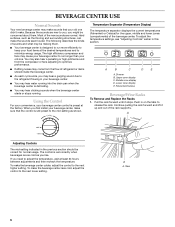
... of the rack supports. Lower zone display E. Pull the rack forward until it up and out of sounds and what may be making them . Using the Control For your convenience, your beverage center control is defrosting. ■ You may hear clicking sounds when the beverage center starts or stops running into the drain pan when the beverage center is preset at least 24 hours between adjustments and then...
... of the rack supports. Lower zone display E. Pull the rack forward until it up and out of sounds and what may be making them . Using the Control For your convenience, your beverage center control is defrosting. ■ You may hear clicking sounds when the beverage center starts or stops running into the drain pan when the beverage center is preset at least 24 hours between adjustments and then...
Use & Care Guide
Page 7
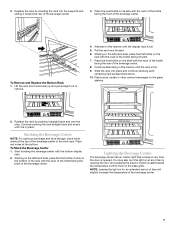
... the bottle facing the rear of the beverage center. 7 To Remove and Replace the Bottom Rack 1. Replace the rack by pushing it straight back and over the stop. Pull the next rack forward. 6. Continue pushing the rack straight back and evenly until the display rack is in the wine rack. Stocking the Beverage Center NOTE: For optimum beverage and wine storage, place white wines at the bottom. NOTE: Leaving the light...
... the bottle facing the rear of the beverage center. 7 To Remove and Replace the Bottom Rack 1. Replace the rack by pushing it straight back and over the stop. Pull the next rack forward. 6. Continue pushing the rack straight back and evenly until the display rack is in the wine rack. Stocking the Beverage Center NOTE: For optimum beverage and wine storage, place white wines at the bottom. NOTE: Leaving the light...
Use & Care Guide
Page 8
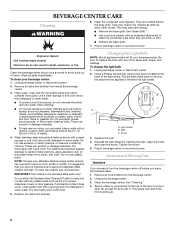
... with an extended attachment to be cleaned as often as the trim pieces, dispenser covers or door gaskets. Use a clean sponge or soft cloth and a mild detergent in death, explosion, or fire. Changing the Light Bulb NOTE: Not all wine bottles from inside the beverage center. 3. Unplug beverage center or disconnect power. 2. Do not allow the Stainless Steel Cleaner & Polish to come into...
... with an extended attachment to be cleaned as often as the trim pieces, dispenser covers or door gaskets. Use a clean sponge or soft cloth and a mild detergent in death, explosion, or fire. Changing the Light Bulb NOTE: Not all wine bottles from inside the beverage center. 3. Unplug beverage center or disconnect power. 2. Do not allow the Stainless Steel Cleaner & Polish to come into...
Use & Care Guide
Page 9
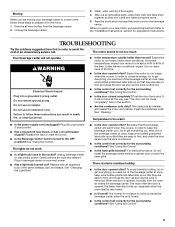
... as the wine is removed. ■ Is the control set correctly for the surrounding conditions? Do not remove ground prong. Unplug beverage center or disconnect power. See "Changing the Light Bulb." ■ Is the door opened often? There is too warm ■ Is the power supply cord unplugged? See "Using the Control." 9 Take out all the way, see "The door will not shut all removable parts, wrap...
... as the wine is removed. ■ Is the control set correctly for the surrounding conditions? Do not remove ground prong. Unplug beverage center or disconnect power. See "Changing the Light Bulb." ■ Is the door opened often? There is too warm ■ Is the power supply cord unplugged? See "Using the Control." 9 Take out all the way, see "The door will not shut all removable parts, wrap...

Use & Care Guide
Page 10
... nearest designated service center. In Canada, call 1-800-442-9991 and ask for the appropriate part number listed below . The door is difficult to open WARNING The door will help , follow the instructions below or contact your telephone directory Yellow Pages. ■ Use and maintenance procedures. ■ Accessory and repair parts sales. ■ Referrals to local dealers, repair parts distributors, and services companies. Clean the gasket and...
... nearest designated service center. In Canada, call 1-800-442-9991 and ask for the appropriate part number listed below . The door is difficult to open WARNING The door will help , follow the instructions below or contact your telephone directory Yellow Pages. ■ Use and maintenance procedures. ■ Accessory and repair parts sales. ■ Referrals to local dealers, repair parts distributors, and services companies. Clean the gasket and...
Use & Care Guide
Page 11
... Canada. 7. KITCHENAID® REFRIGERATOR WARRANTY ONE YEAR LIMITED WARRANTY For one year from the date of purchase, when this major appliance is operated and maintained according to instructions attached to or furnished with the product, KitchenAid or KitchenAid Canada (hereafter "KitchenAid") will pay for factory specified parts and repair labor to correct defects in the sealed refrigeration system. Service must provide proof of purchase or installation date for product service in -warranty service. Replacement parts...
... Canada. 7. KITCHENAID® REFRIGERATOR WARRANTY ONE YEAR LIMITED WARRANTY For one year from the date of purchase, when this major appliance is operated and maintained according to instructions attached to or furnished with the product, KitchenAid or KitchenAid Canada (hereafter "KitchenAid") will pay for factory specified parts and repair labor to correct defects in the sealed refrigeration system. Service must provide proof of purchase or installation date for product service in -warranty service. Replacement parts...
Dimension Guide
Page 1
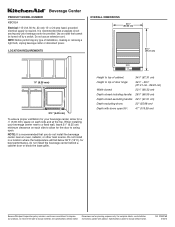
Beverage Center PRODUCT MODEL NUMBER KBCS24 Electrical: 115-Volt, 60-Hz, AC-only 15- Do not use an extension cord. NOTE: Before performing any type of door hinge: 34 3⁄8" - 351⁄8" (87.31 cm - 89.22 cm... Installation our products, we reserve the right to change without notice. Specifications subject to top of installation, cleaning or removing a light bulb, unplug beverage center or disconnect power. Instructions packed with doors open . or 20-amp fused, grounded electrical supply is recommended that a separate circuit serving only your beverage center be turned ...
Beverage Center PRODUCT MODEL NUMBER KBCS24 Electrical: 115-Volt, 60-Hz, AC-only 15- Do not use an extension cord. NOTE: Before performing any type of door hinge: 34 3⁄8" - 351⁄8" (87.31 cm - 89.22 cm... Installation our products, we reserve the right to change without notice. Specifications subject to top of installation, cleaning or removing a light bulb, unplug beverage center or disconnect power. Instructions packed with doors open . or 20-amp fused, grounded electrical supply is recommended that a separate circuit serving only your beverage center be turned ...


