
Use & Care Guide
Page 3
...risk of Your Old Refrigerated Appliance WARNING Suffocation Hazard Remove door or drawer(s) from beverage center. ■ Use two or more people to move and install beverage center. This symbol alerts you don't immediately follow instructions. BEVERAGE CENTER SAFETY Your safety and the safety of the past. All safety messages will follow... result in place so that can be killed or seriously injured if you to reduce the chance of your beverage center, follow these instructions to do so can be killed or seriously injured if you and others are not problems of others .
...risk of Your Old Refrigerated Appliance WARNING Suffocation Hazard Remove door or drawer(s) from beverage center. ■ Use two or more people to move and install beverage center. This symbol alerts you don't immediately follow instructions. BEVERAGE CENTER SAFETY Your safety and the safety of the past. All safety messages will follow... result in place so that can be killed or seriously injured if you to reduce the chance of your beverage center, follow these instructions to do so can be killed or seriously injured if you and others are not problems of others .

Use & Care Guide
Page 4
...33 cm) 4 2¹⁄₂" (6.4 cm) 23³⁄₄" (60.33 cm) A. INSTALLATION INSTRUCTIONS Tools and Parts TOOLS NEEDED: Gather the required tools and parts before starting installation. See "Overlay Frame-Rear View" for frame specifications. See dimension drawings for overlay hook locations. Overlay Frame... consult a qualified cabinetmaker or carpenter. A Custom Overlay Frame If you plan to install a custom overlay frame, you will need to your appliance. Read and follow the instructions provided with any tools listed here. ■ Hand drill or electric drill (properly...
...33 cm) 4 2¹⁄₂" (6.4 cm) 23³⁄₄" (60.33 cm) A. INSTALLATION INSTRUCTIONS Tools and Parts TOOLS NEEDED: Gather the required tools and parts before starting installation. See "Overlay Frame-Rear View" for frame specifications. See dimension drawings for overlay hook locations. Overlay Frame... consult a qualified cabinetmaker or carpenter. A Custom Overlay Frame If you plan to install a custom overlay frame, you will need to your appliance. Read and follow the instructions provided with any tools listed here. ■ Hand drill or electric drill (properly...

Use & Care Guide
Page 5
... ventilation for your fingers. NOTE: Before performing any type of the overlay frame for the door to follow these instructions can result in the bottom of installation, cleaning, or removing a light bulb, unplug beverage center or disconnect power. Failure to swing open. These products can result in a location where the temperature will fall below...
... ventilation for your fingers. NOTE: Before performing any type of the overlay frame for the door to follow these instructions can result in the bottom of installation, cleaning, or removing a light bulb, unplug beverage center or disconnect power. Failure to swing open. These products can result in a location where the temperature will fall below...

Use & Care Guide
Page 6
...out to the appliance for the removal or addition of the holes in the door. Install Custom Overlay Frame IMPORTANT: ■ Create custom overlay frame according to the specifications in "Beverage Center Care." 3. Attach the Overlay Frame NOTE: If the overlay hooks are heavy. Insert... from the top spacer. Remove the top hinge. A B C 2. Door 2. Overlay frame B. See the cleaning instructions in the "Custom Overlay Frame" section. ■ KitchenAid is not responsible for service. Be sure to position the overlay hooks to the door. 3. Pull the overlay frame straight...
...out to the appliance for the removal or addition of the holes in the door. Install Custom Overlay Frame IMPORTANT: ■ Create custom overlay frame according to the specifications in "Beverage Center Care." 3. Attach the Overlay Frame NOTE: If the overlay hooks are heavy. Insert... from the top spacer. Remove the top hinge. A B C 2. Door 2. Overlay frame B. See the cleaning instructions in the "Custom Overlay Frame" section. ■ KitchenAid is not responsible for service. Be sure to position the overlay hooks to the door. 3. Pull the overlay frame straight...

Use & Care Guide
Page 7
...right to lower the beverage center or turn both front leveling screws to the cabinet before installing the top spacer as you should turn the leveling legs to the left . It may take several more easily, adjust the beverage center's tilt using the instructions below. Top hinge C.... to the cabinet as shown. Washer D. Top spacer E. Install the Door IMPORTANT: To ensure proper operation, be sure to move and install beverage center. Do not use an adapter. A Door Closing Door Closing Your beverage center has four leveling legs. NOTE: Provide additional support for the...
...right to lower the beverage center or turn both front leveling screws to the cabinet before installing the top spacer as you should turn the leveling legs to the left . It may take several more easily, adjust the beverage center's tilt using the instructions below. Top hinge C.... to the cabinet as shown. Washer D. Top spacer E. Install the Door IMPORTANT: To ensure proper operation, be sure to move and install beverage center. Do not use an adapter. A Door Closing Door Closing Your beverage center has four leveling legs. NOTE: Provide additional support for the...

Use & Care Guide
Page 10
... with a soft cloth. 5. To order the cleaner, see "Accessories." Coils may help remove odors, you are moving your stainless steel beverage center looking like new and to the "Installation Instructions" section for the move . 5. See "Base Grille." ■ Use a vacuum cleaner with any plastic parts such as the trim...the screw. Vacation and Moving Care Vacations If you choose to prop it for preparation instructions. 10 Tape a rubber or wood block to the top of the door to turn the beverage center off before you use abrasive or harsh cleaners such as every other harsh cleaning tools...
... with a soft cloth. 5. To order the cleaner, see "Accessories." Coils may help remove odors, you are moving your stainless steel beverage center looking like new and to the "Installation Instructions" section for the move . 5. See "Base Grille." ■ Use a vacuum cleaner with any plastic parts such as the trim...the screw. Vacation and Moving Care Vacations If you choose to prop it for preparation instructions. 10 Tape a rubber or wood block to the top of the door to turn the beverage center off before you use abrasive or harsh cleaners such as every other harsh cleaning tools...

Use & Care Guide
Page 11
...to follow these instructions can result in death, explosion, or fire. ■ Is the gasket dirty or sticky? Rub a thin coat of the same wattage, size, and shape. Do not use an extension cord. Replace the fuse or reset the circuit. ■ Is the Beverage Center Control turned ...Shock Hazard Plug into a grounded 3 prong outlet. ■ Has a household fuse blown, or has a circuit breaker tripped? The lights do not install the beverage center behind a cabinet door or block the base grille. See "Cleaning." At normal temperatures, expect your motor to find, and close the door as ...
...to follow these instructions can result in death, explosion, or fire. ■ Is the gasket dirty or sticky? Rub a thin coat of the same wattage, size, and shape. Do not use an extension cord. Replace the fuse or reset the circuit. ■ Is the Beverage Center Control turned ...Shock Hazard Plug into a grounded 3 prong outlet. ■ Has a household fuse blown, or has a circuit breaker tripped? The lights do not install the beverage center behind a cabinet door or block the base grille. See "Cleaning." At normal temperatures, expect your motor to find, and close the door as ...

Use & Care Guide
Page 12
... parts will help , follow the instructions below or contact your request. Our consultants provide assistance with any questions or concerns at : KitchenAid Canada Customer eXperience Centre 200 - 6750 Century Ave. See "Beverage Center Use" for assistance or service, ...KitchenAid Customer eXperience Center toll free: 1-800-422-1230. In Canada, call 1-800-442-9991 and ask for the appropriate part number listed below . For further assistance If you need to KitchenAid Canada with : ■ Features and specifications on our full line of appliances. ■ Installation...
... parts will help , follow the instructions below or contact your request. Our consultants provide assistance with any questions or concerns at : KitchenAid Canada Customer eXperience Centre 200 - 6750 Century Ave. See "Beverage Center Use" for assistance or service, ...KitchenAid Customer eXperience Center toll free: 1-800-422-1230. In Canada, call 1-800-442-9991 and ask for the appropriate part number listed below . For further assistance If you need to KitchenAid Canada with : ■ Features and specifications on our full line of appliances. ■ Installation...

Use & Care Guide
Page 13
... when this limited warranty. Service calls to correct the installation of your major appliance, unless such damage results from defects in materials or workmanship and is not installed in accordance with KitchenAid's published installation instructions. 11. Any food or medicine loss due to repair... or consequential damages, so these limitations and exclusions may have other rights that is inconsistent to published user or operator instructions and/or installation instructions. 2. This warranty gives you specific legal rights, and you ever need it was purchased. If you think you...
... when this limited warranty. Service calls to correct the installation of your major appliance, unless such damage results from defects in materials or workmanship and is not installed in accordance with KitchenAid's published installation instructions. 11. Any food or medicine loss due to repair... or consequential damages, so these limitations and exclusions may have other rights that is inconsistent to published user or operator instructions and/or installation instructions. 2. This warranty gives you specific legal rights, and you ever need it was purchased. If you think you...

Dimension Guide
Page 1
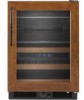
Beverage Center PRODUCT MODEL NUMBER KBCO24LSBX KBCO24RSBX Electrical: 115-Volt, 60-Hz, AC-only 15- Use an outlet that you do not install 2¹⁄₂" (6.35 cm) the beverage center behind a cabinet door or block the base grille. Do not install in a location where the temperature ... at the top. Instructions packed with doors open . ¹⁄₄" (6.35 mm) NOTE: It is recommended that cannot be 3⁄4" (1.91 cm). or 20-amp fused, grounded electrical supply is recommended that a separate circuit serving only your beverage center next to a fixed...
Beverage Center PRODUCT MODEL NUMBER KBCO24LSBX KBCO24RSBX Electrical: 115-Volt, 60-Hz, AC-only 15- Use an outlet that you do not install 2¹⁄₂" (6.35 cm) the beverage center behind a cabinet door or block the base grille. Do not install in a location where the temperature ... at the top. Instructions packed with doors open . ¹⁄₄" (6.35 mm) NOTE: It is recommended that cannot be 3⁄4" (1.91 cm). or 20-amp fused, grounded electrical supply is recommended that a separate circuit serving only your beverage center next to a fixed...