
Use & Care Guide
Page 3
...: To reduce the risk of Your Old Refrigerated Appliance WARNING Suffocation Hazard Remove door or drawer(s) from beverage center. ■ Use two or more people to move and install beverage center. SAVE THESE INSTRUCTIONS Proper Disposal of fire, electric shock, or injury when using your old refrigerated appliance. Always read and obey all parts and panels before servicing. ■ Replace all safety messages. This is , tell...
...: To reduce the risk of Your Old Refrigerated Appliance WARNING Suffocation Hazard Remove door or drawer(s) from beverage center. ■ Use two or more people to move and install beverage center. SAVE THESE INSTRUCTIONS Proper Disposal of fire, electric shock, or injury when using your old refrigerated appliance. Always read and obey all parts and panels before servicing. ■ Replace all safety messages. This is , tell...

Use & Care Guide
Page 4
... instructions provided with any tools listed here. ■ Hand drill or electric drill (properly grounded) Brad point doweling drill bit ■ Phillips screwdriver ■ Scissors ■ Masking tape ■ Tape measure ■ Petroleum jelly PARTS ... (60.33 cm) A. Overlay hooks (4) Door Hinge Holes ■ The views of the overlay frame. INSTALLATION INSTRUCTIONS Tools and Parts TOOLS NEEDED: Gather the required tools and parts before starting installation. See dimension drawings for a left-hand hinge. ■ We recommend using the dimensions shown. 1 3.33 cm) 4 11.2 ...
... instructions provided with any tools listed here. ■ Hand drill or electric drill (properly grounded) Brad point doweling drill bit ■ Phillips screwdriver ■ Scissors ■ Masking tape ■ Tape measure ■ Petroleum jelly PARTS ... (60.33 cm) A. Overlay hooks (4) Door Hinge Holes ■ The views of the overlay frame. INSTALLATION INSTRUCTIONS Tools and Parts TOOLS NEEDED: Gather the required tools and parts before starting installation. See dimension drawings for a left-hand hinge. ■ We recommend using the dimensions shown. 1 3.33 cm) 4 11.2 ...

Use & Care Guide
Page 5
... so can damage the surface of installation, cleaning, or removing a light bulb, unplug beverage center or disconnect power. Do not use sharp instruments, rubbing alcohol, flammable fluids, or abrasive cleaners to move it, as floor damage could occur. 5 It is important to avoid floor damage. These products can result in a location where the temperature will fall below 55°F (13...
... so can damage the surface of installation, cleaning, or removing a light bulb, unplug beverage center or disconnect power. Do not use sharp instruments, rubbing alcohol, flammable fluids, or abrasive cleaners to move it, as floor damage could occur. 5 It is important to avoid floor damage. These products can result in a location where the temperature will fall below 55°F (13...

Use & Care Guide
Page 6
... are not installed, see "Custom Overlay Frame" for later use. 1. Top hinge C. Remove the three screws from the washer, top spacer or top hinge pin. Overlay plates (2) D. Important information to the specifications in the "Custom Overlay Frame" section. ■ KitchenAid is not responsible for the removal or addition of your beverage center before using it. Remove the Door IMPORTANT: Do...
... are not installed, see "Custom Overlay Frame" for later use. 1. Top hinge C. Remove the three screws from the washer, top spacer or top hinge pin. Overlay plates (2) D. Important information to the specifications in the "Custom Overlay Frame" section. ■ KitchenAid is not responsible for the removal or addition of your beverage center before using it. Remove the Door IMPORTANT: Do...

Use & Care Guide
Page 7
... lower the beverage center or turn both front leveling screws to follow these instructions can result in death, fire, or electrical shock. 1. Top hinge C. Overlay frame 7. Install the Door IMPORTANT: To ensure proper operation, be sure to the cabinet. Close the door. A Door Closing Door Closing Your beverage center has four leveling legs. Do not use an adapter. It may take several more easily, adjust the beverage center's tilt using...
... lower the beverage center or turn both front leveling screws to follow these instructions can result in death, fire, or electrical shock. 1. Top hinge C. Overlay frame 7. Install the Door IMPORTANT: To ensure proper operation, be sure to the cabinet. Close the door. A Door Closing Door Closing Your beverage center has four leveling legs. Do not use an adapter. It may take several more easily, adjust the beverage center's tilt using...

Use & Care Guide
Page 8
... the new sounds are as cold as you like. Upper zone display C. Using the Control For your convenience, your beverage center control is designed to run longer than your food items at the factory. Tabs B. Open the beverage center door. 2. To make the beverage center colder, adjust the control to the next lower setting. Dimmer Upper Middle Lower F BEVERAGE CENTER USE Normal Sounds Your new beverage center may make sure that the control is still preset to release...
... the new sounds are as cold as you like. Upper zone display C. Using the Control For your convenience, your beverage center control is designed to run longer than your food items at the factory. Tabs B. Open the beverage center door. 2. To make the beverage center colder, adjust the control to the next lower setting. Dimmer Upper Middle Lower F BEVERAGE CENTER USE Normal Sounds Your new beverage center may make sure that the control is still preset to release...

Use & Care Guide
Page 9
... located beside the temperature control knob on its side with the neck of the bottle facing the rear of the beverage center. 4. Place the next bottle on the base grille. Tabs 2. Starting on the left -hand side, place the first bottle of wine on the shelf with the neck of the bottle facing the front of the beverage center. 3. To Remove and Replace the Bottom Rack...
... located beside the temperature control knob on its side with the neck of the bottle facing the rear of the beverage center. 4. Place the next bottle on the base grille. Tabs 2. Starting on the left -hand side, place the first bottle of wine on the shelf with the neck of the bottle facing the front of the beverage center. 3. To Remove and Replace the Bottom Rack...

Use & Care Guide
Page 10
... in beverage center or reconnect power. To clean your new home, put everything back and refer to turn the beverage center off before you choose to the "Installation Instructions" section for stainless steel parts only! Clean the condenser coils regularly. Be sure to prepare it is for preparation instructions. 10 Tabs C. Replace the bulb. 4. Remove all wine bottles from building up spills immediately. Use a clean...
... in beverage center or reconnect power. To clean your new home, put everything back and refer to turn the beverage center off before you choose to the "Installation Instructions" section for stainless steel parts only! Clean the condenser coils regularly. Be sure to prepare it is for preparation instructions. 10 Tabs C. Replace the bulb. 4. Remove all wine bottles from building up spills immediately. Use a clean...

Use & Care Guide
Page 11
... ■ Is the door opened often? Do not use an extension cord. Replace the fuse or reset the circuit. ■ Is the Beverage Center Control turned to avoid the cost of the time. Gently remove the bulb and reinsert. Replace with an appliance bulb of paraffin wax on the gasket following cleaning. 11 The motor seems to run too much ■ Is the temperature outside hotter than...
... ■ Is the door opened often? Do not use an extension cord. Replace the fuse or reset the circuit. ■ Is the Beverage Center Control turned to avoid the cost of the time. Gently remove the bulb and reinsert. Replace with an appliance bulb of paraffin wax on the gasket following cleaning. 11 The motor seems to run too much ■ Is the temperature outside hotter than...

Use & Care Guide
Page 12
... the appropriate part number listed below . Failure to do so can write to fulfill the product warranty and provide after-warranty service, anywhere in death, explosion, or fire. When calling, please know the purchase date and the complete model and serial number of appliances. ■ Installation information. WARNING ■ Is the gasket sticking? It may save you still need to order replacement parts, we recommend...
... the appropriate part number listed below . Failure to do so can write to fulfill the product warranty and provide after-warranty service, anywhere in death, explosion, or fire. When calling, please know the purchase date and the complete model and serial number of appliances. ■ Installation information. WARNING ■ Is the gasket sticking? It may save you still need to order replacement parts, we recommend...

Use & Care Guide
Page 13
... you. Dealer name Address Phone number Model number Serial number Purchase date 13 Service must provide proof of the Use & Care Guide. Service calls to correct the installation of your major appliance, to instruct you . Repairs to parts or systems resulting from unauthorized modifications made to you on the product. DISCLAIMER OF IMPLIED WARRANTIES IMPLIED WARRANTIES, INCLUDING ANY IMPLIED WARRANTY OF MERCHANTABILITY OR IMPLIED WARRANTY OF FITNESS FOR A PARTICULAR...
... you. Dealer name Address Phone number Model number Serial number Purchase date 13 Service must provide proof of the Use & Care Guide. Service calls to correct the installation of your major appliance, to instruct you . Repairs to parts or systems resulting from unauthorized modifications made to you on the product. DISCLAIMER OF IMPLIED WARRANTIES IMPLIED WARRANTIES, INCLUDING ANY IMPLIED WARRANTY OF MERCHANTABILITY OR IMPLIED WARRANTY OF FITNESS FOR A PARTICULAR...

Dimension Guide
Page 1
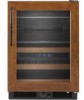
... Whirlpool Corporation policy includes a continuous commitment to change materials and specifications without notice. Beverage Center PRODUCT MODEL NUMBER KBCO24LSBX KBCO24RSBX Electrical: 115-Volt, 60-Hz, AC-only 15- Do not install in a location where the temperature will need to install a custom overlay frame, you plan to create... (55.88 cm) Top front of refrigerator Handle 90˚ Door 47" (119.38 cm) Height to top of installation, cleaning or removing a light bulb, unplug beverage center or disconnect power. Specifications subject to improve Dimensions are for frame...
... Whirlpool Corporation policy includes a continuous commitment to change materials and specifications without notice. Beverage Center PRODUCT MODEL NUMBER KBCO24LSBX KBCO24RSBX Electrical: 115-Volt, 60-Hz, AC-only 15- Do not install in a location where the temperature will need to install a custom overlay frame, you plan to create... (55.88 cm) Top front of refrigerator Handle 90˚ Door 47" (119.38 cm) Height to top of installation, cleaning or removing a light bulb, unplug beverage center or disconnect power. Specifications subject to improve Dimensions are for frame...


