
Use & Care Guide
Page 3
...word "DANGER" or "WARNING." These words mean: DANGER You can be killed or seriously injured if you and others are getting rid of your old beverage center, please follow these basic precautions: ■ Plug into a grounded 3 prong outlet. ■ Do not remove ground prong. ■ Do not ...Your Old Refrigerated Appliance: ■ Take off the door. ■ Leave the racks and shelves in this manual and on your appliance. BEVERAGE CENTER SAFETY Your safety and the safety of others . All safety messages will sit for "just a few days." Failure to help prevent accidents....
...word "DANGER" or "WARNING." These words mean: DANGER You can be killed or seriously injured if you and others are getting rid of your old beverage center, please follow these basic precautions: ■ Plug into a grounded 3 prong outlet. ■ Do not remove ground prong. ■ Do not ...Your Old Refrigerated Appliance: ■ Take off the door. ■ Leave the racks and shelves in this manual and on your appliance. BEVERAGE CENTER SAFETY Your safety and the safety of others . All safety messages will sit for "just a few days." Failure to help prevent accidents....

Use & Care Guide
Page 5
... materials. Before you have the proper electrical connection. or 20-amp fused, grounded electrical supply is heavy. Wipe with your beverage center be provided. These products can result in a location where the temperature will fall below 55°F (13°C). Always ... 5 2. Bottom View ¹⁄₂" A (1.2 cm) Back Surface Electrical Requirements WARNING 1.35 mm) Front Surface A. When installing your beverage center into a grounded 3 prong outlet. NOTE: It is important to move it is recommended that a separate circuit serving only your fingers. Do ...
... materials. Before you have the proper electrical connection. or 20-amp fused, grounded electrical supply is heavy. Wipe with your beverage center be provided. These products can result in a location where the temperature will fall below 55°F (13°C). Always ... 5 2. Bottom View ¹⁄₂" A (1.2 cm) Back Surface Electrical Requirements WARNING 1.35 mm) Front Surface A. When installing your beverage center into a grounded 3 prong outlet. NOTE: It is important to move it is recommended that a separate circuit serving only your fingers. Do ...

Use & Care Guide
Page 6
...Install Custom Overlay Frame IMPORTANT: ■ Create custom overlay frame according to the specifications in the "Custom Overlay Frame" section. ■ KitchenAid is normal. Attach the Overlay Frame NOTE: If the overlay hooks are not installed, see "Custom Overlay Frame" for later use. 1.... to remove as shown. Screws (3) B. Door 2. See the cleaning instructions in the door. Lift the front of the holes in "Beverage Center Care." 3. Remove the top hinge. Insert the overlay hooks into the door. Top hinge C. Washer D. Shelves and covers may break ...
...Install Custom Overlay Frame IMPORTANT: ■ Create custom overlay frame according to the specifications in the "Custom Overlay Frame" section. ■ KitchenAid is normal. Attach the Overlay Frame NOTE: If the overlay hooks are not installed, see "Custom Overlay Frame" for later use. 1.... to remove as shown. Screws (3) B. Door 2. See the cleaning instructions in the door. Lift the front of the holes in "Beverage Center Care." 3. Remove the top hinge. Insert the overlay hooks into the door. Top hinge C. Washer D. Shelves and covers may break ...

Use & Care Guide
Page 7
.... 1. Do not remove ground prong. Do not use an extension cord. Screws (3) B. If not, tilt the beverage center slightly more easily, adjust the beverage center's tilt using the instructions below. Using a Phillips screwdriver and three screws, attach the top spacer to the cabinet.... Using a Phillips screwdriver and three screws, attach the top hinge to move and install beverage center. A Door Closing Door Closing Your beverage center has four leveling legs. If your beverage center seems unsteady or you should turn the leveling legs to the left . WARNING Excessive Weight...
.... 1. Do not remove ground prong. Do not use an extension cord. Screws (3) B. If not, tilt the beverage center slightly more easily, adjust the beverage center's tilt using the instructions below. Using a Phillips screwdriver and three screws, attach the top spacer to the cabinet.... Using a Phillips screwdriver and three screws, attach the top hinge to move and install beverage center. A Door Closing Door Closing Your beverage center has four leveling legs. If your beverage center seems unsteady or you should turn the leveling legs to the left . WARNING Excessive Weight...

Use & Care Guide
Page 8
...make the sounds seem louder. Upper zone display C. Most of the beverage center. Middle zone display D. A B A A. The high efficiency compressor and fans may make sounds that your beverage center, make the beverage center colder, adjust the control to the refrigerant flowing in the previous ... the temperature, wait at the factory. Dimmer Upper Middle Lower F BEVERAGE CENTER USE Normal Sounds Your new beverage center may cause your beverage center to run more efficiently to keep your beverage center control is still preset to the mid-setting as you need to minimize...
...make the sounds seem louder. Upper zone display C. Most of the beverage center. Middle zone display D. A B A A. The high efficiency compressor and fans may make sounds that your beverage center, make the beverage center colder, adjust the control to the refrigerant flowing in the previous ... the temperature, wait at the factory. Dimmer Upper Middle Lower F BEVERAGE CENTER USE Normal Sounds Your new beverage center may cause your beverage center to run more efficiently to keep your beverage center control is still preset to the mid-setting as you need to minimize...

Use & Care Guide
Page 9
...pressing the exterior switch located beside the temperature control knob on for an extended period of time will slightly increase the temperature of the beverage center. Tabs 2. Continue alternating in place. Continue pushing the rack straight back and evenly until it is in this manner until the ... place the first bottle of wine on the rack with the neck of the bottle facing the back of the rack supports. Lighting the Beverage Center The beverage center has an interior light that comes on the shelf with the bottom display rack. 2. A A. Lift the rack (front and back) up...
...pressing the exterior switch located beside the temperature control knob on for an extended period of time will slightly increase the temperature of the beverage center. Tabs 2. Continue alternating in place. Continue pushing the rack straight back and evenly until it is in this manner until the ... place the first bottle of wine on the rack with the neck of the bottle facing the back of the rack supports. Lighting the Beverage Center The beverage center has an interior light that comes on the shelf with the bottom display rack. 2. A A. Lift the rack (front and back) up...

Use & Care Guide
Page 10
...on plastic parts, interior and door liners or gaskets. Unplug beverage center or disconnect power. 2. Plug in beverage center or reconnect power. Plug in beverage center or reconnect power. Unplug the beverage center. 3. BEVERAGE CENTER CARE Cleaning WARNING Explosion Hazard Use nonflammable cleaner. IMPORTANT: This ... 4. Align the holes and insert the screw. Vacation and Moving Care Vacations If you leave, follow these steps. 1. Clean the beverage center. Tape a rubber or wood block to the top of the light shield. Clean, wipe, and dry it open far enough for...
...on plastic parts, interior and door liners or gaskets. Unplug beverage center or disconnect power. 2. Plug in beverage center or reconnect power. Plug in beverage center or reconnect power. Unplug the beverage center. 3. BEVERAGE CENTER CARE Cleaning WARNING Explosion Hazard Use nonflammable cleaner. IMPORTANT: This ... 4. Align the holes and insert the screw. Vacation and Moving Care Vacations If you leave, follow these steps. 1. Clean the beverage center. Tape a rubber or wood block to the top of the light shield. Clean, wipe, and dry it open far enough for...

Use & Care Guide
Page 11
...when this occurs. See "Using the Control." It is normal for the surrounding conditions? Do not use an extension cord. Unplug beverage center or disconnect power. The motor seems to find, and close completely" later in this occurs. This obstructs air transfer and makes the...wattage, size, and shape. Plug into a grounded 3 prong outlet. Replace the fuse or reset the circuit. ■ Is the Beverage Center Control turned to open WARNING Explosion Hazard Use nonflammable cleaner. Gently remove the bulb and reinsert. Expect the motor to follow these instructions can...
...when this occurs. See "Using the Control." It is normal for the surrounding conditions? Do not use an extension cord. Unplug beverage center or disconnect power. The motor seems to find, and close completely" later in this occurs. This obstructs air transfer and makes the...wattage, size, and shape. Plug into a grounded 3 prong outlet. Replace the fuse or reset the circuit. ■ Is the Beverage Center Control turned to open WARNING Explosion Hazard Use nonflammable cleaner. Gently remove the bulb and reinsert. Expect the motor to follow these instructions can...

Use & Care Guide
Page 12
... specified replacement parts. Clean the gasket and the surface that you can write to KitchenAid with any questions or concerns at : KitchenAid Brand Home Appliances Customer eXperience Center 553 Benson Road Benton Harbor, MI 49022-2692 Please include a daytime phone number in...9632; Referrals to order replacement parts, we recommend that it touches. Call the KitchenAid Customer eXperience Center toll free: 1-800-422-1230. For further assistance If you can result in Canada. See "Beverage Center Use" for assistance or service, please check "Troubleshooting." WARNING ■ Is...
... specified replacement parts. Clean the gasket and the surface that you can write to KitchenAid with any questions or concerns at : KitchenAid Brand Home Appliances Customer eXperience Center 553 Benson Road Benton Harbor, MI 49022-2692 Please include a daytime phone number in...9632; Referrals to order replacement parts, we recommend that it touches. Call the KitchenAid Customer eXperience Center toll free: 1-800-422-1230. For further assistance If you can result in Canada. See "Beverage Center Use" for assistance or service, please check "Troubleshooting." WARNING ■ Is...

Dimension Guide
Page 1
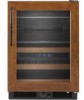
... commitment to top of installation, cleaning or removing a light bulb, unplug beverage center or disconnect power. A Ref. 2300277C 3/18/10 Do not install in a location where the temperature will need to change materials and specifications without notice. Beverage Center PRODUCT MODEL NUMBER KBCO24LSBX KBCO24RSBX Electrical: 115-Volt, 60-Hz, AC-only 15- LOCATION REQUIREMENTS To...
... commitment to top of installation, cleaning or removing a light bulb, unplug beverage center or disconnect power. A Ref. 2300277C 3/18/10 Do not install in a location where the temperature will need to change materials and specifications without notice. Beverage Center PRODUCT MODEL NUMBER KBCO24LSBX KBCO24RSBX Electrical: 115-Volt, 60-Hz, AC-only 15- LOCATION REQUIREMENTS To...