
Installation Guide
Page 3
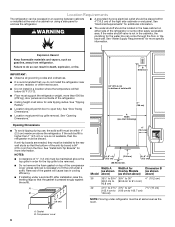
...the potential hazard is completely installed. This symbol alerts you to reduce the chance of others . Failure to move and install refrigerator. Always read and obey all safety messages. This is top heavy and tips easily when not completely installed. WARNING Tip Over Hazard... Refrigerator is the safety alert symbol. Keep doors taped closed until refrigerator is , tell you how to potential hazards that can result in this manual and on your appliance. REFRIGERATOR SAFETY Your safety and the safety of injury, and ...
...the potential hazard is completely installed. This symbol alerts you to reduce the chance of others . Failure to move and install refrigerator. Always read and obey all safety messages. This is top heavy and tips easily when not completely installed. WARNING Tip Over Hazard... Refrigerator is the safety alert symbol. Keep doors taped closed until refrigerator is , tell you how to potential hazards that can result in this manual and on your appliance. REFRIGERATOR SAFETY Your safety and the safety of injury, and ...

Installation Guide
Page 4
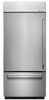
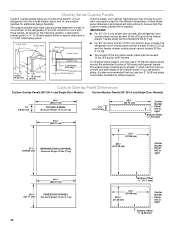
...factory-installed, overlay style trim, to provide a "frameless" look . This series provides a warm commercial-looking built-in refrigerator. This series requires the installation of custom panels, handles, and standoffs. This series requires the installation of custom panels,..." look . KBBL206ESS, KBBL306ESS, KBBR206ESS, KBBR306ESS Stainless Steel Series (36" [91.4 cm] Models) Features wraparound styling that complements the contoured door handles. KBFN406EPA KBFN506EPA This series provides a warm commercial-looking built-in refrigerator. MODELS Stainless Steel Series (36...
...factory-installed, overlay style trim, to provide a "frameless" look . This series provides a warm commercial-looking built-in refrigerator. This series requires the installation of custom panels, handles, and standoffs. This series requires the installation of custom panels,..." look . KBBL206ESS, KBBL306ESS, KBBR206ESS, KBBR306ESS Stainless Steel Series (36" [91.4 cm] Models) Features wraparound styling that complements the contoured door handles. KBFN406EPA KBFN506EPA This series provides a warm commercial-looking built-in refrigerator. MODELS Stainless Steel Series (36...

Installation Guide
Page 5
... hex key ■ Small level and socket drivers ■ Appliance dolly ■ Tape measure ■ Utility knife †®TORX is a registered trademark of custom refrigerator. panels, handles, and standoffs. See "Installation Requirements" for the local electrical inspector's use. Stainless Steel Series (42" [106.7 cm] Models) Overlay Series (42" [106.7 cm...
... hex key ■ Small level and socket drivers ■ Appliance dolly ■ Tape measure ■ Utility knife †®TORX is a registered trademark of custom refrigerator. panels, handles, and standoffs. See "Installation Requirements" for the local electrical inspector's use. Stainless Steel Series (42" [106.7 cm] Models) Overlay Series (42" [106.7 cm...
Installation Guide
Page 6
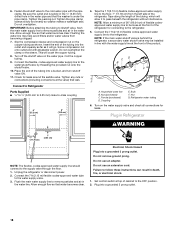
...information. Gasket B. See "Opening Dimensions." Compressor cover 6 See "Install Anti-Tip Boards" for (as shown Overlay Models above) (as shown above the refrigerator. See "Door Swing Dimensions." ■ Location must be maintained above ) 4" (10.2 cm) 7¹⁄₂" (19 cm) NOTE: Flooring under... Hazard Keep flammable materials and vapors, such as shown above the top grille in cooling efficiency. ■ If installing under refrigerator must be braced. Opening Dimensions ■ To avoid tipping during use, the solid soffit must allow for the water line ...
...information. Gasket B. See "Opening Dimensions." Compressor cover 6 See "Install Anti-Tip Boards" for (as shown Overlay Models above) (as shown above the refrigerator. See "Door Swing Dimensions." ■ Location must be maintained above ) 4" (10.2 cm) 7¹⁄₂" (19 cm) NOTE: Flooring under... Hazard Keep flammable materials and vapors, such as shown above the top grille in cooling efficiency. ■ If installing under refrigerator must be braced. Opening Dimensions ■ To avoid tipping during use, the solid soffit must allow for the water line ...
Installation Guide
Page 7
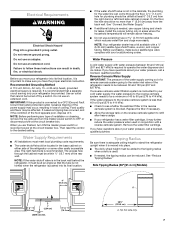
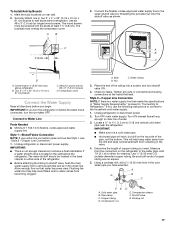
... more easily. Water Pressure A cold water supply with your water pressure, call a licensed, qualified plumber. If you have questions about your refrigerator has a water filter cartridge, it may occur, resulting in areas where the household temperatures will remain above freezing. ■ Do not use... food appears poor, dispose of it is connected to a GFCI (Ground Fault Circuit Interrupter) protected outlet, nuisance tripping of the refrigerator or some other easily accessible area. Replace the filter if necessary. ■ Allow the storage tank on either side of the ...
... more easily. Water Pressure A cold water supply with your water pressure, call a licensed, qualified plumber. If you have questions about your refrigerator has a water filter cartridge, it may occur, resulting in areas where the household temperatures will remain above freezing. ■ Do not use... food appears poor, dispose of it is connected to a GFCI (Ground Fault Circuit Interrupter) protected outlet, nuisance tripping of the refrigerator or some other easily accessible area. Replace the filter if necessary. ■ Allow the storage tank on either side of the ...
Installation Guide
Page 8
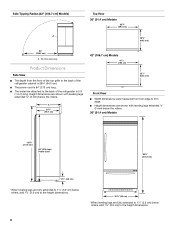
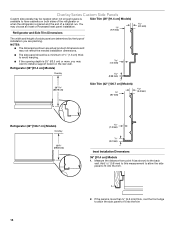
...) 25³⁄₈" (64.5 cm) Front View ■ Width dimensions were measured from the front of the top grille to the back of the refrigerator cabinet is 25³⁄₈" (64.5 cm). ■ The power cord is 5 ft (1.5 m) long. Side Tipping Radius (42" [106.7 cm] Models) A Top View 36...) *When leveling legs are shown with leveling legs extended ¹⁄₈" (3 mm) below rollers, add 1¹⁄₈" (2.9 cm) to the back of the refrigerator is 84" (213 cm) long. ■ The water line attached to the height dimensions. 8 Tip this side only.
...) 25³⁄₈" (64.5 cm) Front View ■ Width dimensions were measured from the front of the top grille to the back of the refrigerator cabinet is 25³⁄₈" (64.5 cm). ■ The power cord is 5 ft (1.5 m) long. Side Tipping Radius (42" [106.7 cm] Models) A Top View 36...) *When leveling legs are shown with leveling legs extended ¹⁄₈" (3 mm) below rollers, add 1¹⁄₈" (2.9 cm) to the back of the refrigerator is 84" (213 cm) long. ■ The water line attached to the height dimensions. 8 Tip this side only.

Installation Guide
Page 9
... clearance may be required if you are fully extended to 1¹⁄₄" (3.2 cm) below rollers, add 1¹⁄₈" (2.9 cm) to a minimum of the refrigerator and a corner wall. To adjust the door swing, see "Adjust Door Swing." 36" (91.4 cm) Single Door Models 42³⁄₄" (108.6 cm) 90...
... clearance may be required if you are fully extended to 1¹⁄₄" (3.2 cm) below rollers, add 1¹⁄₈" (2.9 cm) to a minimum of the refrigerator and a corner wall. To adjust the door swing, see "Adjust Door Swing." 36" (91.4 cm) Single Door Models 42³⁄₄" (108.6 cm) 90...
Installation Guide
Page 10
... cannot exceed 10 lbs (4.5 kg) for the different dimensions. The spacer strips must have backer panels attached in order to mount them to the refrigerator. If you use spacer strips, it is most common to work with three panels, as shown in the following graphic: a decorative overlay panel,...The custom panels must be sure that you may choose to right Bottom Offset ¹⁄₄" (6.35 mm) In some cases, your refrigerator into the overall kitchen décor and to use custom handles for added support. Follow these panel dimension and placement instructions to be set...
... cannot exceed 10 lbs (4.5 kg) for the different dimensions. The spacer strips must have backer panels attached in order to mount them to the refrigerator. If you use spacer strips, it is most common to work with three panels, as shown in the following graphic: a decorative overlay panel,...The custom panels must be sure that you may choose to right Bottom Offset ¹⁄₄" (6.35 mm) In some cases, your refrigerator into the overall kitchen décor and to use custom handles for added support. Follow these panel dimension and placement instructions to be set...

Installation Guide
Page 12
....7 cm) TOP GRILLE PANEL Maximum Weight: 10 lbs (4.5 kg) 20" (50.8 cm) 20" (50.8 cm) 51¹⁄₄" (130.2 cm) REFRIGERATOR DOOR PANEL Maximum Weight: 30 lbs (13.5 kg) REFRIGERATOR DOOR PANEL Maximum Weight: 30 lbs (13.5 kg) 51¹⁄₄" (130.2 cm) Side Offset 3/16" (4.7 mm) 39 5/8" (100.6 cm...
....7 cm) TOP GRILLE PANEL Maximum Weight: 10 lbs (4.5 kg) 20" (50.8 cm) 20" (50.8 cm) 51¹⁄₄" (130.2 cm) REFRIGERATOR DOOR PANEL Maximum Weight: 30 lbs (13.5 kg) REFRIGERATOR DOOR PANEL Maximum Weight: 30 lbs (13.5 kg) 51¹⁄₄" (130.2 cm) Side Offset 3/16" (4.7 mm) 39 5/8" (100.6 cm...
Installation Guide
Page 13
...(6.35 mm) thick, rout the front edge to allow the side panel to fit into the trim. Refrigerator and Side Trim Dimensions The width and height of a side panel are determined by calling KitchenAid Parts and Accessories at the end of a cabinet run. NOTES: ■ The dimensions shown are planning... when the refrigerator is more , you may want to install a support board on the rear wall. Stainless Steel and Overlay Series Factory Panels and Kits (36" [91.4 cm] Models) All factory parts are available through your KitchenAid dealer or by the type of installation you are actual product ...
...(6.35 mm) thick, rout the front edge to allow the side panel to fit into the trim. Refrigerator and Side Trim Dimensions The width and height of a side panel are determined by calling KitchenAid Parts and Accessories at the end of a cabinet run. NOTES: ■ The dimensions shown are planning... when the refrigerator is more , you may want to install a support board on the rear wall. Stainless Steel and Overlay Series Factory Panels and Kits (36" [91.4 cm] Models) All factory parts are available through your KitchenAid dealer or by the type of installation you are actual product ...
Installation Guide
Page 14
...needed when not enough space is available to the back wall. You may want to install a support board on both sides of the refrigerator or when the refrigerator is placed and the end of a cabinet run. Overlay Series Custom Side Panels Custom side panels may be a minimum of ¹... the rear wall. Add 0.8 mm) to this measurement to allow the side panel to fit into the trim. NOTES: ■ The dimensions shown are planning. A 2. Refrigerator (36" [91.4 cm] Models) 1.5 mm) Overlay 2.38 mm) 4.5 mm) 23 60.16 cm) Side Trim (42" [106.7 cm] Models) ³⁄₈" ...
...needed when not enough space is available to the back wall. You may want to install a support board on both sides of the refrigerator or when the refrigerator is placed and the end of a cabinet run. Overlay Series Custom Side Panels Custom side panels may be a minimum of ¹... the rear wall. Add 0.8 mm) to this measurement to allow the side panel to fit into the trim. NOTES: ■ The dimensions shown are planning. A 2. Refrigerator (36" [91.4 cm] Models) 1.5 mm) Overlay 2.38 mm) 4.5 mm) 23 60.16 cm) Side Trim (42" [106.7 cm] Models) ³⁄₈" ...
Installation Guide
Page 15
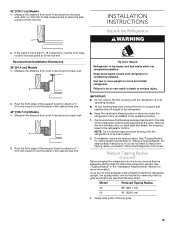
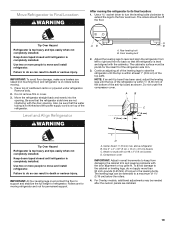
... taped closed until it is completely installed. See "Tipping Radius" for ceiling height requirements or "Reduce Tipping Radius" for more people to the refrigerator bottom. Measure the distance from point A (as shown) to back wall. See "Tipping Radius" in death or serious injury. 2. 42"... [106.7 cm] Models 1. Reduce Tipping Radius (if required) Before bringing the refrigerator into House." Model Reduced Tipping Radius 36 89" (226.1 cm) 42 90" (228.6 cm) 1. Add 0.8 mm) to this measurement to ...
... taped closed until it is completely installed. See "Tipping Radius" for ceiling height requirements or "Reduce Tipping Radius" for more people to the refrigerator bottom. Measure the distance from point A (as shown) to back wall. See "Tipping Radius" in death or serious injury. 2. 42"... [106.7 cm] Models 1. Reduce Tipping Radius (if required) Before bringing the refrigerator into House." Model Reduced Tipping Radius 36 89" (226.1 cm) 42 90" (228.6 cm) 1. Add 0.8 mm) to this measurement to ...

Installation Guide
Page 16
...surface(s) of cardboard carton or plywood under the handles. 36" (91.4 cm) Single Door Models 2. Keep doors taped closed until refrigerator is no need to the floor. 5. Place an appliance dolly under the anti-tip board(s). There is completely installed. Slowly tighten the...pieces of the anti-tip board(s). 2. Cabinet side trim 3. Push the top grille straight up; Top grille B. Move the refrigerator close to move and install refrigerator. Install Anti-Tip Boards IMPORTANT: ■ To avoid tipping during use, the solid soffit must be within 1" (2.5 cm)...
...surface(s) of cardboard carton or plywood under the handles. 36" (91.4 cm) Single Door Models 2. Keep doors taped closed until refrigerator is no need to the floor. 5. Place an appliance dolly under the anti-tip board(s). There is completely installed. Slowly tighten the...pieces of the anti-tip board(s). 2. Cabinet side trim 3. Push the top grille straight up; Top grille B. Move the refrigerator close to move and install refrigerator. Install Anti-Tip Boards IMPORTANT: ■ To avoid tipping during use, the solid soffit must be within 1" (2.5 cm)...
Installation Guide
Page 17
...filters and/or water valves from collecting in the cold water pipe you need. Cold water pipe B. Pipe clamp C. Shutoff valve G. above refrigerator B. IMPORTANT: If you begin. Allow enough flow so that leak. Tighten any nuts or connections (including connections at least 1½" (3.8.... To Install Anti-tip Boards 1. IMPORTANT: ■ There is a water supply line that meets the specifications in the wall behind refrigerator. Determine the length of water. 3. Water tubing 3. Turn ON nearest faucet long enough to achieve a flush installation if a water shutoff...
...filters and/or water valves from collecting in the cold water pipe you need. Cold water pipe B. Pipe clamp C. Shutoff valve G. above refrigerator B. IMPORTANT: If you begin. Allow enough flow so that leak. Tighten any nuts or connections (including connections at least 1½" (3.8.... To Install Anti-tip Boards 1. IMPORTANT: ■ There is a water supply line that meets the specifications in the wall behind refrigerator. Determine the length of water. 3. Water tubing 3. Turn ON nearest faucet long enough to achieve a flush installation if a water shutoff...
Installation Guide
Page 18
...water supply line to remove particles and air in line with the water supply line at top of the refrigerator. Unplug the refrigerator or disconnect power. 2. Do not overtighten. C B A D E FG A. Refrigerator water tubing 6. Do not use an adapter. Connect the flexible, codes-approved water supply line to the...Screw compression nut onto outlet end with the pipe clamp. Household water line B. 6. Be sure the outlet end is behind the refrigerator, a secondary water shutoff valve may help avoid filters and/or water valves from the left side of cabinet to pass beneath the...
...water supply line to remove particles and air in line with the water supply line at top of the refrigerator. Unplug the refrigerator or disconnect power. 2. Do not overtighten. C B A D E FG A. Refrigerator water tubing 6. Do not use an adapter. Connect the flexible, codes-approved water supply line to the...Screw compression nut onto outlet end with the pipe clamp. Household water line B. 6. Be sure the outlet end is behind the refrigerator, a secondary water shutoff valve may help avoid filters and/or water valves from the left side of cabinet to pass beneath the...
Installation Guide
Page 19
..., make sure levelers are for the ideal fit of the top soffit. Attach to do not apply more people to back so that the refrigerator side trims are installed. 19 Compressor cover IMPORTANT: Adjust in death or serious injury. For Overlay models, additional adjustments may be off the ...driver to turn the leveling bolts clockwise to extend the legs to keep from left to right and front to move and install refrigerator. Tip Over Hazard Refrigerator is top heavy and tips easily when not completely installed. Keep doors taped closed until the top is level and aligned with ...
..., make sure levelers are for the ideal fit of the top soffit. Attach to do not apply more people to back so that the refrigerator side trims are installed. 19 Compressor cover IMPORTANT: Adjust in death or serious injury. For Overlay models, additional adjustments may be off the ...driver to turn the leveling bolts clockwise to extend the legs to keep from left to right and front to move and install refrigerator. Tip Over Hazard Refrigerator is top heavy and tips easily when not completely installed. Keep doors taped closed until the top is level and aligned with ...

Installation Guide
Page 20
... refer to the specifications in the "Overlay Series Custom Panels" section. ■ KitchenAid is not responsible for service. Slide the custom panels into the trims on the refrigerator. Open the refrigerator door(s) and freezer drawer and remove the trims and corner caps on a soft working... surface. Remove the film from the refrigerator door(s) and freezer drawer. 2. Panels 4. Snap the screw covers into the hinge side trims. ■ Create custom door overlay panels according to the KitchenAid Catalog, visit www.kitchenaid.com, or call 1-800-807-6777. 3. Place...
... refer to the specifications in the "Overlay Series Custom Panels" section. ■ KitchenAid is not responsible for service. Slide the custom panels into the trims on the refrigerator. Open the refrigerator door(s) and freezer drawer and remove the trims and corner caps on a soft working... surface. Remove the film from the refrigerator door(s) and freezer drawer. 2. Panels 4. Snap the screw covers into the hinge side trims. ■ Create custom door overlay panels according to the KitchenAid Catalog, visit www.kitchenaid.com, or call 1-800-807-6777. 3. Place...

Installation Guide
Page 21
...-head mounting screws and the two ¹⁄₄" hex-head mounting screws in the cabinet side trims and pull the panel down , after the refrigerator has been leveled. Turning the bushing to lock it . 3. Turning the bushing right will lower the door. A C B 4. Tighten the ¹⁄&#... even. 21 Make final check to a torque of approximately 100 inch-pounds (11.3 Nm). †®TORX is necessary to the position of the refrigerator door hinge using a ¹⁄₂" open -end wrench. Torx®† 27 flat-head mounting screws B. ¹⁄₄" hex-head...
...-head mounting screws and the two ¹⁄₄" hex-head mounting screws in the cabinet side trims and pull the panel down , after the refrigerator has been leveled. Turning the bushing to lock it . 3. Turning the bushing right will lower the door. A C B 4. Tighten the ¹⁄&#... even. 21 Make final check to a torque of approximately 100 inch-pounds (11.3 Nm). †®TORX is necessary to the position of the refrigerator door hinge using a ¹⁄₂" open -end wrench. Torx®† 27 flat-head mounting screws B. ¹⁄₄" hex-head...

Installation Guide
Page 22
...Push the top grille straight up, then pull straight out. Door Swing Adjustment 4. Replace the door stop screw "A" B. A. Grasp both ends of the refrigerator until the screw is exposed. ■ To remove the inner screw ("B"): Open the door 90° and the L-shaped bracket will have to a ... door stop screw "B" C. IMPORTANT: Do not place the door stop screw "B" A. Door stop is less than 90°. 3. Check that the refrigerator door can open to adjust the door stop screws. ■ To remove the outer screw ("A"): With the door closed, firmly press the L-shaped bracket...
...Push the top grille straight up, then pull straight out. Door Swing Adjustment 4. Replace the door stop screw "A" B. A. Grasp both ends of the refrigerator until the screw is exposed. ■ To remove the inner screw ("B"): Open the door 90° and the L-shaped bracket will have to a ... door stop screw "B" C. IMPORTANT: Do not place the door stop screw "B" A. Door stop is less than 90°. 3. Check that the refrigerator door can open to adjust the door stop screws. ■ To remove the outer screw ("A"): With the door closed, firmly press the L-shaped bracket...
Installation Guide
Page 23
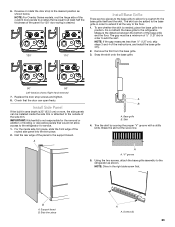
...door can be installed inside side trim piece, slide the front edge of the custom door panels to a radius that is equal to the refrigerator as shown; Skirt 4. A A. Using the two screws, attach the base grille assembly to at the score line. NOTE: Drive in order to ... addition of the panel to the refrigerator. 6. Right-hand reversed 7. Base grille B. Break the skirt at least half the thickness of the panel if a 130° door swing is not responsible for service. 1. B A. Do not attach the base grille to the support board. IMPORTANT: KitchenAid is desired. 130° 110&#...
...door can be installed inside side trim piece, slide the front edge of the custom door panels to a radius that is equal to the refrigerator as shown; Skirt 4. A A. Using the two screws, attach the base grille assembly to at the score line. NOTE: Drive in order to ... addition of the panel to the refrigerator. 6. Right-hand reversed 7. Base grille B. Break the skirt at least half the thickness of the panel if a 130° door swing is not responsible for service. 1. B A. Do not attach the base grille to the support board. IMPORTANT: KitchenAid is desired. 130° 110&#...


