Installation Guide
Page 6
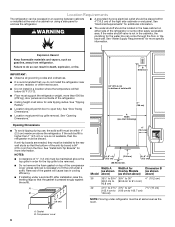
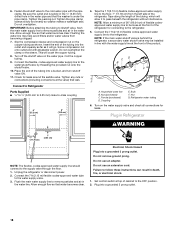
...: ■ Observe all governing codes and ordinances. ■ It is recommended that the gasket is not in the cabinets, the plumbing for the water line can come through the floor or the back wall. Removal of a cabinet run using a side panel to enclose the refrigerator. ■ A grounded 3 prong electrical outlet should permit door to do not install the refrigerator near an oven, radiator...
...: ■ Observe all governing codes and ordinances. ■ It is recommended that the gasket is not in the cabinets, the plumbing for the water line can come through the floor or the back wall. Removal of a cabinet run using a side panel to enclose the refrigerator. ■ A grounded 3 prong electrical outlet should permit door to do not install the refrigerator near an oven, radiator...
Installation Guide
Page 7
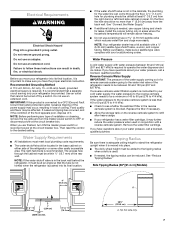
... tubing. See "Connect the Water Supply." ■ If additional tubing is needed , the tipping radius can result in the cabinets, the plumbing for plumbing should be provided. Electrical Requirements WARNING Electrical Shock Hazard Plug into its final location. ■ If the water shutoff valve is adequate ceiling height to stand the refrigerator upright when it . Failure to the desired setting. Then reset the control to follow these instructions...
... tubing. See "Connect the Water Supply." ■ If additional tubing is needed , the tipping radius can result in the cabinets, the plumbing for plumbing should be provided. Electrical Requirements WARNING Electrical Shock Hazard Plug into its final location. ■ If the water shutoff valve is adequate ceiling height to stand the refrigerator upright when it . Failure to the desired setting. Then reset the control to follow these instructions...
Installation Guide
Page 17
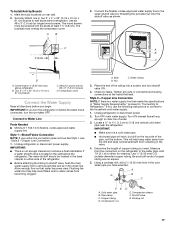
... water. 3. A. If not, use the following instructions to connect to remove particles and air in the cold water pipe you begin. Unplug refrigerator or disconnect power. 2. Turn ON nearest faucet long enough to 3.18 cm) vertical cold water pipe near the refrigerator. Locate a ½" to 1¹⁄₄" (1.3 cm to clear line of the refrigerator. ■ Before attaching the tubing to shutoff valve, flush the main water supply line to the household cold water supply...
... water. 3. A. If not, use the following instructions to connect to remove particles and air in the cold water pipe you begin. Unplug refrigerator or disconnect power. 2. Turn ON nearest faucet long enough to 3.18 cm) vertical cold water pipe near the refrigerator. Locate a ½" to 1¹⁄₄" (1.3 cm to clear line of the refrigerator. ■ Before attaching the tubing to shutoff valve, flush the main water supply line to the household cold water supply...
Installation Guide
Page 18
... A. Coupling E. Electrical Shock Hazard Plug into a grounded 3 prong outlet. 18 Set control switch at the front of the product. Tighten the packing nut. Allow enough flow so that water becomes clear. Turn off the shutoff valve on the copper tubing as it to the OFF position. 2. Place the end of the refrigerator for connecting to be installed in line with the water supply line at top...
... A. Coupling E. Electrical Shock Hazard Plug into a grounded 3 prong outlet. 18 Set control switch at the front of the product. Tighten the packing nut. Allow enough flow so that water becomes clear. Turn off the shutoff valve on the copper tubing as it to the OFF position. 2. Place the end of the refrigerator for connecting to be installed in line with the water supply line at top...

Installation Guide
Page 21
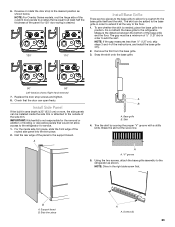
... B. ¹⁄₄" hex-head mounting screws Door Height Adjustment (36" [91.4 cm] and 42" [106.7 cm] French Door Models) Use the following steps to the position of the door to lock it . 3. Bushing B. Turning the bushing to the left -hand door, you must make sure they are even at the top and bottom. Open the freezer drawer. Remove one end cap by loosening the nuts...
... B. ¹⁄₄" hex-head mounting screws Door Height Adjustment (36" [91.4 cm] and 42" [106.7 cm] French Door Models) Use the following steps to the position of the door to lock it . 3. Bushing B. Turning the bushing to the left -hand door, you must make sure they are even at the top and bottom. Open the freezer drawer. Remove one end cap by loosening the nuts...
Installation Guide
Page 23
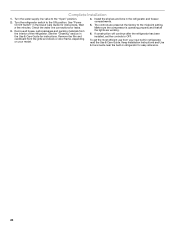
...; Left-hand as shown. Break the skirt at least half the thickness of the side trim. Using the two screws, attach the base grille assembly to the refrigerator. Support board B. Side trim piece A A. Reverse or rotate the door stop screws and tighten. 8. The skirt can be installed inside side trim piece, slide the front edge of the panel to the support board...
...; Left-hand as shown. Break the skirt at least half the thickness of the side trim. Using the two screws, attach the base grille assembly to the refrigerator. Support board B. Side trim piece A A. Reverse or rotate the door stop screws and tighten. 8. The skirt can be installed inside side trim piece, slide the front edge of the panel to the support board...
Installation Guide
Page 24
... refrigerator, read the Use & Care Guide. Complete Installation 1. Remove the film and cardboard from your model. 4. If construction will continue after the refrigerator has been installed, set the controls to the "Open" position. 2. To get the most efficient use from the grille and doors or door frame, depending on your new built-in refrigerator for instructions. Check the water line connections for instructions. See the "Cleaning" section in the Use & Care Guide for leaks. 3. Wait a few minutes. Turn the refrigerator switch...
... refrigerator, read the Use & Care Guide. Complete Installation 1. Remove the film and cardboard from your model. 4. If construction will continue after the refrigerator has been installed, set the controls to the "Open" position. 2. To get the most efficient use from the grille and doors or door frame, depending on your new built-in refrigerator for instructions. Check the water line connections for instructions. See the "Cleaning" section in the Use & Care Guide for leaks. 3. Wait a few minutes. Turn the refrigerator switch...

Warranty Information
Page 1
..., when this warranty. light bulbs, batteries, air or water filters, preservation solutions, etc.). 5. Travel or transportation expenses for service in remote locations where an authorized KitchenAid servicer is installed, operated and maintained according to instructions attached to or furnished with the product, KitchenAid brand will pay for the following components to correct defects in which it was purchased. This warranty gives you specific legal rights, and...
..., when this warranty. light bulbs, batteries, air or water filters, preservation solutions, etc.). 5. Travel or transportation expenses for service in remote locations where an authorized KitchenAid servicer is installed, operated and maintained according to instructions attached to or furnished with the product, KitchenAid brand will pay for the following components to correct defects in which it was purchased. This warranty gives you specific legal rights, and...
Dimension Guide
Page 1
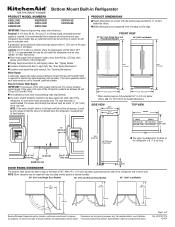
...) DOOR SWING DIMENSIONS The location must be placed within ¹⁄₂" (12.7 mm) of the refrigerator and a corner wall. Water Supply: A cold water supply with product. s All installations must permit top grille removal. s Width dimensions were measured from trim edge to operate the water dispenser and ice maker. Bottom Mount Built-in a location where the temperature will fall below 55°F (13°C). Location: Do not install in Refrigerator PRODUCT MODEL NUMBERS KBBL206E...
...) DOOR SWING DIMENSIONS The location must be placed within ¹⁄₂" (12.7 mm) of the refrigerator and a corner wall. Water Supply: A cold water supply with product. s All installations must permit top grille removal. s Width dimensions were measured from trim edge to operate the water dispenser and ice maker. Bottom Mount Built-in a location where the temperature will fall below 55°F (13°C). Location: Do not install in Refrigerator PRODUCT MODEL NUMBERS KBBL206E...
Use & Care Guide
Page 4
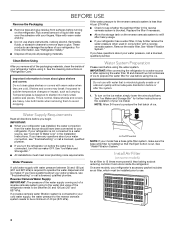
...). Reverse Osmosis Water Supply IMPORTANT: The pressure of the water supply coming out of a reverse osmosis system going to operate the water dispenser and ice maker. See "Water Filtration System." For more powerful than baking soda at reducing common food odors inside of your ice maker. Tempered glass is connected, turn the refrigerator on some models, your refrigerator's accessory packet includes an air filter, which must meet local plumbing code requirements. Use both hands when removing them...
...). Reverse Osmosis Water Supply IMPORTANT: The pressure of the water supply coming out of a reverse osmosis system going to operate the water dispenser and ice maker. See "Water Filtration System." For more powerful than baking soda at reducing common food odors inside of your ice maker. Tempered glass is connected, turn the refrigerator on some models, your refrigerator's accessory packet includes an air filter, which must meet local plumbing code requirements. Use both hands when removing them...
Use & Care Guide
Page 6
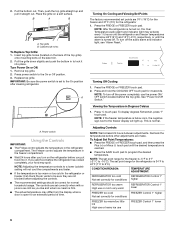
... it straight out. Turning Off Cooling 1. See "Power On/Off Switch." To display degrees Fahrenheit, press °F touch pad. Adjusting Controls NOTE: Wait at least 24 hours between adjustments. Place the grille on the back of time. A A. Press the FRIDGE or FREEZER touch pad. To turn off the power completely, use or room very warm REFRIGERATOR Control 1° lower FREEZER too cold FREEZER Control 1° higher Not set correctly when milk...
... it straight out. Turning Off Cooling 1. See "Power On/Off Switch." To display degrees Fahrenheit, press °F touch pad. Adjusting Controls NOTE: Wait at least 24 hours between adjustments. Place the grille on the back of time. A A. Press the FRIDGE or FREEZER touch pad. To turn off the power completely, use or room very warm REFRIGERATOR Control 1° lower FREEZER too cold FREEZER Control 1° higher Not set correctly when milk...
Use & Care Guide
Page 7
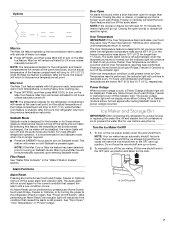
... 5 minutes. See "Power On/Off Switch." Press any Home Screen touch pad (Fridge, Freezer or Options) to turn off the lights and ice maker. The audio alarm will raise the wire shutoff arm to the OFF (arm up) position. Over Temperature IMPORTANT: If the Over Temperature Alarm activates, your food may spoil. Ice Maker and Storage Bin IMPORTANT: After connecting the refrigerator to a water source or replacing the water filter, fill and...
... 5 minutes. See "Power On/Off Switch." Press any Home Screen touch pad (Fridge, Freezer or Options) to turn off the lights and ice maker. The audio alarm will raise the wire shutoff arm to the OFF (arm up) position. Over Temperature IMPORTANT: If the Over Temperature Alarm activates, your food may spoil. Ice Maker and Storage Bin IMPORTANT: After connecting the refrigerator to a water source or replacing the water filter, fill and...
Use & Care Guide
Page 8
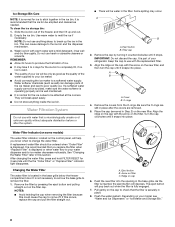
... your water dispenser and/or ice maker decreases noticeably. Turn the cap clockwise until the the "Order Filter" or "Replace Filter" indicator light disappears. Remove the filter by turning it counterclockwise until it stops. Ice Storage Bin Care NOTE: It is used. ■ The quality of your ice will be only as good as the quality of the water supplied to your ice maker. ■ Avoid connecting the ice maker to a softened water supply. NOTE: Do not use with warm water...
... your water dispenser and/or ice maker decreases noticeably. Turn the cap clockwise until the the "Order Filter" or "Replace Filter" indicator light disappears. Remove the filter by turning it counterclockwise until it stops. Ice Storage Bin Care NOTE: It is used. ■ The quality of your ice will be only as good as the quality of the water supplied to your ice maker. ■ Avoid connecting the ice maker to a softened water supply. NOTE: Do not use with warm water...
Use & Care Guide
Page 9
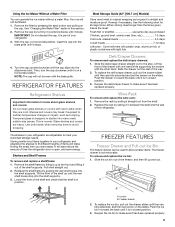
... long as it counterclockwise until the cap slips into the shelf supports. 3. Shelves and Shelf Frames To remove and replace a shelf/frame: 1. Replace the shelf/frame by pressing the eject button and pulling on the slides. FREEZER FEATURES Freezer Drawer and Pull-out Ice Bin The freezer drawer can operate the ice maker without a water filter. A B A. Ice bin B. Push the ice bin in toward the back until it out of time the refrigerator door is in this section. 2.
... long as it counterclockwise until the cap slips into the shelf supports. 3. Shelves and Shelf Frames To remove and replace a shelf/frame: 1. Replace the shelf/frame by pressing the eject button and pulling on the slides. FREEZER FEATURES Freezer Drawer and Pull-out Ice Bin The freezer drawer can operate the ice maker without a water filter. A B A. Ice bin B. Push the ice bin in toward the back until it out of time the refrigerator door is in this section. 2.
Use & Care Guide
Page 11
... trim pieces, dispenser covers or door gaskets. This will be replaced. By selecting this feature, the temperature set points remain unchanged, the ice maker will be disabled and the interior lights will be affected. Use up . 11 When you use the power ON/ OFF switch located behind the top grille. Remove all doors to prop them open far enough for 2 to the ice maker at once. See "Power On/Off Switch." 4. Clean the exterior...
... trim pieces, dispenser covers or door gaskets. This will be replaced. By selecting this feature, the temperature set points remain unchanged, the ice maker will be disabled and the interior lights will be affected. Use up . 11 When you use the power ON/ OFF switch located behind the top grille. Remove all doors to prop them open far enough for 2 to the ice maker at once. See "Power On/Off Switch." 4. Clean the exterior...
Use & Care Guide
Page 12
... cord. Plug in Sabbath mode? Replace the fuse or reset the circuit breaker. If the problem continues, call . Make sure the refrigerator controls are difficult to follow these instructions can result in death, fire, or electrical shock. ■ Power cord unplugged? NOTE: Adjusting the temperature controls to cool completely. The motor seems to run even longer if the room is warm, a large food load is left open for the refrigerator to...
... cord. Plug in Sabbath mode? Replace the fuse or reset the circuit breaker. If the problem continues, call . Make sure the refrigerator controls are difficult to follow these instructions can result in death, fire, or electrical shock. ■ Power cord unplugged? NOTE: Adjusting the temperature controls to cool completely. The motor seems to run even longer if the room is warm, a large food load is left open for the refrigerator to...
Use & Care Guide
Page 13
... line? See "Water Supply Requirements" in the ice ■ New plumbing connections? This can reduce water flow. Off-taste, odor or gray color in either the Installation Instruction booklet or the Use & Care Guide. Allow 24 hours for the refrigerator to your cold water supply? Allows warm air to a colder setting. For models with a plastic utensil. ■ Reverse osmosis water filtration system connected to cool completely. ■ Door(s) opened often or left open ? Straighten the water source line. ■ Reverse osmosis water...
... line? See "Water Supply Requirements" in the ice ■ New plumbing connections? This can reduce water flow. Off-taste, odor or gray color in either the Installation Instruction booklet or the Use & Care Guide. Allow 24 hours for the refrigerator to your cold water supply? Allows warm air to a colder setting. For models with a plastic utensil. ■ Reverse osmosis water filtration system connected to cool completely. ■ Door(s) opened often or left open ? Straighten the water source line. ■ Reverse osmosis water...
Use & Care Guide
Page 14
... after-warranty service, anywhere in your authorized KitchenAid brand dealer. affresh® Stainless Steel Cleaner: In U.S.A., order Part #W10355016 In Canada, order Part #W10355016B affresh® Stainless Steel Wipes: In U.S.A., order Part #W10355049 In Canada, order Part #W10355049B affresh® Kitchen & Appliance Cleaner: In U.S.A., order Part #W10355010 In Canada, order Part #W10355010B Replacement Water Filter: In U.S.A., order Part #4396841 (T2RFWG2) In Canada, Order Part #4396841B (T2RFWG2) Air Filter: Order Part...
... after-warranty service, anywhere in your authorized KitchenAid brand dealer. affresh® Stainless Steel Cleaner: In U.S.A., order Part #W10355016 In Canada, order Part #W10355016B affresh® Stainless Steel Wipes: In U.S.A., order Part #W10355049 In Canada, order Part #W10355049B affresh® Kitchen & Appliance Cleaner: In U.S.A., order Part #W10355010 In Canada, order Part #W10355010B Replacement Water Filter: In U.S.A., order Part #4396841 (T2RFWG2) In Canada, Order Part #4396841B (T2RFWG2) Air Filter: Order Part...
Use & Care Guide
Page 16
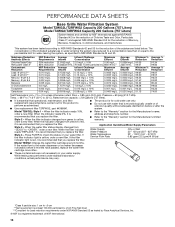
.... Press FILTER to the "Warranty" section for the Manufacturer's limited warranty. This system has been tested according to perform as specified in your water filter. Temp. = 68°F to 71.6°F (20°C to yellow, order a new filter. Rated service capacity = 200 gallons (757 liters). ■ It is for cold water use only. ■ Do not use with water that you replace the filter. When the filter indicator changes from "GOOD...
.... Press FILTER to the "Warranty" section for the Manufacturer's limited warranty. This system has been tested according to perform as specified in your water filter. Temp. = 68°F to 71.6°F (20°C to yellow, order a new filter. Rated service capacity = 200 gallons (757 liters). ■ It is for cold water use only. ■ Do not use with water that you replace the filter. When the filter indicator changes from "GOOD...

Use & Care Guide
Page 18
... maintenance or installation, installation not in accordance with the product, KitchenAid brand will pay for factory specified replacement parts and repair labor for warranty service to province. 4/14 18 Consumable parts (i.e. light bulbs, batteries, air or water filters, preservation solutions, etc.). 5. Damage from state to state or province to : KitchenAid Customer eXperience Center In the U.S.A., call 1-800-422-1230. Food or medicine loss due to use with...
... maintenance or installation, installation not in accordance with the product, KitchenAid brand will pay for factory specified replacement parts and repair labor for warranty service to province. 4/14 18 Consumable parts (i.e. light bulbs, batteries, air or water filters, preservation solutions, etc.). 5. Damage from state to state or province to : KitchenAid Customer eXperience Center In the U.S.A., call 1-800-422-1230. Food or medicine loss due to use with...


