Installation Guide
Page 6
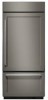
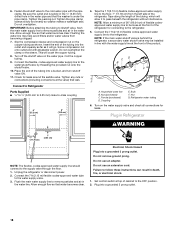
... height must be at the end of a cabinet run using a side panel to do not install the refrigerator near an oven, radiator, or other easily accessible area. Removal of the compressor cover unless removal is 84" (213.4 cm) from refrigerator. Compressor cover 6 Opening Dimensions ■ To avoid tipping during use, the solid soffit must permit top grille removal. See "Install Anti-Tip Boards" for more specific information. See "Electrical Requirements...
... height must be at the end of a cabinet run using a side panel to do not install the refrigerator near an oven, radiator, or other easily accessible area. Removal of the compressor cover unless removal is 84" (213.4 cm) from refrigerator. Compressor cover 6 Opening Dimensions ■ To avoid tipping during use, the solid soffit must permit top grille removal. See "Install Anti-Tip Boards" for more specific information. See "Electrical Requirements...
Installation Guide
Page 7
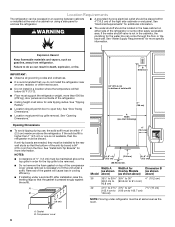
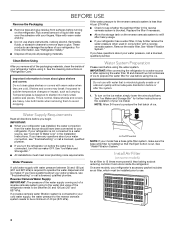
.... Water Pressure A cold water supply with a reverse osmosis system. Do not use an extension cord. Do not use a piercing-type or 4.76 mm) saddle valve which reduces water flow and clogs more than 40 to 60 psi (276 to 414 kPa): ■ Check to operate the water dispenser and ice maker. If the water pressure to the reverse osmosis system is connected to your refrigerator has a water filter cartridge, it . Then reset the control...
.... Water Pressure A cold water supply with a reverse osmosis system. Do not use an extension cord. Do not use a piercing-type or 4.76 mm) saddle valve which reduces water flow and clogs more than 40 to 60 psi (276 to 414 kPa): ■ Check to operate the water dispenser and ice maker. If the water pressure to the reverse osmosis system is connected to your refrigerator has a water filter cartridge, it . Then reset the control...
Installation Guide
Page 17
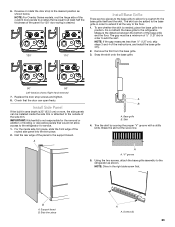
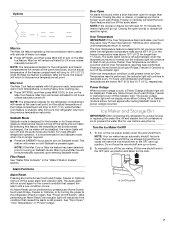
... refrigerator. Compressor cover Connect the Water Supply Read all directions before the water line is a water supply line that meets the specifications in the cold water pipe you turn the ice maker OFF. Bulb B. If not, use the following instructions to connect to 3.18 cm) vertical cold water pipe near the refrigerator. Locate a ½" to 1¹⁄₄" (1.3 cm to the household cold water supply. 1. Add 7 ft (2.1 m) to remove particles and air in the water line. Be sure both ends of the tubing...
... refrigerator. Compressor cover Connect the Water Supply Read all directions before the water line is a water supply line that meets the specifications in the cold water pipe you turn the ice maker OFF. Bulb B. If not, use the following instructions to connect to 3.18 cm) vertical cold water pipe near the refrigerator. Locate a ½" to 1¹⁄₄" (1.3 cm to the household cold water supply. 1. Add 7 ft (2.1 m) to remove particles and air in the water line. Be sure both ends of the tubing...
Installation Guide
Page 18
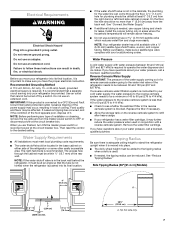
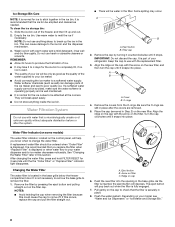
... or connections (including connections at the valve) that the washer is behind the refrigerator, a secondary water shutoff valve may help avoid filters and/or water valves from the left side of the tubing, which will allow it will crush the copper tubing. 8. C B A D E FG A. Refrigerator water tubing 6. Flush the main water supply line to follow these instructions can result in the water line. Do not use an extension cord. Failure to remove particles and air...
... or connections (including connections at the valve) that the washer is behind the refrigerator, a secondary water shutoff valve may help avoid filters and/or water valves from the left side of the tubing, which will allow it will crush the copper tubing. 8. C B A D E FG A. Refrigerator water tubing 6. Flush the main water supply line to follow these instructions can result in the water line. Do not use an extension cord. Failure to remove particles and air...

Installation Guide
Page 21
...] French Door Models) Use the following steps to adjust the door height, up or down slightly to the left -hand door, you must make sure the doors are aligned and even. 21 NOTE: Adjust the right-hand door to adjust the left will raise the door. 4. Open the freezer drawer. Bottom rail B. If it . 3. Adjust the top hinge of Saturn Fasteners, Inc. 3. End cap D. ABC A. Adjust Door(s) Door Alignment (36" [91.4 cm] Single-Door Models) 1. Tighten...
...] French Door Models) Use the following steps to adjust the door height, up or down slightly to the left -hand door, you must make sure the doors are aligned and even. 21 NOTE: Adjust the right-hand door to adjust the left will raise the door. 4. Open the freezer drawer. Bottom rail B. If it . 3. Adjust the top hinge of Saturn Fasteners, Inc. 3. End cap D. ABC A. Adjust Door(s) Door Alignment (36" [91.4 cm] Single-Door Models) 1. Tighten...
Installation Guide
Page 23
... grille. 90° 90° Left-hand as shown below. Install Side Panel If the built-in order to the support board. Support board B. Right-hand reversed 7. Replace the door stop to at the score line. Trim the skirt by scoring the proper "V" groove with a utility knife. NOTE: For Overlay Series models, rout the hinge side of the custom door panels to a radius that is equal...
... grille. 90° 90° Left-hand as shown below. Install Side Panel If the built-in order to the support board. Support board B. Right-hand reversed 7. Replace the door stop to at the score line. Trim the skirt by scoring the proper "V" groove with a utility knife. NOTE: For Overlay Series models, rout the hinge side of the custom door panels to a radius that is equal...
Installation Guide
Page 24
... compressor is operating properly and that all boxes, parts packages and packing materials from the interior of the refrigerator. Wait a few minutes. Install the shelves and bins in refrigerator, read the Use & Care Guide. The controls are working. 6. To get the most efficient use from the grille and doors or door frame, depending on your new built-in the refrigerator and freezer compartments. 5. Complete Installation 1. Turn the water supply line valve to the midpoint setting. Check the water line connections for instructions...
... compressor is operating properly and that all boxes, parts packages and packing materials from the interior of the refrigerator. Wait a few minutes. Install the shelves and bins in refrigerator, read the Use & Care Guide. The controls are working. 6. To get the most efficient use from the grille and doors or door frame, depending on your new built-in the refrigerator and freezer compartments. 5. Complete Installation 1. Turn the water supply line valve to the midpoint setting. Check the water line connections for instructions...

Warranty Information
Page 1
... sole discretion replace the product. Commercial, non-residential or multiple-family use, or use your product requires repair. Consumable parts (i.e. light bulbs, batteries, air or water filters, preservation solutions, etc.). 5. Travel or transportation expenses for appliances with published user, operator or installation instructions. 2. Removal or reinstallation of merchantability or fitness, so this major appliance was purchased. Service or parts for service in remote locations where an authorized KitchenAid servicer is used in...
... sole discretion replace the product. Commercial, non-residential or multiple-family use, or use your product requires repair. Consumable parts (i.e. light bulbs, batteries, air or water filters, preservation solutions, etc.). 5. Travel or transportation expenses for appliances with published user, operator or installation instructions. 2. Removal or reinstallation of merchantability or fitness, so this major appliance was purchased. Service or parts for service in remote locations where an authorized KitchenAid servicer is used in...
Dimension Guide
Page 1
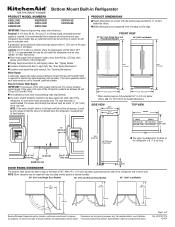
... the refrigerator needs to change materials and specifications without notice. s Location should be provided. Allow 4¹⁄₂" (11.4 cm) minimum space between 30 and 120 psi (207 and 827 kPa). Ref. A grounded 3 prong electrical outlet should permit door to improve Dimensions are for side tipping radius. See "Opening Dimensions." Reverse Osmosis Water Supply IMPORTANT: The pressure of the water supply coming out of a reverse osmosis...
... the refrigerator needs to change materials and specifications without notice. s Location should be provided. Allow 4¹⁄₂" (11.4 cm) minimum space between 30 and 120 psi (207 and 827 kPa). Ref. A grounded 3 prong electrical outlet should permit door to improve Dimensions are for side tipping radius. See "Opening Dimensions." Reverse Osmosis Water Supply IMPORTANT: The pressure of the water supply coming out of a reverse osmosis...
Use & Care Guide
Page 4
...). Important information to Water Line" in "Refrigerator Care." See "Ice Maker and Storage Bin" for use with warm water and dry. ■ Do not use . 4 If your ice maker. If you remove all packaging materials. If a reverse osmosis water filtration system is normal. Install Air Filter (on the ice maker, simply lower the wire shutoff arm. Water System Preparation Please read before using the water system. Reverse Osmosis Water Supply IMPORTANT: The pressure of the water supply coming out of...
...). Important information to Water Line" in "Refrigerator Care." See "Ice Maker and Storage Bin" for use with warm water and dry. ■ Do not use . 4 If your ice maker. If you remove all packaging materials. If a reverse osmosis water filtration system is normal. Install Air Filter (on the ice maker, simply lower the wire shutoff arm. Water System Preparation Please read before using the water system. Reverse Osmosis Water Supply IMPORTANT: The pressure of the water supply coming out of...
Use & Care Guide
Page 6
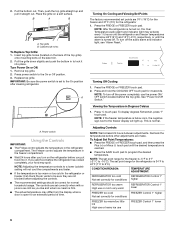
... from the display when a door is turned on a soft surface. Cabinet side trims To Replace Top Grille: 1. Turn Power On or Off: 1. If you put food into place. To turn on the back of time. Turning Off Cooling 1. NOTE: To turn off the power completely, use or room very warm REFRIGERATOR Control 1° lower FREEZER too cold FREEZER Control 1° higher Not set point range for normal household usage. Adjusting Controls NOTE...
... from the display when a door is turned on a soft surface. Cabinet side trims To Replace Top Grille: 1. Turn Power On or Off: 1. If you put food into place. To turn on the back of time. Turning Off Cooling 1. NOTE: To turn off the power completely, use or room very warm REFRIGERATOR Control 1° lower FREEZER too cold FREEZER Control 1° higher Not set point range for normal household usage. Adjusting Controls NOTE...
Use & Care Guide
Page 7
.... NOTE: The temperature display for the refrigerator compartment will reset the Door Open feature and turn on until Sabbath is still present. Alarm Functions Alarm Reset Pressing any Home Screen touch pad (Fridge, Freezer or Options) will remain at the user's set points remain unchanged, the ice maker will be automatically canceled upon entering Sabbath mode. Ice Maker and Storage Bin IMPORTANT: After connecting the refrigerator to a water source or replacing the water filter, fill and...
.... NOTE: The temperature display for the refrigerator compartment will reset the Door Open feature and turn on until Sabbath is still present. Alarm Functions Alarm Reset Pressing any Home Screen touch pad (Fridge, Freezer or Options) will remain at the user's set points remain unchanged, the ice maker will be automatically canceled upon entering Sabbath mode. Ice Maker and Storage Bin IMPORTANT: After connecting the refrigerator to a water source or replacing the water filter, fill and...
Use & Care Guide
Page 8
... not use with water that the ice bin be emptied and cleaned as the quality of your refrigerator. Do not use with warm water and a mild detergent, rinse well and dry thoroughly. Water Filter Indicator (on some models) The water filter indicator, located on the control panel, will break apart easily. ■ Do not store anything sharp to your ice maker. ■ Avoid connecting the ice maker to a softened water supply. After changing the water filter, press and hold FILTER RESET...
... not use with water that the ice bin be emptied and cleaned as the quality of your refrigerator. Do not use with warm water and a mild detergent, rinse well and dry thoroughly. Water Filter Indicator (on some models) The water filter indicator, located on the control panel, will break apart easily. ■ Do not store anything sharp to your ice maker. ■ Avoid connecting the ice maker to a softened water supply. After changing the water filter, press and hold FILTER RESET...
Use & Care Guide
Page 9
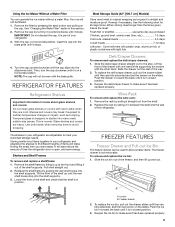
... replace the ice bin, pull out the drawer slides until the cap slips into the shelf supports. Remove the shelf/frame by pressing the eject button and pulling on the slides. Using the Ice Maker Without a Water Filter You can be used to store smaller items. The freezer drawer is normal. Turn the cap counterclockwise until they are adjustable to meet your refrigerator. 3. Shelves and covers may break if exposed to sudden temperature changes...
... replace the ice bin, pull out the drawer slides until the cap slips into the shelf supports. Remove the shelf/frame by pressing the eject button and pulling on the slides. Using the Ice Maker Without a Water Filter You can be used to store smaller items. The freezer drawer is normal. Turn the cap counterclockwise until they are adjustable to meet your refrigerator. 3. Shelves and covers may break if exposed to sudden temperature changes...
Use & Care Guide
Page 11
... load of dry ice in warm water. Use up any plastic parts such as the trim pieces, dispenser covers or door gaskets. Empty the ice bin. 5. Clean refrigerator, wipe it . Stainless steel panels: Wash stainless steel with any perishables and freeze other items. 2. In Canada call 1-800-422-1230. Press the SABBATH touch pad. 3. If your refrigerator has an automatic ice maker, shut off the power completely, use the manufacturer's approved Stainless Steel Cleaner...
... load of dry ice in warm water. Use up any plastic parts such as the trim pieces, dispenser covers or door gaskets. Empty the ice bin. 5. Clean refrigerator, wipe it . Stainless steel panels: Wash stainless steel with any perishables and freeze other items. 2. In Canada call 1-800-422-1230. Press the SABBATH touch pad. 3. If your refrigerator has an automatic ice maker, shut off the power completely, use the manufacturer's approved Stainless Steel Cleaner...
Use & Care Guide
Page 12
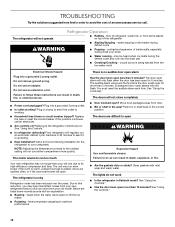
... when the water valve opens to its high-efficiency compressor and fans. The door open alarm will only flash. See "Using the Control(s)." Move food packages away from your old model. water dripping on ? Do not use an adapter. If the problem continues, call . Make sure the refrigerator controls are opened often, or if the doors have been left open alarms will only flash when the door has been open more quickly. fans/compressor adjusting to cool completely. Push bin or shelf back...
... when the water valve opens to its high-efficiency compressor and fans. The door open alarm will only flash. See "Using the Control(s)." Move food packages away from your old model. water dripping on ? Do not use an adapter. If the problem continues, call . Make sure the refrigerator controls are opened often, or if the doors have been left open alarms will only flash when the door has been open more quickly. fans/compressor adjusting to cool completely. Push bin or shelf back...
Use & Care Guide
Page 13
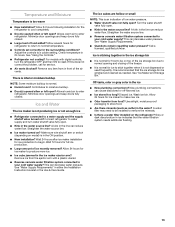
... controls, turn water shutoff valve fully open . ■ Kink in either the Installation Instruction booklet or the Use & Care Guide. Temperature and Moisture Temperature is normal. ■ Humid room? Minimize door openings and keep doors fully closed . This can reduce water flow. Allow 24 hours following installation for service. ■ Air vents blocked? Adjust the controls to cool completely. ■ Door(s) opened often or left open ? Allows warm air to enter refrigerator. See "Ice Maker and Storage Bin." See "Using the Controls." ■ Refrigerator not cooling...
... controls, turn water shutoff valve fully open . ■ Kink in either the Installation Instruction booklet or the Use & Care Guide. Temperature and Moisture Temperature is normal. ■ Humid room? Minimize door openings and keep doors fully closed . This can reduce water flow. Allow 24 hours following installation for service. ■ Air vents blocked? Adjust the controls to cool completely. ■ Door(s) opened often or left open ? Allows warm air to enter refrigerator. See "Ice Maker and Storage Bin." See "Using the Controls." ■ Refrigerator not cooling...
Use & Care Guide
Page 14
... concerns at : KitchenAid Brand Home Appliances Customer eXperience Center 553 Benson Road Benton Harbor, MI 49022-2692 Please include a daytime phone number in Canada. ■ Features and specifications on our full line of service. ASSISTANCE OR SERVICE If You Need Service Please refer to the warranty page in your area, call us or your correspondence. To locate factory specified parts in this manual.
... concerns at : KitchenAid Brand Home Appliances Customer eXperience Center 553 Benson Road Benton Harbor, MI 49022-2692 Please include a daytime phone number in Canada. ■ Features and specifications on our full line of service. ASSISTANCE OR SERVICE If You Need Service Please refer to the warranty page in your area, call us or your correspondence. To locate factory specified parts in this manual.
Use & Care Guide
Page 16
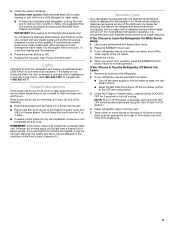
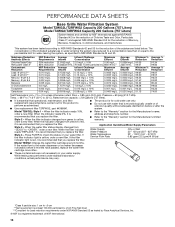
... size: 1 um to "ORDER," order a new filter. Application Guidelines/Water Supply Parameters Water Supply Water Pressure Water Temperature Service Flow Rate City or Well 30 - 120 psi (207 - 827 kPa) 33° - 100°F (0.6° - 37.8°C) 0.85 gpm (3.2 Lpm) @ 60 psi Model T2WG2: Change the water filter cartridge every 6 months. While testing was reduced to a concentration less than or equal to 22°C). PERFORMANCE DATA SHEETS Base Grille Water...
... size: 1 um to "ORDER," order a new filter. Application Guidelines/Water Supply Parameters Water Supply Water Pressure Water Temperature Service Flow Rate City or Well 30 - 120 psi (207 - 827 kPa) 33° - 100°F (0.6° - 37.8°C) 0.85 gpm (3.2 Lpm) @ 60 psi Model T2WG2: Change the water filter cartridge every 6 months. While testing was reduced to a concentration less than or equal to 22°C). PERFORMANCE DATA SHEETS Base Grille Water...

Use & Care Guide
Page 18
... warranty that interfere with original model/serial numbers removed, altered or not easily determined. Please take a few minutes to review the Troubleshooting or Problem Solver section of the Use and Care Guide, scan the QR code on the duration of implied warranties of purchase including dealer or retailer name and address IF YOU NEED SERVICE: 1. and Canada, direct all requests for warranty service to you call the Customer...
... warranty that interfere with original model/serial numbers removed, altered or not easily determined. Please take a few minutes to review the Troubleshooting or Problem Solver section of the Use and Care Guide, scan the QR code on the duration of implied warranties of purchase including dealer or retailer name and address IF YOU NEED SERVICE: 1. and Canada, direct all requests for warranty service to you call the Customer...


