Use & Care Guide
Page 1
STAND MIXER INSTRUCTIONS AND RECIPES 9706634D 1-800-541-6390 Details Inside
STAND MIXER INSTRUCTIONS AND RECIPES 9706634D 1-800-541-6390 Details Inside
Use & Care Guide
Page 2
... assure you in the unlikely event of a product safety notification and assist us in the United States and your KitchenAid® stand mixer should fail within the first year of ownership, simply call our toll-free Customer Satisfaction Center at 1-800-541-6390, 8 a.m....date of purchase of paper along with the stand mixer. Hassle-Free Replacement Warranty We're so confident the quality of our products meets the exacting standards of KitchenAid that, if your stand mixer should fail within the first year of ownership, KitchenAid will arrange to deliver an identical or comparable...
... assure you in the unlikely event of a product safety notification and assist us in the United States and your KitchenAid® stand mixer should fail within the first year of ownership, simply call our toll-free Customer Satisfaction Center at 1-800-541-6390, 8 a.m....date of purchase of paper along with the stand mixer. Hassle-Free Replacement Warranty We're so confident the quality of our products meets the exacting standards of KitchenAid that, if your stand mixer should fail within the first year of ownership, KitchenAid will arrange to deliver an identical or comparable...
Use & Care Guide
Page 3
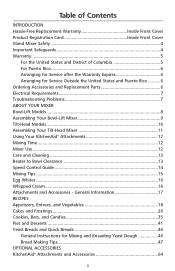
...Front Cover Stand Mixer Safety 4 Important Safeguards 4 Warranty...5 For the United States and District of Columbia 5 For Puerto Rico 6 Arranging for Service after the Warranty Expires 6 Arranging for Mixing and Kneading Yeast Dough 46 Bread Making Tips 47 OPTIONAL ACCESSORIES KitchenAid® ...6 Electrical Requirements 7 Troubleshooting Problems 7 ABOUT YOUR MIXER Bowl-Lift Models 8 Assembling Your Bowl-Lift Mixer 9 Tilt-Head Models 10 Assembling Your Tilt-Head Mixer 11 Using Your KitchenAid® Attachments 12 Mixing Time 12 Mixer Use...12 Care and Cleaning 13 Beater to Bowl...
...Front Cover Stand Mixer Safety 4 Important Safeguards 4 Warranty...5 For the United States and District of Columbia 5 For Puerto Rico 6 Arranging for Service after the Warranty Expires 6 Arranging for Mixing and Kneading Yeast Dough 46 Bread Making Tips 47 OPTIONAL ACCESSORIES KitchenAid® ...6 Electrical Requirements 7 Troubleshooting Problems 7 ABOUT YOUR MIXER Bowl-Lift Models 8 Assembling Your Bowl-Lift Mixer 9 Tilt-Head Models 10 Assembling Your Tilt-Head Mixer 11 Using Your KitchenAid® Attachments 12 Mixing Time 12 Mixer Use...12 Care and Cleaning 13 Beater to Bowl...
Use & Care Guide
Page 4
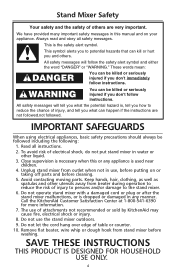
... happen if the instructions are very important. Avoid contacting moving parts. You can be followed including the following: 1. Call the KitchenAid Customer Satisfaction Center at 1-800-541-6390 for more information. 7. Stand Mixer Safety Your safety and the safety of others . All safety messages will follow instructions. This symbol alerts you what can...
... happen if the instructions are very important. Avoid contacting moving parts. You can be followed including the following: 1. Call the KitchenAid Customer Satisfaction Center at 1-800-541-6390 for more information. 7. Stand Mixer Safety Your safety and the safety of others . All safety messages will follow instructions. This symbol alerts you what can...
Use & Care Guide
Page 5
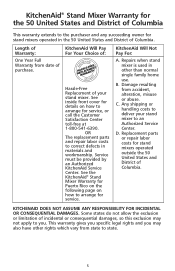
... from accident, alteration, misuse or abuse. Service must be provided by an Authorized KitchenAid Service Center. This warranty gives you specific legal rights and you . See the KitchenAid® Stand Mixer Warranty for Puerto Rico on the following page on how to arrange for service, ...or call the Customer Satisfaction Center toll-free at 1-800-541-6390. KITCHENAID DOES NOT ASSUME ANY RESPONSIBILITY FOR INCIDENTAL OR CONSEQUENTIAL DAMAGES. B. KitchenAid® Stand Mixer Warranty for the 50 United States and District of Columbia This warranty extends to the purchaser...
... from accident, alteration, misuse or abuse. Service must be provided by an Authorized KitchenAid Service Center. This warranty gives you specific legal rights and you . See the KitchenAid® Stand Mixer Warranty for Puerto Rico on the following page on how to arrange for service, ...or call the Customer Satisfaction Center toll-free at 1-800-541-6390. KITCHENAID DOES NOT ASSUME ANY RESPONSIBILITY FOR INCIDENTAL OR CONSEQUENTIAL DAMAGES. B. KitchenAid® Stand Mixer Warranty for the 50 United States and District of Columbia This warranty extends to the purchaser...

Use & Care Guide
Page 6
... Expires For service information, call tollfree 1-800-541-6390 or write to : KitchenAid Portable Appliances, P.O. Arranging for Service Outside the United States and Puerto Rico Consult your stand mixer, call toll-free Customer Satisfaction Center, 1-800-541-6390 or write to ...Ordering Accessories and Replacement Parts To order accessories or replacement parts for your local KitchenAid dealer the stand mixer for information on or the store where you prepaid and insured. KitchenAid® Stand Mixer Warranty for Puerto Rico A limited one year warranty extends to the nearest ...
... Expires For service information, call tollfree 1-800-541-6390 or write to : KitchenAid Portable Appliances, P.O. Arranging for Service Outside the United States and Puerto Rico Consult your stand mixer, call toll-free Customer Satisfaction Center, 1-800-541-6390 or write to ...Ordering Accessories and Replacement Parts To order accessories or replacement parts for your local KitchenAid dealer the stand mixer for information on or the store where you prepaid and insured. KitchenAid® Stand Mixer Warranty for Puerto Rico A limited one year warranty extends to the nearest ...
Use & Care Guide
Page 7
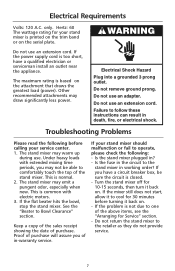
...Plug into a grounded 3 prong outlet. Electrical Requirements Volts: 120 A.C. The stand mixer may not be sure the circuit is printed on the trim band or on the attachment that draws the greatest load (power). Under heavy loads with electric motors. 3. Keep a copy of the sales receipt showing ...the date of the above items, see the "Arranging for your stand mixer should malfunction or fail to one of purchase. Is the fuse...
...Plug into a grounded 3 prong outlet. Electrical Requirements Volts: 120 A.C. The stand mixer may not be sure the circuit is printed on the trim band or on the attachment that draws the greatest load (power). Under heavy loads with electric motors. 3. Keep a copy of the sales receipt showing ...the date of the above items, see the "Arranging for your stand mixer should malfunction or fail to one of purchase. Is the fuse...
Use & Care Guide
Page 8
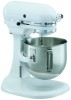
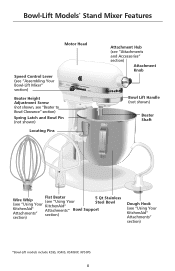
Bowl-Lift Models* Stand Mixer Features Motor Head Speed Control Lever (see "Using Your KitchenAid® Attachments" section) *Bowl-Lift models include K5SS, KSM5, KSM50P, KP50PS 8 JosKeiptch,hMeinchAigiadn USA Solid Off SStatirte2S4pe6ed8 Control 10 CAUTION: Beater Height ... and Accessories" section) Attachment Knob Bowl Lift Handle (not shown) Beater Shaft Flat Beater Wire Whip (see "Using Your (see "Using Your KitchenAid® 5 Qt Stainless Steel Bowl KitchenAid® Attachments" Bowl Support Attachments" section) section) Dough Hook (see "Assembling Your Bowl-Lift...
Bowl-Lift Models* Stand Mixer Features Motor Head Speed Control Lever (see "Using Your KitchenAid® Attachments" section) *Bowl-Lift models include K5SS, KSM5, KSM50P, KP50PS 8 JosKeiptch,hMeinchAigiadn USA Solid Off SStatirte2S4pe6ed8 Control 10 CAUTION: Beater Height ... and Accessories" section) Attachment Knob Bowl Lift Handle (not shown) Beater Shaft Flat Beater Wire Whip (see "Using Your (see "Using Your KitchenAid® 5 Qt Stainless Steel Bowl KitchenAid® Attachments" Bowl Support Attachments" section) section) Dough Hook (see "Assembling Your Bowl-Lift...
Use & Care Guide
Page 9
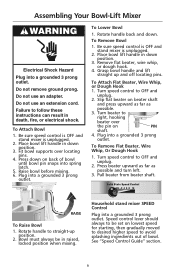
... back of bowl. Pull beater from beater shaft. Solid State Speed Control Off Stir 2 4 6 8 10 RAISE To Raise Bowl 1. Household stand mixer SPEED Control Plug into a grounded 3 prong outlet. Speed control lever should always to follow these instructions can result in down position. 3. Failure to.... Plug into a grounded 3 prong outlet. Place bowl lift handle in death, fire, or electrical shock. Be sure speed control is OFF and stand mixer is unplugged. 2. Raise bowl before mixing. 6. To Remove Bowl 1. Plug into a grounded 3 prong outlet. Do not use an adapter. Be...
... back of bowl. Pull beater from beater shaft. Solid State Speed Control Off Stir 2 4 6 8 10 RAISE To Raise Bowl 1. Household stand mixer SPEED Control Plug into a grounded 3 prong outlet. Speed control lever should always to follow these instructions can result in down position. 3. Failure to.... Plug into a grounded 3 prong outlet. Place bowl lift handle in death, fire, or electrical shock. Be sure speed control is OFF and stand mixer is unplugged. 2. Raise bowl before mixing. 6. To Remove Bowl 1. Plug into a grounded 3 prong outlet. Do not use an adapter. Be...
Use & Care Guide
Page 10
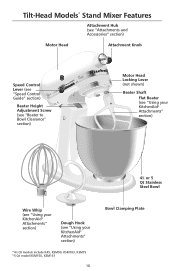
Tilt-Head Models* Stand Mixer Features Attachment Hub (see "Attachments and Accessories" section) Motor Head Attachment Knob Speed Control Lever (see "Using your KitchenAid® Attachments" section) *41⁄2 Qt models include K45, KSM90, KSM103, KSM75 *5 Qt model KSM150, ... section) Motor Head Locking Lever (not shown) Beater Shaft Flat Beater (see "Using your KitchenAid® Attachments" section) 41⁄2 or 5 Qt Stainless Steel Bowl Wire Whip (see "Using your KitchenAid® Attachments" section) Dough Hook (see "Speed Control Guide" section) Solid StOaffteSStirpe2ed4 C6 ...
Tilt-Head Models* Stand Mixer Features Attachment Hub (see "Attachments and Accessories" section) Motor Head Attachment Knob Speed Control Lever (see "Using your KitchenAid® Attachments" section) *41⁄2 Qt models include K45, KSM90, KSM103, KSM75 *5 Qt model KSM150, ... section) Motor Head Locking Lever (not shown) Beater Shaft Flat Beater (see "Using your KitchenAid® Attachments" section) 41⁄2 or 5 Qt Stainless Steel Bowl Wire Whip (see "Using your KitchenAid® Attachments" section) Dough Hook (see "Speed Control Guide" section) Solid StOaffteSStirpe2ed4 C6 ...
Use & Care Guide
Page 11
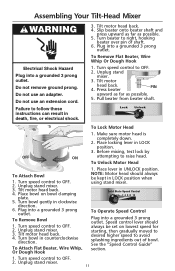
... motor head is completely down. 2. Before mixing, test lock by OFF ON attempting to follow these instructions can result in LOCK position when using stand mixer. To Unlock Motor Head To Attach Bowl 1. Turn speed control to OFF. 2. Turn speed control to OFF. 2. Turn bowl in LOCK position.... 3. Speed control lever should always be set on bowl clamping plate. 5. Unplug stand mixer. 3. Place bowl on lowest speed for starting, then gradually moved to desired higher speed to right, hooking beater over pin of bowl. Unplug...
... motor head is completely down. 2. Before mixing, test lock by OFF ON attempting to follow these instructions can result in LOCK position when using stand mixer. To Unlock Motor Head To Attach Bowl 1. Turn speed control to OFF. 2. Turn speed control to OFF. 2. Turn bowl in LOCK position.... 3. Speed control lever should always be set on bowl clamping plate. 5. Unplug stand mixer. 3. Place bowl on lowest speed for starting, then gradually moved to desired higher speed to right, hooking beater over pin of bowl. Unplug...
Use & Care Guide
Page 12
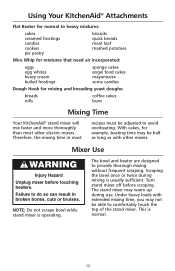
... mix faster and more thoroughly than most recipes must be able to comfortably touch the top of the stand mixer. Turn stand mixer off before touching beaters. Using Your KitchenAid® Attachments Flat Beater for normal to heavy mixtures: cakes creamed frostings candies cookies pie pastry biscuits quick breads meat loaf mashed potatoes Wire Whip for...
... mix faster and more thoroughly than most recipes must be able to comfortably touch the top of the stand mixer. Turn stand mixer off before touching beaters. Using Your KitchenAid® Attachments Flat Beater for normal to heavy mixtures: cakes creamed frostings candies cookies pie pastry biscuits quick breads meat loaf mashed potatoes Wire Whip for...
Use & Care Guide
Page 13
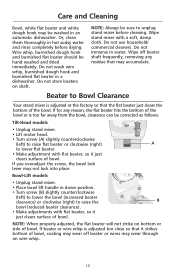
...may be washed in water. Wire whip, burnished dough hook and burnished flat beater should be corrected as follows: Tilt-Head models • Unplug stand mixer. • Lift motor head. • Turn screw (A) slightly counterclockwise (left ) to lower the bowl (increased beater clearance) or clockwise (... bowl or is adjusted at the factory so that the flat beater just clears the bottom of the bowl. Bowl-Lift models • Unplug stand mixer. • Place bowl lift handle in down position. • Turn screw (B) slightly counterclockwise (left ) to raise flat beater or clockwise ...
...may be washed in water. Wire whip, burnished dough hook and burnished flat beater should be corrected as follows: Tilt-Head models • Unplug stand mixer. • Lift motor head. • Turn screw (A) slightly counterclockwise (left ) to lower the bowl (increased beater clearance) or clockwise (... bowl or is adjusted at the factory so that the flat beater just clears the bottom of the bowl. Bowl-Lift models • Unplug stand mixer. • Place bowl lift handle in down position. • Turn screw (B) slightly counterclockwise (left ) to raise flat beater or clockwise ...
Use & Care Guide
Page 14
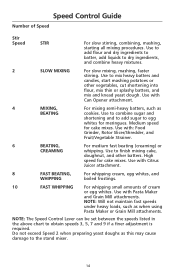
... Maker and Grain Mill attachments. NOTE: Will not maintain fast speeds under heavy loads, such as this may cause damage to mix heavy batters and candies, start mashing potatoes or other batters. Use to the stand mixer. 14 Do not exceed Speed 2 when preparing yeast doughs as when using... Pasta Maker or Grain Mill attachments. NOTE: The Speed Control Lever can be set between the speeds listed in the above chart to dry ingredients, and combine heavy mixtures. 2 SLOW ...
... Maker and Grain Mill attachments. NOTE: Will not maintain fast speeds under heavy loads, such as this may cause damage to mix heavy batters and candies, start mashing potatoes or other batters. Use to the stand mixer. 14 Do not exceed Speed 2 when preparing yeast doughs as when using... Pasta Maker or Grain Mill attachments. NOTE: The Speed Control Lever can be set between the speeds listed in the above chart to dry ingredients, and combine heavy mixtures. 2 SLOW ...
Use & Care Guide
Page 15
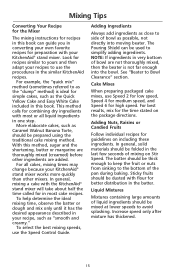
... splashing. This method calls for combining dry ingredients with the KitchenAid® stand mixer will take about half the time called for in most or all cakes, mixing times may change because your KitchenAid® stand mixer works more quickly than other ingredients are not thoroughly mixed, ...prepared using the traditional cake mixing method. Mixing Tips Converting Your Recipe for the Mixer The mixing instructions for recipes in this book can be dusted with your KitchenAid® stand mixer. Adding Ingredients Always add ingredients as close to side of liquid ingredients should be...
... splashing. This method calls for combining dry ingredients with the KitchenAid® stand mixer will take about half the time called for in most or all cakes, mixing times may change because your KitchenAid® stand mixer works more quickly than other ingredients are not thoroughly mixed, ...prepared using the traditional cake mixing method. Mixing Tips Converting Your Recipe for the Mixer The mixing instructions for recipes in this book can be dusted with your KitchenAid® stand mixer. Adding Ingredients Always add ingredients as close to side of liquid ingredients should be...
Use & Care Guide
Page 16
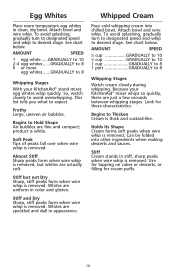
...See chart below . Holds Its Shape Cream forms soft peaks when wire whip is removed. Stiff Cream stands in color and glisten. Stiff but whites are actually soft. To avoid splashing, gradually turn to designated ...whip is removed. To avoid splashing, gradually turn to designated speed and whip to expect. Because your KitchenAid® stand mixer, egg whites whip quickly. Look for cream puffs. 16 So, watch closely to Hold Shape Air ... for these characteristics: Begins to 8 Whipping Stages With your KitchenAid® mixer whips so quickly, there are fine and compact;
...See chart below . Holds Its Shape Cream forms soft peaks when wire whip is removed. Stiff Cream stands in color and glisten. Stiff but whites are actually soft. To avoid splashing, gradually turn to designated ...whip is removed. To avoid splashing, gradually turn to designated speed and whip to expect. Because your KitchenAid® stand mixer, egg whites whip quickly. Look for cream puffs. 16 So, watch closely to Hold Shape Air ... for these characteristics: Begins to 8 Whipping Stages With your KitchenAid® mixer whips so quickly, there are fine and compact;
Use & Care Guide
Page 17
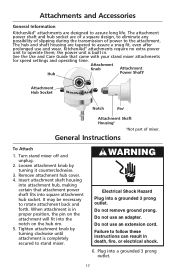
... fits into the notch on the hub rim. 5. Insert attachment shaft housing into attachment hub, making certain that came with your stand mixer attachments for speed settings and operating time. Tighten attachment knob by turning it counterclockwise. 3. Do not use an extension cord. Loosen...to follow these instructions can result in . Electrical Shock Hazard Plug into a grounded 3 prong outlet. 17 Do not use an adapter. KitchenAid® attachments require no extra power unit to assure long life. General Instructions To Attach 1. the power unit is in proper position, ...
... fits into the notch on the hub rim. 5. Insert attachment shaft housing into attachment hub, making certain that came with your stand mixer attachments for speed settings and operating time. Tighten attachment knob by turning it counterclockwise. 3. Do not use an extension cord. Loosen...to follow these instructions can result in . Electrical Shock Hazard Plug into a grounded 3 prong outlet. 17 Do not use an adapter. KitchenAid® attachments require no extra power unit to assure long life. General Instructions To Attach 1. the power unit is in proper position, ...
Use & Care Guide
Page 18
... lemon juice 3 tablespoons chopped green onions 1⁄2 teaspoon garlic salt 3 drops hot pepper sauce Place cream cheese, cottage cheese, and mayonnaise in mixer bowl. Turn to Speed 2 and mix about 30 seconds. Stop and scrape bowl. Rotate attachment slightly back and forth while pulling out. 3. ... About 42 cal, 4 g protein, 1 g carb, 3 g fat, 12 mg chol, 180 mg sodium. Serve with assorted crackers or raw vegetables. Turn stand mixer off and unplug. 2. Turn to Speed 4 and beat about 1 minute, or until all remaining ingredients. Attach bowl and flat beater to...
... lemon juice 3 tablespoons chopped green onions 1⁄2 teaspoon garlic salt 3 drops hot pepper sauce Place cream cheese, cottage cheese, and mayonnaise in mixer bowl. Turn to Speed 2 and mix about 30 seconds. Stop and scrape bowl. Rotate attachment slightly back and forth while pulling out. 3. ... About 42 cal, 4 g protein, 1 g carb, 3 g fat, 12 mg chol, 180 mg sodium. Serve with assorted crackers or raw vegetables. Turn stand mixer off and unplug. 2. Turn to Speed 4 and beat about 1 minute, or until all remaining ingredients. Attach bowl and flat beater to...
Use & Care Guide
Page 25
Add onion and bell pepper. Set aside. Let stand about 1 minute, stirring frequently. Yield: 8 servings. Per serving (filling and... salt, and hot pepper sauce in mixer bowl. Turn to Speed 2 and mix 1 to mixer. Turn to Speed 2 and mix about 2 minutes, or until combined. Garden Quiche Baked Pastry Shell (see "KitchenAid Pie Pastry" recipe) 1 tablespoon oil... Marinara Sauce Place egg substitute, ricotta cheese, mozzarella cheese, Parmesan cheese, parsley, and seasoning in mixer bowl. Attach bowl and flat beater to 2 minutes. Add mushrooms. Cook and stir about 30 ...
Add onion and bell pepper. Set aside. Let stand about 1 minute, stirring frequently. Yield: 8 servings. Per serving (filling and... salt, and hot pepper sauce in mixer bowl. Turn to Speed 2 and mix 1 to mixer. Turn to Speed 2 and mix about 2 minutes, or until combined. Garden Quiche Baked Pastry Shell (see "KitchenAid Pie Pastry" recipe) 1 tablespoon oil... Marinara Sauce Place egg substitute, ricotta cheese, mozzarella cheese, Parmesan cheese, parsley, and seasoning in mixer bowl. Attach bowl and flat beater to 2 minutes. Add mushrooms. Cook and stir about 30 ...
Use & Care Guide
Page 34
Cook about 5 minutes longer, or until frosting loses its gloss and stands in stiff peaks. Place powdered sugar in mixer bowl. Turn to Speed 4 and beat about 1 minute, or until smooth and creamy. Turn to Stir Speed and mix about 2 minutes, or... (8 oz) light cream cheese 1 teaspoon orange juice 1⁄2 teaspoon grated orange peel Place all ingredients in mixer bowl. Turn to mixer. Heat to 11⁄2 minutes. Add brown sugar mixture and vanilla. Fluffy KitchenAid Frosting 11⁄2 cups sugar 1⁄2 teaspoon cream of tartar 1⁄2 teaspoon salt 1⁄2 cup water ...
Cook about 5 minutes longer, or until frosting loses its gloss and stands in stiff peaks. Place powdered sugar in mixer bowl. Turn to Speed 4 and beat about 1 minute, or until smooth and creamy. Turn to Stir Speed and mix about 2 minutes, or... (8 oz) light cream cheese 1 teaspoon orange juice 1⁄2 teaspoon grated orange peel Place all ingredients in mixer bowl. Turn to mixer. Heat to 11⁄2 minutes. Add brown sugar mixture and vanilla. Fluffy KitchenAid Frosting 11⁄2 cups sugar 1⁄2 teaspoon cream of tartar 1⁄2 teaspoon salt 1⁄2 cup water ...


