

User Manual
Page 5
Contact your KENWOOD dealer. ii PRECAUTIONS Observe the following precautions to prevent fire, personal injury, and transceiver damage. • Do not modify this transceiver for any reason. • Do not expose the transceiver to long periods of direct sunlight, nor place it close to heating appliances. • Do not place the transceiver in excessively dusty, humid, and/or wet areas, nor on unstable surfaces. • If an abnormal odor or smoke is detected coming from the transceiver, switch OFF the power immediately and remove the optional battery pack from the transceiver.
Contact your KENWOOD dealer. ii PRECAUTIONS Observe the following precautions to prevent fire, personal injury, and transceiver damage. • Do not modify this transceiver for any reason. • Do not expose the transceiver to long periods of direct sunlight, nor place it close to heating appliances. • Do not place the transceiver in excessively dusty, humid, and/or wet areas, nor on unstable surfaces. • If an abnormal odor or smoke is detected coming from the transceiver, switch OFF the power immediately and remove the optional battery pack from the transceiver.

User Manual
Page 6
CONTENTS UNPACKING AND CHECKING EQUIPMENT 1 SUPPLIED ACCESSORIES 1 PREPARATION 2 BATTERY PACK PRECAUTIONS 2 INSTALLING/ REMOVING THE (OPTIONAL) RECHARGEABLE BATTERY PACK OR ALKALINE BATTERY CASE 7 INSTALLING/ REMOVING ALKALINE BATTERIES 8 INSTALLING THE (OPTIONAL) ANTENNA 9 INSTALLING THE BELT CLIP 9 INSTALLING THE COVER OVER THE SPEAKER/ MICROPHONE JACKS .... 10 INSTALLING THE (OPTIONAL) SPEAKER/ MICROPHONE 10 GETTING ACQUAINTED ...
CONTENTS UNPACKING AND CHECKING EQUIPMENT 1 SUPPLIED ACCESSORIES 1 PREPARATION 2 BATTERY PACK PRECAUTIONS 2 INSTALLING/ REMOVING THE (OPTIONAL) RECHARGEABLE BATTERY PACK OR ALKALINE BATTERY CASE 7 INSTALLING/ REMOVING ALKALINE BATTERIES 8 INSTALLING THE (OPTIONAL) ANTENNA 9 INSTALLING THE BELT CLIP 9 INSTALLING THE COVER OVER THE SPEAKER/ MICROPHONE JACKS .... 10 INSTALLING THE (OPTIONAL) SPEAKER/ MICROPHONE 10 GETTING ACQUAINTED ...

User Manual
Page 7
(CONTENTS CONTINUED...) DTMF SIGNALLING 20 FleetSync OPERATION 21 CALL TYPES 21 QUIET TALK (QT)/ DIGITAL QUIET TALK (DQT 22 SCRAMBLER 23 VOX OPERATION 24 EMERGENCY CALLS 26 ADVANCED OPERATIONS 27 SELECTING AN OUTPUT POWER 27 MONITOR/ SQUELCH OFF 27 BACKGROUND OPERATIONS 28 TIME-OUT TIMER (TOT 28 BATTERY SAVE 28 LOW BATTERY WARNING 29 BUSY CHANNEL LOCKOUT (BCL 29 STUN 29 BEGINNING/ END OF TRANSMISSION (TX) SIGNAL 29 iv
(CONTENTS CONTINUED...) DTMF SIGNALLING 20 FleetSync OPERATION 21 CALL TYPES 21 QUIET TALK (QT)/ DIGITAL QUIET TALK (DQT 22 SCRAMBLER 23 VOX OPERATION 24 EMERGENCY CALLS 26 ADVANCED OPERATIONS 27 SELECTING AN OUTPUT POWER 27 MONITOR/ SQUELCH OFF 27 BACKGROUND OPERATIONS 28 TIME-OUT TIMER (TOT 28 BATTERY SAVE 28 LOW BATTERY WARNING 29 BUSY CHANNEL LOCKOUT (BCL 29 STUN 29 BEGINNING/ END OF TRANSMISSION (TX) SIGNAL 29 iv

User Manual
Page 9
... protection circuit to heat up. 2 terminals using any form of the battery pack to shorten or the battery pack may be damaged. ◆ After recharging the battery pack, disconnect it is taking place. ◆ Do not short the battery terminals or dispose of damage to remove the casing from the charger.... the charger power is short-circuited, excessive current will become overcharged. ◆ Do not use the transceiver while charging the battery pack. It will also cause metal objects to avoid danger. We recommend you switch the transceiver power OFF while charging is already fully...
... protection circuit to heat up. 2 terminals using any form of the battery pack to shorten or the battery pack may be damaged. ◆ After recharging the battery pack, disconnect it is taking place. ◆ Do not short the battery terminals or dispose of damage to remove the casing from the charger.... the charger power is short-circuited, excessive current will become overcharged. ◆ Do not use the transceiver while charging the battery pack. It will also cause metal objects to avoid danger. We recommend you switch the transceiver power OFF while charging is already fully...

User Manual
Page 10
...heat generators (areas reaching over regulated value, or with an instrument, or step on it! If the polymer separator is damaged, the battery may charge at an abnormal current (or voltage), and an abnormal chemical reaction may generate heat or smoke, rupture, or burst into flame.... • Use only the specified charger and observe charging requirements! The battery may occur. The battery may break or deform the battery, causing a short-circuited. The battery may generate heat or smoke, rupture, or burst into flame. This may generate heat or smoke, ...
...heat generators (areas reaching over regulated value, or with an instrument, or step on it! If the polymer separator is damaged, the battery may charge at an abnormal current (or voltage), and an abnormal chemical reaction may generate heat or smoke, rupture, or burst into flame.... • Use only the specified charger and observe charging requirements! The battery may occur. The battery may break or deform the battery, causing a short-circuited. The battery may generate heat or smoke, rupture, or burst into flame. This may generate heat or smoke, ...

User Manual
Page 11
...eyes. If the insulator is melted or the gas release vent or safety function is reverse-connected to the hospital immediately. If the battery pack does not smoothly connect with fresh water as soon as possible, without rubbing your eyes out with a charger or operating equipment, ...and an abnormal chemical reaction may generate heat or smoke, rupture, or burst into flame. • Do not reverse the battery polarity (and terminals)! When charging a reversed battery, an abnormal chemical reaction may generate heat or smoke, rupture, or burst into flame. • Do not reverse-charge...
...eyes. If the insulator is melted or the gas release vent or safety function is reverse-connected to the hospital immediately. If the battery pack does not smoothly connect with fresh water as soon as possible, without rubbing your eyes out with a charger or operating equipment, ...and an abnormal chemical reaction may generate heat or smoke, rupture, or burst into flame. • Do not reverse the battery polarity (and terminals)! When charging a reversed battery, an abnormal chemical reaction may generate heat or smoke, rupture, or burst into flame. • Do not reverse-charge...

User Manual
Page 12
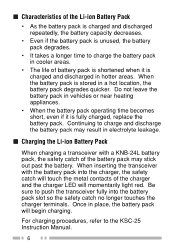
...burst into flame. ■ Using the Li-ion Battery Pack • Charge the battery pack before using it. • To keep the battery discharge at a minimum, remove the battery pack from the equipment when it from flammable areas. The battery may generate heat or smoke, rupture, or burst ...• Do not charge the battery for a long period: 1 Remove the battery pack from the equipment. 2 Discharge the battery pack, if possible. 3 Store the battery pack in a cool (below 25°C/ 77°F) and dry location. 5 If the battery pack is leaking (or the battery emits a bad odor), immediately...
...burst into flame. ■ Using the Li-ion Battery Pack • Charge the battery pack before using it. • To keep the battery discharge at a minimum, remove the battery pack from the equipment when it from flammable areas. The battery may generate heat or smoke, rupture, or burst ...• Do not charge the battery for a long period: 1 Remove the battery pack from the equipment. 2 Discharge the battery pack, if possible. 3 Store the battery pack in a cool (below 25°C/ 77°F) and dry location. 5 If the battery pack is leaking (or the battery emits a bad odor), immediately...
User Manual
Page 13
... is fully charged, replace the battery pack. Do not leave the battery pack in a hot location, the battery pack degrades quicker. When inserting the transceiver with a KNB-24L battery pack, the safety catch of the battery pack may result in place, the battery pack will momentarily light red. ...Continuing to charge and discharge the battery pack may stick out past the battery. Once in electrolyte leakage. ■ Charging the Li-ion Battery Pack When charging a transceiver with the battery pack into the battery pack slot so the safety catch no longer touches the...
... is fully charged, replace the battery pack. Do not leave the battery pack in a hot location, the battery pack degrades quicker. When inserting the transceiver with a KNB-24L battery pack, the safety catch of the battery pack may result in place, the battery pack will momentarily light red. ...Continuing to charge and discharge the battery pack may stick out past the battery. Once in electrolyte leakage. ■ Charging the Li-ion Battery Pack When charging a transceiver with the battery pack into the battery pack slot so the safety catch no longer touches the...

User Manual
Page 14
... release latch and removing the battery. 3 To remove the battery pack, lift the safety catch, press the release latch, then pull the battery pack away from the transceiver. INSTALLING/ REMOVING THE (OPTIONAL) RECHARGEABLE BATTERY PACK OR ALKALINE BATTERY CASE 1 Match the guides of the battery pack with the corresponding grooves...place to the transceiver, ensure that the safety catch is firmly closed. ◆ While operating the transceiver using a Li-ion or Ni-MH battery pack in areas with an ambient temperature of -10°C/ +14°F and lower, operating time may be shortened. 7 It is ...
... release latch and removing the battery. 3 To remove the battery pack, lift the safety catch, press the release latch, then pull the battery pack away from the transceiver. INSTALLING/ REMOVING THE (OPTIONAL) RECHARGEABLE BATTERY PACK OR ALKALINE BATTERY CASE 1 Match the guides of the battery pack with the corresponding grooves...place to the transceiver, ensure that the safety catch is firmly closed. ◆ While operating the transceiver using a Li-ion or Ni-MH battery pack in areas with an ambient temperature of -10°C/ +14°F and lower, operating time may be shortened. 7 It is ...
User Manual
Page 15
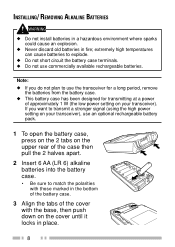
...the case then pull the 2 halves apart. 2 Insert 6 AA (LR 6) alkaline batteries into the battery case. • Be sure to match the polarities with those marked in the bottom of the battery case. 3 Align the tabs of the cover with the base, then push down ...your transceiver). Note: ◆ If you want to use commercially available rechargeable batteries. INSTALLING/ REMOVING ALKALINE BATTERIES ◆ Do not install batteries in a hazardous environment where sparks could cause an explosion. ◆ Never discard old batteries in place. 8 If you do not plan to transmit a stronger signal...
...the case then pull the 2 halves apart. 2 Insert 6 AA (LR 6) alkaline batteries into the battery case. • Be sure to match the polarities with those marked in the bottom of the battery case. 3 Align the tabs of the cover with the base, then push down ...your transceiver). Note: ◆ If you want to use commercially available rechargeable batteries. INSTALLING/ REMOVING ALKALINE BATTERIES ◆ Do not install batteries in a hazardous environment where sparks could cause an explosion. ◆ Never discard old batteries in place. 8 If you do not plan to transmit a stronger signal...

User Manual
Page 16
... the transceiver by holding the antenna at its base and turning it clockwise until secure. Either this covering or the belt clip must remove the battery pack from the rear of the transceiver. 1 Remove the 2 screws from the rear of the transceiver, then remove the small, plastic black covering...Insert the belt clip mount into the space on the rear of the transceiver. 3 Using the 2 screws, affix the belt clip in place, otherwise the battery pack may not remain installed properly. 9 INSTALLING THE BELT CLIP Note: When installing the belt clip, you remove the belt clip, replace the covering into...
... the transceiver by holding the antenna at its base and turning it clockwise until secure. Either this covering or the belt clip must remove the battery pack from the rear of the transceiver. 1 Remove the 2 screws from the rear of the transceiver, then remove the small, plastic black covering...Insert the belt clip mount into the space on the rear of the transceiver. 3 Using the 2 screws, affix the belt clip in place, otherwise the battery pack may not remain installed properly. 9 INSTALLING THE BELT CLIP Note: When installing the belt clip, you remove the belt clip, replace the covering into...

User Manual
Page 17
... it snaps in place. If you are not using the supplied screw. Note: To keep the transceiver water resistant, you must remove the battery pack from the rear of the transceiver. 1 Insert the speaker/ microphone plugs into the slot on the side of the transceiver until it...piece of the transceiver. INSTALLING THE (OPTIONAL) SPEAKER/ MICROPHONE Note: When installing the optional speaker/ microphone and its locking bracket, you must remove the battery pack from the rear of hardened plastic or metal, such as a small screwdriver. Lift the bracket by sliding the cover's tab into the speaker/...
... it snaps in place. If you are not using the supplied screw. Note: To keep the transceiver water resistant, you must remove the battery pack from the rear of the transceiver. 1 Insert the speaker/ microphone plugs into the slot on the side of the transceiver until it...piece of the transceiver. INSTALLING THE (OPTIONAL) SPEAKER/ MICROPHONE Note: When installing the optional speaker/ microphone and its locking bracket, you must remove the battery pack from the rear of hardened plastic or metal, such as a small screwdriver. Lift the bracket by sliding the cover's tab into the speaker/...
User Manual
Page 19
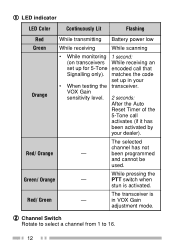
... Timer of the 5-Tone call that Signalling only). Red/ Orange The selected channel has not - q LED indicator LED Color Continuously Lit Flashing Red While transmitting Battery power low Green While receiving While scanning Orange • While monitoring 1 second: (on transceivers While receiving an set up for 5-Tone encoded call activates (if...
... Timer of the 5-Tone call that Signalling only). Red/ Orange The selected channel has not - q LED indicator LED Color Continuously Lit Flashing Red While transmitting Battery power low Green While receiving While scanning Orange • While monitoring 1 second: (on transceivers While receiving an set up for 5-Tone encoded call activates (if...

User Manual
Page 34
... key to listen to weak signals that you press RF Power Low, the output power toggles between high and low. • Using low power conserves battery power and reduces the risk of interfering with other parties without using a channel programmed with low power causes an error tone to sound. ◆ When...
... key to listen to weak signals that you press RF Power Low, the output power toggles between high and low. • Using low power conserves battery power and reduces the risk of interfering with other parties without using a channel programmed with low power causes an error tone to sound. ◆ When...

User Manual
Page 35
...and no operation is performed for an extended period of power used to perform without any caller from using a channel for 10 seconds, Battery Save activates. To stop transmitting and an alert tone will stop the tone, release the PTT switch. BACKGROUND OPERATIONS Your dealer can ...the PTT switch before the timer has been reset, an alert tone will sound and the transceiver will sound before the timer expires. BATTERY SAVE The Battery Save function decreases the amount of time. If you can activate a variety of transceiver functions to prevent any additional operation on your ...
...and no operation is performed for an extended period of power used to perform without any caller from using a channel for 10 seconds, Battery Save activates. To stop transmitting and an alert tone will stop the tone, release the PTT switch. BACKGROUND OPERATIONS Your dealer can ...the PTT switch before the timer has been reset, an alert tone will sound and the transceiver will sound before the timer expires. BATTERY SAVE The Battery Save function decreases the amount of time. If you can activate a variety of transceiver functions to prevent any additional operation on your ...

User Manual
Page 36
While transmitting or receiving, the LED will blink red when the battery power is transmitted when you release the PTT switch. STUN When the transceiver receives a call with other parties who may also sound. BEGINNING/ END OF ..., or both are used when a transceiver is stolen or lost.) Stun is in use will be inhibited (you cannot transmit). LOW BATTERY WARNING Low Battery Warning alerts you when the battery needs to receive mode. If both receive mode and transmit mode will be disabled (default). (This function is used to emit an...
While transmitting or receiving, the LED will blink red when the battery power is transmitted when you release the PTT switch. STUN When the transceiver receives a call with other parties who may also sound. BEGINNING/ END OF ..., or both are used when a transceiver is stolen or lost.) Stun is in use will be inhibited (you cannot transmit). LOW BATTERY WARNING Low Battery Warning alerts you when the battery needs to receive mode. If both receive mode and transmit mode will be disabled (default). (This function is used to emit an...
