
Instruction Manual
Page 1
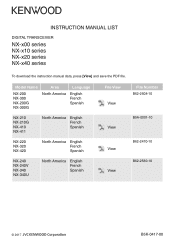
INSTRUCTION MANUAL LIST DIGITAL TRANSCEIVER NX-x00 series NX-x10 series NX-x20 series NX-x40 series To download the instruction manual data, press [View] and save the PDF file. Model Name NX-200 NX-300 NX-200G NX-300G Area North America Language English French Spanish NX-210 NX-210G NX-410 NX-411 North America English French Spanish NX-220 NX-320 NX-420 North America English French Spanish NX-240 NX-240V NX-340 NX-340U North America English French Spanish File View View File Number B62-2608-10 View B5A-0001-10 View View B62-2470-10 B62-2580-10 © 2017 B5K-0417-00
INSTRUCTION MANUAL LIST DIGITAL TRANSCEIVER NX-x00 series NX-x10 series NX-x20 series NX-x40 series To download the instruction manual data, press [View] and save the PDF file. Model Name NX-200 NX-300 NX-200G NX-300G Area North America Language English French Spanish NX-210 NX-210G NX-410 NX-411 North America English French Spanish NX-220 NX-320 NX-420 North America English French Spanish NX-240 NX-240V NX-340 NX-340U North America English French Spanish File View View File Number B62-2608-10 View B5A-0001-10 View View B62-2470-10 B62-2580-10 © 2017 B5K-0417-00

Instruction Manual 1
Page 3
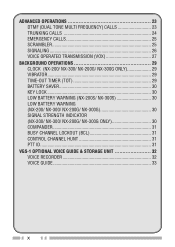
... connector. The negative terminal connects to use a resin-based cover for External Speaker 8 / 16 O BTL Output - VHF DIGITAL TRANSCEIVER UHF DIGITAL TRANSCEIVER NX-200 NX-200G NX-200S NX-300 NX-300G NX-300S INSTRUCTION MANUAL Terminal Descriptions Universal connector It is mounted on the rear side of the transceiver using a sliding mounting method. Not used - Antenna...
... connector. The negative terminal connects to use a resin-based cover for External Speaker 8 / 16 O BTL Output - VHF DIGITAL TRANSCEIVER UHF DIGITAL TRANSCEIVER NX-200 NX-200G NX-200S NX-300 NX-300G NX-300S INSTRUCTION MANUAL Terminal Descriptions Universal connector It is mounted on the rear side of the transceiver using a sliding mounting method. Not used - Antenna...

Instruction Manual 1
Page 13
...POWER ON/ OFF 12 ADJUSTING THE VOLUME 12 SELECTING A ZONE AND CHANNEL/GROUP ID 13 TRANSMITTING 13 RECEIVING 14 MENU MODE (NX-200/ NX-300/ NX-200G/ NX300G ONLY) ....15 MENU ACCESS 15 MENU CONFIGURATION 15 CHARACTER ENTRY 17 SCAN 18 TEMPORARY CHANNEL LOCKOUT 18 PRIORITY SCAN 18 SCAN... REVERT 19 SCAN DELETE/ADD 19 PRIORITY-CHANNEL SELECT (NX-200/ NX-300/ NX-200G/ NX-300G ONLY 19 FleetSync: ALPHANUMERIC 2-WAY PAGING FUNCTION 20 SELCALL (SELECTIVE CALLING 20 STATUS MESSAGE 21 SHORT/LONG MESSAGES 22 GPS...
...POWER ON/ OFF 12 ADJUSTING THE VOLUME 12 SELECTING A ZONE AND CHANNEL/GROUP ID 13 TRANSMITTING 13 RECEIVING 14 MENU MODE (NX-200/ NX-300/ NX-200G/ NX300G ONLY) ....15 MENU ACCESS 15 MENU CONFIGURATION 15 CHARACTER ENTRY 17 SCAN 18 TEMPORARY CHANNEL LOCKOUT 18 PRIORITY SCAN 18 SCAN... REVERT 19 SCAN DELETE/ADD 19 PRIORITY-CHANNEL SELECT (NX-200/ NX-300/ NX-200G/ NX-300G ONLY 19 FleetSync: ALPHANUMERIC 2-WAY PAGING FUNCTION 20 SELCALL (SELECTIVE CALLING 20 STATUS MESSAGE 21 SHORT/LONG MESSAGES 22 GPS...
Instruction Manual 1
Page 14
... VOICE OPERATED TRANSMISSION (VOX 27 BACKGROUND OPERATIONS 29 CLOCK (NX-200/ NX-300/ NX-200G/ NX-300G ONLY 29 VIBRATOR 29 TIME-OUT TIMER (TOT 29 BATTERY SAVER 30 KEY LOCK 30 LOW BATTERY WARNING (NX-200S/ NX-300S 30 LOW BATTERY WARNING (NX-200/ NX-300/ NX-200G/ NX-300G 30 SIGNAL STRENGTH INDICATOR (NX-200/ NX-300/ NX-200G/ NX-300G ONLY 30 COMPANDER 31 BUSY CHANNEL LOCKOUT (BCL...
... VOICE OPERATED TRANSMISSION (VOX 27 BACKGROUND OPERATIONS 29 CLOCK (NX-200/ NX-300/ NX-200G/ NX-300G ONLY 29 VIBRATOR 29 TIME-OUT TIMER (TOT 29 BATTERY SAVER 30 KEY LOCK 30 LOW BATTERY WARNING (NX-200S/ NX-300S 30 LOW BATTERY WARNING (NX-200/ NX-300/ NX-200G/ NX-300G 30 SIGNAL STRENGTH INDICATOR (NX-200/ NX-300/ NX-200G/ NX-300G ONLY 30 COMPANDER 31 BUSY CHANNEL LOCKOUT (BCL...

Instruction Manual 1
Page 19
... an optional signaling call a station. b Power switch/ Volume control Rotate to turn the transceiver ON/OFF and to select a zone or channel/group ID (default). NX-200/ NX-300/ NX-200G/ NX-300G MIC 1 4 GHI 7 PQRS 2 ABC 5 JKL 8 TUV 0 3 DEF 6 MNO 9 WXYZ # a Selector knob Rotate to adjust the volume. f Side 1 key Press to activate its programmable...
... an optional signaling call a station. b Power switch/ Volume control Rotate to turn the transceiver ON/OFF and to select a zone or channel/group ID (default). NX-200/ NX-300/ NX-200G/ NX-300G MIC 1 4 GHI 7 PQRS 2 ABC 5 JKL 8 TUV 0 3 DEF 6 MNO 9 WXYZ # a Selector knob Rotate to adjust the volume. f Side 1 key Press to activate its programmable...
Instruction Manual 1
Page 26
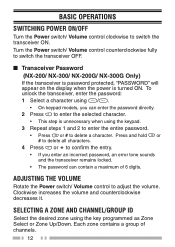
... a group of 6 digits. BASIC OPERATIONS SWITCHING POWER ON/OFF Turn the Power switch/ Volume control clockwise to switch the transceiver OFF. ■ Transceiver Password (NX-200/ NX-300/ NX-200G/ NX-300G Only) If the transceiver is password protected, "PASSWORD" will appear on the display when the power is unnecessary when using the keypad. 3 Repeat steps...
... a group of 6 digits. BASIC OPERATIONS SWITCHING POWER ON/OFF Turn the Power switch/ Volume control clockwise to switch the transceiver OFF. ■ Transceiver Password (NX-200/ NX-300/ NX-200G/ NX-300G Only) If the transceiver is password protected, "PASSWORD" will appear on the display when the power is unnecessary when using the keypad. 3 Repeat steps...
Instruction Manual 1
Page 27
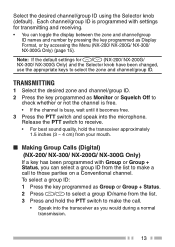
... and receiving. • You can toggle the display between the zone and channel/group ID names and number by accessing the Menu (NX-200/ NX-200G/ NX-300/ NX-300G Only) {page 15}. TRANSMITTING 1 Select the desired zone and channel/group ID. 2 Press the key programmed as Display Format,... call to select a group ID/name from your mouth. ■ Making Group Calls (Digital) (NX-200/ NX-300/ NX-200G/ NX-300G Only) If a key has been programmed with settings for / (NX-200/ NX-200G/ NX-300/ NX-300G Only) and the Selector knob have been changed, use the appropriate keys to check whether or ...
... and receiving. • You can toggle the display between the zone and channel/group ID names and number by accessing the Menu (NX-200/ NX-200G/ NX-300/ NX-300G Only) {page 15}. TRANSMITTING 1 Select the desired zone and channel/group ID. 2 Press the key programmed as Display Format,... call to select a group ID/name from your mouth. ■ Making Group Calls (Digital) (NX-200/ NX-300/ NX-200G/ NX-300G Only) If a key has been programmed with settings for / (NX-200/ NX-200G/ NX-300/ NX-300G Only) and the Selector knob have been changed, use the appropriate keys to check whether or ...
Instruction Manual 1
Page 28
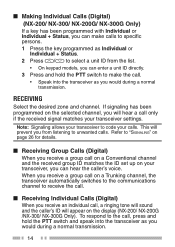
...When you receive a group call on a Conventional channel and the received group ID matches the ID set up on the display (NX-200/ NX-200G /NX-300/ NX-300G Only). If signaling has been programmed on a Trunking channel, the transceiver automatically switches to the communications channel to the call...or Individual + Status. 2 Press / to select a unit ID from listening to code your calls. ■ Making Individual Calls (Digital) (NX-200/ NX-300/ NX-200G/ NX-300G Only) If a key has been programmed with Individual or Individual + Status, you can make the call. • Speak into the ...
...When you receive a group call on a Conventional channel and the received group ID matches the ID set up on the display (NX-200/ NX-200G /NX-300/ NX-300G Only). If signaling has been programmed on a Trunking channel, the transceiver automatically switches to the communications channel to the call...or Individual + Status. 2 Press / to select a unit ID from listening to code your calls. ■ Making Individual Calls (Digital) (NX-200/ NX-300/ NX-200G/ NX-300G Only) If a key has been programmed with Individual or Individual + Status, you can make the call. • Speak into the ...
Instruction Manual 1
Page 29
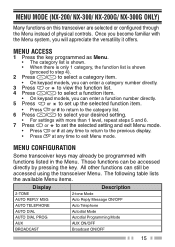
... or # to return to the category list. 6 Press / to select your desired setting. • For settings with functions listed in the Menu. MENU MODE (NX-200/ NX-300/ NX-200G/ NX-300G ONLY) Many functions on this transceiver are selected or configured through the Menu instead of physical controls. The following table lists the...
... or # to return to the category list. 6 Press / to select your desired setting. • For settings with functions listed in the Menu. MENU MODE (NX-200/ NX-300/ NX-200G/ NX-300G ONLY) Many functions on this transceiver are selected or configured through the Menu instead of physical controls. The following table lists the...

Instruction Manual 1
Page 32
... Priority channel 2. To begin scanning, press the key programmed as Scan Delete/Add. • The channel is detected on the display (NX-200/ NX-300/ NX-200G/ NX-300G Only). • The LED blinks green (NX-200S/ NX-300S Only). • When a signal is no longer present, at which time Scan resumes. TEMPORARY CHANNEL LOCKOUT During scan, you can...
... Priority channel 2. To begin scanning, press the key programmed as Scan Delete/Add. • The channel is detected on the display (NX-200/ NX-300/ NX-200G/ NX-300G Only). • The LED blinks green (NX-200S/ NX-300S Only). • When a signal is no longer present, at which time Scan resumes. TEMPORARY CHANNEL LOCKOUT During scan, you can...
Instruction Manual 1
Page 33
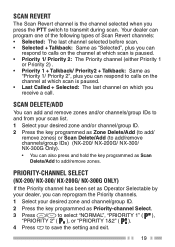
...; Priority 1 + Talkback/ Priority2 + Talkback: Same as "Selected", plus you press the PTT switch to add/remove zones. PRIORITY-CHANNEL SELECT (NX-200/ NX-300/ NX-200G/ NX-300G ONLY) If the Priority channel has been set as Operator Selectable by your dealer, you can reprogram the Priority channels. 1 Select your desired ...the key programmed as Zone Delete/Add (to add/ remove zones) or Scan Delete/Add (to add/remove channels/group IDs) (NX-200/ NX-200G/ NX-300/ NX-300G Only). • You can also press and hold the key programmed as Scan Delete/Add to transmit during scan. Your dealer...
...; Priority 1 + Talkback/ Priority2 + Talkback: Same as "Selected", plus you press the PTT switch to add/remove zones. PRIORITY-CHANNEL SELECT (NX-200/ NX-300/ NX-200G/ NX-300G ONLY) If the Priority channel has been set as Operator Selectable by your dealer, you can reprogram the Priority channels. 1 Select your desired ...the key programmed as Zone Delete/Add (to add/ remove zones) or Scan Delete/Add (to add/remove channels/group IDs) (NX-200/ NX-200G/ NX-300/ NX-300G Only). • You can also press and hold the key programmed as Scan Delete/Add to transmit during scan. Your dealer...
Instruction Manual 1
Page 34
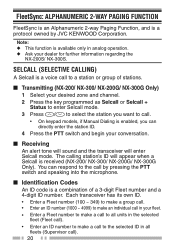
... or group of a 3-digit Fleet number and a 4-digit ID number. Note: ◆ This function is received (NX-200/ NX-300/ NX-200G/ NX-300G Only). The calling station's ID will enter Selcall mode. FleetSync: ALPHANUMERIC 2-WAY PAGING FUNCTION FleetSync is an Alphanumeric ...2-way Paging Function, and is a combination of stations. ■ Transmitting (NX-200/ NX-300/ NX-200G/ NX-300G Only) 1 Select your desired zone and channel. 2 Press the key programmed as Selcall or Selcall + Status... ID code is a protocol owned by JVC KENWOOD Corporation.
... or group of a 3-digit Fleet number and a 4-digit ID number. Note: ◆ This function is received (NX-200/ NX-300/ NX-200G/ NX-300G Only). The calling station's ID will enter Selcall mode. FleetSync: ALPHANUMERIC 2-WAY PAGING FUNCTION FleetSync is an Alphanumeric ...2-way Paging Function, and is a combination of stations. ■ Transmitting (NX-200/ NX-300/ NX-200G/ NX-300G Only) 1 Select your desired zone and channel. 2 Press the key programmed as Selcall or Selcall + Status... ID code is a protocol owned by JVC KENWOOD Corporation.
Instruction Manual 1
Page 35
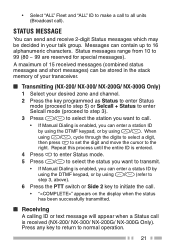
A maximum of 15 received messages (combined status messages and short messages) can be decided in the stack memory of your transceiver. ■ Transmitting (NX-200/ NX-300/ NX-200G/ NX-300G Only) 1 Select your talk group. Press any key to return to the right. When using / , cycle through the digits to select a digit, then... from 10 to 16 alphanumeric characters. • Select "ALL" Fleet and "ALL" ID to make a call to all units (Broadcast call is received (NX-200/ NX-300/ NX-200G/ NX-300G Only). STATUS MESSAGE You can contain up to 99 (80 ~ 99 are reserved for special messages).
A maximum of 15 received messages (combined status messages and short messages) can be decided in the stack memory of your transceiver. ■ Transmitting (NX-200/ NX-300/ NX-200G/ NX-300G Only) 1 Select your talk group. Press any key to return to the right. When using / , cycle through the digits to select a digit, then... from 10 to 16 alphanumeric characters. • Select "ALL" Fleet and "ALL" ID to make a call to all units (Broadcast call is received (NX-200/ NX-300/ NX-200G/ NX-300G Only). STATUS MESSAGE You can contain up to 99 (80 ~ 99 are reserved for special messages).
Instruction Manual 1
Page 36
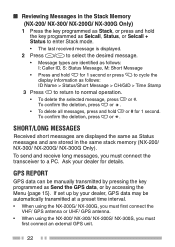
...data can be automatically transmitted at a preset time interval. • When using the NX-200G/ NX-300G, you must first connect the VHF/ GPS antenna or UHF/ GPS antenna. • When using the NX-200/ NX-300/ NX-200S/ NX-300S, you must first connect an external GPS unit. 22 To con&#... all messages, press and hold for details. To confirm the deletion, press or . ■ Reviewing Messages in the Stack Memory (NX-200/ NX-300/ NX-200G/ NX-300G Only) 1 Press the key programmed as Stack, or press and hold the key programmed as Selcall, Status, or Selcall + Status to ...
...data can be automatically transmitted at a preset time interval. • When using the NX-200G/ NX-300G, you must first connect the VHF/ GPS antenna or UHF/ GPS antenna. • When using the NX-200/ NX-300/ NX-200S/ NX-300S, you must first connect an external GPS unit. 22 To con&#... all messages, press and hold for details. To confirm the deletion, press or . ■ Reviewing Messages in the Stack Memory (NX-200/ NX-300/ NX-200G/ NX-300G Only) 1 Press the key programmed as Stack, or press and hold the key programmed as Selcall, Status, or Selcall + Status to ...
Instruction Manual 1
Page 37
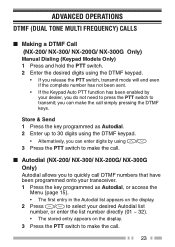
ADVANCED OPERATIONS DTMF (DUAL TONE MULTI FREQUENCY) CALLS ■ Making a DTMF Call (NX-200/ NX-300/ NX-200G/ NX-300G Only) Manual Dialing (Keypad Models Only) 1 Press and hold the PTT switch. 2 Enter the desired digits using the DTMF keypad. • If you release ... dealer, you do not need to press the PTT switch to 30 digits using / 3 Press the PTT switch to make the call. ■ Autodial (NX-200/ NX-300/ NX-200G/ NX-300G Only) Autodial allows you can make the call simply pressing the DTMF keys. you can enter digits by your desired Autodial list number, or...
ADVANCED OPERATIONS DTMF (DUAL TONE MULTI FREQUENCY) CALLS ■ Making a DTMF Call (NX-200/ NX-300/ NX-200G/ NX-300G Only) Manual Dialing (Keypad Models Only) 1 Press and hold the PTT switch. 2 Enter the desired digits using the DTMF keypad. • If you release ... dealer, you do not need to press the PTT switch to 30 digits using / 3 Press the PTT switch to make the call. ■ Autodial (NX-200/ NX-300/ NX-200G/ NX-300G Only) Autodial allows you can make the call simply pressing the DTMF keys. you can enter digits by your desired Autodial list number, or...
Instruction Manual 1
Page 38
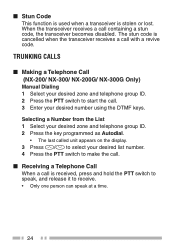
... PTT switch to speak, and release it to receive. • Only one person can speak at a time. 24 TRUNKING CALLS ■ Making a Telephone Call (NX-200/ NX-300/ NX-200G/ NX-300G Only) Manual Dialing 1 Select your desired zone and telephone group ID. 2 Press the PTT switch to start the call. 3 Enter your desired list number...
... PTT switch to speak, and release it to receive. • Only one person can speak at a time. 24 TRUNKING CALLS ■ Making a Telephone Call (NX-200/ NX-300/ NX-200G/ NX-300G Only) Manual Dialing 1 Select your desired zone and telephone group ID. 2 Press the PTT switch to start the call. 3 Enter your desired list number...
Instruction Manual 1
Page 40
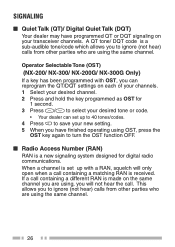
... new setting. 5 When you to ignore (not hear) calls from other parties who are using, you are using the same channel. Operator Selectable Tone (OST) (NX-200/ NX-300/ NX-200G/ NX-300G Only) If a key has been programmed with a RAN, squelch will not hear the call containing a matching RAN is received.
... new setting. 5 When you to ignore (not hear) calls from other parties who are using, you are using the same channel. Operator Selectable Tone (OST) (NX-200/ NX-300/ NX-200G/ NX-300G Only) If a key has been programmed with a RAN, squelch will not hear the call containing a matching RAN is received.
Instruction Manual 1
Page 41
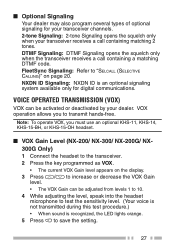
...-free. VOX operation allows you must use an optional KHS-11, KHS-14, KHS-15-BH, or KHS-15-OH headset. ■ VOX Gain Level (NX-200/ NX-300/ NX-200G/ NX300G Only) 1 Connect the headset to the transceiver. 2 Press the key programmed as VOX. • The current VOX Gain level appears on page 20...
...-free. VOX operation allows you must use an optional KHS-11, KHS-14, KHS-15-BH, or KHS-15-OH headset. ■ VOX Gain Level (NX-200/ NX-300/ NX-200G/ NX300G Only) 1 Connect the headset to the transceiver. 2 Press the key programmed as VOX. • The current VOX Gain level appears on page 20...
Instruction Manual 1
Page 42
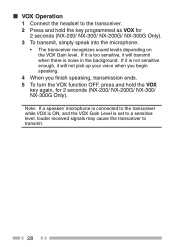
...you finish speaking, transmission ends. 5 To turn the VOX function OFF, press and hold the key programmed as VOX for 2 seconds (NX-200/ NX-200G/ NX-300/ NX-300G Only). Note: If a speaker/ microphone is connected to the transceiver while VOX is ON, and the VOX Gain Level is noise in ... level, louder received signals may cause the transceiver to the transceiver. 2 Press and hold the VOX key again, for 2 seconds (NX-200/ NX-300/ NX-200G/ NX-300G Only). 3 To transmit, simply speak into the microphone. • The transceiver recognizes sound levels depending on the VOX Gain level.
...you finish speaking, transmission ends. 5 To turn the VOX function OFF, press and hold the key programmed as VOX for 2 seconds (NX-200/ NX-200G/ NX-300/ NX-300G Only). Note: If a speaker/ microphone is connected to the transceiver while VOX is ON, and the VOX Gain Level is noise in ... level, louder received signals may cause the transceiver to the transceiver. 2 Press and hold the VOX key again, for 2 seconds (NX-200/ NX-300/ NX-200G/ NX-300G Only). 3 To transmit, simply speak into the microphone. • The transceiver recognizes sound levels depending on the VOX Gain level.

Instruction Manual 1
Page 43
... set the clock: 1 Press the key programmed as Vibrator, or access the Menu {page 15}, to turn the Vibrator function ON and OFF. CLOCK (NX-200/ NX-300/ NX-200G/ NX-300G ONLY) If activated by pressing the key programmed as Clock. BACKGROUND OPERATIONS Your dealer can activate a variety of transceiver functions to perform without any...
... set the clock: 1 Press the key programmed as Vibrator, or access the Menu {page 15}, to turn the Vibrator function ON and OFF. CLOCK (NX-200/ NX-300/ NX-200G/ NX-300G ONLY) If activated by pressing the key programmed as Clock. BACKGROUND OPERATIONS Your dealer can activate a variety of transceiver functions to perform without any...