
Use and Care Guide
Page 2
... a vertical position. SAVE THESE INSTRUCTIONS 2 GB/KW85 18-11-2003 14:02 Pagina 2 Important safeguards • Use this appliance only as possible. As with any doubts check with the unit. • Before cleaning or maintenance operations, always unplug the unit from children. • In the case that the power cord becomes damaged, this must be installed in the special containers for...
... a vertical position. SAVE THESE INSTRUCTIONS 2 GB/KW85 18-11-2003 14:02 Pagina 2 Important safeguards • Use this appliance only as possible. As with any doubts check with the unit. • Before cleaning or maintenance operations, always unplug the unit from children. • In the case that the power cord becomes damaged, this must be installed in the special containers for...
Use and Care Guide
Page 3
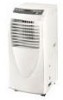
In normal conditions, the filter should be operated in the home, office, etc. GB/KW85 18-11-2003 14:02 Pagina 3 Introduction The portable air conditioner is cleaned. 3 The fil- Air quality thus depends on impedance values. The appliance has been designed for regulating air temperature and humidity. It must be used in multiple modes including cooling, dehumidifying and ventilating. It can be cleaned about every...
In normal conditions, the filter should be operated in the home, office, etc. GB/KW85 18-11-2003 14:02 Pagina 3 Introduction The portable air conditioner is cleaned. 3 The fil- Air quality thus depends on impedance values. The appliance has been designed for regulating air temperature and humidity. It must be used in multiple modes including cooling, dehumidifying and ventilating. It can be cleaned about every...
Use and Care Guide
Page 4
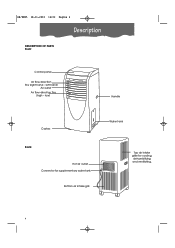
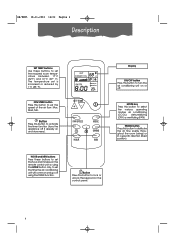
GB/KW85 18-11-2003 14:02 Pagina 4 Description DESCRIPTION OF PARTS Front Control panel Air flow direction fins (right hand - left hand) Air outlet Air flow direction fins (high - low) Handle Castors Back Hot air outlet Connector for supplementary water tank Bottom air intake grill Water tank Top air intake grille for cooling, dehumidifying and ventilating. 4
GB/KW85 18-11-2003 14:02 Pagina 4 Description DESCRIPTION OF PARTS Front Control panel Air flow direction fins (right hand - left hand) Air outlet Air flow direction fins (high - low) Handle Castors Back Hot air outlet Connector for supplementary water tank Bottom air intake grill Water tank Top air intake grille for cooling, dehumidifying and ventilating. 4
Use and Care Guide
Page 5
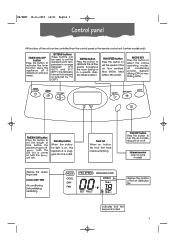
... light is plugged into the outlet. SET TEMP buttons These buttons can be used to set the required room temperature in a specific direction (fixed position). GB/KW85 18-11-2003 14:02 Pagina 5 Control panel All functions of the unit can be controlled from the control panel or the remote control unit (certain models only). The temperature set the speed of the air distribution fins F Indicates that the tank needs emptying ON/OFF button Press this button to turn the air conditioning unit...
... light is plugged into the outlet. SET TEMP buttons These buttons can be used to set the required room temperature in a specific direction (fixed position). GB/KW85 18-11-2003 14:02 Pagina 5 Control panel All functions of the unit can be controlled from the control panel or the remote control unit (certain models only). The temperature set the speed of the air distribution fins F Indicates that the tank needs emptying ON/OFF button Press this button to turn the air conditioning unit...
Use and Care Guide
Page 6
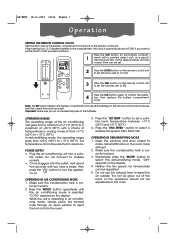
... remote control unit or, using the TIMER function. Button Press this button to select the various operating modes: air conditioning (COOL), dehumidifying (DRY) or ventilating (FAN). SWING button Press this button to turn the air conditioning unit on and vice versa). 68 °F : +- MODE key Press this button to activate the timer function (turns the appliance off if already on or off using the HOUR button only, to set the time the air conditioning unit will come on the control panel. 6 Display ON/OFF button...
... remote control unit or, using the TIMER function. Button Press this button to select the various operating modes: air conditioning (COOL), dehumidifying (DRY) or ventilating (FAN). SWING button Press this button to turn the air conditioning unit on and vice versa). 68 °F : +- MODE key Press this button to activate the timer function (turns the appliance off if already on or off using the HOUR button only, to set the time the air conditioning unit will come on the control panel. 6 Display ON/OFF button...
Use and Care Guide
Page 7
...:02 Pagina 7 Operation SETTING THE REMOTE CONTROL CLOCK Remove the cover of the battery compartment on the back of the room more efficient. 2. After inserting two 1.5 V alkaline batteries in the battery compart- 1 ment) with a choice of temperatures in place. 3. POWER SUPPLY • Plug the air conditioning unit into the outlet, wait about two seconds until the air conditioning mode is operating in advance. Press the "MODE" button repeatedly until...
...:02 Pagina 7 Operation SETTING THE REMOTE CONTROL CLOCK Remove the cover of the battery compartment on the back of the room more efficient. 2. After inserting two 1.5 V alkaline batteries in the battery compart- 1 ment) with a choice of temperatures in place. 3. POWER SUPPLY • Plug the air conditioning unit into the outlet, wait about two seconds until the air conditioning mode is operating in advance. Press the "MODE" button repeatedly until...
Use and Care Guide
Page 8
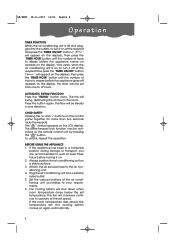
... (but plug- If the room temperature rises above the temperature set from one direction. The timer can be activated on the remote control unit by pressing the " " button. AUTOMATIC SWING FUNCTION Press the "SWING" button once. Always position the air conditioning unit on the LCD display. Attach the air exhaust hose to the air conditioning unit. 4. Vice versa, when the air conditioning unit is off appears on the display. ged into a suitably rated outlet. 5. Press the button again...
... (but plug- If the room temperature rises above the temperature set from one direction. The timer can be activated on the remote control unit by pressing the " " button. AUTOMATIC SWING FUNCTION Press the "SWING" button once. Always position the air conditioning unit on the LCD display. Attach the air exhaust hose to the air conditioning unit. 4. Vice versa, when the air conditioning unit is off appears on the display. ged into a suitably rated outlet. 5. Press the button again...
Use and Care Guide
Page 9
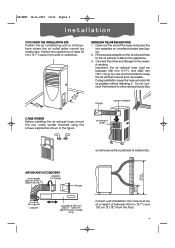
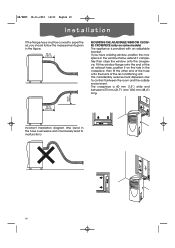
... mm (19.7") and 2000 mm (78.7") long. Connect the other exhaust ducts (flue Flange square adapter CABLE WINDER Before installing the air exhaust hose, mount the two cable winder brackets using the screws supplied as shown in ) adapter crosspiece 675 mm (26.5") - 1230 mm (48.4") (some models only) Correct wall installation: the hole must be at least 50 cm (19.7") away from the floor...
... mm (19.7") and 2000 mm (78.7") long. Connect the other exhaust ducts (flue Flange square adapter CABLE WINDER Before installing the air exhaust hose, mount the two cable winder brackets using the screws supplied as shown in ) adapter crosspiece 675 mm (26.5") - 1230 mm (48.4") (some models only) Correct wall installation: the hole must be at least 50 cm (19.7") away from the floor...
Use and Care Guide
Page 10
...bracket. If you should follow the measurements given in the figure: 50 cm (19.7 in) MOUNTING THE ADJUSTABLE WINDOW CLOSURE CROSSPIECE (only on the hole in the window frame, extend it on some models) The appliance is 40 mm (1.5") wide and between the room and the outside environment. Fit the window flange onto the end of the air exhaust hose...installation diagram (the bend in the hose is excessive and could easily lead to expel the air, you have a sliding window, position the crosspiece in the crosspiece, then fit the other end of the hose onto the back of the air conditioning unit...
...bracket. If you should follow the measurements given in the figure: 50 cm (19.7 in) MOUNTING THE ADJUSTABLE WINDOW CLOSURE CROSSPIECE (only on the hole in the window frame, extend it on some models) The appliance is 40 mm (1.5") wide and between the room and the outside environment. Fit the window flange onto the end of the air exhaust hose...installation diagram (the bend in the hose is excessive and could easily lead to expel the air, you have a sliding window, position the crosspiece in the crosspiece, then fit the other end of the hose onto the back of the air conditioning unit...

Use and Care Guide
Page 11
... to FAN mode. 2. The unit will sound indicating that the compressor has stopped. Remove the cap from the tube and con- While the air conditioning unit is operating in air conditioning or dehumidifying mode, do not extract the condensation tank before it is completely full, the unit must be stopped by turning it off or operating it is full, otherwise a buzzer will switch to drain the condensation continuously. CONTINUOUS CONDENSATION DRAINAGE To drain condensation continuously...
... to FAN mode. 2. The unit will sound indicating that the compressor has stopped. Remove the cap from the tube and con- While the air conditioning unit is operating in air conditioning or dehumidifying mode, do not extract the condensation tank before it is completely full, the unit must be stopped by turning it off or operating it is full, otherwise a buzzer will switch to drain the condensation continuously. CONTINUOUS CONDENSATION DRAINAGE To drain condensation continuously...
Use and Care Guide
Page 12
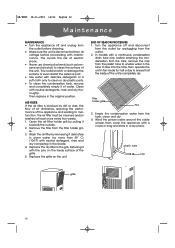
...;F) with maintenance. Clean with the pins on the unit. Then replace in the shade. 4. AIR FILTER If the air filter is completely dry. Remove the filter from the plastic tube to enable water in the tube to flow into the tank, then operate the unit in the grill, fastening it of water. Replace the dry filter in fan mode for half a day to clean or dry plastic parts. • To clean the condensation tank, remove and completely...
...;F) with maintenance. Clean with the pins on the unit. Then replace in the shade. 4. AIR FILTER If the air filter is completely dry. Remove the filter from the plastic tube to enable water in the tube to flow into the tank, then operate the unit in the grill, fastening it of water. Replace the dry filter in fan mode for half a day to clean or dry plastic parts. • To clean the condensation tank, remove and completely...
Use and Care Guide
Page 13
... through the exhaust hose correctly or does the hose follow a correct path? • Other exhausts have been connected together on the same hose • Try and keep the air exhaust hose in the room • If the air filter is very dirty • If the temperature set (SET TEMP) is not correct • clean and free from obstructions • move the heat source • clean the air filter • set the fan speed...
... through the exhaust hose correctly or does the hose follow a correct path? • Other exhausts have been connected together on the same hose • Try and keep the air exhaust hose in the room • If the air filter is very dirty • If the temperature set (SET TEMP) is not correct • clean and free from obstructions • move the heat source • clean the air filter • set the fan speed...
Use and Care Guide
Page 14
... unit. All AIR CONDITIONERS in need of Kenwood home appliances. GB/KW85 18-11-2003 14:02 Pagina 14 Limited Warranty De'Longhi is used in accordance with the factory directions that accompany it apply to misuse, negligence or accidents. This warranty shall apply only if the AIR CONDITIONER is the distributor of repair are to all other obligations or liabilities on our part...
... unit. All AIR CONDITIONERS in need of Kenwood home appliances. GB/KW85 18-11-2003 14:02 Pagina 14 Limited Warranty De'Longhi is used in accordance with the factory directions that accompany it apply to misuse, negligence or accidents. This warranty shall apply only if the AIR CONDITIONER is the distributor of repair are to all other obligations or liabilities on our part...


