
User Manual
Page 1
... remote control supplied with this model has several operation modes. Using the remote control without completely understanding its operation modes (etc.). AUDIO VIDEO SURROUND RECEIVER KRF-X9090D INSTRUCTION MANUAL About the supplied remote control Compared to control other audio/video components.
... remote control supplied with this model has several operation modes. Using the remote control without completely understanding its operation modes (etc.). AUDIO VIDEO SURROUND RECEIVER KRF-X9090D INSTRUCTION MANUAL About the supplied remote control Compared to control other audio/video components.

User Manual
Page 2
...front panel or case becomes dirty, wipe with the symbol (crossed-out wheeled bin)cannot be disposed as follows. Since this manual for the correct connections. Remote Control Shows you . NO USER-SERVICEABLE PARTS INSIDE. THE EXCLAMATION POINT WITHIN AN EQUILATERAL TRIANGLE... careful not to use this page carefully to contact cleaner Do not use thinner, benzine, alcohol, etc. Caution : Read this manual This manual is divided into four sections, Preparations, Operations, Remote Control, and Additional Information. Operations Shows you additional information such as a detailed...
...front panel or case becomes dirty, wipe with the symbol (crossed-out wheeled bin)cannot be disposed as follows. Since this manual for the correct connections. Remote Control Shows you . NO USER-SERVICEABLE PARTS INSIDE. THE EXCLAMATION POINT WITHIN AN EQUILATERAL TRIANGLE... careful not to use this page carefully to contact cleaner Do not use thinner, benzine, alcohol, etc. Caution : Read this manual This manual is divided into four sections, Preparations, Operations, Remote Control, and Additional Information. Operations Shows you additional information such as a detailed...

User Manual
Page 3
... for surround sound 19 Before setting up the speakers 19 Setting up the speakers automatically (AUTO SETUP) "Kenwood Room Acoustic Calibration 20 Setting up the speakers manually (MANUAL SETUP 22 Other settings 24 Operations Normal playback 26 Preparing for playback 26 Listening to a source component 26... video 29 Listening to radio broadcasts 30 Tuning (non-RDS) radio stations 30 Using RDS (Radio Data System 30 Presetting radio stations manually 31 Receiving preset stations 31 Receiving preset stations in order (P.CALL) ... 31 Using the RDS DISP (Display) key 32 Presetting RDS...
... for surround sound 19 Before setting up the speakers 19 Setting up the speakers automatically (AUTO SETUP) "Kenwood Room Acoustic Calibration 20 Setting up the speakers manually (MANUAL SETUP 22 Other settings 24 Operations Normal playback 26 Preparing for playback 26 Listening to a source component 26... video 29 Listening to radio broadcasts 30 Tuning (non-RDS) radio stations 30 Using RDS (Radio Data System 30 Presetting radio stations manually 31 Receiving preset stations 31 Receiving preset stations in order (P.CALL) ... 31 Using the RDS DISP (Display) key 32 Presetting RDS...

User Manual
Page 4
... than before, replace both batteries with new ones. 3. If the unit was shipped to you need to move or ship the unit in the future. Kenwood recommends that all accessories are missing, or if the unit is lit, the power turns ON when you want to prevent malfunction. 4 EN Operating range.... Microphone for future reference. • Insert two AAA-size (R03) batteries as indicated by leaving an interval of the system installation to operate. Keep this manual handy for SETUP (1) (Cord length: approx. 5m) If any accessories are present.
... than before, replace both batteries with new ones. 3. If the unit was shipped to you need to move or ship the unit in the future. Kenwood recommends that all accessories are missing, or if the unit is lit, the power turns ON when you want to prevent malfunction. 4 EN Operating range.... Microphone for future reference. • Insert two AAA-size (R03) batteries as indicated by leaving an interval of the system installation to operate. Keep this manual handy for SETUP (1) (Cord length: approx. 5m) If any accessories are present.
User Manual
Page 5
...; Dolby Virtual Speaker • Dolby Headphone • DTS-ES • DTS Neo:6 • DTS 96/24 • DTS • DSP Mode Kenwood Room Acoustic Calibration ) Without going through a complicated manual setup procedure, this function automatically measures the capacity of your speaker system, speaker layout and acoustic specifications of your listening room correctly...
...; Dolby Virtual Speaker • Dolby Headphone • DTS-ES • DTS Neo:6 • DTS 96/24 • DTS • DSP Mode Kenwood Room Acoustic Calibration ) Without going through a complicated manual setup procedure, this function automatically measures the capacity of your speaker system, speaker layout and acoustic specifications of your listening room correctly...

User Manual
Page 6
..., L-AUDIO-R) jacks * Standby mode While the standby indicator is lit, a small amount of the DSP mode. DSP key ° Use to select the auto or manual tuning mode. ! AUTO/MONO key º Use to select any of power is turned ON. This is called standby mode.
..., L-AUDIO-R) jacks * Standby mode While the standby indicator is lit, a small amount of the DSP mode. DSP key ° Use to select the auto or manual tuning mode. ! AUTO/MONO key º Use to select any of power is turned ON. This is called standby mode.
User Manual
Page 7
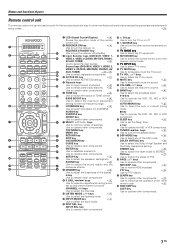
.... @ DISC SEL. LOUDNESS key • Use to switch the status of the display. 8 key Use to memorize the operation of the other non-Kenwood products by setting the appropriate manufacturer's setup codes. INPUT MODE key 8 Use to receive RDS broadcast. RDS DISP. e Use to operate other source components... ambience effects. 8 DIMMER key w Use to operate other components. key INPUT SEL. AUTO/MONO key º Use to select the auto or manual tuning mode. 7 key Use to operate the DVD, CD, MD or VCR component. £ SLEEP key w Use to select the speakers' settings etc....
.... @ DISC SEL. LOUDNESS key • Use to switch the status of the display. 8 key Use to memorize the operation of the other non-Kenwood products by setting the appropriate manufacturer's setup codes. INPUT MODE key 8 Use to receive RDS broadcast. RDS DISP. e Use to operate other source components... ambience effects. 8 DIMMER key w Use to operate other components. key INPUT SEL. AUTO/MONO key º Use to select the auto or manual tuning mode. 7 key Use to operate the DVD, CD, MD or VCR component. £ SLEEP key w Use to select the speakers' settings etc....

User Manual
Page 8
...These cables transfer stereo audio signal in the following items will be sure to refer to play mode 1 FULL AUTO (digital input, analog input) 2 DIGITAL MANUAL (digital input) 3 6CH INPUT (DVD/6CH input only) 4 ANALOG (analog input) Auto detect: In FULL AUTO mode ("AUTO DETECT" indicator lights ... MODE key again. Setting up the system Make connections as follows: In DTS play mode 1 FULL AUTO (digital input, analog input) 2 DIGITAL MANUAL (digital input) In CD/DVD, VIDEO 2, VIDEO 3 or DVD/6CH play analog signals from a VCR, etc. Plugging/unplugging connection cords without disconnecting...
...These cables transfer stereo audio signal in the following items will be sure to refer to play mode 1 FULL AUTO (digital input, analog input) 2 DIGITAL MANUAL (digital input) 3 6CH INPUT (DVD/6CH input only) 4 ANALOG (analog input) Auto detect: In FULL AUTO mode ("AUTO DETECT" indicator lights ... MODE key again. Setting up the system Make connections as follows: In DTS play mode 1 FULL AUTO (digital input, analog input) 2 DIGITAL MANUAL (digital input) In CD/DVD, VIDEO 2, VIDEO 3 or DVD/6CH play analog signals from a VCR, etc. Plugging/unplugging connection cords without disconnecting...

User Manual
Page 19
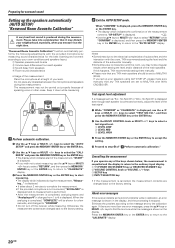
... the SETUP mode. Preparing for surround sound Before setting up the speakers automatically (AUTO SETUP)", connect the provided microphone for the following displays. 1 AUTO SETUP 2 MANUAL SETUP 3 SW RE-MIX 4 CROSSOVER 5 SB SPACING 6 BASS PEAK 7 LFE LEVEL 8 AUDIO DELAY 9 DISPLAY MODE 0 SETTING LOCK - Following the procedure below, go ... optimum surround playback, variety of the SETUP is as follows: AUTO SETUP CALIBRATE START Measuring Analyzing COMPLETE CONFIRM TEST SIG LVL RETURN MANUAL SETUP RETURN ERROR MESSAGE WARNING MESSAGE SP SETUP SP LEVEL SP DISTANCE RETURN SW RE-MIX T.
... the SETUP mode. Preparing for surround sound Before setting up the speakers automatically (AUTO SETUP)", connect the provided microphone for the following displays. 1 AUTO SETUP 2 MANUAL SETUP 3 SW RE-MIX 4 CROSSOVER 5 SB SPACING 6 BASS PEAK 7 LFE LEVEL 8 AUDIO DELAY 9 DISPLAY MODE 0 SETTING LOCK - Following the procedure below, go ... optimum surround playback, variety of the SETUP is as follows: AUTO SETUP CALIBRATE START Measuring Analyzing COMPLETE CONFIRM TEST SIG LVL RETURN MANUAL SETUP RETURN ERROR MESSAGE WARNING MESSAGE SP SETUP SP LEVEL SP DISTANCE RETURN SW RE-MIX T.
User Manual
Page 20
... voice or other noise. When the analyzing is stopped. Eliminate the problem according to the "CALIBRATE" display. 20 EN "Kenwood Room Acoustic Calibration" function automatically performs the following adjustments with the provided microphone by measuring sound characteristics for the best listening environment...you may not be shown for a few seconds, and changed back to the factory setting. If this happens, THX recommends setting them manually. • Please note that it may disturb your room conditions and speakers layout. 1 Speaker presence and its size 2 Volume level ...
... voice or other noise. When the analyzing is stopped. Eliminate the problem according to the "CALIBRATE" display. 20 EN "Kenwood Room Acoustic Calibration" function automatically performs the following adjustments with the provided microphone by measuring sound characteristics for the best listening environment...you may not be shown for a few seconds, and changed back to the factory setting. If this happens, THX recommends setting them manually. • Please note that it may disturb your room conditions and speakers layout. 1 Speaker presence and its size 2 Volume level ...

User Manual
Page 22
Setting up the speakers manually (MANUAL SETUP) 1 Select a speaker system. SP MUTE L C SW R A B CLIP LFE SL SB SR STEREO 5 Use the MULTI CONTROL knob or MULTI %/fi keys to select the .... 3 CNTR OFF : A Center Speaker is not connected. If you have a set them to NML/THX. 1 Press the 5/∞ keys or MULTI @/# keys to select the "MANUAL SETUP" and press the MEMORY/ENTER key or the ENTER key. 2 Select the "SP SETUP" and press the MEMORY/ENTER key or the ENTER key...
Setting up the speakers manually (MANUAL SETUP) 1 Select a speaker system. SP MUTE L C SW R A B CLIP LFE SL SB SR STEREO 5 Use the MULTI CONTROL knob or MULTI %/fi keys to select the .... 3 CNTR OFF : A Center Speaker is not connected. If you have a set them to NML/THX. 1 Press the 5/∞ keys or MULTI @/# keys to select the "MANUAL SETUP" and press the MEMORY/ENTER key or the ENTER key. 2 Select the "SP SETUP" and press the MEMORY/ENTER key or the ENTER key...

User Manual
Page 23
...; When the setting "SURR OFF" is almost the same. • Indicators appear only for the channels of the speakers selected in order. 2 T.TONE MANUAL : Adjust the volume level from each speaker by using test tone. 3 T.TONE OFF : Adjust the volume level from each speaker without using test tone.... ENTER key to return to the "SP LEVEL" display. 3 After selecting "T.TONE AUTO" or "T.TONE MANUAL", press the MEMORY/ENTER key or the ENTER key to the receiver. For "T.TONE MANUAL" selection, press the 5/∞ keys or MULTI @/# keys each time to select appropriate Surround Back Speaker ...
...; When the setting "SURR OFF" is almost the same. • Indicators appear only for the channels of the speakers selected in order. 2 T.TONE MANUAL : Adjust the volume level from each speaker by using test tone. 3 T.TONE OFF : Adjust the volume level from each speaker without using test tone.... ENTER key to return to the "SP LEVEL" display. 3 After selecting "T.TONE AUTO" or "T.TONE MANUAL", press the MEMORY/ENTER key or the ENTER key to the receiver. For "T.TONE MANUAL" selection, press the 5/∞ keys or MULTI @/# keys each time to select appropriate Surround Back Speaker ...

User Manual
Page 24
... Distance to Surround Left (SL) : ____ meters (feet) Distance to Subwoofer (SW) : ____ meters (feet) • If you have been correctly selected. 4 Exit the MANUAL SETUP mode. 1 Press the 5/∞ keys or MULTI @/# keys to select the "RETURN" SP MUTE L R A B CLIP STEREO SL S SB SR 2 Press the ...MEMORY/ENTER key or the ENTER key to return to the "MANUAL SETUP" display. SP MUTE L R A B CLIP STEREO 3 Press the MEMORY/ENTER key or the ENTER key to select the appropriate Subwoofer re-mix setting. ...
... Distance to Surround Left (SL) : ____ meters (feet) Distance to Subwoofer (SW) : ____ meters (feet) • If you have been correctly selected. 4 Exit the MANUAL SETUP mode. 1 Press the 5/∞ keys or MULTI @/# keys to select the "RETURN" SP MUTE L R A B CLIP STEREO SL S SB SR 2 Press the ...MEMORY/ENTER key or the ENTER key to return to the "MANUAL SETUP" display. SP MUTE L R A B CLIP STEREO 3 Press the MEMORY/ENTER key or the ENTER key to select the appropriate Subwoofer re-mix setting. ...

User Manual
Page 25
... ms increments. • Delay is not applied when TUNER, MD/TAPE, PHONO or 6CH INPUT is selected as an input, or AUTO REC MODE or MANUAL REC MODE is selected. • When in 1dB decrements. 3 Press the MEMORY/ENTER key or the ENTER key to accept the setting. 8 Lock the settings...
... ms increments. • Delay is not applied when TUNER, MD/TAPE, PHONO or 6CH INPUT is selected as an input, or AUTO REC MODE or MANUAL REC MODE is selected. • When in 1dB decrements. 3 Press the MEMORY/ENTER key or the ENTER key to accept the setting. 8 Lock the settings...

User Manual
Page 29
... MUTE AUTO DETECT DIGITAL L C R A B CLIP LFE SL S SB SR STEREO SP MUTE AUTO DETECT DIGITAL L C R A B CLIP LFE SL S SB SR For REC MODE MANUAL : SP MUTE L C R A B CLIP LFE SL S SB SR DIGITAL STEREO STEREO DIMMER Input Selector keys INPUT SELECTOR SP MUTE L C R A B CLIP LFE SL S SB ...not be normal for recording. tal, or PCM) are identified automatically and converted into stereo signals that are ready for recording. 3 REC MODE MANUAL : The digital input signals (DTS, Dolby Digital, or PCM) are identified and converted into stereo signals that are ready for some video ...
... MUTE AUTO DETECT DIGITAL L C R A B CLIP LFE SL S SB SR STEREO SP MUTE AUTO DETECT DIGITAL L C R A B CLIP LFE SL S SB SR For REC MODE MANUAL : SP MUTE L C R A B CLIP LFE SL S SB SR DIGITAL STEREO STEREO DIMMER Input Selector keys INPUT SELECTOR SP MUTE L C R A B CLIP LFE SL S SB ...not be normal for recording. tal, or PCM) are identified automatically and converted into stereo signals that are ready for recording. 3 REC MODE MANUAL : The digital input signals (DTS, Dolby Digital, or PCM) are identified and converted into stereo signals that are ready for some video ...

User Manual
Page 30
...(auto tuning). Radio Text function Displays the radio text data transmitted by the RDS station. DTS. DOLBY DIGITAL STEREO NEO:6 THX ACTIVE EQ. Manual tuning : Turn the knob or use with the broadcast signal. "AUTO" indicator lights up to 40 RDS stations in the display. Tuners and...in the form of the station name. STEREO RDS RTY AUTO Using RDS (Radio Data System) RDS is a lot of interference, switch to manual tuning. (With manual tuning, stereo broadcasts will be classified into RDS (Radio Data System) stations and other stations. MATRIX R A B CLIP COAXIAL ANALOG 96kHzfs ...
...(auto tuning). Radio Text function Displays the radio text data transmitted by the RDS station. DTS. DOLBY DIGITAL STEREO NEO:6 THX ACTIVE EQ. Manual tuning : Turn the knob or use with the broadcast signal. "AUTO" indicator lights up to 40 RDS stations in the display. Tuners and...in the form of the station name. STEREO RDS RTY AUTO Using RDS (Radio Data System) RDS is a lot of interference, switch to manual tuning. (With manual tuning, stereo broadcasts will be classified into RDS (Radio Data System) stations and other stations. MATRIX R A B CLIP COAXIAL ANALOG 96kHzfs ...

User Manual
Page 31
... preset station you want to receive (up to store. 2 Press the MEMORY/ENTER key while receiving the station. Listening to radio broadcasts Presetting radio stations manually The RDS auto memory function assigns preset numbers to manually store AM stations and other FM stations, and RDS stations.
... preset station you want to receive (up to store. 2 Press the MEMORY/ENTER key while receiving the station. Listening to radio broadcasts Presetting radio stations manually The RDS auto memory function assigns preset numbers to manually store AM stations and other FM stations, and RDS stations.

User Manual
Page 35
... DVD software. All models are surrounded by increasing the impression of sound echoing in real life. For best results, Dolby Digital EX should be activated manually. Compared with ordinary DVDs and CDs. Although Dolby Digital soundtracks incorporate a separate low frequency channel, connecting a subwoofer will be decoded inside most important is done...
... DVD software. All models are surrounded by increasing the impression of sound echoing in real life. For best results, Dolby Digital EX should be activated manually. Compared with ordinary DVDs and CDs. Although Dolby Digital soundtracks incorporate a separate low frequency channel, connecting a subwoofer will be decoded inside most important is done...

User Manual
Page 36
... what the director intended. In a movie theatre, there is an array of ambient and directional surround sounds. THX Select 2 Before any home theatre component can manually select the THX Surround EX playback mode, otherwise THX Select 2 Cinema mode will be played back in your home theater system using all 5.1 encoded music...
... what the director intended. In a movie theatre, there is an array of ambient and directional surround sounds. THX Select 2 Before any home theatre component can manually select the THX Surround EX playback mode, otherwise THX Select 2 Cinema mode will be played back in your home theater system using all 5.1 encoded music...

User Manual
Page 62
... correctly. • Connect it properly referring to "Connecting the speakers". % • Set it left the factory. If this • Set the input mode to digital manual before using the test tone. £ A humming noise is generated when the PHONO input selector is selected. • The audio cord from the record player... SPEAKERS switches to ON. § • Unplug the headphones plug. • The STANDBY indicator blinks and sound is • Speaker cords are set to digital manual.
... correctly. • Connect it properly referring to "Connecting the speakers". % • Set it left the factory. If this • Set the input mode to digital manual before using the test tone. £ A humming noise is generated when the PHONO input selector is selected. • The audio cord from the record player... SPEAKERS switches to ON. § • Unplug the headphones plug. • The STANDBY indicator blinks and sound is • Speaker cords are set to digital manual.
