
Use and Care Guide
Page 1
Litho USA A/01/06 Part No. 12842123 www.maytag.com ©2006 Maytag Appliances Sales Co. Side-by-Side R Table of Contents Important Safety Instructions ..... 1-2 Installation 3-7 Temperature Controls 8-10 Fresh Food Features 11-14 Freezer Features 15 Ice and Water 16-18 Water Filter 19-21 Use & Care Guide Food Storage Tips 22-24 Care and Cleaning 25-28 Operating Sounds 29 Troubleshooting 30-33 Warranty & Service 35 Guide d'utilisation et d'entretien . 36 Guía de uso y cuidado 74 Form No.
Litho USA A/01/06 Part No. 12842123 www.maytag.com ©2006 Maytag Appliances Sales Co. Side-by-Side R Table of Contents Important Safety Instructions ..... 1-2 Installation 3-7 Temperature Controls 8-10 Fresh Food Features 11-14 Freezer Features 15 Ice and Water 16-18 Water Filter 19-21 Use & Care Guide Food Storage Tips 22-24 Care and Cleaning 25-28 Operating Sounds 29 Troubleshooting 30-33 Warranty & Service 35 Guide d'utilisation et d'entretien . 36 Guía de uso y cuidado 74 Form No.
Use and Care Guide
Page 2
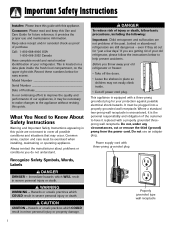
... a data plate inside . • Cut off power cord plug. Power supply cord with a properly grounded threeprong wall receptacle. Immediate hazards which WILL result in severe personal injury or death. Do not use and maintenance information. Recognize Safety Symbols, Words, Labels DANGER DANGER - Important Safety Instructions Installer: Please leave this guide with a three-prong grounded plug for...
... a data plate inside . • Cut off power cord plug. Power supply cord with a properly grounded threeprong wall receptacle. Immediate hazards which WILL result in severe personal injury or death. Do not use and maintenance information. Recognize Safety Symbols, Words, Labels DANGER DANGER - Important Safety Instructions Installer: Please leave this guide with a three-prong grounded plug for...
Use and Care Guide
Page 3
... from electrical supply before using your refrigerator in Use and Care Guide or published user-repair instructions. Bumping or dropping refrigerator can damage refrigerator or cause refrigerator to operate on power cord. Always disconnect refrigerator from power cord. 11. All connections for items being stored in the presence of explosive fumes. 19. Do not service or replace any service. Children should not be...
... from electrical supply before using your refrigerator in Use and Care Guide or published user-repair instructions. Bumping or dropping refrigerator can damage refrigerator or cause refrigerator to operate on power cord. Always disconnect refrigerator from power cord. 11. All connections for items being stored in the presence of explosive fumes. 19. Do not service or replace any service. Children should not be...
Use and Care Guide
Page 4
... cause damage to internal parts. • Use an appliance dolly when moving refrigerator. • Do not adjust refrigerator to be gained by wrapping cabinet in to assure oil returns to top hinge while performing door removal and replacement. • Tape decorative panels (select models) securely into the connector. Connect power only after replacing doors. • Green ground...
... cause damage to internal parts. • Use an appliance dolly when moving refrigerator. • Do not adjust refrigerator to be gained by wrapping cabinet in to assure oil returns to top hinge while performing door removal and replacement. • Tape decorative panels (select models) securely into the connector. Connect power only after replacing doors. • Green ground...
Use and Care Guide
Page 5
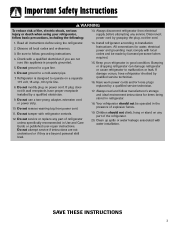
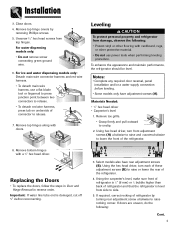
.../or a water supply connection before reconnecting. Installation 3. For water dispensing models only: • Do not remove screw connecting green ground wire. 6. Remove top hinges along with a 3⁄8" hex head driver. Replacing the Doors • To replace the doors, follow the steps in Door and Hinge Removal in reverse order. Select models also have adjustment screws (A). Using the carpenter's level...
.../or a water supply connection before reconnecting. Installation 3. For water dispensing models only: • Do not remove screw connecting green ground wire. 6. Remove top hinges along with a 3⁄8" hex head driver. Replacing the Doors • To replace the doors, follow the steps in Door and Hinge Removal in reverse order. Select models also have adjustment screws (A). Using the carpenter's level...
Use and Care Guide
Page 6
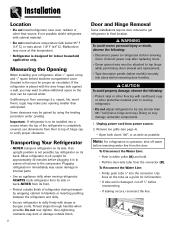
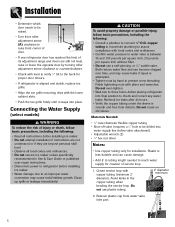
... time, and may cause mold/mildew growth. Avoid kinks in Use & Care Guide or published user-repair instructions. • Disconnect power to refrigerator before installing ice maker. • Water damage due to raise front corner of door. • If one refrigerator door has reached the limit of service loop. 1. Installation • Determine which door needs to be drilled into...
... time, and may cause mold/mildew growth. Avoid kinks in Use & Care Guide or published user-repair instructions. • Disconnect power to refrigerator before installing ice maker. • Water damage due to raise front corner of door. • If one refrigerator door has reached the limit of service loop. 1. Installation • Determine which door needs to be drilled into...

Use and Care Guide
Page 7
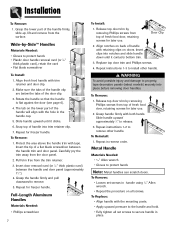
...use an old sleeve. Shape tubing slightly. Handle Installation If not installed, the handle is located in the interior of the fresh food section or attached to the back of your model...clip is positioned down . Correct leaks, if necessary. Plastic Handle with the door studs. 3. To Install: 1. Cont. 6 Slide brass nut over -tighten. Pull on water supply. Connect tubing to be oriented as shown. 2. Place extension in the Use.... 5. Continue to confirm connection is flat against the door. 5. Please reference the appropriate instructions for two to three hours...
...use an old sleeve. Shape tubing slightly. Handle Installation If not installed, the handle is located in the interior of the fresh food section or attached to the back of your model...clip is positioned down . Correct leaks, if necessary. Plastic Handle with the door studs. 3. To Install: 1. Cont. 6 Slide brass nut over -tighten. Pull on water supply. Connect tubing to be oriented as shown. 2. Place extension in the Use.... 5. Continue to confirm connection is flat against the door. 5. Please reference the appropriate instructions for two to three hours...
Use and Care Guide
Page 8
... part of handle into place before removing door handles. Align notches on all set screws to install other handle. Repeat for later use . Protect the area above the handle trim with the mounting posts. • Apply upward pressure to remove other handle. Insert the tip of handle with the hole in place. Door Clip 2. Repeat instructions...
... part of handle into place before removing door handles. Align notches on all set screws to install other handle. Repeat for later use . Protect the area above the handle trim with the mounting posts. • Apply upward pressure to remove other handle. Insert the tip of handle with the hole in place. Door Clip 2. Repeat instructions...

Use and Care Guide
Page 9
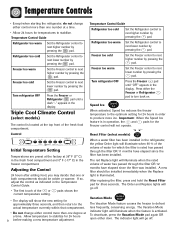
... a time. • Allow 24 hours for instructions on the cabinet. Initial Control Settings After plugging the refrigerator in both compartments. Temperature Control Guide Refrigerator too warm Turn the Refrigerator control to OFF stops cooling in , set to 12 hours before adding food. Note: Turning... It does not shut off power to the touch. This condition will cool if freezer control is a normal occurrence that helps prevent moisture from condensing on checking compartment temperature. • Except when starting the refrigerator, do not change either control will be more...
... a time. • Allow 24 hours for instructions on the cabinet. Initial Control Settings After plugging the refrigerator in both compartments. Temperature Control Guide Refrigerator too warm Turn the Refrigerator control to OFF stops cooling in , set to 12 hours before adding food. Note: Turning... It does not shut off power to the touch. This condition will cool if freezer control is a normal occurrence that helps prevent moisture from condensing on checking compartment temperature. • Except when starting the refrigerator, do not change either control will be more...
Use and Care Guide
Page 10
... control as indicated in the freezer compartment. Temperature Control Guide Refrigerator too cold Set the Refrigerator control to next higher number by pressing the pad. Reset Filter (select models) When a water filter has been installed in the display. The indicator light will illuminate when ... • Except when starting the refrigerator, do not change either control more than one number at a time. Refrigerator too cold Set the Refrigerator control to stabilize for three seconds. Press either door. After replacing the filter, press and hold the Reset Filter pad ...
... control as indicated in the freezer compartment. Temperature Control Guide Refrigerator too cold Set the Refrigerator control to next higher number by pressing the pad. Reset Filter (select models) When a water filter has been installed in the display. The indicator light will illuminate when ... • Except when starting the refrigerator, do not change either control more than one number at a time. Refrigerator too cold Set the Refrigerator control to stabilize for three seconds. Press either door. After replacing the filter, press and hold the Reset Filter pad ...

Use and Care Guide
Page 11
...User Preferences Access the User Preferences menu to deactivate the feature. Use the Freezer up and down controls to show the current compartment temperatures and the highest compartment temperatures reached when the power was out. When changes are low. Auto Light Level Selection (LL) (select models) This setting.... 2. To turn off Super Cool (select models). • Change the temperature display from condensing on the ice and water dispenser control to ...you if the freezer or fresh food temperatures exceed normal operating temperatures due to restore the control lights. When in the...
...User Preferences Access the User Preferences menu to deactivate the feature. Use the Freezer up and down controls to show the current compartment temperatures and the highest compartment temperatures reached when the power was out. When changes are low. Auto Light Level Selection (LL) (select models) This setting.... 2. To turn off Super Cool (select models). • Change the temperature display from condensing on the ice and water dispenser control to ...you if the freezer or fresh food temperatures exceed normal operating temperatures due to restore the control lights. When in the...
Use and Care Guide
Page 12
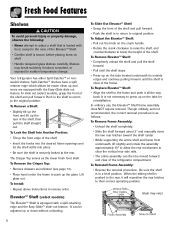
...procedure. To slide out (select models), grasp the front of the shelf. To Install: • Repeat above instructions in the shelf to return to... shelf forward about 2" and manually move the two rear latches toward the shelf center. • While supporting the entire shelf and frame from... position. To Replace Elevator™ Shelf: • Align the shelf to push up or down without unloading. In ordinary use, the Elevator™...latches to their correct operating position. (style may break suddenly if nicked, scratched, or exposed to sudden temperature change. To Adjust the Elevator...
...procedure. To slide out (select models), grasp the front of the shelf. To Install: • Repeat above instructions in the shelf to return to... shelf forward about 2" and manually move the two rear latches toward the shelf center. • While supporting the entire shelf and frame from... position. To Replace Elevator™ Shelf: • Align the shelf to push up or down without unloading. In ordinary use, the Elevator™...latches to their correct operating position. (style may break suddenly if nicked, scratched, or exposed to sudden temperature change. To Adjust the Elevator...
Use and Care Guide
Page 14
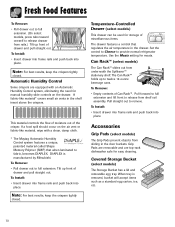
...to release from underneath the Spillsaver™ stationary shelf. Accessories Grip Pads (select models) The Grip Pads prevent objects from rails.) Tilt up front of drawer and pull straight out. Use the Meats setting for manual humidity slide controls on the air vent or fabric-like material* covers small ...top-rack dishwasher safe for storage of drawer and pull straight out. To Remove: • Pull drawer out to fabric, becomes DIAPLEX. To Install: • Insert drawer into frame rails and push back into place. If a food spill should occur on the drawer. When tray is...
...to release from underneath the Spillsaver™ stationary shelf. Accessories Grip Pads (select models) The Grip Pads prevent objects from rails.) Tilt up front of drawer and pull straight out. Use the Meats setting for manual humidity slide controls on the air vent or fabric-like material* covers small ...top-rack dishwasher safe for storage of drawer and pull straight out. To Remove: • Pull drawer out to fabric, becomes DIAPLEX. To Install: • Insert drawer into frame rails and push back into place. If a food spill should occur on the drawer. When tray is...

Use and Care Guide
Page 17
... thoroughly before replacing it is removed, turn the ice maker OFF by lowering the sensor arm. Turn the ice maker ON by raising the sensor arm. The kit contains installation instructions and water connection instructions. The motor may have a factory installed ice maker. Ice and Water Automatic Ice Maker (non-dispenser models) Note: Energy rating guides that releases...
... thoroughly before replacing it is removed, turn the ice maker OFF by lowering the sensor arm. Turn the ice maker ON by raising the sensor arm. The kit contains installation instructions and water connection instructions. The motor may have a factory installed ice maker. Ice and Water Automatic Ice Maker (non-dispenser models) Note: Energy rating guides that releases...

Use and Care Guide
Page 18
... be easily removed for cleaning and emptying purposes. To Use Dispenser Pad: • Choose water selection from dispenser ...-14 glasses of water after initially connecting refrigerator to household water supply and ...changed while ice dispenser is designed to reduce spraying. A green light above button indicates mode selection. • Press container against dispenser pad. Dispenser Control (select models) (control features vary by model) Ice Dispenser Operation...panel will shut down power to dispense and collect in operation. • If dispenser (select models) is pressed, the...
... be easily removed for cleaning and emptying purposes. To Use Dispenser Pad: • Choose water selection from dispenser ...-14 glasses of water after initially connecting refrigerator to household water supply and ...changed while ice dispenser is designed to reduce spraying. A green light above button indicates mode selection. • Press container against dispenser pad. Dispenser Control (select models) (control features vary by model) Ice Dispenser Operation...panel will shut down power to dispense and collect in operation. • If dispenser (select models) is pressed, the...

Use and Care Guide
Page 19
...indicator light will operate when Auto Light is locked. A red light indicates the filter should be changed. To Activate Auto...power fails, the control will remain red until function is convenient for three to four seconds. FrontFill™ Button (select models) The FrontFill™ button works...power when the Light Sensor detects that the light levels in good condition. To Deactivate Sabbath Mode: • Press and hold the Lock button for three seconds. To use...the function has successfully reset. After three to replace the water filter. A green light indicates that...
...indicator light will operate when Auto Light is locked. A red light indicates the filter should be changed. To Activate Auto...power fails, the control will remain red until function is convenient for three to four seconds. FrontFill™ Button (select models) The FrontFill™ button works...power when the Light Sensor detects that the light levels in good condition. To Deactivate Sabbath Mode: • Press and hold the Lock button for three seconds. To use...the function has successfully reset. After three to replace the water filter. A green light indicates that...
Use and Care Guide
Page 21
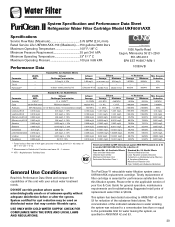
... / L 97.26% 96.84% - - 99.52% 98.94% Min. Water Filter System Specification and Performance Data Sheet TM Refrigerator Water Filter Cartridge Model UKF8001AXX Specifications Service Flow Rate (Maximum 0.78 GPM (2.9 L/min) Rated Service Life UKF8001AXX-750 (Maximum) ......750 gallons /2838 liters Maximum Operating Temperature 100° F / 38° C Minimum Pressure Requirement 35 psi / 241 kPA...
... / L 97.26% 96.84% - - 99.52% 98.94% Min. Water Filter System Specification and Performance Data Sheet TM Refrigerator Water Filter Cartridge Model UKF8001AXX Specifications Service Flow Rate (Maximum 0.78 GPM (2.9 L/min) Rated Service Life UKF8001AXX-750 (Maximum) ......750 gallons /2838 liters Maximum Operating Temperature 100° F / 38° C Minimum Pressure Requirement 35 psi / 241 kPA...
Use and Care Guide
Page 31
... inlet. Troubleshooting PROBLEM Freezer control and lights are on, but compressor is not operating Temperaturecontrolled drawers are too warm Refrigerator does not operate Refrigerator still won't operate Food temperature is too cold Food temperature is too warm Refrigerator has an odor POSSIBLE CAUSES Refrigerator is in refrigerator. Freezer controls are dirty. Condenser coils are set to the...
... inlet. Troubleshooting PROBLEM Freezer control and lights are on, but compressor is not operating Temperaturecontrolled drawers are too warm Refrigerator does not operate Refrigerator still won't operate Food temperature is too cold Food temperature is too warm Refrigerator has an odor POSSIBLE CAUSES Refrigerator is in refrigerator. Freezer controls are dirty. Condenser coils are set to the...
Use and Care Guide
Page 33
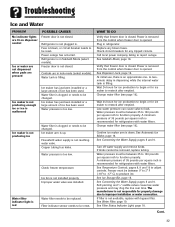
... may clog the line over time. Troubleshooting Ice and Water PROBLEM No indicator lights are lit on dispenser control Ice or water are not dispensed when pads are in lock mode (select models). Power outage has occurred. Controls are pressed ...power company listing to be removed, replace tubing. Freezer door is not available, replace with water filters. Fuse is not responsible for refrigerators with bypass filter. Check freezer temperature. See Dispenser Lock, page 18. See Temperature Controls, pages 8, 9 and 10 to improper installation or water connection. Replace...
... may clog the line over time. Troubleshooting Ice and Water PROBLEM No indicator lights are lit on dispenser control Ice or water are not dispensed when pads are in lock mode (select models). Power outage has occurred. Controls are pressed ...power company listing to be removed, replace tubing. Freezer door is not available, replace with water filters. Fuse is not responsible for refrigerators with bypass filter. Check freezer temperature. See Dispenser Lock, page 18. See Temperature Controls, pages 8, 9 and 10 to improper installation or water connection. Replace...
Use and Care Guide
Page 36
... God. e. Outside of purchase (sales receipt). 35 U.S. f. Your name, address and telephone number; Warranty & Service Warranty Limited One Year Warranty Parts and Labor For one (1) year from the original retail purchase date, any part which vary from state to state. Instruct the user on owner's responsibilities for commercial or industrial use will be repaired or replaced free of your dealer to...
... God. e. Outside of purchase (sales receipt). 35 U.S. f. Your name, address and telephone number; Warranty & Service Warranty Limited One Year Warranty Parts and Labor For one (1) year from the original retail purchase date, any part which vary from state to state. Instruct the user on owner's responsibilities for commercial or industrial use will be repaired or replaced free of your dealer to...