Instruction Manual
Page 2
...the amplifier. To prevent battery rise When the unit is used , use a power supply wiring wire and protective fuse of the panel and/or cause the indicator letters to peel off the power immediately and consult your Kenwood dealer. • Do not touch the unit during installation, consult your Kenwood dealer... with a protection function for bridged connections). Do not turn the power on if the ground wire is not connected. • Be sure to install a protective fuse in the following situations: This unit is high and unit won't operate. • When a ground wire of speakers are going...
...the amplifier. To prevent battery rise When the unit is used , use a power supply wiring wire and protective fuse of the panel and/or cause the indicator letters to peel off the power immediately and consult your Kenwood dealer. • Do not touch the unit during installation, consult your Kenwood dealer... with a protection function for bridged connections). Do not turn the power on if the ground wire is not connected. • Be sure to install a protective fuse in the following situations: This unit is high and unit won't operate. • When a ground wire of speakers are going...
Instruction Manual
Page 3
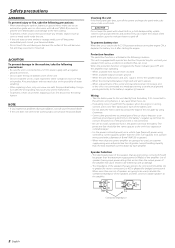
... or an accident. • After installing the unit, check to easily dissipate. Install the amplifier in a place where people, resins, and other damage. • Do not install near the dashboard, rear tray, or air bag safety parts. • The installation to the vehicle should securely fasten the...normally. Blocking these openings will inhibit the cooling of the internal temperature and result in the unit. 7.Attach the unit. 8.Install the remote controller. (KAC-7252 only) 9.Connect the negative - terminal of the battery to prevent short circuits. 2.Set the unit according to the intended...
... or an accident. • After installing the unit, check to easily dissipate. Install the amplifier in a place where people, resins, and other damage. • Do not install near the dashboard, rear tray, or air bag safety parts. • The installation to the vehicle should securely fasten the...normally. Blocking these openings will inhibit the cooling of the internal temperature and result in the unit. 7.Attach the unit. 8.Install the remote controller. (KAC-7252 only) 9.Connect the negative - terminal of the battery to prevent short circuits. 2.Set the unit according to the intended...
Instruction Manual
Page 4
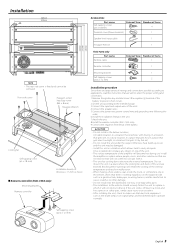
... lamps, winkers, and wipers work properly. Sharing the negative wire of the speaker or grounding speaker wires to fail. • After installation, check that no unconnected wires or connectors are touching the car body. CENTER UNIT (CD receiver, etc.) RCA cable* RCA cable ...Fuse* Battery Ground wire* Lead terminal* Right speaker Left speaker ■ Bridged Connections Speaker (Bridged) ■ Remote cable connection (KAC-7252 only) 2CAUTION • Before connecting the remote controller cables, always set the Bass boost level control to appropriate speaker connectors separately...
... lamps, winkers, and wipers work properly. Sharing the negative wire of the speaker or grounding speaker wires to fail. • After installation, check that no unconnected wires or connectors are touching the car body. CENTER UNIT (CD receiver, etc.) RCA cable* RCA cable ...Fuse* Battery Ground wire* Lead terminal* Right speaker Left speaker ■ Bridged Connections Speaker (Bridged) ■ Remote cable connection (KAC-7252 only) 2CAUTION • Before connecting the remote controller cables, always set the Bass boost level control to appropriate speaker connectors separately...
Instruction Manual
Page 7
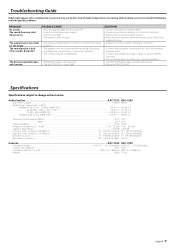
... Boost Circuit...0 - +18 dB (variable) 0 - +18 dB (variable) Bass Boost Frequency...40 - 100 Hz (variable) 40 Hz General ...KAC-7252 KAC-7202 Operating Voltage ...14.4 V (11 - 16 V allowable) 14.4 V (11 - 16 V allowable) Current Consumption ...40 A 40 A Installation Size (W × H × D) ...380 × 61 × 286 mm 380 × 61 × 286 mm Weight ...5.8 kg...
... Boost Circuit...0 - +18 dB (variable) 0 - +18 dB (variable) Bass Boost Frequency...40 - 100 Hz (variable) 40 Hz General ...KAC-7252 KAC-7202 Operating Voltage ...14.4 V (11 - 16 V allowable) 14.4 V (11 - 16 V allowable) Current Consumption ...40 A 40 A Installation Size (W × H × D) ...380 × 61 × 286 mm 380 × 61 × 286 mm Weight ...5.8 kg...


