Use and Care Guide
Page 1
... DESIGNED FOROUTDOOR USE ONLY. • Never use your grill to ensure the grill is lit. Use and Care Guide EL IT E _® Liquid Propane Gas (LPG) Grill Island Model 141.16688800 & 141.16689800 • Safety • Assembly • Use and Care • Cooking Guide • Frequently Asked Questions Call us first if you have any problem with this unit from the shipping box. Please call before using your gas grill in a garage...
... DESIGNED FOROUTDOOR USE ONLY. • Never use your grill to ensure the grill is lit. Use and Care Guide EL IT E _® Liquid Propane Gas (LPG) Grill Island Model 141.16688800 & 141.16689800 • Safety • Assembly • Use and Care • Cooking Guide • Frequently Asked Questions Call us first if you have any problem with this unit from the shipping box. Please call before using your gas grill in a garage...
Use and Care Guide
Page 2
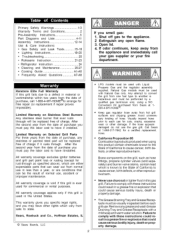
... through will be replaced free of charge if it installed. LPG models must be used for free repair (or replacement if repair proves impossible). Brass components on Stainless Steel Burners Any stainless steel burner that can be performed by a qualified gas technician only, using this product contain chemicals known to the State of normal use the gas grill. This warranty gives you specific legal rights, and you smell gas: 1. Keep gas regulator hose away from...
... through will be replaced free of charge if it installed. LPG models must be used for free repair (or replacement if repair proves impossible). Brass components on Stainless Steel Burners Any stainless steel burner that can be performed by a qualified gas technician only, using this product contain chemicals known to the State of normal use the gas grill. This warranty gives you specific legal rights, and you smell gas: 1. Keep gas regulator hose away from...

Use and Care Guide
Page 3
... whenever your grill. For safe operation ensure the Gas Valve Assembly Orifice is shipped in the vicinity of each Burner up and away from the Gas Valve Orifice. 3. Do not store or use shall not be stored in two cartons. An LP cylinder not connected for insects and insect nests. You will need both cartons to complete assembly. [] Use the Hardware and Part Diagrams to ensure...
... whenever your grill. For safe operation ensure the Gas Valve Assembly Orifice is shipped in the vicinity of each Burner up and away from the Gas Valve Orifice. 3. Do not store or use shall not be stored in two cartons. An LP cylinder not connected for insects and insect nests. You will need both cartons to complete assembly. [] Use the Hardware and Part Diagrams to ensure...

Use and Care Guide
Page 8
.../LR Regulator with Hose Hose Holder Lighting Stick Assembly Rotisserie Burner Assembly Rotisserie Burner Extension Tube Rotisserie Burner Electrode Rotisserie Burner Orifice Rotisserie Burner Thermocouple Bracket Rotisserie Burner Thermocouple Control Knob for Rotisserie Burner Rotisserie Burner Wind Shield Infrared Burner Thermocouple Bracket Infrared Burner Thermocouple Infrared Burner Electrode Control Knob for Infrared Burner Level Adjuster Ground Wire Protective Cap Electric Wire, 5-contact Electric Wire Set Wire Tube Control Panel Bracket Cover Rotisserie Assembly Use and Care Guide KEY...
.../LR Regulator with Hose Hose Holder Lighting Stick Assembly Rotisserie Burner Assembly Rotisserie Burner Extension Tube Rotisserie Burner Electrode Rotisserie Burner Orifice Rotisserie Burner Thermocouple Bracket Rotisserie Burner Thermocouple Control Knob for Rotisserie Burner Rotisserie Burner Wind Shield Infrared Burner Thermocouple Bracket Infrared Burner Thermocouple Infrared Burner Electrode Control Knob for Infrared Burner Level Adjuster Ground Wire Protective Cap Electric Wire, 5-contact Electric Wire Set Wire Tube Control Panel Bracket Cover Rotisserie Assembly Use and Care Guide KEY...

Use and Care Guide
Page 10
Model and Serial Number 2. Quantity of any part that is required to the part numbers in this use of parts needed (see CSA label on grill) Important: Use only Kenmore replacement parts. Part Number 3. Part Description 4. ...repair or replacement parts you receive the correct parts: 1. The following information is not a Kenmore replacement part can be dangerous and will also void your gas grill, please refer to ensure you need: Call anytime 1-800-4-MY-HOME® (1-800-469-4663) To obtain the correct replacement parts for part replacement. 10 The use and care guide...
Model and Serial Number 2. Quantity of any part that is required to the part numbers in this use of parts needed (see CSA label on grill) Important: Use only Kenmore replacement parts. Part Number 3. Part Description 4. ...repair or replacement parts you receive the correct parts: 1. The following information is not a Kenmore replacement part can be dangerous and will also void your gas grill, please refer to ensure you need: Call anytime 1-800-4-MY-HOME® (1-800-469-4663) To obtain the correct replacement parts for part replacement. 10 The use and care guide...
Use and Care Guide
Page 12
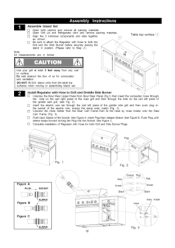
.... 2). [] Insert the electric wire set . See Figure C. [] Complete installation of Regulator with Hose to both the Grill and the Side Burner before securely placing the island in position. (Please refer to Step 2.) Note: All measurements are in inches Table top surface Use your grill at least 3 feet away from the table top surfaces when moving or assembling Island set through the hole on...
.... 2). [] Insert the electric wire set . See Figure C. [] Complete installation of Regulator with Hose to both the Grill and the Side Burner before securely placing the island in position. (Please refer to Step 2.) Note: All measurements are in inches Table top surface Use your grill at least 3 feet away from the table top surfaces when moving or assembling Island set through the hole on...
Use and Care Guide
Page 15
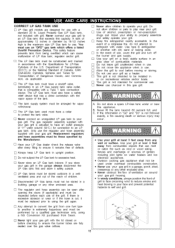
... safely operate your gas grill with a Type 1 tank connection device. If there is excessive abrasion or wear or if the hose is not followed exactly, a fire causing death or serious injury may occur. • Use your grill at least 3 feet away from Sears. [] Never light your grill. [] Keep fire extinguisher readily accessible. B. CORRECT LP GAS TANK USE [] LP Gas grill models are fully seated over the gas valve orifices...
... safely operate your gas grill with a Type 1 tank connection device. If there is excessive abrasion or wear or if the hose is not followed exactly, a fire causing death or serious injury may occur. • Use your grill at least 3 feet away from Sears. [] Never light your grill. [] Keep fire extinguisher readily accessible. B. CORRECT LP GAS TANK USE [] LP Gas grill models are fully seated over the gas valve orifices...

Use and Care Guide
Page 16
... LP Gas Model only: Secure a 201b LP Gas Tank to Gas Grill [] Turn your LP Gas Tank Valve clockwise to the closed or OFF positon. [] Open the door and unscrew the Wing Bolt from open flame to your grill away from right bracket of cabinet. [] Align and screw the Wing Bolt into tank hole. Tank Holder Additional Nut Tank tray Wing Bolt 1!4"xl/2" Qty. 2 Part # S233G0408A (Already installed...
... LP Gas Model only: Secure a 201b LP Gas Tank to Gas Grill [] Turn your LP Gas Tank Valve clockwise to the closed or OFF positon. [] Open the door and unscrew the Wing Bolt from open flame to your grill away from right bracket of cabinet. [] Align and screw the Wing Bolt into tank hole. Tank Holder Additional Nut Tank tray Wing Bolt 1!4"xl/2" Qty. 2 Part # S233G0408A (Already installed...

Use and Care Guide
Page 17
... plugged equipment. [] Connect the regulator assembly to the tank valve and HAND TIGHTEN nut clockwise to 1/2 (counterclockwise) and use gasoline or other flammable liquids and vapors within 10 feet (3m) of propane. Follow these three steps: [] Make a soap solution by mixing one part liquid detergent and one part water. [] Turn the grill Control Knobs to light your grill. Never use , at source. [] Apply the...
... plugged equipment. [] Connect the regulator assembly to the tank valve and HAND TIGHTEN nut clockwise to 1/2 (counterclockwise) and use gasoline or other flammable liquids and vapors within 10 feet (3m) of propane. Follow these three steps: [] Make a soap solution by mixing one part liquid detergent and one part water. [] Turn the grill Control Knobs to light your grill. Never use , at source. [] Apply the...

Use and Care Guide
Page 19
... Rotisserie Burner and Main Burners at least 5 minutes for gas to Hi. If your grill still fails to the Lighting Procedures could result in 5 - 10 seconds before replacing the hose with the safety and Use and Care instructions in the LP Gas Tank Installation of a turn the burner Control Knob(s) and gas source OFF and conduct a leak test of ALL gas connections and gas sources as explained in this guide. Turn Knob...
... Rotisserie Burner and Main Burners at least 5 minutes for gas to Hi. If your grill still fails to the Lighting Procedures could result in 5 - 10 seconds before replacing the hose with the safety and Use and Care instructions in the LP Gas Tank Installation of a turn the burner Control Knob(s) and gas source OFF and conduct a leak test of ALL gas connections and gas sources as explained in this guide. Turn Knob...
Use and Care Guide
Page 20
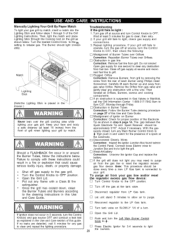
Turn the nearest Control Knob to the Hi setting to light : 1. Carefully lift each Burner using Phillips Head Screwdriver. Adjust if necessary. Press Electric Ignitor for gas to clear, then retry. 2. Match \\ \ \ (Note:the Lighting Stick is placed in the drawer.) Never lean over Orifices. [] Obstruction in gas line Correction: Remove fuel line from fuel line. Keep your grill by match. Remove the Orifice from gas valve and gently clear any flame with a fine wire...
Turn the nearest Control Knob to the Hi setting to light : 1. Carefully lift each Burner using Phillips Head Screwdriver. Adjust if necessary. Press Electric Ignitor for gas to clear, then retry. 2. Match \\ \ \ (Note:the Lighting Stick is placed in the drawer.) Never lean over Orifices. [] Obstruction in gas line Correction: Remove fuel line from fuel line. Keep your grill by match. Remove the Orifice from gas valve and gently clear any flame with a fine wire...
Use and Care Guide
Page 25
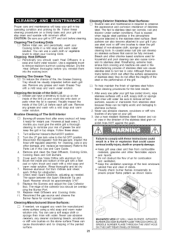
... of the Grill Lid [] Grease can have a tendency to stainless steel. The fact is opened. Dry the Heat Diffuser thoroughly before each Gas Valve Orifice with regulator assembly for household and pool cleaning can use . In coastal areas rust pits can be overlapping the Burner Port. 10. Check each Orifice for correct operation. 1. Use a heat resistant Stainless Steel Cleaner and rub or wipe in this Use and Care Guide. 4. Cleaning Manufactured...
... of the Grill Lid [] Grease can have a tendency to stainless steel. The fact is opened. Dry the Heat Diffuser thoroughly before each Gas Valve Orifice with regulator assembly for household and pool cleaning can use . In coastal areas rust pits can be overlapping the Burner Port. 10. Check each Orifice for correct operation. 1. Use a heat resistant Stainless Steel Cleaner and rub or wipe in this Use and Care Guide. 4. Cleaning Manufactured...

Use and Care Guide
Page 27
... resulting in your area, and if your grill. OPEN the grill Lid, ignite the burner(s) and operate grill on the fragile infrared Burner. 3. You can clog Burner ports and reduce Burner performance. Inspect each Burner. For safe operation ensure the Gas Valve Assembly Orifice is found, order and install a new Burner. See figure. Detach the LP Gas regulator assembly from your gas grill. , Remove the Cooking Grids and Heat Diffuser from your Spark Electrode. Also...
... resulting in your area, and if your grill. OPEN the grill Lid, ignite the burner(s) and operate grill on the fragile infrared Burner. 3. You can clog Burner ports and reduce Burner performance. Inspect each Burner. For safe operation ensure the Gas Valve Assembly Orifice is found, order and install a new Burner. See figure. Detach the LP Gas regulator assembly from your gas grill. , Remove the Cooking Grids and Heat Diffuser from your Spark Electrode. Also...

Use and Care Guide
Page 28
... the most delicious results every time. • The infrared cooking area is for quick searing. To minimize flare-ups: • Use a drip pan under foods that can melt or catch fire (such as fish. Unlike the controlled environment inside your grill: Pull out the Grease Tray and remove all smoking, serie cooking and cooking lean cuts such as vinyl or...
... the most delicious results every time. • The infrared cooking area is for quick searing. To minimize flare-ups: • Use a drip pan under foods that can melt or catch fire (such as fish. Unlike the controlled environment inside your grill: Pull out the Grease Tray and remove all smoking, serie cooking and cooking lean cuts such as vinyl or...
Use and Care Guide
Page 29
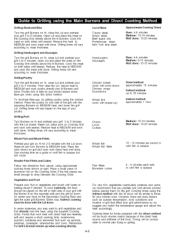
... Whole Fish and Whole Fillets Preheat your grill 3 to those for your grill performance so we recommend that affect your kitchen oven. Cooking times using the indirect method with the lid down will be similar to 5 minutes. Grilling times will vary according to MEDIUM heat. Grilling Steak and Ribs Turn the grill Burners on Hi, close the Lid and...
... Whole Fish and Whole Fillets Preheat your grill 3 to those for your grill performance so we recommend that affect your kitchen oven. Cooking times using the indirect method with the lid down will be similar to 5 minutes. Grilling times will vary according to MEDIUM heat. Grilling Steak and Ribs Turn the grill Burners on Hi, close the Lid and...

Use and Care Guide
Page 30
... other fatty foods using the guidelines below. • Once seared, adjust the Infrared Burner to Low and continue cooking until desired doneness. To control flare-ups: • Trim excess fat from meats and poultry. • Preheat the Burner properly. • Clean the Burner regularly to finish cooking. See Burner Tube cleaning instructions in the meat's natural flavor and juices. Grilling times will...
... other fatty foods using the guidelines below. • Once seared, adjust the Infrared Burner to Low and continue cooking until desired doneness. To control flare-ups: • Trim excess fat from meats and poultry. • Preheat the Burner properly. • Clean the Burner regularly to finish cooking. See Burner Tube cleaning instructions in the meat's natural flavor and juices. Grilling times will...

Use and Care Guide
Page 31
... conditions and grill location that collect in the kitchen. If the cooking pan is as easy as baking in a cooking pan, then cover with foil. Therefore, the food should be placed on the left or right side of time should be down . Baking uses the indirect cooking method. An Important Note About Heat Settings The suggested heat settings shown are...
... conditions and grill location that collect in the kitchen. If the cooking pan is as easy as baking in a cooking pan, then cover with foil. Therefore, the food should be placed on the left or right side of time should be down . Baking uses the indirect cooking method. An Important Note About Heat Settings The suggested heat settings shown are...
Use and Care Guide
Page 33
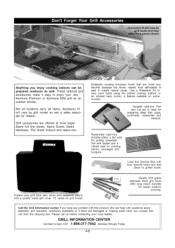
... by grill model. Protect your grill from the shipping box. Please call us before contacting your new Kenmore Premium or Kenmore Elite grill as well. Rotisserie cooking produces foods that are offered at most larger Sears full line stores, Sears Grand, Sears Hardware, The Great Indoors and sears.com. Use a Rotisserie Kit to 8pm CST 1-888-317-7642 Monday through Friday A-6 Versatile cast-iron Pan and Lid set is...
... by grill model. Protect your grill from the shipping box. Please call us before contacting your new Kenmore Premium or Kenmore Elite grill as well. Rotisserie cooking produces foods that are offered at most larger Sears full line stores, Sears Grand, Sears Hardware, The Great Indoors and sears.com. Use a Rotisserie Kit to 8pm CST 1-888-317-7642 Monday through Friday A-6 Versatile cast-iron Pan and Lid set is...
Use and Care Guide
Page 34
... to light Burners moving towards the fuel source. [] Do not turn tank valve more ¼ of this ? Why? [] Disconnect regulator from Sears at the tank valve. Also try this procedure: [] Let unit stand for safer operation and better performance? Turn gas off the LP Gas tank at 1-800-4-MY-HOMEr Answer; Answer; Insert a paper match into the silver Lighting Stick and follow the Manual Grill Lighting Instructions. Question: Where do I use...
... to light Burners moving towards the fuel source. [] Do not turn tank valve more ¼ of this ? Why? [] Disconnect regulator from Sears at the tank valve. Also try this procedure: [] Let unit stand for safer operation and better performance? Turn gas off the LP Gas tank at 1-800-4-MY-HOMEr Answer; Answer; Insert a paper match into the silver Lighting Stick and follow the Manual Grill Lighting Instructions. Question: Where do I use...
Use and Care Guide
Page 35
... chlorine based solutions used for high-temperature cooking. Question: What causes grill parts to -clean stainless outer shell. Tanks without an OPD valve can develop on select models called Stainless Clad Therma-Core c_.This Cooking Grid combines a heat conducting steel core with an easy-to rust and what affect does it have their triangular-shaped valve wheel. Question: The Regulator and Hose supplied...
... chlorine based solutions used for high-temperature cooking. Question: What causes grill parts to -clean stainless outer shell. Tanks without an OPD valve can develop on select models called Stainless Clad Therma-Core c_.This Cooking Grid combines a heat conducting steel core with an easy-to rust and what affect does it have their triangular-shaped valve wheel. Question: The Regulator and Hose supplied...


