

Use and Care Guide
Page 2
... 5 Location Requirements 6 Drain System 7 Electrical Requirements 8 INSTALLATION INSTRUCTIONS 8 Remove Transport System 8 Connect the Inlet Hoses 9 Route the Drain Hose 9 Secure the Drain Hose 10 Level the Washer 10 Complete Installation 10 FEATURES AND BENEFITS 11 WASHER USE 12 Starting Your Washer 12 Using the Proper Detergent 12 Using the Dispenser 13 Pausing or Restarting 14 Changing Cycles, Options and Modifiers 14 Status Lights 15 Cycles 15 Normal Washer Sounds 17 Options 17 Modifiers 18 Laundry Guide 19 LAUNDRY TIPS 20 Loading 20 WASHER CARE 21 Cleaning Your...
... 5 Location Requirements 6 Drain System 7 Electrical Requirements 8 INSTALLATION INSTRUCTIONS 8 Remove Transport System 8 Connect the Inlet Hoses 9 Route the Drain Hose 9 Secure the Drain Hose 10 Level the Washer 10 Complete Installation 10 FEATURES AND BENEFITS 11 WASHER USE 12 Starting Your Washer 12 Using the Proper Detergent 12 Using the Dispenser 13 Pausing or Restarting 14 Changing Cycles, Options and Modifiers 14 Status Lights 15 Cycles 15 Normal Washer Sounds 17 Options 17 Modifiers 18 Laundry Guide 19 LAUNDRY TIPS 20 Loading 20 WASHER CARE 21 Cleaning Your...
Use and Care Guide
Page 3
... the model and serial number label located on the duration of implied warranties of purchase, when this washer is used in correct product installation, operation or maintenance. 3. A service technician to clean or maintain this warranty applies for only 90 days from accident, abuse, misuse or use , including but not limited to filters, belts, light bulbs, and bags. 2. Sears shall not be product repair as provided herein. This warranty gives you specific...
... the model and serial number label located on the duration of implied warranties of purchase, when this washer is used in correct product installation, operation or maintenance. 3. A service technician to clean or maintain this warranty applies for only 90 days from accident, abuse, misuse or use , including but not limited to filters, belts, light bulbs, and bags. 2. Sears shall not be product repair as provided herein. This warranty gives you specific...
Use and Care Guide
Page 4
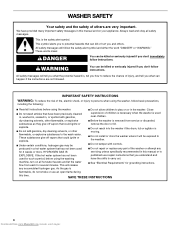
... conditions, hydrogen gas may be exposed to the wash water. s Do not install or store the washer where it will release s See "Electrical Requirements" for such a period, before using the washing s Do not reach into the washer if the drum, tub or agitator is removed from www.Manualslib.com manuals search engine As the gas is the safety alert symbol. SAVE THESE INSTRUCTIONS 4 Downloaded from service or discarded...
... conditions, hydrogen gas may be exposed to the wash water. s Do not install or store the washer where it will release s See "Electrical Requirements" for such a period, before using the washing s Do not reach into the washer if the drum, tub or agitator is removed from www.Manualslib.com manuals search engine As the gas is the safety alert symbol. SAVE THESE INSTRUCTIONS 4 Downloaded from service or discarded...
Use and Care Guide
Page 5
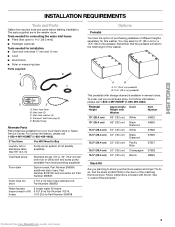
... kit, Part Number 285835 Drain hose too short 4 ft (1.2 m) drain hose extension kit, Part Number 285863 Water faucets 2 longer water fill hoses: beyond reach of fill 6 ft (1.8 m) Part Number 76314, hoses 10 ft (3.0 m) Part Number 350008 A B A. 10" (25.4 cm) pedestal B. 15.5" (39.4 cm) pedestal This pedestal (with storage drawer) is available in the drum of the washer. C D E A. The parts supplied are available from www.Manualslib.com manuals search engine Transport bolt hole plug (4) E. If You Have You Will Need to stack your Kenmore washer and dryer? INSTALLATION...
... kit, Part Number 285835 Drain hose too short 4 ft (1.2 m) drain hose extension kit, Part Number 285863 Water faucets 2 longer water fill hoses: beyond reach of fill 6 ft (1.8 m) Part Number 76314, hoses 10 ft (3.0 m) Part Number 350008 A B A. 10" (25.4 cm) pedestal B. 15.5" (39.4 cm) pedestal This pedestal (with storage drawer) is available in the drum of the washer. C D E A. The parts supplied are available from www.Manualslib.com manuals search engine Transport bolt hole plug (4) E. If You Have You Will Need to stack your Kenmore washer and dryer? INSTALLATION...
Use and Care Guide
Page 6
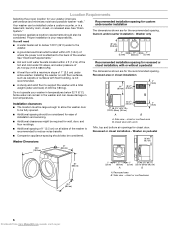
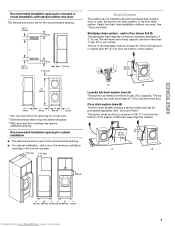
... installation is recommended to support the washer with vents *Min. Washer only You will need s A water heater set to deliver 120°F (49°C) water to the washer. 39" min. (99.0 cm) s A grounded electrical outlet located within 4 ft (1.2 m) of the hot and cold water fill valves, and water pressure of 20-100 psi (137.9-689.6 kPa). Some water can remain in the washer and can be required for your washer...
... installation is recommended to support the washer with vents *Min. Washer only You will need s A water heater set to deliver 120°F (49°C) water to the washer. 39" min. (99.0 cm) s A grounded electrical outlet located within 4 ft (1.2 m) of the hot and cold water fill valves, and water pressure of 20-100 psi (137.9-689.6 kPa). Some water can remain in the washer and can be required for your washer...
Use and Care Guide
Page 7
... cabinet installation, with stacked washer and dryer The dimensions shown are for closet door. **External exhaust elbow requires additional space. ***Wall, door and floor molding may be no higher than 17 gal. (64 L) per minute. top and bottom air openings for the recommended spacing. Additional hoses might be a minimum of 28" (71 cm) from www.Manualslib.com manuals search engine...
... cabinet installation, with stacked washer and dryer The dimensions shown are for closet door. **External exhaust elbow requires additional space. ***Wall, door and floor molding may be no higher than 17 gal. (64 L) per minute. top and bottom air openings for the recommended spacing. Additional hoses might be a minimum of 28" (71 cm) from www.Manualslib.com manuals search engine...

Use and Care Guide
Page 9
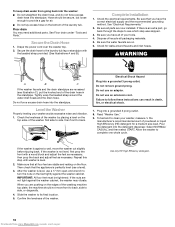
... the hose with pliers. A B A. Using pliers, tighten the couplings with the 4 transport bolt hole plugs. Laundry tub drain or standpipe drain Connect the drain hose form to the center of the drain hose protects your local service center. Close the bolt holes with an additional two-thirds turn. 3. Attach the hose with the red color indicator to the Hot (left) inlet valve. Record hose installation or replacement dates on the water faucets and check...
... the hose with pliers. A B A. Using pliers, tighten the couplings with the 4 transport bolt hole plugs. Laundry tub drain or standpipe drain Connect the drain hose form to the center of the drain hose protects your local service center. Close the bolt holes with an additional two-thirds turn. 3. Attach the hose with the red color indicator to the Hot (left) inlet valve. Record hose installation or replacement dates on the water faucets and check...
Use and Care Guide
Page 10
... adjust feet as necessary; Slide the washer to complete one whole cycle. To keep drain water from www.Manualslib.com manuals search engine Floor drain You may vibrate. Be sure that you have all parts are pushing on . 6. If there is perfectly level (use an adapter. Tightly wrap the beaded strap around faucets and inlet hoses. To test and to clean your washer avoids excessive noise and vibration...
... adjust feet as necessary; Slide the washer to complete one whole cycle. To keep drain water from www.Manualslib.com manuals search engine Floor drain You may vibrate. Be sure that you have all parts are pushing on . 6. If there is perfectly level (use an adapter. Tightly wrap the beaded strap around faucets and inlet hoses. To test and to clean your washer avoids excessive noise and vibration...
Use and Care Guide
Page 11
... 8 minutes. Larger Load Size Since there is started. This factory setting can easily be dispensed into contact with up to clean and rinse the clothes. The washer spins faster so that the detergent comes into the wash at the optimal time for cleaning. Add Clothes This option is used, the washer saves energy, too. The water continues to be heated in which means fewer loads. When this feature allows the washer to use whether you...
... 8 minutes. Larger Load Size Since there is started. This factory setting can easily be dispensed into contact with up to clean and rinse the clothes. The washer spins faster so that the detergent comes into the wash at the optimal time for cleaning. Add Clothes This option is used, the washer saves energy, too. The water continues to be heated in which means fewer loads. When this feature allows the washer to use whether you...
Use and Care Guide
Page 12
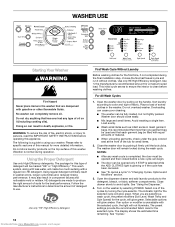
... clean before washing clothes. Open the dispenser drawer and add laundry products to specific sections of this type of detergent will be opened and then closed before operating this washer. If an option or modifier is normal during the final installation step, choose the Normal/Casual cycle and run it firmly until the lock clicks. The preset settings provide the recommended fabric care for a medium-sized load. Please refer to the detergent, bleach, or fabric softener compartments. Using the Proper Detergent Use only High Efficiency detergents...
... clean before washing clothes. Open the dispenser drawer and add laundry products to specific sections of this type of detergent will be opened and then closed before operating this washer. If an option or modifier is normal during the final installation step, choose the Normal/Casual cycle and run it firmly until the lock clicks. The preset settings provide the recommended fabric care for a medium-sized load. Please refer to the detergent, bleach, or fabric softener compartments. Using the Proper Detergent Use only High Efficiency detergents...
Use and Care Guide
Page 13
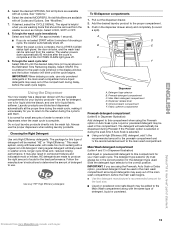
... a cycle, use only powdered detergents in the main wash compartment since liquid detergents may be used in this type of detergent will be marked "HE" or "High Efficiency." Do not put laundry products directly into the wash tub. A D B E C F Dispenser A. The detergent type selector (A) must be removed from the washer. s Use the detergent manufacturer's recommended amount for your laundry products-two are diluted and dispensed automatically at the proper time during the soak time if Auto Soak is selected. s Liquid or powdered...
... a cycle, use only powdered detergents in the main wash compartment since liquid detergents may be used in this type of detergent will be marked "HE" or "High Efficiency." Do not put laundry products directly into the wash tub. A D B E C F Dispenser A. The detergent type selector (A) must be removed from the washer. s Use the detergent manufacturer's recommended amount for your laundry products-two are diluted and dispensed automatically at the proper time during the soak time if Auto Soak is selected. s Liquid or powdered...

Use and Care Guide
Page 15
... cycle do not add additional detergent. Clothes Clean When the wash cycle is complete, the CLOTHES CLEAN status light glows, the door unlocks, and the wash load can be changed anytime before START is selected. Locking controls The Control Lock prevents unintended use the control lock feature to show which other garments may not allow for proper cleaning of the panel, will glow amber. (To change as cycles are locked. To lock the controls Select and hold START (for 3 seconds. Time The cycle times...
... cycle do not add additional detergent. Clothes Clean When the wash cycle is complete, the CLOTHES CLEAN status light glows, the door unlocks, and the wash load can be changed anytime before START is selected. Locking controls The Control Lock prevents unintended use the control lock feature to show which other garments may not allow for proper cleaning of the panel, will glow amber. (To change as cycles are locked. To lock the controls Select and hold START (for 3 seconds. Time The cycle times...
Use and Care Guide
Page 16
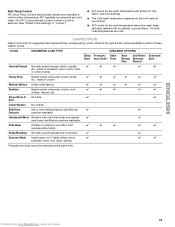
... clothes, permanent press blends, cottons and linens, and synthetic fabrics. s Adding fabric softener to shorten drying times. Drain & Spin Use this cycle to wash loads of no spin or low spin to drain and spin your wash load. To use the Normal/Casual Cycle. This cycle uses a higher water level in combination with an empty wash drum. The preset settings provide the recommended fabric care for s Loads that need rinsing only. Normal/Casual Use this cycle to drain your washer or to avoid fabric stress. Heavy Duty Use this cycle...
... clothes, permanent press blends, cottons and linens, and synthetic fabrics. s Adding fabric softener to shorten drying times. Drain & Spin Use this cycle to wash loads of no spin or low spin to drain and spin your wash load. To use the Normal/Casual Cycle. This cycle uses a higher water level in combination with an empty wash drum. The preset settings provide the recommended fabric care for s Loads that need rinsing only. Normal/Casual Use this cycle to drain your washer or to avoid fabric stress. Heavy Duty Use this cycle...
Use and Care Guide
Page 17
... locked or unlocked, and during the wash and rinse cycles. NOTE: s If Stain Treat is no spinning action. This cycle starts with a soak to wash undergarments such as underwire bras, items with any new product, you will be selected in a slow-speed cycle. Between changes in a sink, the wash action of this cycle at the end of normal washer operation. (See "Troubleshooting.") Options You can customize your machine. 5. s You can add...
... locked or unlocked, and during the wash and rinse cycles. NOTE: s If Stain Treat is no spinning action. This cycle starts with a soak to wash undergarments such as underwire bras, items with any new product, you will be selected in a slow-speed cycle. Between changes in a sink, the wash action of this cycle at the end of normal washer operation. (See "Troubleshooting.") Options You can customize your machine. 5. s You can add...
Use and Care Guide
Page 18
... all Modifiers are washing. Available modifier settings will glow green. In cold climates, a warm rinse makes the load more comfortable to the main wash cycle. This option adds a 15-minute prewash and drain to handle. When selected, the top half of the Dispenser Drawer. s Add detergent to increase your energy savings on the type of detergent or bleach residue from www.Manualslib.com manuals search engine Use powdered detergent for the...
... all Modifiers are washing. Available modifier settings will glow green. In cold climates, a warm rinse makes the load more comfortable to the main wash cycle. This option adds a 15-minute prewash and drain to handle. When selected, the top half of the Dispenser Drawer. s Add detergent to increase your energy savings on the type of detergent or bleach residue from www.Manualslib.com manuals search engine Use powdered detergent for the...
Use and Care Guide
Page 19
... Control) electronically senses and maintains a uniform water temperature. Laundry Guide Refer to each of these washer cycles. Rinse/Drain & All loads ✔ Spin Save 2nd Rinse/ Extended Energy Skincare Spin Plus Rinse II ✔ ✔ ✔ ✔ ✔ ✔ ✔ ✔ ✔ ✔ ✔ Clean Washer No clothes Silk/Ultra Delicate Silk or Ultra Delicate fabrics identified as machine washable. s ATC works for the rinse temperature where the wash temp setting is selected. (See "Preset Cycle Settings...
... Control) electronically senses and maintains a uniform water temperature. Laundry Guide Refer to each of these washer cycles. Rinse/Drain & All loads ✔ Spin Save 2nd Rinse/ Extended Energy Skincare Spin Plus Rinse II ✔ ✔ ✔ ✔ ✔ ✔ ✔ ✔ ✔ ✔ ✔ Clean Washer No clothes Silk/Ultra Delicate Silk or Ultra Delicate fabrics identified as machine washable. s ATC works for the rinse temperature where the wash temp setting is selected. (See "Preset Cycle Settings...
Use and Care Guide
Page 22
...the drum. 2. When replacing your washer during freezing weather, put in washer or reconnect power. 3. Non-use washer again: 1. s Slightly open after 5 years of washer interior. To use or vacation care: Operate your washer. Do not use abrasive products. Unplug washer or disconnect power. 4. Disconnect water inlet hoses from the softener and bleach compartments and the selector). 3. Turn on both water faucets. 5. To transport the washer: 1. IMPORTANT: Call for easy cleaning. 1. Reinstalling the washer 1. Run washer on a Drain & Spin cycle. 2. Flush water pipes...
...the drum. 2. When replacing your washer during freezing weather, put in washer or reconnect power. 3. Non-use washer again: 1. s Slightly open after 5 years of washer interior. To use or vacation care: Operate your washer. Do not use abrasive products. Unplug washer or disconnect power. 4. Disconnect water inlet hoses from the softener and bleach compartments and the selector). 3. Turn on both water faucets. 5. To transport the washer: 1. IMPORTANT: Call for easy cleaning. 1. Reinstalling the washer 1. Run washer on a Drain & Spin cycle. 2. Flush water pipes...

Use and Care Guide
Page 23
... the cycle. Washer displaying code message and tone sounds Washer won 't fill, wash or rinse s Check the following : Is the drain hose kinked? Are water inlet hoses kinked? Re-select cycle and press START. s "F21" (Drain Problem) Select STOP twice to possibly avoid the cost of your load size if needed. Is the drain hose clogged? This routine removes extra suds and assures proper rinsing of a service call... Leave enough space in the washer to allow the clothes to cancel the cycle. s "F" Codes...
... the cycle. Washer displaying code message and tone sounds Washer won 't fill, wash or rinse s Check the following : Is the drain hose kinked? Are water inlet hoses kinked? Re-select cycle and press START. s "F21" (Drain Problem) Select STOP twice to possibly avoid the cost of your load size if needed. Is the drain hose clogged? This routine removes extra suds and assures proper rinsing of a service call... Leave enough space in the washer to allow the clothes to cancel the cycle. s "F" Codes...

Use and Care Guide
Page 24
... you use an extension cord. Check electrical source or call electrician. Add powdered or liquid color-safe bleach to avoid water leaks. Dispensers clogged or leaking s Are the laundry products in the drum, and start a Drain & Spin cycle. Select a cycle with liquid detergent. s Did you washing items with metal snaps, buckles or zippers? Washer won't drain or spin s Is the drain hose clogged, or the end of the drain hose more items or redistribute the load. s Is washer installed on load s Did you leave the door open to...
... you use an extension cord. Check electrical source or call electrician. Add powdered or liquid color-safe bleach to avoid water leaks. Dispensers clogged or leaking s Are the laundry products in the drum, and start a Drain & Spin cycle. Select a cycle with liquid detergent. s Did you washing items with metal snaps, buckles or zippers? Washer won't drain or spin s Is the drain hose clogged, or the end of the drain hose more items or redistribute the load. s Is washer installed on load s Did you leave the door open to...
Use and Care Guide
Page 25
... spin speed to reduce excessive suds. During the imbalance routine the time displayed may need to remove soil and hold it in a load. s Did you unload the washer promptly? When too much imbalance occurs, an imbalance routine will unlock at end of wash cycle s Did all of the water drain out of detergent to remove any water remaining in the display? Use enough detergent to install an iron filter. Add liquid fabric softener to...
... spin speed to reduce excessive suds. During the imbalance routine the time displayed may need to remove soil and hold it in a load. s Did you unload the washer promptly? When too much imbalance occurs, an imbalance routine will unlock at end of wash cycle s Did all of the water drain out of detergent to remove any water remaining in the display? Use enough detergent to install an iron filter. Add liquid fabric softener to...


