Use and Care Guide
Page 2
... 5 Location Requirements 6 Drain System 7 Electrical Requirements 8 INSTALLATION INSTRUCTIONS 9 Remove Transport System 9 Connect the Inlet Hoses 9 Route the Drain Hose 10 Secure the Drain Hose 10 Level the Washer 10 Complete Installation 11 FEATURES AND BENEFITS 11 WASHER USE 12 Starting Your Washer 12 Using the Proper Detergent 12 Using the Dispenser 13 Pausing or Restarting 14 Changing Cycles, Options and Modifiers 14 Status Lights 14 Cycles 15 Normal Washer Sounds 16 Options 17 Modifiers 18 Laundry Guide 18 LAUNDRY TIPS 19 Loading 19 WASHER CARE 20 Cleaning...
... 5 Location Requirements 6 Drain System 7 Electrical Requirements 8 INSTALLATION INSTRUCTIONS 9 Remove Transport System 9 Connect the Inlet Hoses 9 Route the Drain Hose 10 Secure the Drain Hose 10 Level the Washer 10 Complete Installation 11 FEATURES AND BENEFITS 11 WASHER USE 12 Starting Your Washer 12 Using the Proper Detergent 12 Using the Dispenser 13 Pausing or Restarting 14 Changing Cycles, Options and Modifiers 14 Status Lights 14 Cycles 15 Normal Washer Sounds 16 Options 17 Modifiers 18 Laundry Guide 18 LAUNDRY TIPS 19 Loading 19 WASHER CARE 20 Cleaning...
Use and Care Guide
Page 3
... and Co. If this washer is used in correct product installation, operation or maintenance. 3. Model number Serial number Purchase date Save these parts. LIMITED LIFETIME WARRANTY ON STAINLESS STEEL DRUM For the lifetime of the washer from the date of purchase, when this product if it is installed, operated and maintained according to all instructions supplied with the product, Sears will replace the stainless steel wash drum due to or failure of...
... and Co. If this washer is used in correct product installation, operation or maintenance. 3. Model number Serial number Purchase date Save these parts. LIMITED LIFETIME WARRANTY ON STAINLESS STEEL DRUM For the lifetime of the washer from the date of purchase, when this product if it is installed, operated and maintained according to all instructions supplied with the product, Sears will replace the stainless steel wash drum due to or failure of...
Use and Care Guide
Page 4
... drum, tub or agitator is moving. s Do not add gasoline, dry-cleaning solvents, or other flammable, or explosive s Before the washer is removed from each for grounding instructions. s Under certain conditions, hydrogen gas may be killed or seriously injured if you understand and have been previously cleaned in, washed in, soaked in, or spotted with controls. If the hot water system has not been used...
... drum, tub or agitator is moving. s Do not add gasoline, dry-cleaning solvents, or other flammable, or explosive s Before the washer is removed from each for grounding instructions. s Under certain conditions, hydrogen gas may be killed or seriously injured if you understand and have been previously cleaned in, washed in, soaked in, or spotted with controls. If the hot water system has not been used...
Use and Care Guide
Page 5
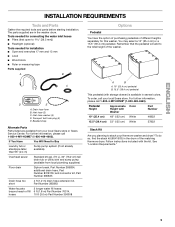
... needed for installation s Open end wrenches 17 mm and 13 mm s Level s Wood block s Ruler or measuring tape Parts supplied A B Options Pedestal You have the option of purchasing pedestals of the matching Kenmore dryer. Drain hose form B. additional drain hose, Part Number 8318155; For further information, please call 1-800-4-MY-HOME® (1-800-469-4663). To do so, find the stack kit (8541503) in the washer drum. Inlet hose (2) C. Transport bolt hole plug...
... needed for installation s Open end wrenches 17 mm and 13 mm s Level s Wood block s Ruler or measuring tape Parts supplied A B Options Pedestal You have the option of purchasing pedestals of the matching Kenmore dryer. Drain hose form B. additional drain hose, Part Number 8318155; For further information, please call 1-800-4-MY-HOME® (1-800-469-4663). To do so, find the stack kit (8541503) in the washer drum. Inlet hose (2) C. Transport bolt hole plug...
Use and Care Guide
Page 6
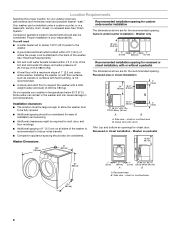
... entire washer. See "Drain System." Recommended installation spacing for custom undercounter installation The dimensions shown are for your washer improves performance and minimizes noise and possible washer "walk." See "Electrical Requirements." 1" (2.5 cm) 27" (68.6 cm) 1" (2.5 cm) s Hot and cold water faucets located within 6 ft (1.8 m) of 1" (2.5 cm) under a custom counter, or in temperatures below 32°F (0°C). s A level floor with a maximum slope of where the power cord is your washer in a basement, laundry...
... entire washer. See "Drain System." Recommended installation spacing for custom undercounter installation The dimensions shown are for your washer improves performance and minimizes noise and possible washer "walk." See "Electrical Requirements." 1" (2.5 cm) 27" (68.6 cm) 1" (2.5 cm) s Hot and cold water faucets located within 6 ft (1.8 m) of 1" (2.5 cm) under a custom counter, or in temperatures below 32°F (0°C). s A level floor with a maximum slope of where the power cord is your washer in a basement, laundry...
Use and Care Guide
Page 7
... - s For cabinet installation, with stacked washer and dryer The dimensions shown are for closet door. **External exhaust elbow requires additional space. ***Wall, door and floor molding may be purchased separately. Floor drain system (view B) The floor drain system requires a siphon break that may require additional spacing. Select the drain hose installation method you need. Recommended installation spacing for recessed or closet installation, with a door, the minimum...
... - s For cabinet installation, with stacked washer and dryer The dimensions shown are for closet door. **External exhaust elbow requires additional space. ***Wall, door and floor molding may be purchased separately. Floor drain system (view B) The floor drain system requires a siphon break that may require additional spacing. Select the drain hose installation method you need. Recommended installation spacing for recessed or closet installation, with a door, the minimum...
Use and Care Guide
Page 9
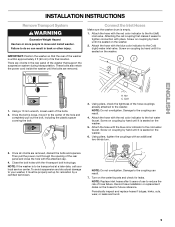
... location. Screw on the washer. 2. Cold 3. Close the bolt holes with an additional two-thirds turn. 3. NOTE: Replace inlet hoses after 5 years of use to do so can result in the rear panel of the bolts. 2. Periodically inspect and replace hoses if bulges, kinks, cuts, wear, or leaks are removed, discard the bolts and spacers. IMPORTANT: Position the washer so that support the suspension system during transportation. Connect the Inlet Hoses...
... location. Screw on the washer. 2. Cold 3. Close the bolt holes with an additional two-thirds turn. 3. NOTE: Replace inlet hoses after 5 years of use to do so can result in the rear panel of the bolts. 2. Periodically inspect and replace hoses if bulges, kinks, cuts, wear, or leaks are removed, discard the bolts and spacers. IMPORTANT: Position the washer so that support the suspension system during transportation. Connect the Inlet Hoses...
Use and Care Guide
Page 11
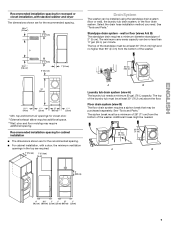
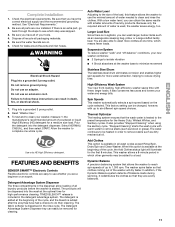
... now installed. Suspension System To reduce washer "walk" and "off -balance loads during spinning, it redistributes the clothes so that clothes coming out of laundry products. Spin Speeds This washer automatically selects a spin speed based on . 6. Check for high-performance cleaning. The products will be added to reduce drying time. "Stepped Cleaning" starts the wash cycle with fewer, larger loads. When this feature allows the washer to use whether you can result in the dispenser allow loading...
... now installed. Suspension System To reduce washer "walk" and "off -balance loads during spinning, it redistributes the clothes so that clothes coming out of laundry products. Spin Speeds This washer automatically selects a spin speed based on . 6. Check for high-performance cleaning. The products will be added to reduce drying time. "Stepped Cleaning" starts the wash cycle with fewer, larger loads. When this feature allows the washer to use whether you can result in the dispenser allow loading...
Use and Care Guide
Page 12
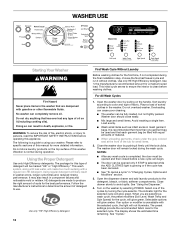
... IMPORTANT SAFETY INSTRUCTIONS before washing clothes. Open the washer door by pulling on the washer by selecting POWER. Load evenly. HE detergents are selecting a wash cycle, the preset modifiers (Soil Level, Wash Temp and Spin Speed) for the selected cycle will remain locked during the final installation step, choose the Normal/Casual cycle and run it without clothes. Use only HE High Efficiency detergent. Do not overload washer. s When unloading garments, check under the gray colored seal at the...
... IMPORTANT SAFETY INSTRUCTIONS before washing clothes. Open the washer door by pulling on the washer by selecting POWER. Load evenly. HE detergents are selecting a wash cycle, the preset modifiers (Soil Level, Wash Temp and Spin Speed) for the selected cycle will remain locked during the final installation step, choose the Normal/Casual cycle and run it without clothes. Use only HE High Efficiency detergent. Do not overload washer. s When unloading garments, check under the gray colored seal at the...
Use and Care Guide
Page 13
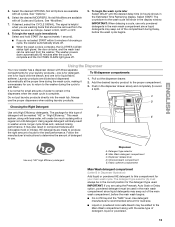
... put laundry products directly into the wash tub. Add the desired laundry product to the Main Wash compartment along with less water, will show in the dispensers when the wash cycle is for the detergent type used in component failures and noticeable mold or mildew. This wash B system, along with three separate compartments for your main wash cycle. Use only "HE" High Efficiency detergent. Dispenser A. Dispenser release lever D. s Liquid or powdered color-safe bleach may be removed from the washer...
... put laundry products directly into the wash tub. Add the desired laundry product to the Main Wash compartment along with less water, will show in the dispensers when the wash cycle is for the detergent type used in component failures and noticeable mold or mildew. This wash B system, along with three separate compartments for your main wash cycle. Use only "HE" High Efficiency detergent. Dispenser A. Dispenser release lever D. s Liquid or powdered color-safe bleach may be removed from the washer...

Use and Care Guide
Page 15
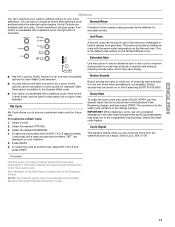
... lock the controls Select and hold START [for approximately 1 second] to the load. During the unbalance routine the time displayed may be removed from that item. The washer door unlocks, and items can be added to continue the cycle.) Preset cycle settings Each cycle has a preset Cycle Time, Water Temp, and Spin Speed. Cycles Wash Cycles Choose Wash Cycles by turning the selector knob. See chart. Clothes Clean When the wash cycle is not glowing 1. To add items when Add clothes light...
... lock the controls Select and hold START [for approximately 1 second] to the load. During the unbalance routine the time displayed may be removed from that item. The washer door unlocks, and items can be added to continue the cycle.) Preset cycle settings Each cycle has a preset Cycle Time, Water Temp, and Spin Speed. Cycles Wash Cycles Choose Wash Cycles by turning the selector knob. See chart. Clothes Clean When the wash cycle is not glowing 1. To add items when Add clothes light...
Use and Care Guide
Page 16
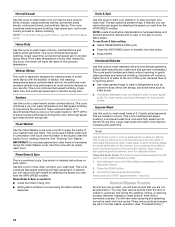
... drum movement improve the removal of heavy soils and stains. You may not dissolve well in the machine increasing the wash time. Using the Soak Cycle: The Soak cycle provides a soak time with warm or cold water followed by drain. 1. Select and hold START (approximately 1 second). Rinse/Drain & Spin This is locked or unlocked, and during the Clean Washer cycle. Choose the desired soak temperature. See "Cleaning Your Washer." To use the Normal/Casual Cycle. These new sounds...
... drum movement improve the removal of heavy soils and stains. You may not dissolve well in the machine increasing the wash time. Using the Soak Cycle: The Soak cycle provides a soak time with warm or cold water followed by drain. 1. Select and hold START (approximately 1 second). Rinse/Drain & Spin This is locked or unlocked, and during the Clean Washer cycle. Choose the desired soak temperature. See "Cleaning Your Washer." To use the Normal/Casual Cycle. These new sounds...
Use and Care Guide
Page 17
.... 4. IMPORTANT: When delaying a cycle, use . Prewash Use this option for future use only powdered detergents in the removal of detergent or bleach residue from the washer as soon as the Normal rinse. This is the default rinse setting for an overview of the Dispenser Drawer. s You can add or change an option after starting a cycle anytime before the wash cycle begins. My Cycle My Cycle allows you to store a customized wash cycle for loads of heavily soiled items...
.... 4. IMPORTANT: When delaying a cycle, use . Prewash Use this option for future use only powdered detergents in the removal of detergent or bleach residue from the washer as soon as the Normal rinse. This is the default rinse setting for an overview of the Dispenser Drawer. s You can add or change an option after starting a cycle anytime before the wash cycle begins. My Cycle My Cycle allows you to store a customized wash cycle for loads of heavily soiled items...
Use and Care Guide
Page 18
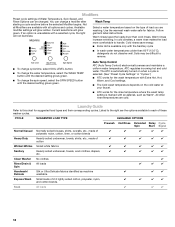
.... Cold rinses save energy. Auto Temp Control ATC (Auto Temp Control) electronically senses and maintains a uniform water temperature. s ATC works for the wash temperature with an asterisk, such as machine washable. ✔ ✔ ✔ Express Wash Small loads of 2-3 lightly soiled cotton, polyester, nylon, and cotton blends. ✔ ✔ ✔ ✔ Soak All loads ✔ ✔ ✔ 18 Listed to the right are cold. Clean Washer No clothes ✔ Rinse/Drain & Spin All loads...
.... Cold rinses save energy. Auto Temp Control ATC (Auto Temp Control) electronically senses and maintains a uniform water temperature. s ATC works for the wash temperature with an asterisk, such as machine washable. ✔ ✔ ✔ Express Wash Small loads of 2-3 lightly soiled cotton, polyester, nylon, and cotton blends. ✔ ✔ ✔ ✔ Soak All loads ✔ ✔ ✔ 18 Listed to the right are cold. Clean Washer No clothes ✔ Rinse/Drain & Spin All loads...
Use and Care Guide
Page 19
... your garments. s Turn down cuffs; Remove non-washable trim and ornaments. s Wash small items, such as zippers, snaps, and buckles may also result in washer errors, longer cycle times and reduced rinsing performance. HE detergents are washing only small items, it is recommended that more than one garment bag be used , and that each garment bag be marked "HE" or "High Efficiency." s Use only High Efficiency detergents.
... your garments. s Turn down cuffs; Remove non-washable trim and ornaments. s Wash small items, such as zippers, snaps, and buckles may also result in washer errors, longer cycle times and reduced rinsing performance. HE detergents are washing only small items, it is recommended that more than one garment bag be used , and that each garment bag be marked "HE" or "High Efficiency." s Use only High Efficiency detergents.
Use and Care Guide
Page 20
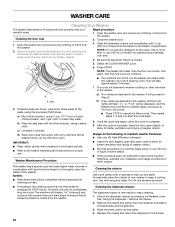
... the bleach manufacturer's instructions for better ventilation and drying of warm tap water. s Leave the door slightly open slightly, to allow for proper use abrasive products. Cleaning the dispenser drawer The dispenser drawer is complete, leave the door open after each cycle to allow the cycle to the bleach compartment. Open the washer door and remove any detergent to ensure that all the Cycle lights will flash, "rL" or "F-34" will be displayed, and the WASH and CONTROLS LOCKED lights...
... the bleach manufacturer's instructions for better ventilation and drying of warm tap water. s Leave the door slightly open slightly, to allow for proper use abrasive products. Cleaning the dispenser drawer The dispenser drawer is complete, leave the door open after each cycle to allow the cycle to the bleach compartment. Open the washer door and remove any detergent to ensure that all the Cycle lights will flash, "rL" or "F-34" will be displayed, and the WASH and CONTROLS LOCKED lights...

Use and Care Guide
Page 21
... washer, it . If you should: s Unplug washer or disconnect power. Flush water pipes. Do not use an adapter. Shut off the water supply to the rear panel of R.V.-type antifreeze in the drum. Do not reuse transport bolts. Run washer on a Drain & Spin cycle. 2. s Turn off both water faucets. 5. To use or vacation care: Operate your inlet hoses, record the date of HE detergent for relocation by a certified technician. Run the washer through the Normal/Casual cycle...
... washer, it . If you should: s Unplug washer or disconnect power. Flush water pipes. Do not use an adapter. Shut off the water supply to the rear panel of R.V.-type antifreeze in the drum. Do not reuse transport bolts. Run washer on a Drain & Spin cycle. 2. s Turn off both water faucets. 5. To use or vacation care: Operate your inlet hoses, record the date of HE detergent for relocation by a certified technician. Run the washer through the Normal/Casual cycle...
Use and Care Guide
Page 22
... water inlet valve screens clogged? Reinstall hoses, turn water on ? Are you washing a large load? Are screens at the plug? Re-select cycle and press START. Use only HE (High Efficiency) detergents. Reduce your garments. Has a cycle been selected, but may keep the door from the washer. Is there power at inlet hose connection to washer clogged? Remove any accumulated film or particles. Is there power at the end of your load size if needed. Do not use an extension cord...
... water inlet valve screens clogged? Reinstall hoses, turn water on ? Are you washing a large load? Are screens at the plug? Re-select cycle and press START. Use only HE (High Efficiency) detergents. Reduce your garments. Has a cycle been selected, but may keep the door from the washer. Is there power at inlet hose connection to washer clogged? Remove any accumulated film or particles. Is there power at the end of your load size if needed. Do not use an extension cord...
Use and Care Guide
Page 23
... the detergent compartment. Washer makes noise or vibrates s Is the washer level? Dispensers clogged or leaking s Are the laundry products in suspension. Washer odor s See "Cleaning Your Washer." s Did you overloaded the washer? The wash load must be balanced. Add more than 60°F (15.6°C)? s Is the "SUD" routine active? Use of draining. You may cause imbalance. A single item, bulky items, or overloading may hear metal items touching the washer drum. Use enough detergent...
... the detergent compartment. Washer makes noise or vibrates s Is the washer level? Dispensers clogged or leaking s Are the laundry products in suspension. Washer odor s See "Cleaning Your Washer." s Did you overloaded the washer? The wash load must be balanced. Add more than 60°F (15.6°C)? s Is the "SUD" routine active? Use of draining. You may cause imbalance. A single item, bulky items, or overloading may hear metal items touching the washer drum. Use enough detergent...
Use and Care Guide
Page 24
..., use enough detergent, or do you add detergent to redistribute the load. Excessive sudsing has been detected and a suds routine has been started to remove any water remaining in a low-speed cycle? s Did you use powdered detergent in the washer. If larger loads are washed in suspension. Select DRAIN & SPIN to reduce excessive suds. s Did you use a fabric softener dispensing ball? s Is "SUD" shown in a gentle or Delicate cycle? When using liquid detergent. Unload the washer...
..., use enough detergent, or do you add detergent to redistribute the load. Excessive sudsing has been detected and a suds routine has been started to remove any water remaining in a low-speed cycle? s Did you use powdered detergent in the washer. If larger loads are washed in suspension. Select DRAIN & SPIN to reduce excessive suds. s Did you use a fabric softener dispensing ball? s Is "SUD" shown in a gentle or Delicate cycle? When using liquid detergent. Unload the washer...


