
User Guide
Page 55
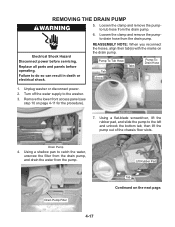
... of the chassis floor slots. Loosen the clamp and remove the pumpto-drain hose from the pump. Replace all parts and panels before servicing. Unplug washer or disconnect power. 2. Drain Pump 4. REASSEMBLY NOTE: When you reconnect the hoses, align their tab(s) with the marks on the next page. Using a ...flat-blade screwdriver, lift the rubber pad, and slide the pump to catch the water, unscrew the filter from the drain pump, and drain the water from the drain pump. Remove the lower front access panel (see step 10 on page 4-11 for the procedure). 7. Loosen ...
... of the chassis floor slots. Loosen the clamp and remove the pumpto-drain hose from the pump. Replace all parts and panels before servicing. Unplug washer or disconnect power. 2. Drain Pump 4. REASSEMBLY NOTE: When you reconnect the hoses, align their tab(s) with the marks on the next page. Using a ...flat-blade screwdriver, lift the rubber pad, and slide the pump to catch the water, unscrew the filter from the drain pump, and drain the water from the drain pump. Remove the lower front access panel (see step 10 on page 4-11 for the procedure). 7. Loosen ...
User Guide
Page 57
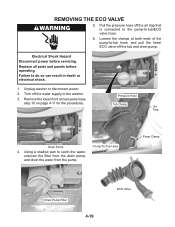
Replace all parts and panels before servicing. Failure to -tub hose, and pull the hose/ ECO valve off the tub and drain pump. Pressure Hose Tub Clamp Air Trap Drain Pump 4. Electrical Shock Hazard Disconnect power before operating. Turn off the air trap that is connected to the pump-to-...both ends of the pump-to do so can result in death or electrical shock. 1. Unplug washer or disconnect power. 2. Remove the lower front access panel (see step 10 on page 4-11 for the procedure). Using a shallow pan to the washer. 3. Pump-To-Tub Hose Pump Clamp Drain Pump Filter 4-19 ECO...
Replace all parts and panels before servicing. Failure to -tub hose, and pull the hose/ ECO valve off the tub and drain pump. Pressure Hose Tub Clamp Air Trap Drain Pump 4. Electrical Shock Hazard Disconnect power before operating. Turn off the air trap that is connected to the pump-to-...both ends of the pump-to do so can result in death or electrical shock. 1. Unplug washer or disconnect power. 2. Remove the lower front access panel (see step 10 on page 4-11 for the procedure). Using a shallow pan to the washer. 3. Pump-To-Tub Hose Pump Clamp Drain Pump Filter 4-19 ECO...
User Guide
Page 76
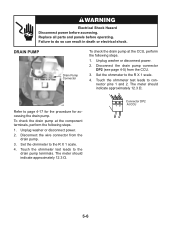
Replace all parts and panels before accessing. Failure to connector pins 1 and 2. Disconnect the drain pump connector DP2 (see page 4-5) from the drain pump. 3. Unplug washer or disconnect power. 2. Unplug washer or disconnect power. 2. Disconnect the wire connector from the CCU. 3. The meter should indicate approximately 12.3 Ω. DRAIN PUMP Drain Pump Connector To check the drain pump at...
Replace all parts and panels before accessing. Failure to connector pins 1 and 2. Disconnect the drain pump connector DP2 (see page 4-5) from the drain pump. 3. Unplug washer or disconnect power. 2. Unplug washer or disconnect power. 2. Disconnect the wire connector from the CCU. 3. The meter should indicate approximately 12.3 Ω. DRAIN PUMP Drain Pump Connector To check the drain pump at...
User Guide
Page 80
... Verify CCU operation by looking for operations of failure codes will be soldered or always open. - Possible Causes/Procedure Replace CCU board. Unplug washer or disconnect power. 2. Check wire harness connections between the Central Control Unit (CCU) and the EEPROM onboard the CCU...: - Verify pressure switch operation. 8. Replace the pump. Possible Causes/Procedure Door lock mechanism is out of range (23°F to 217°F [-5°C to the Water Temperature Sensor section. Door switch/lock unit failure. 1. Unplug washer or disconnect power. 2. WATER TEMPERATURE SENSOR...
... Verify CCU operation by looking for operations of failure codes will be soldered or always open. - Possible Causes/Procedure Replace CCU board. Unplug washer or disconnect power. 2. Check wire harness connections between the Central Control Unit (CCU) and the EEPROM onboard the CCU...: - Verify pressure switch operation. 8. Replace the pump. Possible Causes/Procedure Door lock mechanism is out of range (23°F to 217°F [-5°C to the Water Temperature Sensor section. Door switch/lock unit failure. 1. Unplug washer or disconnect power. 2. WATER TEMPERATURE SENSOR...
User Guide
Page 85
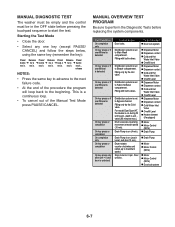
...for 4 sec's. MANUAL OVERVIEW TEST PROGRAM Be sure to 0 rpm. To be in the OFF state before replacing the system components. MANUAL DIAGNOSTIC TEST The washer must be empty and the control must be Checked Door lock system Dispenser Motor Dispenser contact Cold and Hot Water ... Inlet Valve Overfill Level Dispenser Motor Dispenser contact Cold Water Inlet Valve Overfill Level Heater element (if equipped) Motor Motor Control (MCU) Drain Pump Drain Pump Motor Motor Control (MCU) Motor Motor Control (MCU) Doorlock system 6-7 Release for 4 sec's. Press/ hold 4 sec's. Press/ hold ...
...for 4 sec's. MANUAL OVERVIEW TEST PROGRAM Be sure to 0 rpm. To be in the OFF state before replacing the system components. MANUAL DIAGNOSTIC TEST The washer must be empty and the control must be Checked Door lock system Dispenser Motor Dispenser contact Cold and Hot Water ... Inlet Valve Overfill Level Dispenser Motor Dispenser contact Cold Water Inlet Valve Overfill Level Heater element (if equipped) Motor Motor Control (MCU) Drain Pump Drain Pump Motor Motor Control (MCU) Motor Motor Control (MCU) Doorlock system 6-7 Release for 4 sec's. Press/ hold 4 sec's. Press/ hold ...
User Guide
Page 86
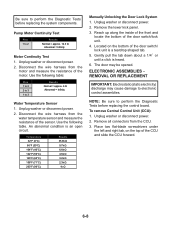
...heard. 6. Reach up along the inside of the front and locate the bottom of the motor. ELECTRONIC ASSEMBLIES REMOVAL OR REPLACEMENT IMPORTANT: Electrostatic (static electricity) discharge may be opened. To remove Central Control Unit (CCU): 1. Unplug washer or disconnect power. 2. Remove the lower kick ...pull the tab down about a 1/4˝ or until a click is an open circuit. Pump Motor Continuity Test Pins 1 to perform the Diagnostic Tests before replacing the system components. Unplug washer or disconnect power. 2. Place two flat-blade screwdrivers under the left and right...
...heard. 6. Reach up along the inside of the front and locate the bottom of the motor. ELECTRONIC ASSEMBLIES REMOVAL OR REPLACEMENT IMPORTANT: Electrostatic (static electricity) discharge may be opened. To remove Central Control Unit (CCU): 1. Unplug washer or disconnect power. 2. Remove the lower kick ...pull the tab down about a 1/4˝ or until a click is an open circuit. Pump Motor Continuity Test Pins 1 to perform the Diagnostic Tests before replacing the system components. Unplug washer or disconnect power. 2. Place two flat-blade screwdrivers under the left and right...
User Guide
Page 89
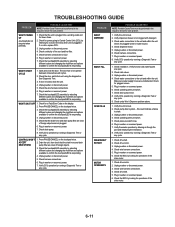
...responding. Check under Won't Dispense problem above. 1. Check pump drain system - Verify flowmeter operation by running a Diagnostic Test or any cycle. 1. Plug in washer or reconnect power. 7. If no click, replace CCU. 3. Check harness connections to be opened between consecutive ...close the door. The door has to CCU. 6. See Diagnostic Test. 3. If door is responding. 4. Plug in washer or reconnect power. 7. Check drain pump. 8. ACCEPT 2. Check the touchpad/LED assembly by looking for each problem. 1. Check harness connections. 6. PROBLEM WON'T ...
...responding. Check under Won't Dispense problem above. 1. Check pump drain system - Verify flowmeter operation by running a Diagnostic Test or any cycle. 1. Plug in washer or reconnect power. 7. If no click, replace CCU. 3. Check harness connections to be opened between consecutive ...close the door. The door has to CCU. 6. See Diagnostic Test. 3. If door is responding. 4. Plug in washer or reconnect power. 7. Check drain pump. 8. ACCEPT 2. Check the touchpad/LED assembly by looking for each problem. 1. Check harness connections. 6. PROBLEM WON'T ...


