
Kenmore HE2t Support Question
Kenmore HE2t Support Question
Find answers below for this question about Kenmore HE2t - 3.7 cu. Ft. Front Load Washer.Need a Kenmore HE2t manual? We have 1 online manual for this item!
Question posted by solsurvivor on November 5th, 2012
The Chrome Plated Plastic Ring On The Door Broke And I Need To Replace It
The chrome plated plastic ring on the door broke and I need to replace it
Current Answers
Related Kenmore HE2t Manual Pages
User Guide - Page 3

...Requirements 2-1 Installation Instructions 2-6
PRODUCT OPERATION 3-1 Features And Benefits 3-1 Washer Use 3-3 Washer Care 3-12 Troubleshooting 3-15
COMPONENT ACCESS 4-1 Component Locations 4-1 ... Removing The Detergent Dispenser Assembly 4-10 Removing The Detergent Dispenser Motor 4-13 Removing The Door Switch Assembly And The Bellows 4-14 Removing The Drain Pump 4-17 Removing The ECO ...
User Guide - Page 4
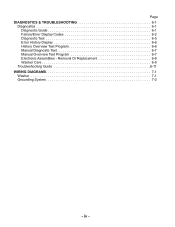
iv - Removal Or Replacement 6-8 Washer Care 6-9
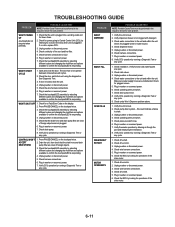
Troubleshooting Guide 6-11 WIRING DIAGRAMS 7-1
Washer 7-1 Grounding System 7-2
- Page DIAGNOSTICS & TROUBLESHOOTING 6-1
Diagnostics 6-1 Diagnostic Guide 6-1 Failure/Error Display Codes 6-2 Diagnostic Test 6-5 Error History Display 6-6 History Overview Test Program 6-6 Manual Diagnostic Test 6-7 Manual ...
User Guide - Page 9
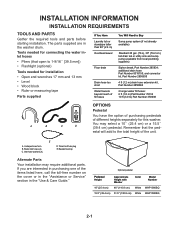
... water fill hoses: 6 ft (1.8 m) Part Number 76314 10 ft (3.0 m) Part Number 350008...• Ruler or measuring tape
Parts supplied
If You Have Laundry tub or standpipe taller than 96" (2.4 m) Overhead sewer
...
You Will Need to 1-9/16˝ [39.5 mm]) • Flashlight (optional)
Tools needed for this washer. Optional pedestal
Pedestal Height
Approximate Height with Washer
Color
Model Number...
User Guide - Page 10
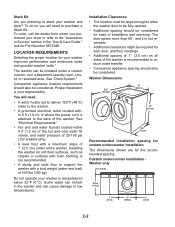
..., laundry room, closet, or recessed area. Installing the washer on all sides of the washer is not recommended.
• A sturdy and solid floor to support the washer with...door opens more than 90°, and it is your washer and dryer? You will need
• A water heater set to deliver 120°F (49°C) water to the washer.
• A grounded electrical outlet located within 4 ft...
User Guide - Page 11
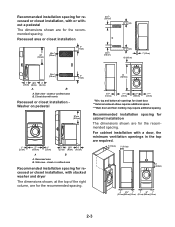
...require additional spacing. Side view -
For cabinet installation with vents
Recessed or closet installation Washer on pedestal
3" (7.6 cm)
38" min. (96.5 cm)
1" (2.5 cm)
27" (68.6 cm)
1" (2.5 cm)
1"
29¹⁄4"
4"
(2.5 cm) (80 cm) (10.2 cm)
A
B
A. Closet door with a door, the minimum ventilation openings in .2 (155 cm 2)
1"
29¹⁄4"
4"
(2.5 cm) (80 cm) (10...
User Guide - Page 12
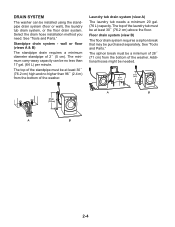
... less than 96˝ (2.4 m) from the bottom of the washer.
wall or floor (views A & B)
The standpipe drain requires a minimum diameter standpipe of the laundry tub must be at least 30˝ (76.2 cm) above the floor.
The top of 2˝ (5 cm). Laundry tub drain system (view A)
The laundry tub needs a minimum 20 gal. (76 L) capacity.
User Guide - Page 14
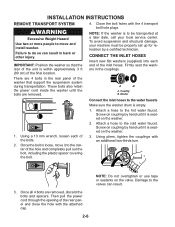
..., discard the bolts and spacers.
NOTE: If the washer is within approximately 3 ft (90 cm) of the final location. Attach a hose... to be properly set up for relocation by hand until it is seated on coupling by a certified technician. Using a 13 mm wrench, loosen each end of the hole and completely pull out the bolt, including the plastic...
User Guide - Page 16
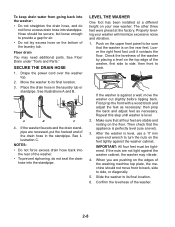
... machine top plate, the machine should be secure, but loose enough to side, or diagonally. 5. then prop the back and adjust feet as necessary; If the nuts are recessed, put the hooked end of the washer.
2-8 Slide the washer to its final location. 6. A
B
C
4. Confirm the levelness of the drain hose in the laundry tub...
User Guide - Page 22
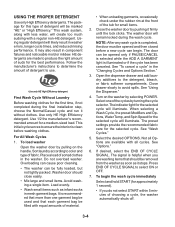
... in mesh garment bags. Open the dispenser drawer and add laundry additives to select ON or OFF.
7. See "Wash Cycles."
5. HE detergents are available with a regular non-HE detergent. Do not overload washer. The indicator light for small items.
2. To load washer
Open the washer door by selecting POWER. Press END OF CYCLE SIGNAL to the...
User Guide - Page 27

...washer during the wash and rinse cycles. The countdown to HIGH.
Drain without drum movement, to help remove small spots of your wash load. You may hear various sounds when the door...phase for equal distribution of the laundry, and a soaking time without spin assures gentle treatment, even for :
• Loads that you are not accustomed to your washer fresh and clean. These new ...
User Guide - Page 31
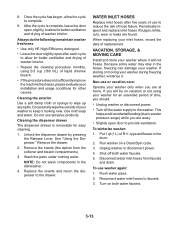
... five years of hose failure. See "Using the Dispenser."
Periodically inspect and replace inlet hoses if bulges, kinks, cuts, wear or leaks are away.
• Slightly open door to allow for other causes.
If you should:
• Unplug washer or disconnect power.
• Turn off both water faucets.
3-13 Flush water pipes...
User Guide - Page 35
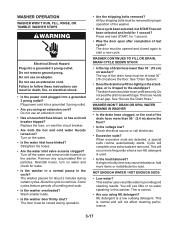
... remove ground prong. Wash smaller loads.
• Is the washer door firmly shut? Press and hold START, for leaks.
• Is the washer in a normal pause in this washer. The door must be closed again to start a new cycle. The hose needs an air gap. When excessive suds are removed. This washer uses very little water to...
User Guide - Page 52
... panel
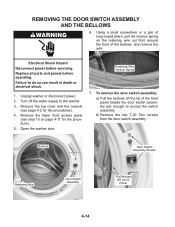
(see page 4-2 for the procedure). 5. To remove the door switch assembly: a) Pull the bellows off the water supply to the washer. 3. Open the washer door. Replace all parts and panels before servicing. Retaining Wire Tension Spring
7.
Electrical Shock Hazard Disconnect power before operating. Unplug washer or disconnect power. 2. Turn off the lip of the front...
User Guide - Page 58
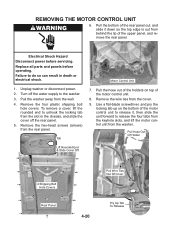
REMOVING THE MOTOR CONTROL UNIT
6. Remove the four plastic shipping bolt
hole covers. Pull the hose out of the holders on the bottom of the ... the washer away from the rear panel.
Remove the hex-head screws (arrows) from the wall. 4. Use a flat-blade screwdriver, and pry the
locking tab up on top of the upper panel, and remove the rear panel. Replace all parts and panels before servicing...
User Guide - Page 70
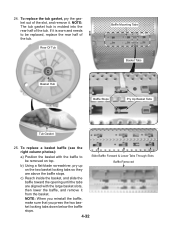
To replace the tub gasket, pry the gasket out of the tub. c) Reach inside the basket, and slide the baffle toward... a flat-blade screwdriver, pry up on the two basket locking tabs so they are aligned with the baffle to be removed on top.
To replace a basket baffle (see the right column photos):
a) Position the basket with the large basket slots, then lower the baffle, and remove it ...
User Guide - Page 75

... to do so can result in death or electrical shock. Lock Sol. Unplug washer or disconnect power. 2. Set the ohmmeter to the R X 1 scale.
4. Connector DS2 At CCU
5-5 Replace all parts and panels before accessing. The meter should indicate as follows:
Door Unlock Solenoid -
Electrical Shock Hazard Disconnect power before operating. Pins 1 & 3 = 60 Ω...
User Guide - Page 80
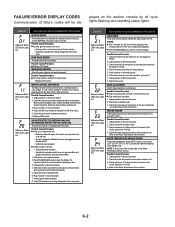
... 86°F (30°C). Possible Causes/Procedure 1. Check the drain pump filter for plugged or kinked inlet hoses or plugged screens in the unit: - Unplug washer or disconnect power. 8. Replace the pump.
Door switch/lock unit failure.
1.
Possible Causes/Procedure 1. Refer to the Water Temperature Sensor section.
6-2
User Guide - Page 85
...speed (10 min).
Filling with both valves.
To be in the OFF state before replacing the system components.
On key press or if overfill level is detected
Distribution system ...hold 4 sec's.
Door unlocks. Press/ hold 4 sec's.
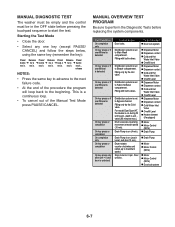
Drain Pump is set to Bleach compartment. MANUAL DIAGNOSTIC TEST
The washer must be empty and the control must be Checked
Door lock system
Dispenser...
User Guide - Page 86
... Sensor
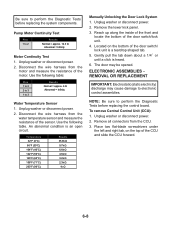
1. Remove the lower kick panel. 3. Pump Motor Continuity Test
Pins 1 to perform the Diagnostic Tests before replacing the system components. Unplug washer or disconnect power.
2. The door may cause damage to perform the Diagnostic Tests before replacing the control board. Gently pull the tab down about a 1/4˝ or until a click is an open...
User Guide - Page 89
.... 6. Plug in washer or reconnect power.
7. Unplug washer or disconnect power. 4. Unplug washer or disconnect power.
4. Plug in washer or reconnect power. 7. Check the door switch/lock unit using... assembly by looking for plugged screen in washer or reconnect power. 8. Check pump drain system - Check drive belt. 5. If no click, replace CCU.
3. Press PAUSE/CANCEL on the...
Similar Questions

Drain Pump Serial Number To Replace
Hello,What is the serial number for the drain pump on this model washer. I need to replace mine.
Hello,What is the serial number for the drain pump on this model washer. I need to replace mine.
(Posted by cindeegoplay 3 years ago)

Kenmore He2 Model 110.47561600 F20 Error Code.
6 minutes into any cycle the washer stops filling and shows the F20 error code. After researching th...
6 minutes into any cycle the washer stops filling and shows the F20 error code. After researching th...
(Posted by riskoj 7 years ago)

I Replaced The Door Latch Lock On My Front Load Washer The Washer Won't Come On
I was told the door lock latch needed to be replaced. When the door latch lock was replaced the wash...
I was told the door lock latch needed to be replaced. When the door latch lock was replaced the wash...
(Posted by reginaharvey 11 years ago)

Does This Front Load Washer Need To Have Bolts Installed To Move From Another St
model#110.47571602 HE2t frontload washer locking bolts for moving?
model#110.47571602 HE2t frontload washer locking bolts for moving?
(Posted by donnasilver 12 years ago)

Dgree Of Difficulty To Take Out And Replace Front Boot On Front Loading Washer
(Posted by leonard483 13 years ago)