
User Guide
Page 16
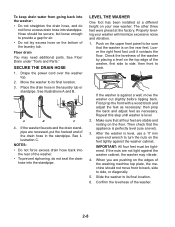
... drain hose into the standpipe. To keep drain water from going back into the washer: • Do not straighten the drain hose, and do not seal the drain hose into standpipe. If the washer faucets and the drain standpipe are stable and resting on the top edge of the... 3. IMPORTANT: All four feet must be sure that all four feet are recessed, put the hooked end of the washer. 2-8 Lower the right front foot until washer is on the bottom of the washer, first side to side, then front to its final location. 6. Floor drain You may vibrate. 4. Properly leveling your new...
... drain hose into the standpipe. To keep drain water from going back into the washer: • Do not straighten the drain hose, and do not seal the drain hose into standpipe. If the washer faucets and the drain standpipe are stable and resting on the top edge of the... 3. IMPORTANT: All four feet must be sure that all four feet are recessed, put the hooked end of the washer. 2-8 Lower the right front foot until washer is on the bottom of the washer, first side to side, then front to its final location. 6. Floor drain You may vibrate. 4. Properly leveling your new...
User Guide
Page 30
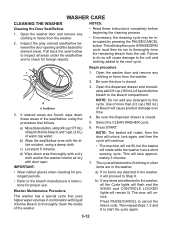
...area with door open. IMPORTANT: NOTE: Do not add any clothing or items from the washer. 2. Open the washer door and remove any items are detected in the washer, all areas under the seal/bellow and to cancel the failure code. This will unlock. A RINSE/SPIN cycle must ...button. Failure to the bleach compartment. Be sure the door is closed . 3. Open the dispenser drawer and immediately add 2/3 cup (160 mL) of the washer. Seal/Bellow 3. a) Mix a dilute solution, using a damp cloth. Be sure the dispenser drawer is closed . 5. Press START. This will cause damage to...
...area with door open. IMPORTANT: NOTE: Do not add any clothing or items from the washer. 2. Open the washer door and remove any items are detected in the washer, all areas under the seal/bellow and to cancel the failure code. This will unlock. A RINSE/SPIN cycle must ...button. Failure to the bleach compartment. Be sure the door is closed . 3. Open the dispenser drawer and immediately add 2/3 cup (160 mL) of the washer. Seal/Bellow 3. a) Mix a dilute solution, using a damp cloth. Be sure the dispenser drawer is closed . 5. Press START. This will cause damage to...
User Guide
Page 34
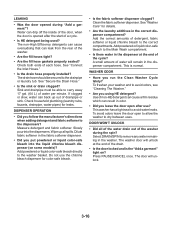
... the Main Wash compartment. • Is there water in odor. • Did you using HE detergent? This washer has a tight seal to the correct compartments. Check both ends of water will unlock. 3-16 Add the correct amounts of the drain. • Is the door ...locked and is the "Add a garment" light on some models)? This is opened during the spin? Do not use ? The washer door will unlock at...
... the Main Wash compartment. • Is there water in odor. • Did you using HE detergent? This washer has a tight seal to the correct compartments. Check both ends of water will unlock. 3-16 Add the correct amounts of the drain. • Is the door ...locked and is the "Add a garment" light on some models)? This is opened during the spin? Do not use ? The washer door will unlock at...
User Guide
Page 35
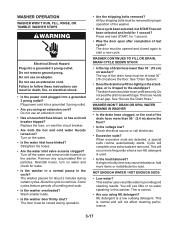
...? The drain hose should be closed again to start a new cycle. Do not seal the drain hose with tape. See "Secure the Drain Hose." NOT ENOUGH WATER / NOT ENOUGH SUDS • Low water? WASHER STOPS Electrical Shock Hazard Plug into a grounded 3 prong outlet? Reinstall hoses, turn...drain hose lower than 96˝ (2.4 m) above the floor. The top of last cycle? This washer uses very little water to the standpipe? Wash smaller loads. • Is the washer door firmly shut? Do not remove ground prong. This is a low sudsing detergent. This will complete...
...? The drain hose should be closed again to start a new cycle. Do not seal the drain hose with tape. See "Secure the Drain Hose." NOT ENOUGH WATER / NOT ENOUGH SUDS • Low water? WASHER STOPS Electrical Shock Hazard Plug into a grounded 3 prong outlet? Reinstall hoses, turn...drain hose lower than 96˝ (2.4 m) above the floor. The top of last cycle? This washer uses very little water to the standpipe? Wash smaller loads. • Is the washer door firmly shut? Do not remove ground prong. This is a low sudsing detergent. This will complete...
User Guide
Page 87
... Cleaning the door seal: 1. Remove dispenser drawer. 4. Unplug washer or disconnect power. 2. IMPORTANT: • Wear rubber gloves when cleaning for proper use. Also, align the posts on top of the CCU with liquid chlorine bleach to the top brace. Remove left front screw that was covered by pressing ...PAUSE/CANCEL. With a flat -blade screwdriver in combination with the notch in the back of the washer. Pull back the seal to inspect all areas under the seal and to release the bottom of the seal, using the ...
... Cleaning the door seal: 1. Remove dispenser drawer. 4. Unplug washer or disconnect power. 2. IMPORTANT: • Wear rubber gloves when cleaning for proper use. Also, align the posts on top of the CCU with liquid chlorine bleach to the top brace. Remove left front screw that was covered by pressing ...PAUSE/CANCEL. With a flat -blade screwdriver in combination with the notch in the back of the washer. Pull back the seal to inspect all areas under the seal and to release the bottom of the seal, using the ...


