
User Guide
Page 4
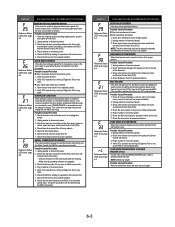
iv - Page DIAGNOSTICS & TROUBLESHOOTING 6-1 Diagnostics 6-1 Diagnostic Guide 6-1 Failure/Error Display Codes 6-2 Diagnostic Test 6-5 Error History Display 6-6 History Overview Test Program 6-6 Manual Diagnostic Test 6-7 Manual Overview Test Program 6-7 Electronic Assemblies - Removal Or Replacement 6-8 Washer Care 6-9 Troubleshooting Guide 6-11 WIRING DIAGRAMS 7-1 Washer 7-1 Grounding System 7-2 -
iv - Page DIAGNOSTICS & TROUBLESHOOTING 6-1 Diagnostics 6-1 Diagnostic Guide 6-1 Failure/Error Display Codes 6-2 Diagnostic Test 6-5 Error History Display 6-6 History Overview Test Program 6-6 Manual Diagnostic Test 6-7 Manual Overview Test Program 6-7 Electronic Assemblies - Removal Or Replacement 6-8 Washer Care 6-9 Troubleshooting Guide 6-11 WIRING DIAGRAMS 7-1 Washer 7-1 Grounding System 7-2 -
User Guide
Page 21
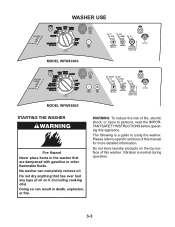
... operating this appliance. The following is normal during operation. 3-3 WARNING: To reduce the risk of oil on the top surface of this washer. Do not dry anything that are dampened with gasoline or other flammable fluids. Do not store laundry products on it (...including cooking oils). Doing so can completely remove oil. Please refer to specific sections of this manual for more detailed information. WASHER USE MODEL WFW8300S MODEL WFW8500S STARTING THE WASHER Fire Hazard Never place items in death, explosion, or fire.
... operating this appliance. The following is normal during operation. 3-3 WARNING: To reduce the risk of oil on the top surface of this washer. Do not dry anything that are dampened with gasoline or other flammable fluids. Do not store laundry products on it (...including cooking oils). Doing so can completely remove oil. Please refer to specific sections of this manual for more detailed information. WASHER USE MODEL WFW8300S MODEL WFW8500S STARTING THE WASHER Fire Hazard Never place items in death, explosion, or fire.
User Guide
Page 23
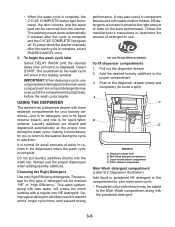
...High Efficiency detergent. To fill dispenser compartments 1. Pull out the dispenser drawer. 2. Always use . Using regular detergent will show in washer errors, longer cycle times, and reduced rinsing performance. A C MAX DETERGENT LIQUID BLEACH SOFTENER B MAX D Dispenser A. The countdown to ...unlocks, and the wash load can be removed from the washer. Main Wash detergent compartment C. Liquid chlorine bleach compartment D. It is complete. It may be marked "HE" or "High Efficiency." The washer powers down the washer manually after the cycle is ...
...High Efficiency detergent. To fill dispenser compartments 1. Pull out the dispenser drawer. 2. Always use . Using regular detergent will show in washer errors, longer cycle times, and reduced rinsing performance. A C MAX DETERGENT LIQUID BLEACH SOFTENER B MAX D Dispenser A. The countdown to ...unlocks, and the wash load can be removed from the washer. Main Wash detergent compartment C. Liquid chlorine bleach compartment D. It is complete. It may be marked "HE" or "High Efficiency." The washer powers down the washer manually after the cycle is ...
User Guide
Page 24
...The bleach will drain automatically before START is too high, the washer will be removed. Fabric softener compartment (Letter D in Dispenser Illustration) Add NO MORE THAN 2/3 cup (160 mL) liquid chlorine bleach to this dispenser to your load. • Always measure liquid chlorine bleach. To stop a ... than the manufacturer's recommended amount. NOTE: Overfilling could cause an oversudsing condition. To cancel a cycle 1. To drain the washer manually 1. When the spin is operating. Do not use . • Do not fill beyond the "MAX" level. Select PAUSE/CANCEL once. ...
...The bleach will drain automatically before START is too high, the washer will be removed. Fabric softener compartment (Letter D in Dispenser Illustration) Add NO MORE THAN 2/3 cup (160 mL) liquid chlorine bleach to this dispenser to your load. • Always measure liquid chlorine bleach. To stop a ... than the manufacturer's recommended amount. NOTE: Overfilling could cause an oversudsing condition. To cancel a cycle 1. To drain the washer manually 1. When the spin is operating. Do not use . • Do not fill beyond the "MAX" level. Select PAUSE/CANCEL once. ...
User Guide
Page 81
... installation, verify the unit is detected inside the drum. Verify CCU operation by looking for operations of the dispenser. 3. LOAD INSIDE DRUM DURING CLEANING WASHER CYCLE If at the MCU is locked. 1. If a failure occurs during 3 consecutive cycles. 1. Check the MCU by... within the housing. - Check connections of foreign objects. 5. See Manually Unlocking The Door Lock System. Plug in washer or reconnect power. 5. Check the drive motor for foreign objects. 2. Plug in washer or reconnect power. 5. Possible Causes/Procedure Remove clothes from dispenser motor...
... installation, verify the unit is detected inside the drum. Verify CCU operation by looking for operations of the dispenser. 3. LOAD INSIDE DRUM DURING CLEANING WASHER CYCLE If at the MCU is locked. 1. If a failure occurs during 3 consecutive cycles. 1. Check the MCU by... within the housing. - Check connections of foreign objects. 5. See Manually Unlocking The Door Lock System. Plug in washer or reconnect power. 5. Check the drive motor for foreign objects. 2. Plug in washer or reconnect power. 5. Possible Causes/Procedure Remove clothes from dispenser motor...
User Guide
Page 85
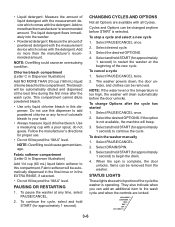
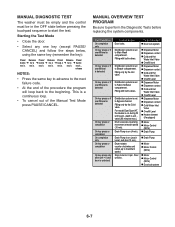
... only On key press or if overfill level is set to Bypass channel. Filling only by the Cold valve. MANUAL OVERVIEW TEST PROGRAM Be sure to start the test. MANUAL DIAGNOSTIC TEST The washer must be empty and the control must be Checked Door lock system Dispenser Motor Dispenser contact Cold and Hot... the key): Press/ hold 4 sec's., release NOTES: • Press the same key to advance to the next failure code. • At the end of the Manual Test Mode press PAUSE/CANCEL. Drum rotates counter-clockwise and ramps up to maximum speed.
... only On key press or if overfill level is set to Bypass channel. Filling only by the Cold valve. MANUAL OVERVIEW TEST PROGRAM Be sure to start the test. MANUAL DIAGNOSTIC TEST The washer must be empty and the control must be Checked Door lock system Dispenser Motor Dispenser contact Cold and Hot... the key): Press/ hold 4 sec's., release NOTES: • Press the same key to advance to the next failure code. • At the end of the Manual Test Mode press PAUSE/CANCEL. Drum rotates counter-clockwise and ramps up to maximum speed.
User Guide
Page 86
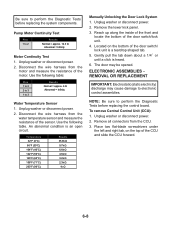
...-blade screwdrivers under the left and right tab, on the bottom of the motor. Reach up along the inside of the front and locate the bottom of the sensor. Unplug washer or disconnect power. 2. Disconnect the wire harness from the CCU. 3. Gently pull the tab down about a 1/4˝...°C) 203°F (96°C) Results 35.9k Ω 9.7k Ω 6.6k Ω 4.6k Ω 3.2k Ω 2.3k Ω 1k Ω Manually Unlocking the Door Lock System 1. Be sure to perform the Diagnostic Tests before replacing the control board. Disconnect the wire harness from the water temperature...
...-blade screwdrivers under the left and right tab, on the bottom of the motor. Reach up along the inside of the front and locate the bottom of the sensor. Unplug washer or disconnect power. 2. Disconnect the wire harness from the CCU. 3. Gently pull the tab down about a 1/4˝...°C) 203°F (96°C) Results 35.9k Ω 9.7k Ω 6.6k Ω 4.6k Ω 3.2k Ω 2.3k Ω 1k Ω Manually Unlocking the Door Lock System 1. Be sure to perform the Diagnostic Tests before replacing the control board. Disconnect the wire harness from the water temperature...


