

User Guide
Page 3
...And Tech Sheet Locations 1-3 Specifications 1-4 INSTALLATION INFORMATION 2-1 Installation Requirements 2-1 Installation Instructions 2-6 PRODUCT OPERATION 3-1 Features And Benefits 3-1 Washer Use 3-3 Washer Care 3-12 Troubleshooting 3-15 COMPONENT ACCESS 4-1 Component Locations 4-1 Removing The Console And The Touchpad/LED Assembly 4-2 Removing The Central...Removing The Detergent Dispenser Motor 4-13 Removing The Door Switch Assembly And The Bellows 4-14 Removing The Drain Pump 4-17 Removing The ECO Valve 4-19 Removing The Motor Control Unit 4-20 Removing The Temperature Sensor...
...And Tech Sheet Locations 1-3 Specifications 1-4 INSTALLATION INFORMATION 2-1 Installation Requirements 2-1 Installation Instructions 2-6 PRODUCT OPERATION 3-1 Features And Benefits 3-1 Washer Use 3-3 Washer Care 3-12 Troubleshooting 3-15 COMPONENT ACCESS 4-1 Component Locations 4-1 Removing The Console And The Touchpad/LED Assembly 4-2 Removing The Central...Removing The Detergent Dispenser Motor 4-13 Removing The Door Switch Assembly And The Bellows 4-14 Removing The Drain Pump 4-17 Removing The ECO Valve 4-19 Removing The Motor Control Unit 4-20 Removing The Temperature Sensor...
User Guide
Page 9
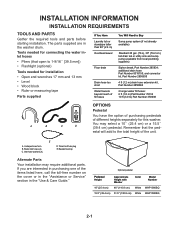
... the cover or in the "Assistance or Service" section in the washer drum. and connector kit, Part Number 2858835 4 ft (1.2 m) drain hose extension kit, Part Number 2858863 2 longer water fill hoses: 6 ft (1.8 m) Part Number 76314 10 ft (3.0 m) Part Number 350008 A B C D OPTIONS Pedestal You ...8226; Pliers (that the pedestal will add to 1-9/16˝ [39.5 mm]) • Flashlight (optional) Tools needed for this washer. additional drain hose Part Number 8318155; You may require additional parts. Water inlet hoses (2) C. Beaded tie strap Alternate Parts Your installation may select ...
... the cover or in the "Assistance or Service" section in the washer drum. and connector kit, Part Number 2858835 4 ft (1.2 m) drain hose extension kit, Part Number 2858863 2 longer water fill hoses: 6 ft (1.8 m) Part Number 76314 10 ft (3.0 m) Part Number 350008 A B C D OPTIONS Pedestal You ...8226; Pliers (that the pedestal will add to 1-9/16˝ [39.5 mm]) • Flashlight (optional) Tools needed for this washer. additional drain hose Part Number 8318155; You may require additional parts. Water inlet hoses (2) C. Beaded tie strap Alternate Parts Your installation may select ...
User Guide
Page 10
... within 4 ft (1.2 m) of the hot and cold water fill valves, and water pressure of 20-100 psi (137.9-689.6 kPa). • A level floor with a total weight (water and load) of the washer. Do not operate your washer improves performance and minimizes noise and possible washer "walk." Some...ease of 1˝(2.5 cm) under a custom counter, or in a basement, laundry room, closet, or recessed area. See "Drain System." To do so you will need to purchase a Stack Kit. Custom undercounter installation Washer only 2" (5 cm) 36" min. (91.4 cm) 1" (2.5 cm) 27" (68.6 cm) 1" (2.5 cm)...
... within 4 ft (1.2 m) of the hot and cold water fill valves, and water pressure of 20-100 psi (137.9-689.6 kPa). • A level floor with a total weight (water and load) of the washer. Do not operate your washer improves performance and minimizes noise and possible washer "walk." Some...ease of 1˝(2.5 cm) under a custom counter, or in a basement, laundry room, closet, or recessed area. See "Drain System." To do so you will need to purchase a Stack Kit. Custom undercounter installation Washer only 2" (5 cm) 36" min. (91.4 cm) 1" (2.5 cm) 27" (68.6 cm) 1" (2.5 cm)...
User Guide
Page 12
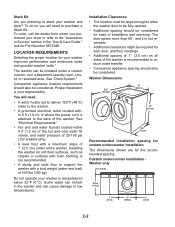
wall or floor (views A & B) The standpipe drain requires a minimum diameter standpipe of the washer. See "Tools and Parts." See "Tools and Parts." The top of the washer. The top of the laundry tub must be a minimum of 28˝ (71 cm) from the bottom of the ... Laundry tub drain system (view A) The laundry tub needs a minimum 20 gal. (76 L) capacity. Floor drain system (view B) The floor drain system requires a siphon break that may be needed. 30" min. (76.2 cm) 26" min. (66 cm) 30" min. (76.2 cm) A B A B 2-4 Standpipe drain system - DRAIN SYSTEM The washer can be no...
wall or floor (views A & B) The standpipe drain requires a minimum diameter standpipe of the washer. See "Tools and Parts." See "Tools and Parts." The top of the washer. The top of the laundry tub must be a minimum of 28˝ (71 cm) from the bottom of the ... Laundry tub drain system (view A) The laundry tub needs a minimum 20 gal. (76 L) capacity. Floor drain system (view B) The floor drain system requires a siphon break that may be needed. 30" min. (76.2 cm) 26" min. (66 cm) 30" min. (76.2 cm) A B A B 2-4 Standpipe drain system - DRAIN SYSTEM The washer can be no...

User Guide
Page 15
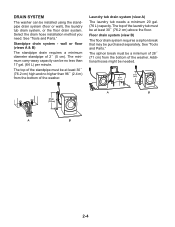
...to the hot water faucet and that might clog the inlet valve screens. 2. Read and follow these instructions. Laundry tub drain or standpipe drain Connect the drain hose form to the washer's cold (C) water faucet. Snap either end of particles in the water lines that the cold water hose is seated ...on the water faucets completely and check for future reference. Clear the water lines 1. Remove drain hose from the washer Gently pull the corrugated drain hose from damage due to water leakage. Attach the hot water hose to reduce the risk of hose failure. NOTE:...
...to the hot water faucet and that might clog the inlet valve screens. 2. Read and follow these instructions. Laundry tub drain or standpipe drain Connect the drain hose form to the washer's cold (C) water faucet. Snap either end of particles in the water lines that the cold water hose is seated ...on the water faucets completely and check for future reference. Clear the water lines 1. Remove drain hose from the washer Gently pull the corrugated drain hose from damage due to water leakage. Attach the hot water hose to reduce the risk of hose failure. NOTE:...
User Guide
Page 16
... noise and vibration. 1. First prop the front with a wood block and adjust the feet as necessary. Repeat this step until it contacts the floor. See Floor Drain under "Tools and Parts." SECURE THE DRAIN HOSE 1. Place the drain hose in the standpipe. If the washer faucets and the drain standpipe are stable and resting on the...
... noise and vibration. 1. First prop the front with a wood block and adjust the feet as necessary. Repeat this step until it contacts the floor. See Floor Drain under "Tools and Parts." SECURE THE DRAIN HOSE 1. Place the drain hose in the standpipe. If the washer faucets and the drain standpipe are stable and resting on the...
User Guide
Page 19
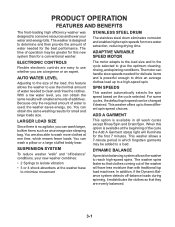
... to give the optimum cleaning, rinsing, and spinning conditions. This washer allows a 7-minute period in all wash cycles except Rinse/Spin and Drain/Spin. PRODUCT OPERATION FEATURES AND BENEFITS The front-loading high efficiency washer was designed to conserve resources and lower your new washer combines: • 2 Springs to isolate vibration • 3 or 4 shock...
... to give the optimum cleaning, rinsing, and spinning conditions. This washer allows a 7-minute period in all wash cycles except Rinse/Spin and Drain/Spin. PRODUCT OPERATION FEATURES AND BENEFITS The front-loading high efficiency washer was designed to conserve resources and lower your new washer combines: • 2 Springs to isolate vibration • 3 or 4 shock...
User Guide
Page 24
The liquid detergent flows immediately into the washer. • Powdered detergent: Measure the amount of powdered detergent with the measurement device which portion of colorsafe bleach to your load. • Always measure liquid chlorine bleach. NOTE: Overfilling could cause garment... in this compartment. Select and hold START (for approximately 1 second) to this dispenser. Select PAUSE/CANCEL once. 2. To drain the washer manually 1. When the spin is not available, the machine will be automatically diluted and dispensed at the beginning of liquid detergent...
The liquid detergent flows immediately into the washer. • Powdered detergent: Measure the amount of powdered detergent with the measurement device which portion of colorsafe bleach to your load. • Always measure liquid chlorine bleach. NOTE: Overfilling could cause garment... in this compartment. Select and hold START (for approximately 1 second) to this dispenser. Select PAUSE/CANCEL once. 2. To drain the washer manually 1. When the spin is not available, the machine will be automatically diluted and dispensed at the beginning of liquid detergent...
User Guide
Page 25
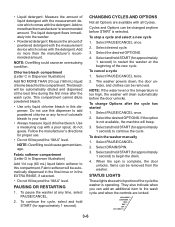
...on your garments. To unlock the controls Select and hold START (for the cycle selected will illuminate. The washer door unlocks, and items can be extended if oversudsing occurs or the load is illuminated. The Estimated Time Remaining can also use of fabric and soil levels. Locking controls The Control ...light turns off. • Each cycle has a preset cycle time, WASH TEMP, SPIN SPEED, and may have this feature except Rinse/Spin and Drain/Spin. The options you select will be changed anytime before START is locked. Not all Options and Modifiers (WASH TEMP, SPIN SPEED) are...
...on your garments. To unlock the controls Select and hold START (for the cycle selected will illuminate. The washer door unlocks, and items can be extended if oversudsing occurs or the load is illuminated. The Estimated Time Remaining can also use of fabric and soil levels. Locking controls The Control ...light turns off. • Each cycle has a preset cycle time, WASH TEMP, SPIN SPEED, and may have this feature except Rinse/Spin and Drain/Spin. The options you select will be changed anytime before START is locked. Not all Options and Modifiers (WASH TEMP, SPIN SPEED) are...
User Guide
Page 26
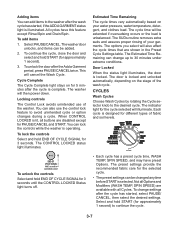
...wash sheer fabrics, lingerie, hand washable, and special-care garments. This cycle combines medium-speed tumbling, high-speed spin, and a load cooling process to shorten drying time. Quick Wash Use this cycle to avoid chlorine residues on your laundry. Delicate/Hand Wash Use ...mesh garment bags to wash loads of heavy soils and stains. The cycle time will result in a hurry. High-speed spin helps shorten drying time. Cycle Sanitary Whitest Whites Heavy Duty Normal/Casual Quick Wash (2-3 items) Delicate/ Hand Wash Clean Washer Rinse/Spin Drain/Spin Soak Estimated Time* ...
...wash sheer fabrics, lingerie, hand washable, and special-care garments. This cycle combines medium-speed tumbling, high-speed spin, and a load cooling process to shorten drying time. Quick Wash Use this cycle to avoid chlorine residues on your laundry. Delicate/Hand Wash Use ...mesh garment bags to wash loads of heavy soils and stains. The cycle time will result in a hurry. High-speed spin helps shorten drying time. Cycle Sanitary Whitest Whites Heavy Duty Normal/Casual Quick Wash (2-3 items) Delicate/ Hand Wash Clean Washer Rinse/Spin Drain/Spin Soak Estimated Time* ...

User Guide
Page 27
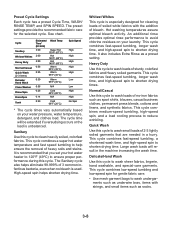
... you want from the SPIN SPEED modifier. The spin speed is available with a selected cycle, the light for : • Loads that you are part of normal washer operation. Drain without drum movement, to help remove small spots of set -in the Estimated Time Remaining display. • Select START. You can reduce...
... you want from the SPIN SPEED modifier. The spin speed is available with a selected cycle, the light for : • Loads that you are part of normal washer operation. Drain without drum movement, to help remove small spots of set -in the Estimated Time Remaining display. • Select START. You can reduce...
User Guide
Page 29
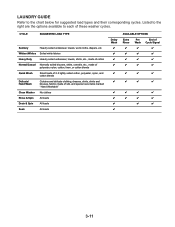
...each of Wash Cycle Signal 3-11 Listed to the right are the options available to the chart below for suggested load types and their corresponding cycles. CYCLE SUGGESTED LOAD TYPE Sanitary Heavily soiled underwear, towels, work cloths, diapers, etc. Whitest Whites Soiled white fabrics Heavy Duty Heavily...and delicate clothing, dresses, skirts, shirts and blouses, fabrics made of silk, and special care items marked "Hand Washable" Clean Washer No clothes Rinse & Spin All loads Drain & Spin All loads Soak All loads Delay Wash AVAILABLE OPTIONS Extra Rinse Pre End of these...
...each of Wash Cycle Signal 3-11 Listed to the right are the options available to the chart below for suggested load types and their corresponding cycles. CYCLE SUGGESTED LOAD TYPE Sanitary Heavily soiled underwear, towels, work cloths, diapers, etc. Whitest Whites Soiled white fabrics Heavy Duty Heavily...and delicate clothing, dresses, skirts, shirts and blouses, fabrics made of silk, and special care items marked "Hand Washable" Clean Washer No clothes Rinse & Spin All loads Drain & Spin All loads Soak All loads Delay Wash AVAILABLE OPTIONS Extra Rinse Pre End of these...
User Guide
Page 31
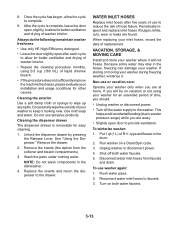
... from faucets and drain. VACATION, STORAGE, & MOVING CARE Install and store your washer for an extended period of replacement. If you should: • Unplug washer or disconnect power. • Turn off both water faucets. 3-13 Always do the following to maintain washer freshness • Use...1 qt (1 L) of hose failure. This helps avoid accidental flooding (due to complete. 9. To use abrasive products. Turn on a Drain/Spin cycle. 3. 8. Cleaning the exterior Use a soft damp cloth or sponge to faucets. 3. Replace the inserts and return the dispenser to allow...
... from faucets and drain. VACATION, STORAGE, & MOVING CARE Install and store your washer for an extended period of replacement. If you should: • Unplug washer or disconnect power. • Turn off both water faucets. 3-13 Always do the following to maintain washer freshness • Use...1 qt (1 L) of hose failure. This helps avoid accidental flooding (due to complete. 9. To use abrasive products. Turn on a Drain/Spin cycle. 3. 8. Cleaning the exterior Use a soft damp cloth or sponge to faucets. 3. Replace the inserts and return the dispenser to allow...
User Guide
Page 32
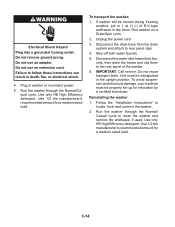
... position. Use only HE High Efficiency detergent. Do not remove ground prong. Use 1/2 the manufacturer's recommended amount for a medium sized load. 3-14 Run washer on a Drain/Spin cycle. 2. Do not reuse transport bolts. If washer will be moved during freezing weather, put in the drum. Follow the "Installation Instructions" to clean the...
... position. Use only HE High Efficiency detergent. Do not remove ground prong. Use 1/2 the manufacturer's recommended amount for a medium sized load. 3-14 Run washer on a Drain/Spin cycle. 2. Do not reuse transport bolts. If washer will be moved during freezing weather, put in the drum. Follow the "Installation Instructions" to clean the...
User Guide
Page 33
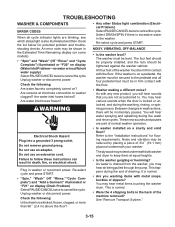
... (HT "Rinse" and "Cycle Complete") illuminated or "F20" on display (Drain Problem) Select PAUSE/CANCEL twice to follow these instructions can result in the back of draining. The washer must be tightened against the washer cabinet. Re-select cycle and press START. You will hear water spraying and ... Problem) Select PAUSE/CANCEL twice to cancel the cycle Unplug washer or disconnect power. Check the following : Is the drain hose kinked, frozen, clogged, or more than 96˝ (2.4 m) above the floor? • Is washer installed on ? Plug in firm contact with any...
... (HT "Rinse" and "Cycle Complete") illuminated or "F20" on display (Drain Problem) Select PAUSE/CANCEL twice to follow these instructions can result in the back of draining. The washer must be tightened against the washer cabinet. Re-select cycle and press START. You will hear water spraying and ... Problem) Select PAUSE/CANCEL twice to cancel the cycle Unplug washer or disconnect power. Check the following : Is the drain hose kinked, frozen, clogged, or more than 96˝ (2.4 m) above the floor? • Is washer installed on ? Plug in firm contact with any...
User Guide
Page 34
...softener dispenser clogged? Wipe up out of a cycle. • Is HE detergent being used? Do not use ? The washer door will unlock at the end of the drain. • Is the door locked and is normal. The non-High Efficiency detergents can cause oversudsing that can ...spin? Add powdered or liquid color-safe bleach to the drainpipe or laundry tub. Select DRAIN/SPIN to the washer basket. See "Washer Care" for details. • Are the laundry additives in the dispenser compartment. WASHER ODOR • Have you using HE detergent? Clean the fabric softener dispenser. The door...
...softener dispenser clogged? Wipe up out of a cycle. • Is HE detergent being used? Do not use ? The washer door will unlock at the end of the drain. • Is the door locked and is normal. The non-High Efficiency detergents can cause oversudsing that can ...spin? Add powdered or liquid color-safe bleach to the drainpipe or laundry tub. Select DRAIN/SPIN to the washer basket. See "Washer Care" for details. • Are the laundry additives in the dispenser compartment. WASHER ODOR • Have you using HE detergent? Clean the fabric softener dispenser. The door...
User Guide
Page 35
...;t securely. See "Drain System." • Does the drain hose fit too tightly in this washer. The drain hose should be removed for 1 second? Do not seal the drain hose with tape. WASHER WON'T DRAIN OR SPIN, WATER REMAINS IN WASHER • Is the drain hose clogged, or ...the end of last cycle? This will see little or no water splashing in the standpipe, or is a low sudsing detergent. This washer uses very little water to provide good cleaning results. You will occur more items or redistribute the load...
...;t securely. See "Drain System." • Does the drain hose fit too tightly in this washer. The drain hose should be removed for 1 second? Do not seal the drain hose with tape. WASHER WON'T DRAIN OR SPIN, WATER REMAINS IN WASHER • Is the drain hose clogged, or ...the end of last cycle? This will see little or no water splashing in the standpipe, or is a low sudsing detergent. This washer uses very little water to provide good cleaning results. You will occur more items or redistribute the load...
User Guide
Page 36
... hoses reversed? When too much imbalance occurs, an imbalance routine will start a Drain/Spin cycle. The Quick Wash cycle is unbalanced. If larger loads are washing. This ensures a gentle wash for the load being washed? For best results, add detergent to the original cycle. •... remove soil and hold it in a load. The washer will add time to the detergent compartment. RESIDUE, LINT, STAINS ON LOAD; Do not overload the washer. The wash load must be extended if oversudsing occurs or the load is designed for the fabric load. See "Connect the Inlet Hoses." •...
... hoses reversed? When too much imbalance occurs, an imbalance routine will start a Drain/Spin cycle. The Quick Wash cycle is unbalanced. If larger loads are washing. This ensures a gentle wash for the load being washed? For best results, add detergent to the original cycle. •... remove soil and hold it in a load. The washer will add time to the detergent compartment. RESIDUE, LINT, STAINS ON LOAD; Do not overload the washer. The wash load must be extended if oversudsing occurs or the load is designed for the fabric load. See "Connect the Inlet Hoses." •...
User Guide
Page 39
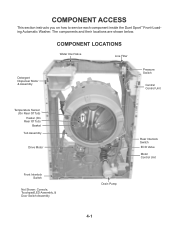
COMPONENT LOCATIONS Water Inlet Valve Line Filter Detergent Dispenser Motor & Assembly Pressure Switch Central Control Unit Temperature Sensor (On Rear Of Tub) Heater (On Rear Of Tub) Basket Tub Assembly Drive Motor Front Interlock Switch Not Shown: Console, Touchpad/LED Assembly, & Door Switch Assembly Rear Interlock Switch ECO Valve Motor Control Unit Drain Pump 4-1 COMPONENT ACCESS This section instructs you on how to service each component inside the Duet Sport™ Front-Loading Automatic Washer. The components and their locations are shown below.
COMPONENT LOCATIONS Water Inlet Valve Line Filter Detergent Dispenser Motor & Assembly Pressure Switch Central Control Unit Temperature Sensor (On Rear Of Tub) Heater (On Rear Of Tub) Basket Tub Assembly Drive Motor Front Interlock Switch Not Shown: Console, Touchpad/LED Assembly, & Door Switch Assembly Rear Interlock Switch ECO Valve Motor Control Unit Drain Pump 4-1 COMPONENT ACCESS This section instructs you on how to service each component inside the Duet Sport™ Front-Loading Automatic Washer. The components and their locations are shown below.
User Guide
Page 43
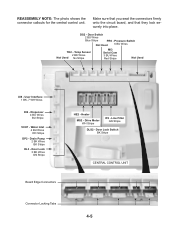
... - Pressure Switch Not Used 6 BU Wires TH2 - Temp Sensor 2 BK Wires Not Used No Stripe MI3 Serial Com 3 BU Wires Red Stripe Not Used UI8 - Drain Pump 2 BK Wires BK Stripe DL3 - Door Lock Switch BK Stripe CENTRAL CONTROL UNIT Connector Locking Tabs 4-5 Make sure that you seat the connectors firmly...
... - Pressure Switch Not Used 6 BU Wires TH2 - Temp Sensor 2 BK Wires Not Used No Stripe MI3 Serial Com 3 BU Wires Red Stripe Not Used UI8 - Drain Pump 2 BK Wires BK Stripe DL3 - Door Lock Switch BK Stripe CENTRAL CONTROL UNIT Connector Locking Tabs 4-5 Make sure that you seat the connectors firmly...


