Operation Manual
Page 3
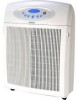
... gives you specific legal rights, and you require quick cleaning and extra refreshing of room air Designed for outstanding owner convenience, the air cleaner features a washable pre-filter and collecting cell, so there are easily set and adjusted on your special needs. All operating functions are... vary from the date of purchase, when operated and maintained according to the owner's manual, if any part of the Kenmore Electrostatic Air Cleaner. Sears, Roebuck and Co., Dept. 817WA, Hoffman Estates, IL 60179 INTRODUCTION Congratulations on the well-lighted, user-friendly LCD control ...
... gives you specific legal rights, and you require quick cleaning and extra refreshing of room air Designed for outstanding owner convenience, the air cleaner features a washable pre-filter and collecting cell, so there are easily set and adjusted on your special needs. All operating functions are... vary from the date of purchase, when operated and maintained according to the owner's manual, if any part of the Kenmore Electrostatic Air Cleaner. Sears, Roebuck and Co., Dept. 817WA, Hoffman Estates, IL 60179 INTRODUCTION Congratulations on the well-lighted, user-friendly LCD control ...
Operation Manual
Page 4
...! Permanent damage could result to packaging. Contents: o Electrostatic Air Cleaner o 2 Protective Screens (Only used when cleaning the Collecting Cell in place. 4 ELECTRICAL HOOKUP Plug the Electrostatic Air Cleaner into a properly grounded 3-prong, 120-Volt AC outlet. CAUTION: NEVER operate the Electrostatic Air Cleaner until it checked out by a qualified electrician. SETUP Your Electrostatic Air Cleaner was thoroughly inspected and tested at the factory...
...! Permanent damage could result to packaging. Contents: o Electrostatic Air Cleaner o 2 Protective Screens (Only used when cleaning the Collecting Cell in place. 4 ELECTRICAL HOOKUP Plug the Electrostatic Air Cleaner into a properly grounded 3-prong, 120-Volt AC outlet. CAUTION: NEVER operate the Electrostatic Air Cleaner until it checked out by a qualified electrician. SETUP Your Electrostatic Air Cleaner was thoroughly inspected and tested at the factory...
Operation Manual
Page 5
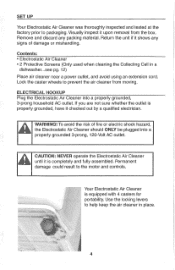
... and smoke particles are then attracted to the exiting stream of clean air. These electrically grounded plates hold the dirt until the cell is drawn through the front grill and passes through into the Collecting Cell. Fig. 1 Front Grill Collecting Cell Pre-filter Air Cleaner Stage 1 The washable Pre-filter prevents larger particles from passing through...
... and smoke particles are then attracted to the exiting stream of clean air. These electrically grounded plates hold the dirt until the cell is drawn through the front grill and passes through into the Collecting Cell. Fig. 1 Front Grill Collecting Cell Pre-filter Air Cleaner Stage 1 The washable Pre-filter prevents larger particles from passing through...
Operation Manual
Page 6
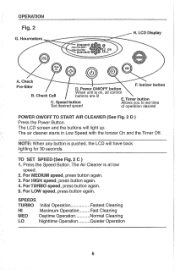
... .......... LCD Display A. Timer button C. Press the Speed Button. For TURBO speed, press button again. 5. For LOW speed, press button again. The Air Cleaner is on, all control buttons are lit E. Check Cell When unit is at low speed. 2. For HIGH speed, press button again. 4. Quieter Operation 6 Ionizer button B. Speed button Set desired speed...
... .......... LCD Display A. Timer button C. Press the Speed Button. For TURBO speed, press button again. 5. For LOW speed, press button again. The Air Cleaner is on, all control buttons are lit E. Check Cell When unit is at low speed. 2. For HIGH speed, press button again. 4. Quieter Operation 6 Ionizer button B. Speed button Set desired speed...
Operation Manual
Page 7
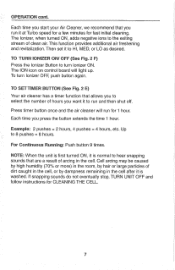
... you want it at Turbo speed for a few minutes for CLEANING THE CELL. 7 Press timer button once and the air cleaner will light up. For Continuous Running: Push button 9 times. TO SETTgMER BUTTON (See Fig. 2 E) Your air cleaner has a timer function that allows you to select the number of dirt ...caught in the cell, or by dampness remaining in the cell. NOTE: When the unit is first turned ON, it to 8 pushes = 8 hours. The...
... you want it at Turbo speed for a few minutes for CLEANING THE CELL. 7 Press timer button once and the air cleaner will light up. For Continuous Running: Push button 9 times. TO SETTgMER BUTTON (See Fig. 2 E) Your air cleaner has a timer function that allows you to select the number of dirt ...caught in the cell, or by dampness remaining in the cell. NOTE: When the unit is first turned ON, it to 8 pushes = 8 hours. The...
Operation Manual
Page 8
...need to be cleaned sooner than the hourmeter indicates. To avoid serious injury from electric shock ALWAYS turn the air cleaner OFF and disconnect the plug from electrical outlet, and clean Cell before turning unit back ON. Icons on the LCD and flashing lights will alert the user to the ...need to be cleaned earlier depending on the environment. o To manually reset the Pre-Filter and/or Cell Hourmeter, press and hold the Check Cell button for the air cleaner to reset. After running approximately 7 weeks, 24 hours a day, the Check Pre-Filter button will begin flashing to ...
...need to be cleaned sooner than the hourmeter indicates. To avoid serious injury from electric shock ALWAYS turn the air cleaner OFF and disconnect the plug from electrical outlet, and clean Cell before turning unit back ON. Icons on the LCD and flashing lights will alert the user to the ...need to be cleaned earlier depending on the environment. o To manually reset the Pre-Filter and/or Cell Hourmeter, press and hold the Check Cell button for the air cleaner to reset. After running approximately 7 weeks, 24 hours a day, the Check Pre-Filter button will begin flashing to ...
Operation Manual
Page 9
...clips on the bottom engage into the slots at base of unit. 6. Place front grill into the air cleaner front so that the tabs on the top edge of cell cavity. 3. Then unplug the unit from air cleaner. 5. There are 2 built-in place. 9 Push the top of the front grill and pull... the grill outward and remove. 3. Gently push the front grill forward until the retention tabs snap into the air cleaner. 2. A hand-held dryer may...
...clips on the bottom engage into the slots at base of unit. 6. Place front grill into the air cleaner front so that the tabs on the top edge of cell cavity. 3. Then unplug the unit from air cleaner. 5. There are 2 built-in place. 9 Push the top of the front grill and pull... the grill outward and remove. 3. Gently push the front grill forward until the retention tabs snap into the air cleaner. 2. A hand-held dryer may...

Operation Manual
Page 10
...Swing out the two handles on either of 2 ways: in a tub of the cell are sharp, so handle it is flashing, it with extreme care. 10 The cell can be washed either side of the air cleaner. DO NOT touch unit for two minutes after turning OFF and -i unApUluTgIgOinNg:. Plug... the air cleaner back into a properly grounded 3-prong outlet. 8. IMPORTANT: Be extremely careful and DO ...
...Swing out the two handles on either of 2 ways: in a tub of the cell are sharp, so handle it is flashing, it with extreme care. 10 The cell can be washed either side of the air cleaner. DO NOT touch unit for two minutes after turning OFF and -i unApUluTgIgOinNg:. Plug... the air cleaner back into a properly grounded 3-prong outlet. 8. IMPORTANT: Be extremely careful and DO ...

Operation Manual
Page 11
... may be used to drain all the excess water. 6. MAINTENANCE Washing Cell in a Tub of clean hot water. 5. Use a mild dishwashing liquid that is non-chlorine and non-abrasive. Plug the Air Cleaner into the air cleaner and swing handles inward. 8. Press Power On Button. 11. Press ...Check Button to clean between the collector plates in the cell. IMPORTANT: NEVER use any final particles of dirt. 4. Doing this...
... may be used to drain all the excess water. 6. MAINTENANCE Washing Cell in a Tub of clean hot water. 5. Use a mild dishwashing liquid that is non-chlorine and non-abrasive. Plug the Air Cleaner into the air cleaner and swing handles inward. 8. Press Power On Button. 11. Press ...Check Button to clean between the collector plates in the cell. IMPORTANT: NEVER use any final particles of dirt. 4. Doing this...
Operation Manual
Page 12
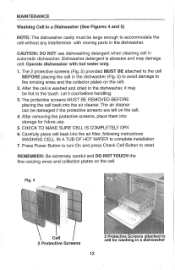
...: Be extremely careful and DO NOTTOUCH the fine ionizing wires and collection plates on the cell. 4. Operate dishwasher with moving parts in the dishwasher, it cool before handling. 3. Let it may damage cell. Carefully place cell back into the air cleaner. Dishwasher detergent is washed and dried in the dishwasher. The protective screens MUST BE...
...: Be extremely careful and DO NOTTOUCH the fine ionizing wires and collection plates on the cell. 4. Operate dishwasher with moving parts in the dishwasher, it cool before handling. 3. Let it may damage cell. Carefully place cell back into the air cleaner. Dishwasher detergent is washed and dried in the dishwasher. The protective screens MUST BE...

Operation Manual
Page 13
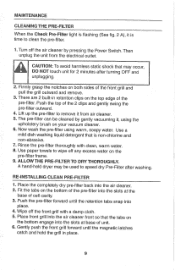
... dirt may pass through the pre-filter and enter the cell. IMPORTANT: NEVER use any abrasive cleaners to gently wipe dirt away from the electrical outlet. 2. Turn Off the air cleaner by pressing the Power Switch. The cell will begin making snapping sounds. Use a soft, damp... cloth to clean cabinet or grills. Cover the air cleaner and store in the previous two sections. Turn Off the air cleaner by pressing the Power Button. STORAGE...
... dirt may pass through the pre-filter and enter the cell. IMPORTANT: NEVER use any abrasive cleaners to gently wipe dirt away from the electrical outlet. 2. Turn Off the air cleaner by pressing the Power Switch. The cell will begin making snapping sounds. Use a soft, damp... cloth to clean cabinet or grills. Cover the air cleaner and store in the previous two sections. Turn Off the air cleaner by pressing the Power Button. STORAGE...

Operation Manual
Page 14
... electrical outlet by plugging in . (35.9cm) 40.3 Ibs. (18.3 kg) 120 volts AC, 60 Hz REPLACEMENT PARTS Protective Screens 85160 Pre-Filter 85161 Collecting Cell 85162 Rev. Unplug the unit. Remove and reassemble the front grill to be sure that the power cord is plugged into a properly-grounded 3-prong 120...
... electrical outlet by plugging in . (35.9cm) 40.3 Ibs. (18.3 kg) 120 volts AC, 60 Hz REPLACEMENT PARTS Protective Screens 85160 Pre-Filter 85161 Collecting Cell 85162 Rev. Unplug the unit. Remove and reassemble the front grill to be sure that the power cord is plugged into a properly-grounded 3-prong 120...