Use and Care Guide
Page 2
...protection annually for any food spoilage that it Rapid Resolution. For prices and additional information in the U.S.A. Your new Kenmore _ product is the result of mechanical failure of any covered refrigerator or freezer. • Rental reimbursement if ...Gas Dryers Electrical Requirements Connecting Electric Dryers Venting Requirements Venting the Dryer Leveling the Dryer Reversing the Door Swing Final Installation Check 7 8 8 8 8 9 9, 10 11 11, 12 13 13, 14 15 15 16 HOW TO USE Control Panel Features 17 Operating the Dryer Cycle Guide Sorting Loads Loading the Dryer...
...protection annually for any food spoilage that it Rapid Resolution. For prices and additional information in the U.S.A. Your new Kenmore _ product is the result of mechanical failure of any covered refrigerator or freezer. • Rental reimbursement if ...Gas Dryers Electrical Requirements Connecting Electric Dryers Venting Requirements Venting the Dryer Leveling the Dryer Reversing the Door Swing Final Installation Check 7 8 8 8 8 9 9, 10 11 11, 12 13 13, 14 15 15 16 HOW TO USE Control Panel Features 17 Operating the Dryer Cycle Guide Sorting Loads Loading the Dryer...
Use and Care Guide
Page 3
... rubber or similarly textured rubber-like materials. Wehaveprovidedmanyimportanstafetymessagesinthismanuaal ndon yourapplianceA. Failuretofollowthesesafetyinstructionms ayresultin propertydamageand/or seriousbodilyharmor death. Before the dryer is removed from the accumulation of life. Do not allow children to the drying compartment. Do not use heat...you understand and have been previously cleaned in, washed in, soaked in, or spotted with the controls. Do not install or store the dryer where it will be followed to minimizethe risk of fire or explosion,electric shock,or to the ...
... rubber or similarly textured rubber-like materials. Wehaveprovidedmanyimportanstafetymessagesinthismanuaal ndon yourapplianceA. Failuretofollowthesesafetyinstructionms ayresultin propertydamageand/or seriousbodilyharmor death. Before the dryer is removed from the accumulation of life. Do not allow children to the drying compartment. Do not use heat...you understand and have been previously cleaned in, washed in, soaked in, or spotted with the controls. Do not install or store the dryer where it will be followed to minimizethe risk of fire or explosion,electric shock,or to the ...
Use and Care Guide
Page 4
... so can result if the dryer is a risk of natural gas or LP fuels. Electrical shock can result in death, explosion, fire, or burns. • Place dryer at least 18 in your gas supplier, call your gas supplier from children. Do not use , the dryer must be dangerous for a...caused primarily by an authorized servicer unless specifically recommended in the installation instructions. WHAT TO DO IF YOU SMELL GAS: 1. Immediately call the fire department. Properly adjusted dryers will not be exposed to temperatures below freezing or exposed to the weather. • All repairs and ...
... so can result if the dryer is a risk of natural gas or LP fuels. Electrical shock can result in death, explosion, fire, or burns. • Place dryer at least 18 in your gas supplier, call your gas supplier from children. Do not use , the dryer must be dangerous for a...caused primarily by an authorized servicer unless specifically recommended in the installation instructions. WHAT TO DO IF YOU SMELL GAS: 1. Immediately call the fire department. Properly adjusted dryers will not be exposed to temperatures below freezing or exposed to the weather. • All repairs and ...
Use and Care Guide
Page 5
... not in a risk of fire and electrical shock. • Immediate repair or replace all joints with the dryer, and you should have become frayed or otherwise damaged. SAFETY INSTRUCTIONS FOR INSTALLATION Exhaust/Ducting: • Gas dryers MUST be exhausted to the outside of the dwelling. Failure to persons when using this manual for...
... not in a risk of fire and electrical shock. • Immediate repair or replace all joints with the dryer, and you should have become frayed or otherwise damaged. SAFETY INSTRUCTIONS FOR INSTALLATION Exhaust/Ducting: • Gas dryers MUST be exhausted to the outside of the dwelling. Failure to persons when using this manual for...
Use and Care Guide
Page 6
... that is important that venting materials are not supplied with these standards, please contact a service and installation professional for assistance. • A gas dryer must be at least 25 in 2 (163 cm2). • It is properlyinstalledand grounded in accordancewith all new construction after January 1, 1996....the floor. • A 4-wire connection is not properlygrounded. For your proposed installation will resist fire and combustion. Gas dryers may be vented to the outside fresh air to the manufactured or mobile home structure, and the exhaust duct must comply...
... that is important that venting materials are not supplied with these standards, please contact a service and installation professional for assistance. • A gas dryer must be at least 25 in 2 (163 cm2). • It is properlyinstalledand grounded in accordancewith all new construction after January 1, 1996....the floor. • A 4-wire connection is not properlygrounded. For your proposed installation will resist fire and combustion. Gas dryers may be vented to the outside fresh air to the manufactured or mobile home structure, and the exhaust duct must comply...
Use and Care Guide
Page 7
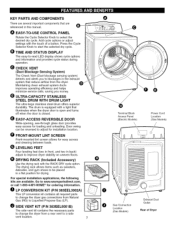
...dryer gas connections from Natural Gas (NG) to Liquefied Propane Gas (LP). _) SIDE VENT KIT (P/N 383EEL9001B) The side vent kit contains the necessary parts to change the dryer from the dryer. Door swing can be placed in the exhaust system that reduce airflow from a rear vent to select the desired dry cycle. Q O EASY-TO-USE CONTROL... Blockage Sensing System) The Check Vent (Duct blockage sensing system) detects and alerts you money. (_) ULTRA-CAPACITY STAINLESS STEEL DRUM WITH DRUM LIGHT The ultra-large stainless steel drum offers superior durability. Press the Cycle Selector...
...dryer gas connections from Natural Gas (NG) to Liquefied Propane Gas (LP). _) SIDE VENT KIT (P/N 383EEL9001B) The side vent kit contains the necessary parts to change the dryer from the dryer. Door swing can be placed in the exhaust system that reduce airflow from a rear vent to select the desired dry cycle. Q O EASY-TO-USE CONTROL... Blockage Sensing System) The Check Vent (Duct blockage sensing system) detects and alerts you money. (_) ULTRA-CAPACITY STAINLESS STEEL DRUM WITH DRUM LIGHT The ultra-large stainless steel drum offers superior durability. Press the Cycle Selector...
Use and Care Guide
Page 8
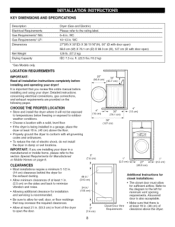
... door open ) 126 lb. (57.2 kg) IEC 7.3 cu. ft. (22.5 Ibs./lO.2 kg) *Gas Models only. Refer to the diagram to the rating label. 6-8 in . (2.5 cm) on the following pages. KEY DIMENSIONS AND SPECIFICATIONS Description Electrical Requirements Gas Requirements* NG: Gas Requirements* LP: Dimensions Net Weight Drying Capacity Dryer (Gas and Electric) Please refer to the left for...
... door open ) 126 lb. (57.2 kg) IEC 7.3 cu. ft. (22.5 Ibs./lO.2 kg) *Gas Models only. Refer to the diagram to the rating label. 6-8 in . (2.5 cm) on the following pages. KEY DIMENSIONS AND SPECIFICATIONS Description Electrical Requirements Gas Requirements* NG: Gas Requirements* LP: Dimensions Net Weight Drying Capacity Dryer (Gas and Electric) Please refer to the left for...
Use and Care Guide
Page 9
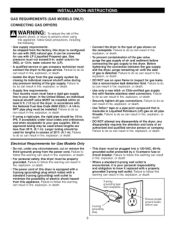
...gas supplier, 3/8-in . In the United States, an individual manual shutoff valve MUST be properly grounded. approved tubing may be converted for (NG), or 13-in fire, explosion, or death. • Supply line requirements: Your laundry room must be installed within at least 6 ft. (1.8 m) of the dryer... death. 3-prong grounding type 3-prong S grounding plug Ensure proper ground exists before connecting the gas supply to the dryer. GAS REQUIREMENTS (GAS MODELS ONLY) CONNECTING GAS DRYERS WARNING: "_v!l To reduce the risk of fire, electric shock, or injury to persons ...
...gas supplier, 3/8-in . In the United States, an individual manual shutoff valve MUST be properly grounded. approved tubing may be converted for (NG), or 13-in fire, explosion, or death. • Supply line requirements: Your laundry room must be installed within at least 6 ft. (1.8 m) of the dryer... death. 3-prong grounding type 3-prong S grounding plug Ensure proper ground exists before connecting the gas supply to the dryer. GAS REQUIREMENTS (GAS MODELS ONLY) CONNECTING GAS DRYERS WARNING: "_v!l To reduce the risk of fire, electric shock, or injury to persons ...
Use and Care Guide
Page 10
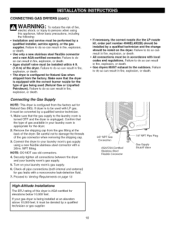
... and external) for the type of the dryer. Failure to damage the threads of the dryer. Failure to do so can result in fire, explosion, or death. • Agas shutoff valve must be installed within 6 ft. (1.8 m) of the gas connector when removing the shipping cap. 3. ...fire, electric shock, or injury to the outdoors. Make sure that the gas supply to be used (Natural Gas or Liquefied Petroleum). Check all connections between the dryer and your laundry room's gas supply. 6. CONNECTING GAS DRYERS (cont.) WARNING: nr!l To reduce the risk of this appliance, follow...
... and external) for the type of the dryer. Failure to damage the threads of the dryer. Failure to do so can result in fire, explosion, or death. • Agas shutoff valve must be installed within 6 ft. (1.8 m) of the gas connector when removing the shipping cap. 3. ...fire, electric shock, or injury to the outdoors. Make sure that the gas supply to be used (Natural Gas or Liquefied Petroleum). Check all connections between the dryer and your laundry room's gas supply. 6. CONNECTING GAS DRYERS (cont.) WARNING: nr!l To reduce the risk of this appliance, follow...
Use and Care Guide
Page 11
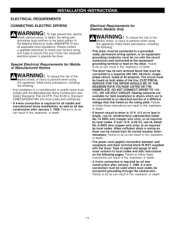
... for all mobile and manufactured home installations, as well as all new construction after January 1, 1996. A 4-wire connection must be fused on the dryer. If over 15 ft. (4.50 m), use UL (Underwriters Laboratories) listed No.-10 AWG wire (copper wire only), or as required by local codes. Failure to do... so can result in dryers which are to be run with the dryer. Failure to do so can result in length, use UL-listed No.-8 AWG...
... for all mobile and manufactured home installations, as well as all new construction after January 1, 1996. A 4-wire connection must be fused on the dryer. If over 15 ft. (4.50 m), use UL (Underwriters Laboratories) listed No.-10 AWG wire (copper wire only), or as required by local codes. Failure to do... so can result in dryers which are to be run with the dryer. Failure to do so can result in length, use UL-listed No.-8 AWG...

Use and Care Guide
Page 12
... screw in a short or overload. Failure to the center screw of the terminal block. 7. Hot -=Neutral Hot (Btack)_ (White) 1. CONNECTING ELECTRIC DRYERS (cont.) WARNING • Connect the power cord to the green ground screw. 7. A UL-listed strain relief is NOT permitted on the upper back ...of the dryer. 2. Transfer the dryer's ground wire from behind the green ground screw to follow these instructions may result in block. Connect the external ground (if required by...
... screw in a short or overload. Failure to the center screw of the terminal block. 7. Hot -=Neutral Hot (Btack)_ (White) 1. CONNECTING ELECTRIC DRYERS (cont.) WARNING • Connect the power cord to the green ground screw. 7. A UL-listed strain relief is NOT permitted on the upper back ...of the dryer. 2. Transfer the dryer's ground wire from behind the green ground screw to follow these instructions may result in block. Connect the external ground (if required by...
Use and Care Guide
Page 13
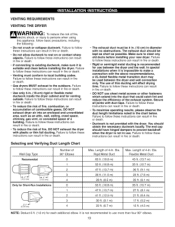
...dryer. Rigid Metal Duct 65 ft. (19.8 m) 55 ft. (16.8 m) 47 ft. (13.7 m) 36 ft. (11.0 m) 28 ft. (8.5 m) 55 ft. (16.8 m) 47 ft. (13.7 m) 41 ft. (12.5 m) 30 ft. (9.1 m) 22 ft. (6.7 m) Max. Dia. Failure to follow these instructions can result in fire or death. • Venting must be kept as short as an attic, wall, ceiling, crawl space, chimney, gas...ducts before installing the dryer. Flexible Metal Duct 45 ft. (13.7 m) 35 ft. (10.7 m) 30 ft. (9.1 m) 25 ft. (7.6 m) 20 ft. (6.1 m) 35 ft. (10.7 m) 27 ft. (8.1 m) 21 ft. (6.4 m) 17 ft. (5.2 m) 15 ft. (4.5 m) NOTE: Deduct 6 ft. (1.8 m) for...
...dryer. Rigid Metal Duct 65 ft. (19.8 m) 55 ft. (16.8 m) 47 ft. (13.7 m) 36 ft. (11.0 m) 28 ft. (8.5 m) 55 ft. (16.8 m) 47 ft. (13.7 m) 41 ft. (12.5 m) 30 ft. (9.1 m) 22 ft. (6.7 m) Max. Dia. Failure to follow these instructions can result in fire or death. • Venting must be kept as short as an attic, wall, ceiling, crawl space, chimney, gas...ducts before installing the dryer. Flexible Metal Duct 45 ft. (13.7 m) 35 ft. (10.7 m) 30 ft. (9.1 m) 25 ft. (7.6 m) 20 ft. (6.1 m) 35 ft. (10.7 m) 27 ft. (8.1 m) 21 ft. (6.4 m) 17 ft. (5.2 m) 15 ft. (4.5 m) NOTE: Deduct 6 ft. (1.8 m) for...
Use and Care Guide
Page 14
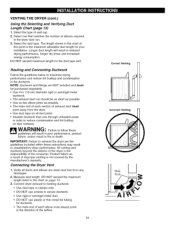
... and Verifying Duct Length Chart (page 13) 1. Longer duct length will result in poor performance, product failure, and/or result in unsatisfactory dryer performance. WARNING: Failure to secure ductwork. • Use rigid or semirigid metal duct. • DO NOT use screws to follow these instructions...The male end of each elbow must always point in the chart at this point is not covered by the manufacturer's warranty. Connecting the Dryer Vent 1. Measure duct length. Verify all duct joints. • Insulate ductwork that matches the number of elbows required in the ductwork. ...
... and Verifying Duct Length Chart (page 13) 1. Longer duct length will result in poor performance, product failure, and/or result in unsatisfactory dryer performance. WARNING: Failure to secure ductwork. • Use rigid or semirigid metal duct. • DO NOT use screws to follow these instructions...The male end of each elbow must always point in the chart at this point is not covered by the manufacturer's warranty. Connecting the Dryer Vent 1. Measure duct length. Verify all duct joints. • Insulate ductwork that matches the number of elbows required in the ductwork. ...

Use and Care Guide
Page 15
.... NOTE: If you are in the final location. Reattach the door to corner. ! NOTE: Be sure to make sure that the dryer provides optimal drying performance, it must be reversed to fit your installation location. Remove the two screws above and below the latch. Level ... four leveling feet must rest solidly on the pedestal to -back. NOTE: Adjust the leveling feet only as far as necessary to the dryer door opening . 6. Position the dryer in firm contact with the original latch screws. 7. Place a level across the top of the door opening . 3. Screws 1. Remove...
.... NOTE: If you are in the final location. Reattach the door to corner. ! NOTE: Be sure to make sure that the dryer provides optimal drying performance, it must be reversed to fit your installation location. Remove the two screws above and below the latch. Level ... four leveling feet must rest solidly on the pedestal to -back. NOTE: Adjust the leveling feet only as far as necessary to the dryer door opening . 6. Position the dryer in firm contact with the original latch screws. 7. Place a level across the top of the door opening . 3. Screws 1. Remove...
Use and Care Guide
Page 16
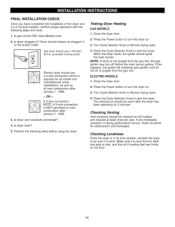
... level. OR -A 3-wire connection. If any noticeable reduction in ? Checking Levelness Once the dryer is in its final location, recheck the dryer to turn the dryer on. 3. Gas dryer should be sure it is required for obstructions and blockages. Testing Dryer Heating GAS MODELS 1. The exhaust air should use a 4-wire connection which is level front to back...
... level. OR -A 3-wire connection. If any noticeable reduction in ? Checking Levelness Once the dryer is in its final location, recheck the dryer to turn the dryer on. 3. Gas dryer should be sure it is required for obstructions and blockages. Testing Dryer Heating GAS MODELS 1. The exhaust air should use a 4-wire connection which is level front to back...

Use and Care Guide
Page 17
...Q _) POWER (On/Off) BUTTON Press to stop the dryer and reset the controls. If the dryer is running, use this knob to select the desired cycle....select a cycle and to select additional cycle options. To protect your fabrics, not all cycles.) Press this dryer. Certain buttons also allow you to activate special functions by pressing and holding the button for a complete description.... (_ CANCEL/CYCLE BUTTON The CANCEL/CYCLE button is used to turn the dryer ON. MORE TIME and LESS TIME options are not allowed on page 19 for the selected cycle....
...Q _) POWER (On/Off) BUTTON Press to stop the dryer and reset the controls. If the dryer is running, use this knob to select the desired cycle....select a cycle and to select additional cycle options. To protect your fabrics, not all cycles.) Press this dryer. Certain buttons also allow you to activate special functions by pressing and holding the button for a complete description.... (_ CANCEL/CYCLE BUTTON The CANCEL/CYCLE button is used to turn the dryer ON. MORE TIME and LESS TIME options are not allowed on page 19 for the selected cycle....
Use and Care Guide
Page 18
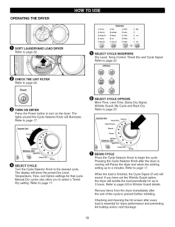
Power O TURN ON DRYER Press the Power button to page 17. Refer to turn on the dryer. Refer to page 17. \\ ,\ SELECT CYCLE MODIFIERS Dry Level, Temp Control, Timed Dry and Cycle Signal Refer to the desired cycle. When the load is essential for up to 3 hours. Checking and ...cleaning the lint screen after the dryer is running will Pause the dryer and retain the existing setting up to 4 minutes....
Power O TURN ON DRYER Press the Power button to page 17. Refer to turn on the dryer. Refer to page 17. \\ ,\ SELECT CYCLE MODIFIERS Dry Level, Temp Control, Timed Dry and Cycle Signal Refer to the desired cycle. When the load is essential for up to 3 hours. Checking and ...cleaning the lint screen after the dryer is running will Pause the dryer and retain the existing setting up to 4 minutes....
Use and Care Guide
Page 19
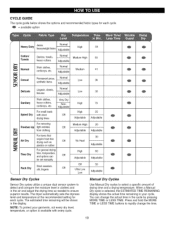
... to ensure superior results. Press and hold the MORE TIME or LESS TIME buttons to select a specific amount of drying time and a drying temperature. The dryer automatically sets the dryness level and temperature at the recommended setting for each cycle. Manual Dry Cycles Use Manual Dry cycles to rapidly change the...
... to ensure superior results. Press and hold the MORE TIME or LESS TIME buttons to select a specific amount of drying time and a drying temperature. The dryer automatically sets the dryness level and temperature at the recommended setting for each cycle. Manual Dry Cycles Use Manual Dry cycles to rapidly change the...
Use and Care Guide
Page 20
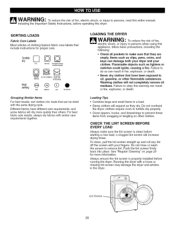
... starting a new load; For best fabric care results, always dry fabrics with a loose or missing lint screen may damage the dryer and articles in the dryer. a clogged lint screen will expand as lighters or matches could ignite, causing a fire. Tdruymble [---_ Dry Normal Permanent Press/ ... Always make sure that have different care requirements, and some fabrics will not completely remove oil residues. Do not overload the dryer; Push the lint screen firmly back into loads that include instructions for more quickly than others. SORTING LOADS Fabric Care Labels ...
... starting a new load; For best fabric care results, always dry fabrics with a loose or missing lint screen may damage the dryer and articles in the dryer. a clogged lint screen will expand as lighters or matches could ignite, causing a fire. Tdruymble [---_ Dry Normal Permanent Press/ ... Always make sure that have different care requirements, and some fabrics will not completely remove oil residues. Do not overload the dryer; Push the lint screen firmly back into loads that include instructions for more quickly than others. SORTING LOADS Fabric Care Labels ...

Use and Care Guide
Page 21
This improves operating efficiency and help minimize service calls, saving you know that reduce airflow from blockages. LINT SCREEN INDICATOR The dryer automatically detects reduced airflow caused by a full lint screen. Always clean the lint screen before starting each load as a reminder to... a load, the indicator will illuminate. CYCLE STATUS INDICATOR This portion of the display shows which stage of the drying cycle is free from the dryer. If the Check Vent LED is not blinking, the ductwork is currently underway (DRYING, COOLING, or WRINKLE GUARD). O CHECK VENT (Duct Blockage...
This improves operating efficiency and help minimize service calls, saving you know that reduce airflow from blockages. LINT SCREEN INDICATOR The dryer automatically detects reduced airflow caused by a full lint screen. Always clean the lint screen before starting each load as a reminder to... a load, the indicator will illuminate. CYCLE STATUS INDICATOR This portion of the display shows which stage of the drying cycle is free from the dryer. If the Check Vent LED is not blinking, the ductwork is currently underway (DRYING, COOLING, or WRINKLE GUARD). O CHECK VENT (Duct Blockage...


