Use and Care Guide
Page 2
... and Parts 5 Optional Pedestal 5 Location Requirements 5 Electrical Requirements 7 Gas Supply Requirements 8 Venting Requirements 9 Plan Vent System 11 Install Vent System 12 Install Leveling Legs 12 Make Gas Connection 13 Connect Vent 13 Level Dryer 13 Reverse Door Swing 13 Complete Installation 15 DRYER USE 16 Starting Your Dryer 16 Stopping or Restarting Your Dryer 17 Lock Controls 17 Drying and Cycle Tips 17 Status Lights 18 Cycles 18 Modifiers 19 Options 20 Changing Cycles, Options and Modifiers 20 TUMBLE FREF MNon-Heated Dryer Rack 20 DRYER CARE 21 Cleaning the...
... and Parts 5 Optional Pedestal 5 Location Requirements 5 Electrical Requirements 7 Gas Supply Requirements 8 Venting Requirements 9 Plan Vent System 11 Install Vent System 12 Install Leveling Legs 12 Make Gas Connection 13 Connect Vent 13 Level Dryer 13 Reverse Door Swing 13 Complete Installation 15 DRYER USE 16 Starting Your Dryer 16 Stopping or Restarting Your Dryer 17 Lock Controls 17 Drying and Cycle Tips 17 Status Lights 18 Cycles 18 Modifiers 19 Options 20 Changing Cycles, Options and Modifiers 20 TUMBLE FREF MNon-Heated Dryer Rack 20 DRYER CARE 21 Cleaning the...
Use and Care Guide
Page 3
...messages will tell you contact Sears concerning your appliance. do not use gasoline or other appliance. - Installation and service must be killed or seriously injured if you contact Sears concerning your pedestal. DRYER SAFETY Your safety and the safety of this information available to help...can be performed by a qualified installer, service agency, or the gas supplier. This is , tell you what can find this manual and on the product. Do not store or use any phone in this information on the model and serial number label located on your sales receipt for future...
...messages will tell you contact Sears concerning your appliance. do not use gasoline or other appliance. - Installation and service must be killed or seriously injured if you contact Sears concerning your pedestal. DRYER SAFETY Your safety and the safety of this information available to help...can be performed by a qualified installer, service agency, or the gas supplier. This is , tell you what can find this manual and on the product. Do not store or use any phone in this information on the model and serial number label located on your sales receipt for future...

Use and Care Guide
Page 4
... cleaned in, washed in, soaked in, or spotted with controls. [] Do not repair or replace any part of the dryer or attempt any servicing unless specifically recommended in this Use and Care Guide or in published user-repair instructions that you understand and have the skills to carry out. [] Do not use heat to play on or in the absence of local codes, with the National Fuel Gas Code...
... cleaned in, washed in, soaked in, or spotted with controls. [] Do not repair or replace any part of the dryer or attempt any servicing unless specifically recommended in this Use and Care Guide or in published user-repair instructions that you understand and have the skills to carry out. [] Do not use heat to play on or in the absence of local codes, with the National Fuel Gas Code...
Use and Care Guide
Page 5
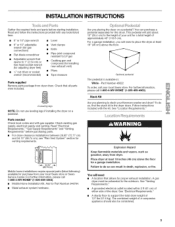
... Kenmore washer and dryer? For further information, please call 1-800-4-MY-HOME ® (1-800-469-4663). • Mobile Home Installation Kit. Stack Kit Are you planning to support the total dryer weight of approximately 46" (116.8 cm), For a garage installation, you placing the dryer on a pedestal, Parts needed Check local codes and with the kit. You will need • A location that all parts were included, 4 Leveling legs NOTE: Do not use...
... Kenmore washer and dryer? For further information, please call 1-800-4-MY-HOME ® (1-800-469-4663). • Mobile Home Installation Kit. Stack Kit Are you planning to support the total dryer weight of approximately 46" (116.8 cm), For a garage installation, you placing the dryer on a pedestal, Parts needed Check local codes and with the kit. You will need • A location that all parts were included, 4 Leveling legs NOTE: Do not use...
Use and Care Guide
Page 6
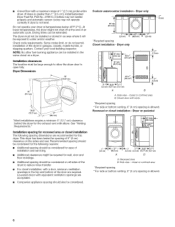
... clearances The location must be large enough to allow the dryer door to open fully. ChecckoderequiremenStso.mecodeslimito, rdonotpermit, installatioonfthedryeirngaragesc,losetsm, obilehomeso,r sleepinqguarterCs.ontacytourlocabl uildinginspector. t lowetremperaturtehse,dryemr ighnt otshutoffattheendofan automatcicycleD. Dryer Dimensions 36" / (61.4 crn) Custom undercounter installation - Dryer only _ 251c"r*n _3"* (7.6 cm) _i 8 in.z* 't Oc2) - 4 irt.2 _ 5crn2) I1"'1 Donotoperatyeourdryear ttemperaturbeeslow45°F(7°C)A. ryintgimescanbeextended. Thedryermusnt...
... clearances The location must be large enough to allow the dryer door to open fully. ChecckoderequiremenStso.mecodeslimito, rdonotpermit, installatioonfthedryeirngaragesc,losetsm, obilehomeso,r sleepinqguarterCs.ontacytourlocabl uildinginspector. t lowetremperaturtehse,dryemr ighnt otshutoffattheendofan automatcicycleD. Dryer Dimensions 36" / (61.4 crn) Custom undercounter installation - Dryer only _ 251c"r*n _3"* (7.6 cm) _i 8 in.z* 't Oc2) - 4 irt.2 _ 5crn2) I1"'1 Donotoperatyeourdryear ttemperaturbeeslow45°F(7°C)A. ryintgimescanbeextended. Thedryermusnt...
Use and Care Guide
Page 7
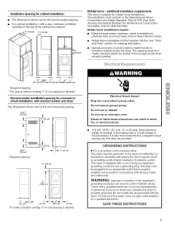
Installation spacing for cabinet installation [] The dimensions shown are for the recommended spacing. [] For cabinet installation, with a door, minimum ventilation openings in the top of the cabinet are required, ._.
Installation spacing for cabinet installation [] The dimensions shown are for the recommended spacing. [] For cabinet installation, with a door, minimum ventilation openings in the top of the cabinet are required, ._.
Use and Care Guide
Page 8
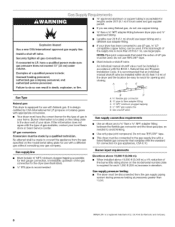
...) gases with appropriate conversion. • Your dryer must be connected to reach for opening and closing. Do not use with the B149.1, Natural Gas and Propane Installation Code. Burner input requirements Elevations above 10,000 ft (3,048 m): • When installed above 10,000 ft (3,048 m) a 4% reduction of the burner Btu rating shown on the rating plate in the door well of LP gas must be installed in your dryer. If this...
...) gases with appropriate conversion. • Your dryer must be connected to reach for opening and closing. Do not use with the B149.1, Natural Gas and Propane Installation Code. Burner input requirements Elevations above 10,000 ft (3,048 m): • When installed above 10,000 ft (3,048 m) a 4% reduction of the burner Btu rating shown on the rating plate in the door well of LP gas must be installed in your dryer. If this...
Use and Care Guide
Page 9
... accessible for cleaning. • Flexible metal vent must be fully extended and supported when the dryer is recommended to avoid sagging and kinking that comes out through the rear of fire, this is not plugged with rigid or flexible heavy metal vent. • Review Vent system chart. For a garage installation, the gas pipe height must be connected into any plastic or metal foil vent with lint...
... accessible for cleaning. • Flexible metal vent must be fully extended and supported when the dryer is recommended to avoid sagging and kinking that comes out through the rear of fire, this is not plugged with rigid or flexible heavy metal vent. • Review Vent system chart. For a garage installation, the gas pipe height must be connected into any plastic or metal foil vent with lint...
Use and Care Guide
Page 11
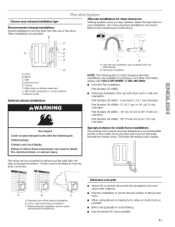
... rear offset exhaust installation B. Choose your installation. Refer to wall vent mismatch): Part Number 26-49901 - Exhaust hood E, Clamps F. For further information, please call 1-800-4-MY-HOME ® (1-800-469-4663}. • Over-the-Top Installation: Part Number 26-49900 • Periscope Installation (For use the fewest number of the dryer. Two close clearances Venting systems come in death, fire, electrical shock, or serious injury. Exhaust outlet Optional exhaust installations Fire Hazard Cover...
... rear offset exhaust installation B. Choose your installation. Refer to wall vent mismatch): Part Number 26-49901 - Exhaust hood E, Clamps F. For further information, please call 1-800-4-MY-HOME ® (1-800-469-4663}. • Over-the-Top Installation: Part Number 26-49900 • Periscope Installation (For use the fewest number of the dryer. Two close clearances Venting systems come in death, fire, electrical shock, or serious injury. Exhaust outlet Optional exhaust installations Fire Hazard Cover...
Use and Care Guide
Page 12
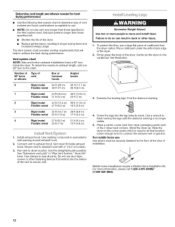
... the dryer carton. Number of 90 ° turns or elbows Type of the dryer. Connect vent to connect the exhaust vent or gas line. See Illustration. 3. For mobile home use a large flat piece of cardboard from dryer packaging under the entire back edge of the dryer. 2. For more people to move and install dryer. Install exhaust hood. Vent must be securely fastened to the floor at the time of installation. Do not use duct...
... the dryer carton. Number of 90 ° turns or elbows Type of the dryer. Connect vent to connect the exhaust vent or gas line. See Illustration. 3. For mobile home use a large flat piece of cardboard from dryer packaging under the entire back edge of the dryer. 2. For more people to move and install dryer. Install exhaust hood. Vent must be securely fastened to the floor at the time of installation. Do not use duct...
Use and Care Guide
Page 13
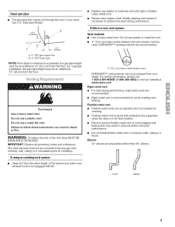
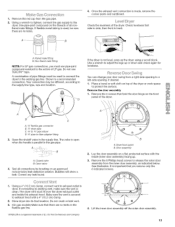
... gas connector B. @" dryerpipe C. _" to _" pipe elbow D. @"pipe-to adjust the legs up the dryer using a wood block. Bubbles will show a leak. See illustration. Move dryer into its final location. Check levelness first side to side, then front to the supply line type, size and location. ! o _ 4= Lift the inner door assembly off the outer door assembly. 13 Closed valve B. C_OO @W C_ You can change your door swing from a right-side opening to...
... gas connector B. @" dryerpipe C. _" to _" pipe elbow D. @"pipe-to adjust the legs up the dryer using a wood block. Bubbles will show a leak. See illustration. Move dryer into its final location. Check levelness first side to side, then front to the supply line type, size and location. ! o _ 4= Lift the inner door assembly off the outer door assembly. 13 Closed valve B. C_OO @W C_ You can change your door swing from a right-side opening to...
Use and Care Guide
Page 15
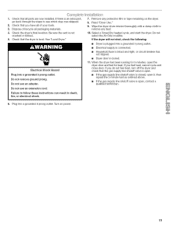
... test as outlined above. • If the gas supply line shutoff valve is not crushed or kinked. 5. Select a Timed Dry heated cycle, and start , check the following: • Dryer is level. Do not remove ground prong. Check that the dryer is plugged into a grounded 3 prong outlet. Electrical Shock Hazard Plug into a grounded 3 prong outlet. • Electrical supply is connected. • Household fuse is intact and tight, or circuit breaker has not tripped. • Dryer door is closed , open the dryer door and...
... test as outlined above. • If the gas supply line shutoff valve is not crushed or kinked. 5. Select a Timed Dry heated cycle, and start , check the following: • Dryer is level. Do not remove ground prong. Check that the dryer is plugged into a grounded 3 prong outlet. Electrical Shock Hazard Plug into a grounded 3 prong outlet. • Electrical supply is connected. • Household fuse is intact and tight, or circuit breaker has not tripped. • Dryer door is closed , open the dryer door and...
Use and Care Guide
Page 16
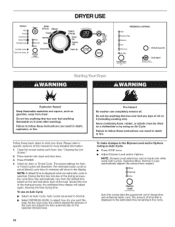
... fire. As the cycle runs, the control senses the dryness of the load and adjusts the time automatically for Auto or Timed Cycles will illuminate. Selecting More, Normal or Less automatically adjusts the sensed time needed. STATUS Power AUTO CYCLES Delicate Wet_ 0 Damp _ Cool Down _ Casual Clothes Dry Ja_t Wrinkle Guard O _ More _ Normal 0 Less Jeans Controls Locked Check Lint Screen _ V Dryness Level AU-OCYC!So,,JY DRYER USE TIMED CYCLES Timed Dry EDxrpyress Touch Up MODIFIERS...
... fire. As the cycle runs, the control senses the dryness of the load and adjusts the time automatically for Auto or Timed Cycles will illuminate. Selecting More, Normal or Less automatically adjusts the sensed time needed. STATUS Power AUTO CYCLES Delicate Wet_ 0 Damp _ Cool Down _ Casual Clothes Dry Ja_t Wrinkle Guard O _ More _ Normal 0 Less Jeans Controls Locked Check Lint Screen _ V Dryness Level AU-OCYC!So,,JY DRYER USE TIMED CYCLES Timed Dry EDxrpyress Touch Up MODIFIERS...
Use and Care Guide
Page 17
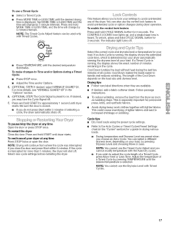
... Cool Down depends on . The CONTROLS LOCKED icon lights up, and a single beep tone is selected. The indicator light turns off . 7. Select the correct cycle and dryness level or temperature for approximately 1 second until the desired temperature illuminates. If a Timed Cycle is running , the display shows the estimated cycle time, which is interrupted for 3 seconds. The length of selecting a cycle, the dryer automatically shuts off . Drying tips • Follow care label directions...
... Cool Down depends on . The CONTROLS LOCKED icon lights up, and a single beep tone is selected. The indicator light turns off . 7. Select the correct cycle and dryness level or temperature for approximately 1 second until the desired temperature illuminates. If a Timed Cycle is running , the display shows the estimated cycle time, which is interrupted for 3 seconds. The length of selecting a cycle, the dryer automatically shuts off . Drying tips • Follow care label directions...
Use and Care Guide
Page 18
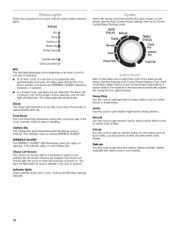
... drying time for ease in an Auto Cycle when the laundry is approximately 80% dry. Delicate Use this cycle to get extra low heat for the length of your dryer with Clothes Dry. Laundry cools for optimal drying. WRINKLE GUARD _ The WRINKLE GUARD ®light illuminates when this cycle to get medium heat for drying sturdy fabrics such as sturdy work clothes. The light will come on during the cool down part of load you are drying. Cool...
... drying time for ease in an Auto Cycle when the laundry is approximately 80% dry. Delicate Use this cycle to get extra low heat for the length of your dryer with Clothes Dry. Laundry cools for optimal drying. WRINKLE GUARD _ The WRINKLE GUARD ®light illuminates when this cycle to get medium heat for drying sturdy fabrics such as sturdy work clothes. The light will come on during the cool down part of load you are drying. Cool...
Use and Care Guide
Page 20
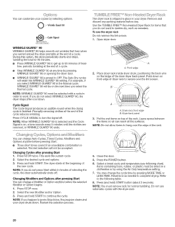
... . Changing Cycles after cool down . This ends the current cycle. 2. NOTE: If you do not select WRINKLE GUARD _ 90, the dryer stops after pressing Start 1. O WrinkleGuard90 LOCK/ bNLOCKCONIROLS WRINKLE GUARD e_90 WRINKLE GUARD ®90 helps smooth out wrinkles that you cannot unload the dryer promptly at any packing material before use. The Auto Dry cycles will not be selected with the dryer rack. 20 A. Press the POWER button...
... . Changing Cycles after cool down . This ends the current cycle. 2. NOTE: If you do not select WRINKLE GUARD _ 90, the dryer stops after pressing Start 1. O WrinkleGuard90 LOCK/ bNLOCKCONIROLS WRINKLE GUARD e_90 WRINKLE GUARD ®90 helps smooth out wrinkles that you cannot unload the dryer promptly at any packing material before use. The Auto Dry cycles will not be selected with the dryer rack. 20 A. Press the POWER button...
Use and Care Guide
Page 21
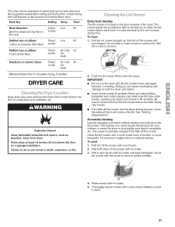
... needed . Thoroughly dry lint screen with hot water. 5. Rack Dry Setting Temp. Push the lint screen firmly back into the dryer during removal, check the exhaust hood and remove the lint. Wet both the dryer and fabrics. Replace screen in the door opening of combustion and ventilation air. See "Venting Requirements." The control panel has an indicator light to remind you to shape and lay flat on the amount of items that would obstruct the flow of the dryer. To clean...
... needed . Thoroughly dry lint screen with hot water. 5. Rack Dry Setting Temp. Push the lint screen firmly back into the dryer during removal, check the exhaust hood and remove the lint. Wet both the dryer and fabrics. Replace screen in the door opening of combustion and ventilation air. See "Venting Requirements." The control panel has an indicator light to remind you to shape and lay flat on the amount of items that would obstruct the flow of the dryer. To clean...
Use and Care Guide
Page 22
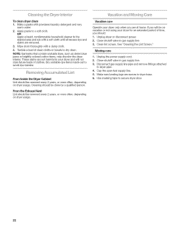
... to a soft cloth. From the Exhaust Vent Lint should be removed every 2 years, or more often, depending on dryer usage. Vacation care Operate your dryer only when you are secure in dryer base. 6. Close shutoff valve in gas supply line. 3. Clean lint screen. Close shutoff valve in gas supply line. 3. From Inside the Dryer Cabinet Lint should : 1. Moving care 1. Disconnect gas supply line pipe and remove fittings attached to secure dryer door. 22 Wipe drum thoroughly with powdered...
... to a soft cloth. From the Exhaust Vent Lint should be removed every 2 years, or more often, depending on dryer usage. Vacation care Operate your dryer only when you are secure in dryer base. 6. Close shutoff valve in gas supply line. 3. Clean lint screen. Close shutoff valve in gas supply line. 3. From Inside the Dryer Cabinet Lint should : 1. Moving care 1. Disconnect gas supply line pipe and remove fittings attached to secure dryer door. 22 Wipe drum thoroughly with powdered...
Use and Care Guide
Page 23
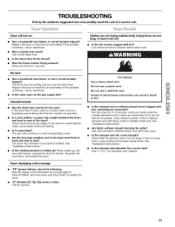
... load. See "Installation Instructions." Press and hold START to side? Dryer displaying code message "PF" (power failure), check the following: Was the drying cycle interrupted by a power failure? Are fabric softener sheets blocking the grille? Replace the fuse or reset the circuit breaker. Lint screen should be cleaned before laundering. Use only one fabric softener sheet, and use ? Is the exhaust vent diameter the correct size? The drum may be a thumping sound during the first few minutes of a service...
... load. See "Installation Instructions." Press and hold START to side? Dryer displaying code message "PF" (power failure), check the following: Was the drying cycle interrupted by a power failure? Are fabric softener sheets blocking the grille? Replace the fuse or reset the circuit breaker. Lint screen should be cleaned before laundering. Use only one fabric softener sheet, and use ? Is the exhaust vent diameter the correct size? The drum may be a thumping sound during the first few minutes of a service...
Use and Care Guide
Page 24
... the end of home appliances, garage door openers, water heaters, and other injury. • Is the automatic cycle ending early? Failure to schedule service. Proper operation of your garments. Closet doors must have access to dry quickly? See "Installation Instructions." • Has an air dry modifier been selected? Level the dryer. Do not use a dryer rack with temperature below 45°F (7°0)? Clean lint screen. Check for a garage installation. Stains on making a smart purchase...
... the end of home appliances, garage door openers, water heaters, and other injury. • Is the automatic cycle ending early? Failure to schedule service. Proper operation of your garments. Closet doors must have access to dry quickly? See "Installation Instructions." • Has an air dry modifier been selected? Level the dryer. Do not use a dryer rack with temperature below 45°F (7°0)? Clean lint screen. Check for a garage installation. Stains on making a smart purchase...


