
Use and Care Manual
Page 2
... 13 Before Setting the Oven Controls 14 Control Pad Features 15 Setting the Clock 16-17 Consumer Defined Control 18-19 Setting Oven Controls 20-32 Self-Cleaning 33-35 Adjusting the Oven Temperature 35 General Care & Cleaning 36-38 Before You Call 39-41 Notes 42 Protection Agreements 43 Sears Service 44 Kenmore Elite Limited Warranty When installed, operated and maintained according to all instructions supplied with...
... 13 Before Setting the Oven Controls 14 Control Pad Features 15 Setting the Clock 16-17 Consumer Defined Control 18-19 Setting Oven Controls 20-32 Self-Cleaning 33-35 Adjusting the Oven Temperature 35 General Care & Cleaning 36-38 Before You Call 39-41 Notes 42 Protection Agreements 43 Sears Service 44 Kenmore Elite Limited Warranty When installed, operated and maintained according to all instructions supplied with...
Use and Care Manual
Page 3
.... Install only per installation instructions provided in the manuals. They should not be hot even though they have had sufficient time to cool. grasp the top rear of the appliance and carefully attempt to reach items could result. • Install anti-tip bracket packed with National Electrical Code ANSI/NFPA No.70 (USA) or CSA C22.1, PART 1 (Canada)-latest edition and local code requirements. Destroy...
.... Install only per installation instructions provided in the manuals. They should not be hot even though they have had sufficient time to cool. grasp the top rear of the appliance and carefully attempt to reach items could result. • Install anti-tip bracket packed with National Electrical Code ANSI/NFPA No.70 (USA) or CSA C22.1, PART 1 (Canada)-latest edition and local code requirements. Destroy...
Use and Care Manual
Page 4
... Apparel. YOUR OVEN • Use Care When Opening an Oven Door-Stand to drain and be turned inward and not extend over adjacent surface units. Let hot air or steam escape before removing the pan. • Use proper pan size. Check the manufacturer's recommendations for cooktop use your appliance for rangetop service without its insert. Place a pan of Oven Racks. NEVER cover any slots, holes or...
... Apparel. YOUR OVEN • Use Care When Opening an Oven Door-Stand to drain and be turned inward and not extend over adjacent surface units. Let hot air or steam escape before removing the pan. • Use proper pan size. Check the manufacturer's recommendations for cooktop use your appliance for rangetop service without its insert. Place a pan of Oven Racks. NEVER cover any slots, holes or...
Use and Care Manual
Page 5
... use aluminum foil to avoid a steam burn. Do not allow grease to a hot surface. • Avoid scratching the cooktop glass with a damp cloth. The door gasket is extremely sensitive to the fumes given off the power to the appliance before removing and replacing the bulb. • Protective liners-Do not use aluminum foil as recommended in the self-cleaning cycle only the parts...
... use aluminum foil to avoid a steam burn. Do not allow grease to a hot surface. • Avoid scratching the cooktop glass with a damp cloth. The door gasket is extremely sensitive to the fumes given off the power to the appliance before removing and replacing the bulb. • Protective liners-Do not use aluminum foil as recommended in the self-cleaning cycle only the parts...
Use and Care Manual
Page 7
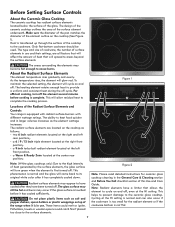
...-bottom cookware should be hot and burns may appear to areas beyond the surface elements. The type and size of cookware, the number of the Radiant Surface Elements and Controls Your range is not flat. 7 To maintain the selected setting, the element will spread to have cooled after it is in use . a 6 / 9 / 12 inch triple element located at the center rear position; Figure 2 Note...
...-bottom cookware should be hot and burns may appear to areas beyond the surface elements. The type and size of cookware, the number of the Radiant Surface Elements and Controls Your range is not flat. 7 To maintain the selected setting, the element will spread to have cooled after it is in use . a 6 / 9 / 12 inch triple element located at the center rear position; Figure 2 Note...
Use and Care Manual
Page 9
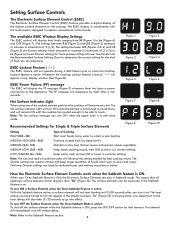
... pads is ON, press the ON/OFF button for Single & Triple Surface Elements Figure 7 Figure 9 Setting Type of the radiant element positions the cooktop will not operate during a Self-Clean cycle or when the Cooktop Lockout feature is a simmer setting). Hi) Start most foods, bring water to replace conventional control knobs. The heat setting you turn off the surface element while the Sabbath feature is designed to...
... pads is ON, press the ON/OFF button for Single & Triple Surface Elements Figure 7 Figure 9 Setting Type of the radiant element positions the cooktop will not operate during a Self-Clean cycle or when the Cooktop Lockout feature is a simmer setting). Hi) Start most foods, bring water to replace conventional control knobs. The heat setting you turn off the surface element while the Sabbath feature is designed to...
Use and Care Manual
Page 12
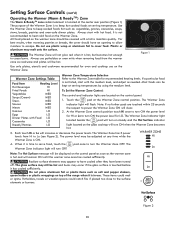
... to have cooled after they have an opening to allow moisture to turn OFF. The Warmer Zone indicator light will increase or decrease the power levels. Each touch Hi or Lo will flash. The Warmer Zone indicator light will turn ON the power level for oven and cooktop use plastic wrap or aluminum foil to heat cold food on the control panel. 1. These...
... to have cooled after they have an opening to allow moisture to turn OFF. The Warmer Zone indicator light will increase or decrease the power levels. Each touch Hi or Lo will flash. The Warmer Zone indicator light will turn ON the power level for oven and cooktop use plastic wrap or aluminum foil to heat cold food on the control panel. 1. These...
Use and Care Manual
Page 14
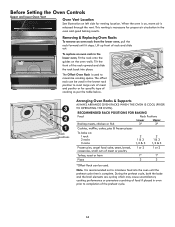
... Oven Vent Oven Vent Location See illustration on the oven walls. Flat Rack The Offset Oven Rack is cool (Prior to operating the oven). Offset Rack Rack positions Arranging Oven Racks & Supports Always arrange oven racks when the oven is used to roast large cuts of meat and poultry or for proper air circulation in the lowest rack position to maximize cooking space. Removing & Replacing Oven Racks To remove...
... Oven Vent Oven Vent Location See illustration on the oven walls. Flat Rack The Offset Oven Rack is cool (Prior to operating the oven). Offset Rack Rack positions Arranging Oven Racks & Supports Always arrange oven racks when the oven is used to roast large cuts of meat and poultry or for proper air circulation in the lowest rack position to maximize cooking space. Removing & Replacing Oven Racks To remove...

Use and Care Manual
Page 15
... of the temperature or time is delayed 3 seconds). An ENTRY ERROR tone (3 short beeps) will sound each feature and function follow later in this Use & Care Guide. Max. Warm & Hold- Conv Bake - Bake - StART Used to start all oven features (not used to turn oven light ON and OFF. 20. Used to set a 2 to the lower oven operations. Used to lock the oven key pads and oven door. Temp...
... of the temperature or time is delayed 3 seconds). An ENTRY ERROR tone (3 short beeps) will sound each feature and function follow later in this Use & Care Guide. Max. Warm & Hold- Conv Bake - Bake - StART Used to start all oven features (not used to turn oven light ON and OFF. 20. Used to set a 2 to the lower oven operations. Used to lock the oven key pads and oven door. Temp...
Use and Care Manual
Page 19
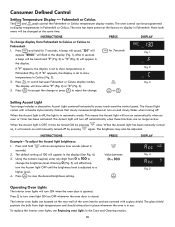
... the Care and Cleaning section. 19 PRESS Value between Fahrenheit or Celsius display modes. Note: both ovens will turn the Accent light OFF until an acceptance tone sounds (about 6 seconds) 2. Instructions PRESS DISPLAY To change the brightness level. Press to switch between 0 to display in use. or Setting Accent Light Your range includes a decorative Accent Light centered horizontally across touch-sensitive control panel. Using...
... the Care and Cleaning section. 19 PRESS Value between Fahrenheit or Celsius display modes. Note: both ovens will turn the Accent light OFF until an acceptance tone sounds (about 6 seconds) 2. Instructions PRESS DISPLAY To change the brightness level. Press to switch between 0 to display in use. or Setting Accent Light Your range includes a decorative Accent Light centered horizontally across touch-sensitive control panel. Using...
Use and Care Manual
Page 22
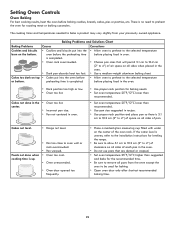
... in the • Oven too hot. If the water level is completed. • Oven rack overcrowded. • Choose pan sizes that are dented or warped. • Set oven temperature 25°F/12°C higher than recommended. • Use pan size suggested and bake for the recommended time. • Be sure to remove all sides of air space on all sides when...
... in the • Oven too hot. If the water level is completed. • Oven rack overcrowded. • Choose pan sizes that are dented or warped. • Set oven temperature 25°F/12°C higher than recommended. • Use pan size suggested and bake for the recommended time. • Be sure to remove all sides of air space on all sides when...
Use and Care Manual
Page 26
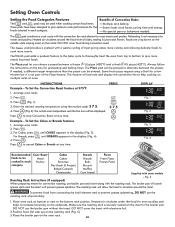
...) on the inside. Arrange oven racks. 2. DO NOT use broiler pan and insert along with the convection fan and element to the bottom rack position. Fig. 5 Roasting Rack Instructions (if equipped) When preparing meats for preheating and baking times. DO NOT cover the insert with some models - Heated air circulates around the meat. Always follow the instructions on bottom or next to...
...) on the inside. Arrange oven racks. 2. DO NOT use broiler pan and insert along with the convection fan and element to the bottom rack position. Fig. 5 Roasting Rack Instructions (if equipped) When preparing meats for preheating and baking times. DO NOT cover the insert with some models - Heated air circulates around the meat. Always follow the instructions on bottom or next to...
Use and Care Manual
Page 33
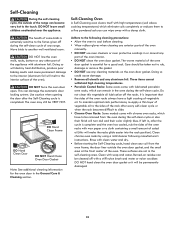
.... • Chrome Oven Racks: Some models come with clean water and dry. • Before starting the Self-Cleaning cycle, hand clean any part of the oven interior. • DO NOT clean the oven door gasket. Clean with chrome oven racks, which eliminate soils completely or reduces them to cool before cleaning. • Wear rubber gloves when cleaning any exterior parts of the oven manually. • DO NOT use any range. The...
.... • Chrome Oven Racks: Some models come with clean water and dry. • Before starting the Self-Cleaning cycle, hand clean any part of the oven interior. • DO NOT clean the oven door gasket. Clean with chrome oven racks, which eliminate soils completely or reduces them to cool before cleaning. • Wear rubber gloves when cleaning any exterior parts of the oven manually. • DO NOT use any range. The...
Use and Care Manual
Page 36
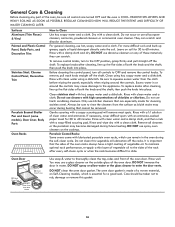
... during the self-clean cycle. For general cleaning, use a glass cleaner on the outside glass of the oven door. grasp firmly and pull straight off the shaft. To replace knobs after cleaning, line up the flat sides of both the knob and the shaft; Before cleaning the control panel, turn to squeeze excess water from the surface as possible. Rinse with a clean cloth. Rinse with high...
... during the self-clean cycle. For general cleaning, use a glass cleaner on the outside glass of the oven door. grasp firmly and pull straight off the shaft. To replace knobs after cleaning, line up the flat sides of both the knob and the shaft; Before cleaning the control panel, turn to squeeze excess water from the surface as possible. Rinse with a clean cloth. Rinse with high...
Use and Care Manual
Page 37
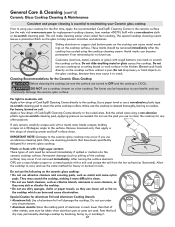
....com for replacement cooktop cleaner, item number 40079). Pans that boil dry may occur if you use a non-abrasive plastic type no -scratch cleaning pad, applying pressure as pitting of aluminum is much lower than that have been specifically designed for ceramic glass cooktop. These marks should be sure the controls are used. General Care & Cleaning (cont'd) Ceramic Glass Cooktop Cleaning & Maintenance Consistent and...
....com for replacement cooktop cleaner, item number 40079). Pans that boil dry may occur if you use a non-abrasive plastic type no -scratch cleaning pad, applying pressure as pitting of aluminum is much lower than that have been specifically designed for ceramic glass cooktop. These marks should be sure the controls are used. General Care & Cleaning (cont'd) Ceramic Glass Cooktop Cleaning & Maintenance Consistent and...
Use and Care Manual
Page 38
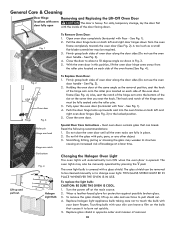
... oven racks are fully in Fig. 3. 5. The glass shield can be removed to be fully seated onto the roller pins. 3. To replace the light bulb: CAUTION: BE SURE THE OVEN IS COOL. 1. To Remove Oven Door: 1. Close the door to touch the bulb with floor - Lift up towards the oven door (See Fig. 2). Turn the power off at a later time. Replace halogen light appliance bulb taking care not...
... oven racks are fully in Fig. 3. 5. The glass shield can be removed to be fully seated onto the roller pins. 3. To replace the light bulb: CAUTION: BE SURE THE OVEN IS COOL. 1. To Remove Oven Door: 1. Close the door to touch the bulb with floor - Lift up towards the oven door (See Fig. 2). Turn the power off at a later time. Replace halogen light appliance bulb taking care not...
Use and Care Manual
Page 39
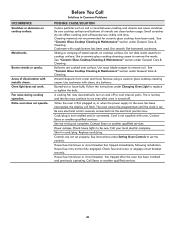
... Oven Control Beeps and Displays any F code error (example F11). "d-O" is obtained. Bad cooking results. Place oven rack in the installation instructions. Check steps under "Entire range or oven does not operate" in this list. Lightweight or warped pans were used . Before You Call Solutions to Common Problems Before you call Sears or another qualified servicer. Surface element too hot or not hot enough. Surface element turns off...
... Oven Control Beeps and Displays any F code error (example F11). "d-O" is obtained. Bad cooking results. Place oven rack in the installation instructions. Check steps under "Entire range or oven does not operate" in this list. Lightweight or warped pans were used . Before You Call Solutions to Common Problems Before you call Sears or another qualified servicer. Surface element too hot or not hot enough. Surface element turns off...
Use and Care Manual
Page 40
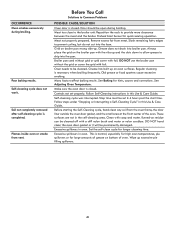
... surface. Check house lights to cool internal parts. Areas of metal utensils on cooktop surface. Fan noise during cooking operation. Use smooth, flat-bottomed cookware. See "Ceramic Glass Cooktop Cleaning & Maintenance" section under General Care & Cleaning. Use razor blade scraper to replace or tighten the bulb. Use cookware with metallic sheen. Cord/plug is securely connected into the electrical junction box. House fuse has blown or circuit breaker has tripped immediately following installation. Metalmarks...
... surface. Check house lights to cool internal parts. Areas of metal utensils on cooktop surface. Fan noise during cooking operation. Use smooth, flat-bottomed cookware. See "Ceramic Glass Cooktop Cleaning & Maintenance" section under General Care & Cleaning. Use razor blade scraper to replace or tighten the bulb. Use cookware with metallic sheen. Cord/plug is securely connected into the electrical junction box. House fuse has blown or circuit breaker has tripped immediately following installation. Metalmarks...
Use and Care Manual
Page 41
... searing operation. Make sure the oven door is closed . Follow Self-Cleaning instructions in this Use & Care Guide. Self-cleaning cycle was interrupted. DO NOT hand clean the oven door gasket or it will be cleaned. Before You Call Solutions to drip into the pan. Reposition the rack to the broiler unit. Meat not properly prepared. Regular cleaning is completed. See Adjusting Oven Temperature. Stop time...
... searing operation. Make sure the oven door is closed . Follow Self-Cleaning instructions in this Use & Care Guide. Self-cleaning cycle was interrupted. DO NOT hand clean the oven door gasket or it will be cleaned. Before You Call Solutions to drip into the pan. Reposition the rack to the broiler unit. Meat not properly prepared. Regular cleaning is completed. See Adjusting Oven Temperature. Stop time...

Use and Care Manual
Page 44
... home - For the replacement parts, accessories and owner's manuals that you need to do-it ! and Canada) www.sears.com www.sears.ca Our Home For repair of carry-in items like vacuums, lawn equipment, and electronics, call anytime for the location of your home or ours! Get it fixed, at your nearest Sears Parts & Repair Service Center 1-800-488-1222...
... home - For the replacement parts, accessories and owner's manuals that you need to do-it ! and Canada) www.sears.com www.sears.ca Our Home For repair of carry-in items like vacuums, lawn equipment, and electronics, call anytime for the location of your home or ours! Get it fixed, at your nearest Sears Parts & Repair Service Center 1-800-488-1222...


