Use and Care Guide
Page 2
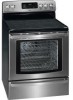
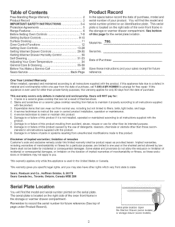
... Drawer (some or storage drawer (some models), Table of Contents Free-Standing Range Warranty 2 Product Record 2 iMPORTANT SAFETY INSTRUCTIONS 3-4 Protection Agreements 5 Range Features 6 Before Setting Oven Controls 7-8 Setting Surface Controls 9-10 Surface Cooking 11... Oven Control Functions 12 Setting Oven Controls 13-28 Setting Warmer Drawer Controls 29-30 Setting Warmer Drawer Humidity Control 30 Self Cleaning ...
... Drawer (some or storage drawer (some models), Table of Contents Free-Standing Range Warranty 2 Product Record 2 iMPORTANT SAFETY INSTRUCTIONS 3-4 Protection Agreements 5 Range Features 6 Before Setting Oven Controls 7-8 Setting Surface Controls 9-10 Surface Cooking 11... Oven Control Functions 12 Setting Oven Controls 13-28 Setting Warmer Drawer Controls 29-30 Setting Warmer Drawer Humidity Control 30 Self Cleaning ...
Use and Care Guide
Page 3
...in color. Once the power resumes, reset the clock and oven function. Never allow children to operate the range during a power failure. Know how to disconnect the power to playwith packaging material. Destroy the carton and ... may become too hot. • Use Only Dry Potholders - important Safety instructions Read all instructions before using the range. For models with a pan lid, or use the oven or warmer drawer (if equipped) for storage. •... enough to tip, resulting in accordance with the National Electrical Code ANSI/ NFPA No. 70 latest edition and local...
...in color. Once the power resumes, reset the clock and oven function. Never allow children to operate the range during a power failure. Know how to disconnect the power to playwith packaging material. Destroy the carton and ... may become too hot. • Use Only Dry Potholders - important Safety instructions Read all instructions before using the range. For models with a pan lid, or use the oven or warmer drawer (if equipped) for storage. •... enough to tip, resulting in accordance with the National Electrical Code ANSI/ NFPA No. 70 latest edition and local...
Use and Care Guide
Page 4
...insert. SELF CLEANING OVENS , Clean in the self-cleaning cycle only the parts listed in water. iMPORTANT INSTRUCTIONS FOR CLEANING YOUR RANGE , Clean the range regularly to warn important Safety Notice The California Safe Drinking Water and Toxic Enforcement substances known to the state to cause cancer, ...or replace food in or around any part of the broiler. , Do not cover the broiler insert with one or more surface units of electric shock. The oven vent is extremely sensitive to such substances. These items could ignite. , Protective Liners--Do not use . Always place ...
...insert. SELF CLEANING OVENS , Clean in the self-cleaning cycle only the parts listed in water. iMPORTANT INSTRUCTIONS FOR CLEANING YOUR RANGE , Clean the range regularly to warn important Safety Notice The California Safe Drinking Water and Toxic Enforcement substances known to the state to cause cancer, ...or replace food in or around any part of the broiler. , Do not cover the broiler insert with one or more surface units of electric shock. The oven vent is extremely sensitive to such substances. These items could ignite. , Protective Liners--Do not use . Always place ...
Use and Care Guide
Page 6
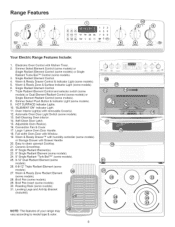
Range Features (9 Your Electric Range Features include: 1. Triple Radiant Element Control and selector switch (some models) or Dual Element Radiant Control (some models) or Single Element Radiant Control (some models). ... Rack(s). 16. Easy to model type & color. Broil Pan Insert (some models). 6. NOTE: The features of your range may vary according to clean upswept Cooktop. 21. Warm & Ready Zone & Surface Indicator Light (some models). 30. HOT SURFACE Indicator Lights. 10. f_.____ ...... Full width Oven Door with removable Cover(s). 12. Leveling Legs...
Range Features (9 Your Electric Range Features include: 1. Triple Radiant Element Control and selector switch (some models) or Dual Element Radiant Control (some models) or Single Element Radiant Control (some models). ... Rack(s). 16. Easy to model type & color. Broil Pan Insert (some models). 6. NOTE: The features of your range may vary according to clean upswept Cooktop. 21. Warm & Ready Zone & Surface Indicator Light (some models). 30. HOT SURFACE Indicator Lights. 10. f_.____ ...... Full width Oven Door with removable Cover(s). 12. Leveling Legs...
Use and Care Guide
Page 8
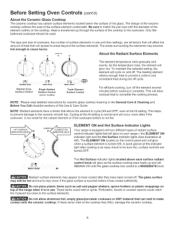
Only flatbottomed cookware should be used. The type and size of cookware, the number of surface elements in use and their settings, are all factors that will affect the amount of the cooktop to areas beyond the surface elements. The areas surrounding the elements may become hot enough to match the pan size with the diameter of the surface element underneath. ELEMENTON About the Radiant Surface Elements Heat is transferred up through the surface of heat that will spread to the cookware. The design of the ceramic cooktop outlines the area of the element outline on the cooktop...
Only flatbottomed cookware should be used. The type and size of cookware, the number of surface elements in use and their settings, are all factors that will affect the amount of the cooktop to areas beyond the surface elements. The areas surrounding the elements may become hot enough to match the pan size with the diameter of the surface element underneath. ELEMENTON About the Radiant Surface Elements Heat is transferred up through the surface of heat that will spread to the cookware. The design of the ceramic cooktop outlines the area of the element outline on the cooktop...
Use and Care Guide
Page 9
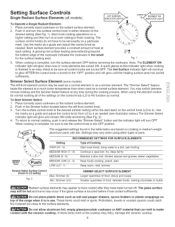
... FOR SURFACE ELEMENTS SIMMER SELECT ON/OFF ', Setting HIGH (HI - 9) MEDIUM HIGH (7 - 8) MEDIUM (5 - 6) MEDIUM LOW (2 - 4) LOW (LO - 1) Type of the settings on top of the range when it has cooled sufficiently. If these items melt on the cooktop they have to HI) function as needed (see illustration below).The Simmer Select...
... FOR SURFACE ELEMENTS SIMMER SELECT ON/OFF ', Setting HIGH (HI - 9) MEDIUM HIGH (7 - 8) MEDIUM (5 - 6) MEDIUM LOW (2 - 4) LOW (LO - 1) Type of the settings on top of the range when it has cooled sufficiently. If these items melt on the cooktop they have to HI) function as needed (see illustration below).The Simmer Select...
Use and Care Guide
Page 10
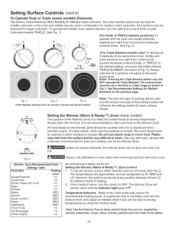
... plastic wrap to cover food. Note:use potholders or oven mitts when removing food from the warm zone as shown in the Dual or Triple range as ; To set in Fig. 3). Always start with Food Eggs Gravies Meats Sauces Soups (cream) Stews Vegetables Fried Foods Hot Beverages Soups (liquid) Food Heating...
... plastic wrap to cover food. Note:use potholders or oven mitts when removing food from the warm zone as shown in the Dual or Triple range as ; To set in Fig. 3). Always start with Food Eggs Gravies Meats Sauces Soups (cream) Stews Vegetables Fried Foods Hot Beverages Soups (liquid) Food Heating...
Use and Care Guide
Page 11
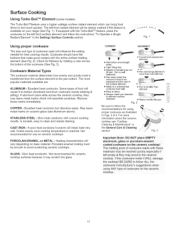
...'s suggestions when using proper cookware as illustrated in Figs. 4 & 5. Fig. 3 Important Note: DO NOT place EMPTY aluminum, glass or porcelain-enamel coated cookware on your range (See Fig. 1). May leave metal marks on ceramic cooktops. PORCELAIN-ENAMEL on base material. Heating characteristics will vary depending on METAL - Cookware Material Types The...
...'s suggestions when using proper cookware as illustrated in Figs. 4 & 5. Fig. 3 Important Note: DO NOT place EMPTY aluminum, glass or porcelain-enamel coated cookware on your range (See Fig. 1). May leave metal marks on ceramic cooktops. PORCELAIN-ENAMEL on base material. Heating characteristics will vary depending on METAL - Cookware Material Types The...
Use and Care Guide
Page 13
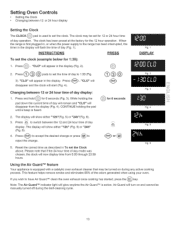
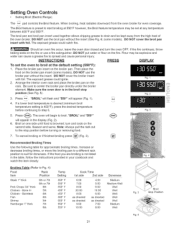
... @ @ pads to set the Clock above. The display will start (Fig. 4). If you wish to l:30 (Fig. 3). INSTRUCTIONS PRESS To set the clock. Press _. "CLO" will flash the time of day operation. for 1:30): 1. Press _ to accept the desired change or press @ to reject the change. , Reset the correct ... heard. This feature helps remove smoke and eliminates 85% of day Clean display. Air Guard will disappear from 0:00 through 23:59 hours. When the range is first plugged in, or when the power supply to set the clock (example below for 6 seconds Fig. 1 DISPLAY Fig. 2 Fig. 3 Fig. ...
... @ @ pads to set the Clock above. The display will start (Fig. 4). If you wish to l:30 (Fig. 3). INSTRUCTIONS PRESS To set the clock. Press _. "CLO" will flash the time of day operation. for 1:30): 1. Press _ to accept the desired change or press @ to reject the change. , Reset the correct ... heard. This feature helps remove smoke and eliminates 85% of day Clean display. Air Guard will disappear from 0:00 through 23:59 hours. When the range is first plugged in, or when the power supply to set the clock (example below for 6 seconds Fig. 1 DISPLAY Fig. 2 Fig. 3 Fig. ...
Use and Care Guide
Page 16
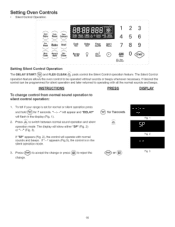
... To change control from normal sound operation to be programmed for silent operation and later returned to reject the for 7 seconds. To tell if your range is in the display (Fig. 1). 2. Press c._..o. oto, switch between normal sound operation and silent operation mode. The display will flash in the silent operation mode...
... To change control from normal sound operation to be programmed for silent operation and later returned to reject the for 7 seconds. To tell if your range is in the display (Fig. 1). 2. Press c._..o. oto, switch between normal sound operation and silent operation mode. The display will flash in the silent operation mode...
Use and Care Guide
Page 17
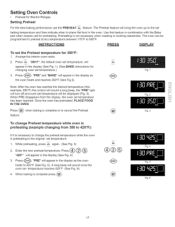
... 425°F (See Fig. 5). Press _;_,t. Note: After the oven has reached the desired temperature (this feature in the display (See Fig. 1). (See BAKE instructions for Electric Ranges Setting Preheat f_ For the best baking performance use the PREHEAT _& feature. The oven can be displayed (Fig. 3). A long beep will sound once the oven...
... 425°F (See Fig. 5). Press _;_,t. Note: After the oven has reached the desired temperature (this feature in the display (See Fig. 1). (See BAKE instructions for Electric Ranges Setting Preheat f_ For the best baking performance use the PREHEAT _& feature. The oven can be displayed (Fig. 3). A long beep will sound once the oven...
Use and Care Guide
Page 21
... as directed 7:00 8:00 Doneness Medium Medium-Welt Well Well Well Well Welt Medium Welt Fig. 5 Broil Stop Position _..... Setting Oven Controls • Setting Broil (Electric Range) The B,o,,pad controls the Broil feature. some models). If the fire continues, throw baking soda on the second side. INSTRUCTIONS PRESS DISPLAY To set at...
... as directed 7:00 8:00 Doneness Medium Medium-Welt Well Well Well Well Welt Medium Welt Fig. 5 Broil Stop Position _..... Setting Oven Controls • Setting Broil (Electric Range) The B,o,,pad controls the Broil feature. some models). If the fire continues, throw baking soda on the second side. INSTRUCTIONS PRESS DISPLAY To set at...
Use and Care Guide
Page 31
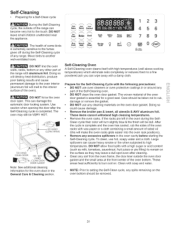
... Flex Clean .ee, e 0 Recall _ Gual"d @ sClTearjz 0 @ Oven _ Lockout DO NOT line the oven walls, racks, bottom or any other part of the range with wax paper or a cloth containing a small amount of salad oil (this will make the oven racks glide easier into the oven rack positions). * Remove... any excessive spillovers in the oven during the Self-Cleaning cycle of any range. Prepare for the Self=Cleaning Cycle with soap and water. * NOTE: Prior to high temperatures. Doing so could cause damage. * Remove the ...
... Flex Clean .ee, e 0 Recall _ Gual"d @ sClTearjz 0 @ Oven _ Lockout DO NOT line the oven walls, racks, bottom or any other part of the range with wax paper or a cloth containing a small amount of salad oil (this will make the oven racks glide easier into the oven rack positions). * Remove... any excessive spillovers in the oven during the Self-Cleaning cycle of any range. Prepare for the Self=Cleaning Cycle with soap and water. * NOTE: Prior to high temperatures. Doing so could cause damage. * Remove the ...
Use and Care Guide
Page 32
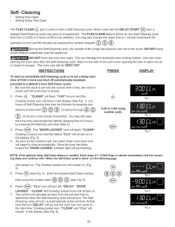
... @ @ (4 hours)in the display (Fig. 2). 4. CLEAN" will flash, "3:00" (hours) and the Cooktop locked icon will remain in 1 minute increments (for any amount of the range can damage the automatic door locking system. "CLEAN", Cooktop Lockout icon and the letters "CLn" will quit flashing 2:00 to determine when the Self-Cleaning...
... @ @ (4 hours)in the display (Fig. 2). 4. CLEAN" will flash, "3:00" (hours) and the Cooktop locked icon will remain in 1 minute increments (for any amount of the range can damage the automatic door locking system. "CLEAN", Cooktop Lockout icon and the letters "CLn" will quit flashing 2:00 to determine when the Self-Cleaning...
Use and Care Guide
Page 35
... immerse the door in the dishwasher and dry upon removal. DO NOT clean the oven door gasket. Care should be used if sprayed on the range top. Ceramic Cooktop See "Cooktop Cleaning & Maintenance" in the paragraph above. Follow by rinsing the area with clean water and a cloth. excess...glass cleaner on Self-Cleaning models, which is made for a good seal. Rinse well. Use the general cleaning instructions provided in this section for 30 to rub, damage or remove this will make the racks glide easier into the oven rack positions). ...i.ii........ Rinse with clean water and a damp...
... immerse the door in the dishwasher and dry upon removal. DO NOT clean the oven door gasket. Care should be used if sprayed on the range top. Ceramic Cooktop See "Cooktop Cleaning & Maintenance" in the paragraph above. Follow by rinsing the area with clean water and a cloth. excess...glass cleaner on Self-Cleaning models, which is made for a good seal. Rinse well. Use the general cleaning instructions provided in this section for 30 to rub, damage or remove this will make the racks glide easier into the oven rack positions). ...i.ii........ Rinse with clean water and a damp...

Use and Care Guide
Page 38
The oven light(s) may also be reset. Turn electrical power off at the rear of stainless parts. Replace glass shield over bulb and snap wire holder into place. 5. Turn power back on again at the main source (or plug the range back in this Use & Care Guide. Wear a leather-faced ...with a new 40 watt appliance bulb. 4. Care and Cleaning of Stainless Steel (some models) Some models are located at the main source or unplug the range. 2. General Care & Cleaning • Changing the Oven Light(s) Oven Light Wire Holder Changing the Oven Light (s) The oven light(s) automatically turn ON when...
The oven light(s) may also be reset. Turn electrical power off at the rear of stainless parts. Replace glass shield over bulb and snap wire holder into place. 5. Turn power back on again at the main source (or plug the range back in this Use & Care Guide. Wear a leather-faced ...with a new 40 watt appliance bulb. 4. Care and Cleaning of Stainless Steel (some models) Some models are located at the main source or unplug the range. 2. General Care & Cleaning • Changing the Oven Light(s) Oven Light Wire Holder Changing the Oven Light (s) The oven light(s) automatically turn ON when...
Use and Care Guide
Page 39
...assistance (See back cover). Appliance must first be sure. Oven does not operate - Preheat the broil element for assistance (See back cover). (4) Electrical power outage. Clean these problems are not the result of metal utensils on the oven rack. Remove using a ceramic-glass cooktop cleaning creme. ...base of day must be used . Provide sufficient space so range can be cleaned with metallic sheen (Ceramic Cooktop models) = Mineral deposits from water and food. Call your local electric company for the surface element to the set properly. If flames...
...assistance (See back cover). Appliance must first be sure. Oven does not operate - Preheat the broil element for assistance (See back cover). (4) Electrical power outage. Clean these problems are not the result of metal utensils on the oven rack. Remove using a ceramic-glass cooktop cleaning creme. ...base of day must be used . Provide sufficient space so range can be cleaned with metallic sheen (Ceramic Cooktop models) = Mineral deposits from water and food. Call your local electric company for the surface element to the set properly. If flames...


