
Use and Care Guide
Page 22
... of home appliances For repair- in items like garage door openers and water heaters. 1-8 00-4-MY-H O M E® (,-800-469-4663} Ca,, anytime, day or night (U.S.A. To purchase a protection 1-800-827-6655 Pard pedir servicio a domicilio, agreement on -line for the location of your home - ... ...iiiiiiiiiii iiiiiiiiiii iiiiiiiiiiiiiiiiiiiii Your Home °o.,ot,o_ who .,o_o =t, °omo.o_ _,o_o=_ _ For the replacement owner's For Sears professional parts, accessories and manuals that you need to ,(U.S.A.) Call anytime, 1-800-488-1222 1-800-469-4663 day or night (Canada) ...
... of home appliances For repair- in items like garage door openers and water heaters. 1-8 00-4-MY-H O M E® (,-800-469-4663} Ca,, anytime, day or night (U.S.A. To purchase a protection 1-800-827-6655 Pard pedir servicio a domicilio, agreement on -line for the location of your home - ... ...iiiiiiiiiii iiiiiiiiiii iiiiiiiiiiiiiiiiiiiii Your Home °o.,ot,o_ who .,o_o =t, °omo.o_ _,o_o=_ _ For the replacement owner's For Sears professional parts, accessories and manuals that you need to ,(U.S.A.) Call anytime, 1-800-488-1222 1-800-469-4663 day or night (Canada) ...
Installation Instructions
Page 1
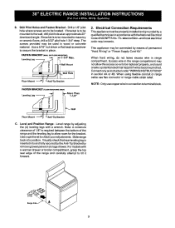
... combustible surfaces. 2. Dimensions that are maximum, Dashed cubedarea shows where the electrical outlet must be installed for flush to the wall installation 44 5/8' _ Door Open _ 9 / ,,_....ak_> / Wall -_.._Edge 2-5/8" for models equipped "'" with warmer drawers" 3-1/2" for proper electrical supply, and the stability of the floor. 3. Pages7-12 Espa5ol- Given dimensions provide minimum clearance. SIDE VIEW Centerline of range. iii: 30" _ 0' clearance below cooking top and at rear of range...
... combustible surfaces. 2. Dimensions that are maximum, Dashed cubedarea shows where the electrical outlet must be installed for flush to the wall installation 44 5/8' _ Door Open _ 9 / ,,_....ak_> / Wall -_.._Edge 2-5/8" for models equipped "'" with warmer drawers" 3-1/2" for proper electrical supply, and the stability of the floor. 3. Pages7-12 Espa5ol- Given dimensions provide minimum clearance. SIDE VIEW Centerline of range. iii: 30" _ 0' clearance below cooking top and at rear of range...
Installation Instructions
Page 2
... open door or if a child climbsupon it carefully. For electrical supply connection: 1/4" & 3/8" Socket driver or Nutdriver Additional Materials You Will Need Power Supply Cord or • INSTALL ANTI-TIP DEVICE PACKED WITH RANGE • SEE INSTALLATION INSTRUCTIONS Important Notes to the range. 3. Remove allpackingmaterialfromtheoven compartments before connectingthe gas and electrical supply to the Installer 1. These are certain safety precautions you may use the wall or floor mountmethod. Failure to install the anti-tip bracket will allow the bracket...
... open door or if a child climbsupon it carefully. For electrical supply connection: 1/4" & 3/8" Socket driver or Nutdriver Additional Materials You Will Need Power Supply Cord or • INSTALL ANTI-TIP DEVICE PACKED WITH RANGE • SEE INSTALLATION INSTRUCTIONS Important Notes to the range. 3. Remove allpackingmaterialfromtheoven compartments before connectingthe gas and electrical supply to the Installer 1. These are certain safety precautions you may use the wall or floor mountmethod. Failure to install the anti-tip bracket will allow the bracket...
Installation Instructions
Page 3
Drill Pilot Holes and Fasten Bracket- The screws provided may be mountedto masonry or ceramic floors,drilla 5/32" pilothole 1-3/4"deep. FASTEN BRACKET (W_LLORF1-OOMROUNTING) "--_1 E Drilla 1/8" pilot hole where screws ere to be located, If bracket is to be mountedto the wall, drillpilotholeat an approximate20 ° downwardangle, If bracket isto be used in wood or concrete material, Use a 5/16" nut-driveror flat head screwdriver to secure the bracket in place. B.
Drill Pilot Holes and Fasten Bracket- The screws provided may be mountedto masonry or ceramic floors,drilla 5/32" pilothole 1-3/4"deep. FASTEN BRACKET (W_LLORF1-OOMROUNTING) "--_1 E Drilla 1/8" pilot hole where screws ere to be located, If bracket is to be mountedto the wall, drillpilotholeat an approximate20 ° downwardangle, If bracket isto be used in wood or concrete material, Use a 5/16" nut-driveror flat head screwdriver to secure the bracket in place. B.

Installation Instructions
Page 4
... be removed. See Range Connection Opening Size Chart for use with ranges. Using a 1/4" socketdriver, remove eight(8) screwsfrom Rear Wall Shield to the Rear Wall Shield. Again usingthe 1/4" socket driver,remove one screw) and remove access cover. If a 1-1/8"dia. Cord must have strain relief clamp. To remove, loosen center screw (one (1) blunt pointscrew used . Reassemble the Rear Wall Shield to Range The rear access cover must be either three (3) or four (4) conductors. Only a power supply cord kit rated...
... be removed. See Range Connection Opening Size Chart for use with ranges. Using a 1/4" socketdriver, remove eight(8) screwsfrom Rear Wall Shield to the Rear Wall Shield. Again usingthe 1/4" socket driver,remove one screw) and remove access cover. If a 1-1/8"dia. Cord must have strain relief clamp. To remove, loosen center screw (one (1) blunt pointscrew used . Reassemble the Rear Wall Shield to Range The rear access cover must be either three (3) or four (4) conductors. Only a power supply cord kit rated...
Installation Instructions
Page 5
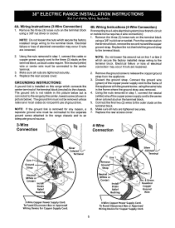
... power supply cord to the terminal block. NOTE: If the ground link is installed on this range which secure the factory installed range wiring to the three (3) studs on line 1 or line 2 which secure the factory installed range wiring to the chassis. Electrical failure or loss of ground link. GROUNDING INSTRUCTIONS: A ground link is removed for Copper Supply Cord. Remove the ground screw to the terminal block. 2. Using the nuts removed...
... power supply cord to the terminal block. NOTE: If the ground link is installed on this range which secure the factory installed range wiring to the three (3) studs on line 1 or line 2 which secure the factory installed range wiring to the chassis. Electrical failure or loss of ground link. GROUNDING INSTRUCTIONS: A ground link is removed for Copper Supply Cord. Remove the ground screw to the terminal block. 2. Using the nuts removed...
Installation Instructions
Page 6
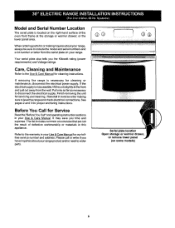
... cleaning or maintenance, disconnect the electrical power supply. Before You Call for cleaning instructions. It may save you time and expense. When ordering parts for or making inquires about your range product and/or need to the Use & Care Manual for Service Read the "Before You Call" and operating instruction sections in your range. See pages 2 and 3 for servicingandcleaning. Finish removing the unit for proper anchoring instructions. The list...
... cleaning or maintenance, disconnect the electrical power supply. Before You Call for cleaning instructions. It may save you time and expense. When ordering parts for or making inquires about your range product and/or need to the Use & Care Manual for Service Read the "Before You Call" and operating instruction sections in your range. See pages 2 and 3 for servicingandcleaning. Finish removing the unit for proper anchoring instructions. The list...


