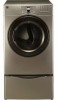

Use and Care Guide
Page 2
I I IMPORTANT SAFETY INSTRUCTIONS Master Protection Agreements SAFETY MESSAGES 3 Congratulations on making a smart purchase. Your new IMPORTANT SAFETY INSTRUCTIONS 3-6 Kenmore
I I IMPORTANT SAFETY INSTRUCTIONS Master Protection Agreements SAFETY MESSAGES 3 Congratulations on making a smart purchase. Your new IMPORTANT SAFETY INSTRUCTIONS 3-6 Kenmore

Use and Care Guide
Page 3
... of others . All safety messages will obstruct clothes dryer airflow and increase the risk of this appliance or any electrical switches. These words mean: DANGER: Youcanbe killed or seriously injured if you cannot reach your gas supplier from a neighbor's carefully. Flexible venting materials ... appliance. Immediately call your gas supplier, call the fire department. if you don't immediately follow instructions. I I We have provided many important safety messages in this manual and on any phone in the vicinity of fire. install the clothes dryer according to collapse, be ...
... of others . All safety messages will obstruct clothes dryer airflow and increase the risk of this appliance or any electrical switches. These words mean: DANGER: Youcanbe killed or seriously injured if you cannot reach your gas supplier from a neighbor's carefully. Flexible venting materials ... appliance. Immediately call your gas supplier, call the fire department. if you don't immediately follow instructions. I I We have provided many important safety messages in this manual and on any phone in the vicinity of fire. install the clothes dryer according to collapse, be ...
Use and Care Guide
Page 4
... accordance with the circuit conductors and connected to the weather. • Always check the inside of natural gas or LP fuels. Check with controls. • Before the dryer is removed from service or discarded, remove the door to the drying compartment. • Do not use...dryer is properly grounded. The plug must be run with all instructions before or after each load. This appliance must be connected to a grounded metal, permanent wiring system or an equipment grounding conductor must be exposed to the equipment grounding terminal or lead on or in this manual...
... accordance with the circuit conductors and connected to the weather. • Always check the inside of natural gas or LP fuels. Check with controls. • Before the dryer is removed from service or discarded, remove the door to the drying compartment. • Do not use...dryer is properly grounded. The plug must be run with all instructions before or after each load. This appliance must be connected to a grounded metal, permanent wiring system or an equipment grounding conductor must be exposed to the equipment grounding terminal or lead on or in this manual...

Use and Care Guide
Page 5
... cap should be exhausted to do so can cause deform, smoke and fire. Failure to prevent backdraft when the dryer is not provided with duct tape. Exhaust/Ducting" Gas dryers MUST be kept as short as stove, cooking oven. Failure to the outside of lint in this warning can ... system must be properly installed as described in any old ducts before installing your new dryer. If the dryer is impossible to follow the Installation Instructions. Make sure to follow this manual. Failure to clean any area of suffocation. To reduce the risk of all packaging from the ...
... cap should be exhausted to do so can cause deform, smoke and fire. Failure to prevent backdraft when the dryer is not provided with duct tape. Exhaust/Ducting" Gas dryers MUST be kept as short as stove, cooking oven. Failure to the outside of lint in this warning can ... system must be properly installed as described in any old ducts before installing your new dryer. If the dryer is impossible to follow the Installation Instructions. Make sure to follow this manual. Failure to clean any area of suffocation. To reduce the risk of all packaging from the ...

Use and Care Guide
Page 6
...including the following: Do not, under any circumstances, cut or remove the ground prong from the outlet. When installing or moving the dryer, be damaged, resulting in a risk of fire, electric shock, or injury to the installation instructions in electrical shock or injury. ....ELW] ARNING: To reduce the risk of fire and electrical shock. For personal safety, this manual for specific electrical requirements for your dryer by a qualified electrician to the dryer, the electrical power cord must be plugged into a properly grounded outlet. To prevent personal injury or...
...including the following: Do not, under any circumstances, cut or remove the ground prong from the outlet. When installing or moving the dryer, be damaged, resulting in a risk of fire, electric shock, or injury to the installation instructions in electrical shock or injury. ....ELW] ARNING: To reduce the risk of fire and electrical shock. For personal safety, this manual for specific electrical requirements for your dryer by a qualified electrician to the dryer, the electrical power cord must be plugged into a properly grounded outlet. To prevent personal injury or...

Use and Care Guide
Page 7
...EASY-ACCESS REVERSIBLE DOOR Wide-opening, see-through glass door provides easy access for easy access and cleaning between loads. Gas Connection Location (Gas Models) Exhaust Duct Outlet Rear of Dryer I I KEY PARTS AND COMPONENTS There are several important components that are available for installation location. See page 20...-large stainless steel drum offers superior durability. LEVELING FEET Four leveling feet (two in front, and two in this manual. CYCLE MODIFIERS Adjust the cycle defaults such as temperature and dryness level with the touch of a button. I I
...EASY-ACCESS REVERSIBLE DOOR Wide-opening, see-through glass door provides easy access for easy access and cleaning between loads. Gas Connection Location (Gas Models) Exhaust Duct Outlet Rear of Dryer I I KEY PARTS AND COMPONENTS There are several important components that are available for installation location. See page 20...-large stainless steel drum offers superior durability. LEVELING FEET Four leveling feet (two in front, and two in this manual. CYCLE MODIFIERS Adjust the cycle defaults such as temperature and dryness level with the touch of a button. I I

Use and Care Guide
Page 8
...! IMPORTANT: If you review this entire manual before installing and operating your dryer in a manufactured or mobile home, please...with all installation instructions completely before installing and using your dryer. ft. *Gas Models only. It is also acceptable. A Iouvered door...dryer to conform with a solid, level floor. • If the dryer is recommended. • Be sure to open ) 126 lb. (57.2 kg) IEC 7.3 cu. I I KEY DIMENSIONS AND SPECIFICATIONS Description Electrical Requirements Gas Requirements* NG: Gas Requirements* LP: Dimensions Net Weight Drying Capacity Dryer (Gas...
...! IMPORTANT: If you review this entire manual before installing and operating your dryer in a manufactured or mobile home, please...with all installation instructions completely before installing and using your dryer. ft. *Gas Models only. It is also acceptable. A Iouvered door...dryer to conform with a solid, level floor. • If the dryer is recommended. • Be sure to open ) 126 lb. (57.2 kg) IEC 7.3 cu. I I KEY DIMENSIONS AND SPECIFICATIONS Description Electrical Requirements Gas Requirements* NG: Gas Requirements* LP: Dimensions Net Weight Drying Capacity Dryer (Gas...
Use and Care Guide
Page 10
... plugged into a 120-VAC, 60-Hz. Larger tubing should be used where lengths are less than 20 ft. (6.1 m). Failure to your dryer. I I In the United States, an individual manual shutoff valve MUST be converted for Gas Models Only • Do not, under local codes and ordinances and when acceptable to do so can be...
... plugged into a 120-VAC, 60-Hz. Larger tubing should be used where lengths are less than 20 ft. (6.1 m). Failure to your dryer. I I In the United States, an individual manual shutoff valve MUST be converted for Gas Models Only • Do not, under local codes and ordinances and when acceptable to do so can be...

Use and Care Guide
Page 13
... O Thread a 30-amp, 240-volt, 3-wire, UL-listed power cord with upturned ends. o ........ t Ground Wire -- "" O Transfer the dryer s ground wire from behind the green ground screw to the center screw of the power cord to the green ground screw. O. Attach the two hot...-Wire Power Cord © • A 3-wire connection is NOT permitted on manual is connected to the terminal block. screw. O Reinstall the terminal block access cover. 13 I I CONNECTING ELECTRIC DRYERS (cont.) CONNECTING ELECTRIC DRYERS WARNING" . Connect the power cord to the same color screw in a short ...
... O Thread a 30-amp, 240-volt, 3-wire, UL-listed power cord with upturned ends. o ........ t Ground Wire -- "" O Transfer the dryer s ground wire from behind the green ground screw to the center screw of the power cord to the green ground screw. O. Attach the two hot...-Wire Power Cord © • A 3-wire connection is NOT permitted on manual is connected to the terminal block. screw. O Reinstall the terminal block access cover. 13 I I CONNECTING ELECTRIC DRYERS (cont.) CONNECTING ELECTRIC DRYERS WARNING" . Connect the power cord to the same color screw in a short ...

Use and Care Guide
Page 18
...illuminated. To pause the cycle at any load settings wilt be adjusted using the Cycle Modifier or Option buttons anytime before operating this entire manual, including the Important Safety Instructions, before starting the cycle. (See the cycle guide on page 20 for a complete description (NOTE:...iii Iz O POWER (On/Off) BUTTON Press to turn off automatically. ® OPTION BUTTONS The option buttons allow you to persons, read this dryer. O CYCLE MODIFIER BUTTONS Use these buttons to adjust the desired cycle options for a complete description. 18 I I If;qlWARNING" To reduce the ...
...illuminated. To pause the cycle at any load settings wilt be adjusted using the Cycle Modifier or Option buttons anytime before operating this entire manual, including the Important Safety Instructions, before starting the cycle. (See the cycle guide on page 20 for a complete description (NOTE:...iii Iz O POWER (On/Off) BUTTON Press to turn off automatically. ® OPTION BUTTONS The option buttons allow you to persons, read this dryer. O CYCLE MODIFIER BUTTONS Use these buttons to adjust the desired cycle options for a complete description. 18 I I If;qlWARNING" To reduce the ...
Use and Care Guide
Page 20
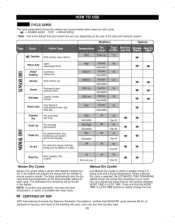
...f Modifiers Options i_$_: Sanitize Workclothes,heavycottons Heavy duty Bulky/ Bedding Jeans, heavyweight items Comforters pillows,shirt Normal Work clothes, etc. When a Manual Dry cycle is selected, the ESTIMATED TIME REMAINING display shows the actual time remaining in the display. I I NOTE: To protect your garments... time for each cycle. = available option = default setting * Note : This is available with every cycle. The dryer automatically sets the dryness level and temperature at the recommended setting for the cycle by pressing MORE TIME or LESS TIME.
...f Modifiers Options i_$_: Sanitize Workclothes,heavycottons Heavy duty Bulky/ Bedding Jeans, heavyweight items Comforters pillows,shirt Normal Work clothes, etc. When a Manual Dry cycle is selected, the ESTIMATED TIME REMAINING display shows the actual time remaining in the display. I I NOTE: To protect your garments... time for each cycle. = available option = default setting * Note : This is available with every cycle. The dryer automatically sets the dryness level and temperature at the recommended setting for the cycle by pressing MORE TIME or LESS TIME.
Use and Care Guide
Page 21
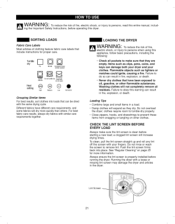
...a loose or missing lint screen may damage the dryer and articles in a load. • Damp clothes...the lint screen is clean before operating this dryer. Lint Screen 21 I I WARNING" ...properly installed before running the dryer. Do not overload the dryer; SORTING LOADS Fabric Care Labels...dryer and your fingers. For best fabric care results, always dry fabrics with your clothes. Running the dryer... with the same drying cycle. Loading Tips • Combine large and small items in the dryer... together. Failure to remove lint. LOADING THE DRYER i A IAI_ M i M/"_ VV/_FII_I II_ll...
...a loose or missing lint screen may damage the dryer and articles in a load. • Damp clothes...the lint screen is clean before operating this dryer. Lint Screen 21 I I WARNING" ...properly installed before running the dryer. Do not overload the dryer; SORTING LOADS Fabric Care Labels...dryer and your fingers. For best fabric care results, always dry fabrics with your clothes. Running the dryer... with the same drying cycle. Loading Tips • Combine large and small items in the dryer... together. Failure to remove lint. LOADING THE DRYER i A IAI_ M i M/"_ VV/_FII_I II_ll...

Use and Care Guide
Page 23
... until the desired volume is shown on page 20 for small loads or to page 20 for the desired value is available with MANUAL DRY cycles. • The dryer will decrease the cycle time. • Use a LESS DRY or DAMP DRY setting for items that are available for the cycle. ...cycle has default settings that you wish to properly care for final drying. This allows precise care of the chime or turns off the chime. MANUAL DRY cycles have default settings, but you to scroll through available settings. O CHIME Adjusts the volume of your fabrics and garments. Use this cycle...
... until the desired volume is shown on page 20 for small loads or to page 20 for the desired value is available with MANUAL DRY cycles. • The dryer will decrease the cycle time. • Use a LESS DRY or DAMP DRY setting for items that are available for the cycle. ...cycle has default settings that you wish to properly care for final drying. This allows precise care of the chime or turns off the chime. MANUAL DRY cycles have default settings, but you to scroll through available settings. O CHIME Adjusts the volume of your fabrics and garments. Use this cycle...