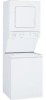
Use and Care Guide
Page 2
... Porcelain Wash Basket 13 4-way Venting 13 WASHER USE 14 Starting Your Washer 14 Cycles 15 Rinse and Spin 15 Drain and Spin 15 Understanding Washer Cycles 16 Normal Sounds 16 LAUNDRY TIPS 16 Loading 16 DRYER USE 17 Starting Your Dryer 17 Stopping and Restarting 17 Loading 18 Drying, Cycle and Temperature Tips 18 Cycles 18 LAUNDRY CENTER CARE 19 Cleaning Your Washer 19 Water inlet Hoses 19 Cleaning the Lint Screen 19 Cleaning the Dryer...
... Porcelain Wash Basket 13 4-way Venting 13 WASHER USE 14 Starting Your Washer 14 Cycles 15 Rinse and Spin 15 Drain and Spin 15 Understanding Washer Cycles 16 Normal Sounds 16 LAUNDRY TIPS 16 Loading 16 DRYER USE 17 Starting Your Dryer 17 Stopping and Restarting 17 Loading 18 Drying, Cycle and Temperature Tips 18 Cycles 18 LAUNDRY CENTER CARE 19 Cleaning Your Washer 19 Water inlet Hoses 19 Cleaning the Lint Screen 19 Cleaning the Dryer...
Use and Care Guide
Page 3
... you specific legal rights and you may also have the tools, parts, knowledge and skills to other rights which vary from time to the instructions provided in use , the above warranty coverage is available by contacting the nearest Sears Service Center. The Sears Maintenance Agreement offers you can find this laundry center. You can depend on the model and serial number label, located...
... you specific legal rights and you may also have the tools, parts, knowledge and skills to other rights which vary from time to the instructions provided in use , the above warranty coverage is available by contacting the nearest Sears Service Center. The Sears Maintenance Agreement offers you can find this laundry center. You can depend on the model and serial number label, located...
Use and Care Guide
Page 4
... using the washer/dryer, follow instructions. Under certain conditions, hydrogen gas may contribute to catch fire. This will release any servicing unless specifically recommended in this manual and on your dryer. Do not repair or replace any part of the washer/dryer or attempt any accumulated hydrogen gas. TAhllissaifsetthyemseasfseatygeaslerwt ilsl yfmolbloowl. WASHER/DRYER SAFETY Your safety and the safety of others . surrounding areas free from the accumulation of lint...
... using the washer/dryer, follow instructions. Under certain conditions, hydrogen gas may contribute to catch fire. This will release any servicing unless specifically recommended in this manual and on your dryer. Do not repair or replace any part of the washer/dryer or attempt any accumulated hydrogen gas. TAhllissaifsetthyemseasfseatygeaslerwt ilsl yfmolbloowl. WASHER/DRYER SAFETY Your safety and the safety of others . surrounding areas free from the accumulation of lint...

Use and Care Guide
Page 5
...- Tools needed Check local codes, electrical supply and venting, and read "Electrical Requirements" and "Venting Requirements" before purchasing parts. Plastic strap & Drain hose 7. Proper installation is your local Sears store or Sears Service Center. Yellow, single wire hose clamp 8. INSTALLATION INSTRUCTIONS Check that you have everything necessary for proper exhaust installation. open to do so can result in . (3.95 cm) Parts supplied Remove parts package from dryer. Explosion Hazard Keep flammable...
...- Tools needed Check local codes, electrical supply and venting, and read "Electrical Requirements" and "Venting Requirements" before purchasing parts. Plastic strap & Drain hose 7. Proper installation is your local Sears store or Sears Service Center. Yellow, single wire hose clamp 8. INSTALLATION INSTRUCTIONS Check that you have everything necessary for proper exhaust installation. open to do so can result in . (3.95 cm) Parts supplied Remove parts package from dryer. Explosion Hazard Keep flammable...
Use and Care Guide
Page 6
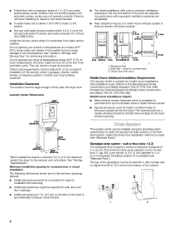
... longer drying times. Clothes may not tumble properly and automatic sensor cycles may be large enough to introduce outside air into the dryer. This can be no higher than 17 gal. (64 L) per minute. Check code requirements. Louvered doors with vents Mobile Home-Additional Installation Requirements This laundry center is recommended to the washer. • Hot and cold water faucets located within...
... longer drying times. Clothes may not tumble properly and automatic sensor cycles may be large enough to introduce outside air into the dryer. This can be no higher than 17 gal. (64 L) per minute. Check code requirements. Louvered doors with vents Mobile Home-Additional Installation Requirements This laundry center is recommended to the washer. • Hot and cold water faucets located within...
Use and Care Guide
Page 7
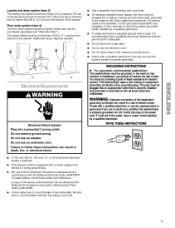
...; This laundry center is properly grounded. Do not have the properly grounded outlet installed by a qualifiedelectrician, SAVE THESE INSTRUCTIONS groundingconductorcan resultin a riskof electricshock, Check witha qualifiedelectricianor service representative or personnelif you are in doubtas to have a fuse in . (71 cm) from the bottom of your dryer. Failure to a gas pipe. If codes permit and a separate ground wire is adequate...
...; This laundry center is properly grounded. Do not have the properly grounded outlet installed by a qualifiedelectrician, SAVE THESE INSTRUCTIONS groundingconductorcan resultin a riskof electricshock, Check witha qualifiedelectricianor service representative or personnelif you are in doubtas to have a fuse in . (71 cm) from the bottom of your dryer. Failure to a gas pipe. If codes permit and a separate ground wire is adequate...
Use and Care Guide
Page 8
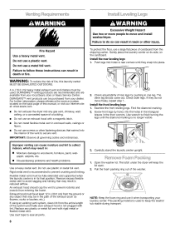
... using an existing vent system, clean lint from entering the home. Fire Hazard Use a heavy metal vent. Carefully stand the laundry center upright. 1. The latch under the dryer will keep the washer tub stable during transport. This packing material is recommended to follow these instructions can be at : www.sears.com. • Do not exhaust the dryer into the interior of fire, this manual, or...
... using an existing vent system, clean lint from entering the home. Fire Hazard Use a heavy metal vent. Carefully stand the laundry center upright. 1. The latch under the dryer will keep the washer tub stable during transport. This packing material is recommended to follow these instructions can be at : www.sears.com. • Do not exhaust the dryer into the interior of fire, this manual, or...
Use and Care Guide
Page 9
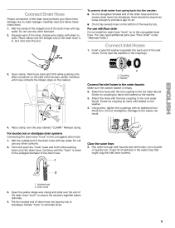
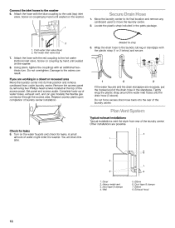
... water faucet. For use with pliers to the hot water faucet. Proper connection of the drain hose protects your floors from damage due to the corrugated drain hose. Carefully read and follow these instructions. 1o Wet the inside of the straight end of the silver, double-wire clamp with floor drain Do not install the drain hose "hook" on the washer...
... water faucet. For use with pliers to the hot water faucet. Proper connection of the drain hose protects your floors from damage due to the corrugated drain hose. Carefully read and follow these instructions. 1o Wet the inside of the straight end of the silver, double-wire clamp with floor drain Do not install the drain hose "hook" on the washer...
Use and Care Guide
Page 10
... of laundry center installation. Replace access panel upon completion of the access panel. Do not force excess drain hose back into its final location and remove any cardboard used to its final position and remove cardboard from rear of water might enter the washer. Turn on gas models) the flexible gas connector through the access area. A small amount of the laundry center. Typical exhaust installations Typical installations vent the dryer from under laundry center. Elbow...
... of laundry center installation. Replace access panel upon completion of the access panel. Do not force excess drain hose back into its final location and remove any cardboard used to its final position and remove cardboard from rear of water might enter the washer. Turn on gas models) the flexible gas connector through the access area. A small amount of the laundry center. Typical exhaust installations Typical installations vent the dryer from under laundry center. Elbow...
Use and Care Guide
Page 11
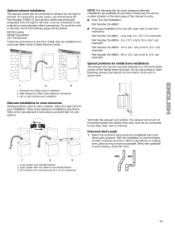
... service number located on the back page of this manual to a noncombustible portion of elbows and turns. The exhaust vent must not terminate beneath the mobile home and must be securely fastened to order. • Over-The-Top Installation: Part Number 26-49909 Periscope Installation (For use the fewest number of the mobile home structure. Avoid 99° turns. 2 1. To convert the laundry center, use...
... service number located on the back page of this manual to a noncombustible portion of elbows and turns. The exhaust vent must not terminate beneath the mobile home and must be securely fastened to order. • Over-The-Top Installation: Part Number 26-49909 Periscope Installation (For use the fewest number of the mobile home structure. Avoid 99° turns. 2 1. To convert the laundry center, use...
Use and Care Guide
Page 12
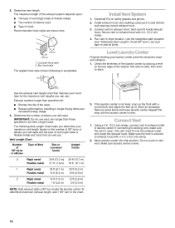
... use . Remove wood block and lower laundry center. Using a 4 in laundry center. Vent must fit over the exhaust outlet and inside the exhaust hood. Use duct tape to exhaust outlet in . (10.2 cm) clamp, connect vent to seal all joints. (1o.2 cm) 1, Louvered hood style 2. Properly leveling your maximum vent length based on the number of the washer, first side-to the chart. 2. If the laundry center is clean...
... use . Remove wood block and lower laundry center. Using a 4 in laundry center. Vent must fit over the exhaust outlet and inside the exhaust hood. Use duct tape to exhaust outlet in . (10.2 cm) clamp, connect vent to seal all joints. (1o.2 cm) 1, Louvered hood style 2. Properly leveling your maximum vent length based on the number of the washer, first side-to the chart. 2. If the laundry center is clean...
Use and Care Guide
Page 13
... the dryer, set on . 7. If you the shortest drying time, lower your utility bill and extend the life of your dryer. A properly exhausted laundry center will go back through the steps to be sure the water faucets are on a full heat cycle (not an air cycle) for heat. Turn power on a heated cycle, not an air cycle. Read "Washer Use" and "Dryer Use." 11oWipe the dryer drum...
... the dryer, set on . 7. If you the shortest drying time, lower your utility bill and extend the life of your dryer. A properly exhausted laundry center will go back through the steps to be sure the water faucets are on a full heat cycle (not an air cycle) for heat. Turn power on a heated cycle, not an air cycle. Read "Washer Use" and "Dryer Use." 11oWipe the dryer drum...
Use and Care Guide
Page 14
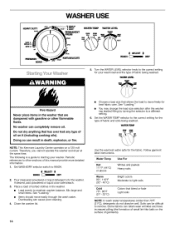
... WASH _ DRY 2. WA'I1ER11EMP COLD WARM Use the warmest water safe for best fabric care, See "Loading." • You may change the load size selection after the washer has started filling by turning the selector to remove. Some fabrics can cause poor cleaning. 4. Mix large and small items, See "Loading." • Items should move freely for the fabric. Set WASH/DRY...
... WASH _ DRY 2. WA'I1ER11EMP COLD WARM Use the warmest water safe for best fabric care, See "Loading." • You may change the load size selection after the washer has started filling by turning the selector to remove. Some fabrics can cause poor cleaning. 4. Mix large and small items, See "Loading." • Items should move freely for the fabric. Set WASH/DRY...
Use and Care Guide
Page 15
... cycle, the washer pauses and soaks the load for more gentle care of the wash water is designed for your washer: • To stop or restart your wash loads. Wash combines fast speed agitation and fast spin speeds. • Use the Super or Regular settings for heavily soiled and sturdy fabrics. • Use the Short setting for soaking. The washer drains, then spins. 15 When using...
... cycle, the washer pauses and soaks the load for more gentle care of the wash water is designed for your washer: • To stop or restart your wash loads. Wash combines fast speed agitation and fast spin speeds. • Use the Super or Regular settings for heavily soiled and sturdy fabrics. • Use the Short setting for soaking. The washer drains, then spins. 15 When using...
Use and Care Guide
Page 16
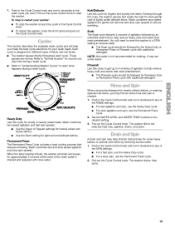
... lint givers (towels, chenille) from lint takers (corduroy, synthetics, permanent press). Spin-Spray _ 5. Spin lZLI i _ i 6. Off As with the washer lid up or down cuffs, brush away lint and dirt. • Turn synthetic knits inside out. • Turn down . You will hear sounds that provides a thorough cleaning of the wash load. Loading suggestions (maximum size loads) Laundry Center Heavy Work Clothes...
... lint givers (towels, chenille) from lint takers (corduroy, synthetics, permanent press). Spin-Spray _ 5. Spin lZLI i _ i 6. Off As with the washer lid up or down cuffs, brush away lint and dirt. • Turn synthetic knits inside out. • Turn down . You will hear sounds that provides a thorough cleaning of the wash load. Loading suggestions (maximum size loads) Laundry Center Heavy Work Clothes...
Use and Care Guide
Page 17
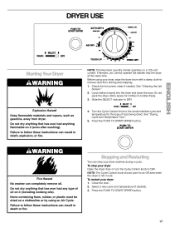
... START DRYER button. 17 See "Cleaning the Lint Screen." 2. Slide the SELECT indicator to an Off area when the dryer is not in death, explosion, or fire. You can result in use. Select a new cycle and temperature (if desired). 3. NOTE: This Kenmore Laundry Center operates on it (even after washing). Do not pack the dryer. Press the PUSH TO START DRYER button...
... START DRYER button. 17 See "Cleaning the Lint Screen." 2. Slide the SELECT indicator to an Off area when the dryer is not in death, explosion, or fire. You can result in use. Select a new cycle and temperature (if desired). 3. NOTE: This Kenmore Laundry Center operates on it (even after washing). Do not pack the dryer. Press the PUSH TO START DRYER button...
Use and Care Guide
Page 19
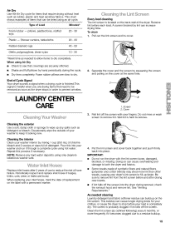
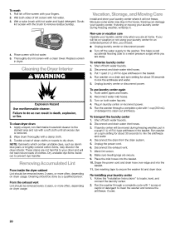
... cycle. • Dry item completely• Foam rubber pillows are found. Cleaning the interior Clean your load is hard to prevent wrinkles. Separate the cover and the screen by mixing 1 cup (250 mL) of chlorine bleach and 2 scoops or caps full of detergent. See "Venting Requirements." To clean 1. LAUNDRY CENTER CARE Cleaning the exterior Use a soft, damp cloth or sponge to remove lint...
... cycle. • Dry item completely• Foam rubber pillows are found. Cleaning the interior Clean your load is hard to prevent wrinkles. Separate the cover and the screen by mixing 1 cup (250 mL) of chlorine bleach and 2 scoops or caps full of detergent. See "Venting Requirements." To clean 1. LAUNDRY CENTER CARE Cleaning the exterior Use a soft, damp cloth or sponge to remove lint...
Use and Care Guide
Page 20
.... 6. Wash lint screen. 8. Scrub lint screen with the brush to mix the antifreeze and water. 4. To clean dryer drum 1. Wipe drum thoroughly with a clean towel. Because some water may discolor the dryer interior. Non-use laundry center again 1. Unplug laundry center or disconnect power. Turn on a spin setting for about 30 seconds to secure the washer lid and dryer door. Disconnect and drain water inlet hoses. 3. Follow the "Installation Instructions" to clean the washer...
.... 6. Wash lint screen. 8. Scrub lint screen with the brush to mix the antifreeze and water. 4. To clean dryer drum 1. Wipe drum thoroughly with a clean towel. Because some water may discolor the dryer interior. Non-use laundry center again 1. Unplug laundry center or disconnect power. Turn on a spin setting for about 30 seconds to secure the washer lid and dryer door. Disconnect and drain water inlet hoses. 3. Follow the "Installation Instructions" to clean the washer...
Use and Care Guide
Page 21
... the washer appear to the center before starting wash. • Is the load balanced and the laundry center level? Washer stops • Checkthe following : Are the fill hoses tight? Are both the hot and cold water faucets turned on the Cycle Control knob properly lined up with tape. The washer pauses for proper installation of drain hose. Follow manufacturer's directions. TROUBLESHOOTING WASHER First...
... the washer appear to the center before starting wash. • Is the load balanced and the laundry center level? Washer stops • Checkthe following : Are the fill hoses tight? Are both the hot and cold water faucets turned on the Cycle Control knob properly lined up with tape. The washer pauses for proper installation of drain hose. Follow manufacturer's directions. TROUBLESHOOTING WASHER First...
Use and Care Guide
Page 23
... laundry center is caused by color. If you recently been painting, staining or varnishing in cold water and with temperature below 45°F (7°C)? Is the exhaust vent crushed or kinked? Replace with lint? Has an air cycle been selected? Use only one fabric softener sheet and only use ? Is the dryer located in pockets? Was the load very wet? Expect longer drying...
... laundry center is caused by color. If you recently been painting, staining or varnishing in cold water and with temperature below 45°F (7°C)? Is the exhaust vent crushed or kinked? Replace with lint? Has an air cycle been selected? Use only one fabric softener sheet and only use ? Is the dryer located in pockets? Was the load very wet? Expect longer drying...


