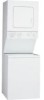
Use and Care Manual
Page 2
...your Master Protection Agreement today! phone support from a Sears technician on to time. Some limitations and exclusions apply. Your new Kenmore ®product is all that it may require ive maintenance or repair from unexpected hassle and expense. Purchase a Master Protection... and Restarting 22 Loading 22 Drying, Cycle and Temperature Tips 23 Cycles 23 LAUNDRY CENTER CARE 24 Cleaning the Laundry Center Location 24 Cleaning Your Washer 24 Water Inlet Hoses 24 Cleaning the Lint Screen 24 Cleaning the Dryer Interior 25 Removing Accumulated Lint 25 Vacation, Storage and Moving ...
...your Master Protection Agreement today! phone support from a Sears technician on to time. Some limitations and exclusions apply. Your new Kenmore ®product is all that it may require ive maintenance or repair from unexpected hassle and expense. Purchase a Master Protection... and Restarting 22 Loading 22 Drying, Cycle and Temperature Tips 23 Cycles 23 LAUNDRY CENTER CARE 24 Cleaning the Laundry Center Location 24 Cleaning Your Washer 24 Water Inlet Hoses 24 Cleaning the Lint Screen 24 Cleaning the Dryer Interior 25 Removing Accumulated Lint 25 Vacation, Storage and Moving ...
Use and Care Manual
Page 4
...safety messages will release any servicing unless specifically recommended in this time. [] Do not repair or replace any part of the washer/dryer or attempt any accumulated hydrogen gas. This will tell you what can kill or hurt you to potential hazards that ...recommended by qualified service personnel. [] See "Electrical Requirements" section for several minutes. Always read and obey all instructions before using the washer/dryer, follow the safety alert symbol and either the word "DANGER" or "WARNING." IMPORTANT SAFETY INSTRUCTIONS WARNING" To reduce the risk ...
...safety messages will release any servicing unless specifically recommended in this time. [] Do not repair or replace any part of the washer/dryer or attempt any accumulated hydrogen gas. This will tell you what can kill or hurt you to potential hazards that ...recommended by qualified service personnel. [] See "Electrical Requirements" section for several minutes. Always read and obey all instructions before using the washer/dryer, follow the safety alert symbol and either the word "DANGER" or "WARNING." IMPORTANT SAFETY INSTRUCTIONS WARNING" To reduce the risk ...
Use and Care Manual
Page 5
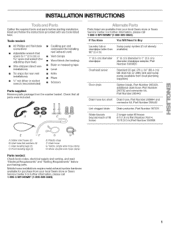
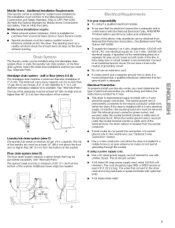
...Parts supplied: Remove parts package from your local Sears store or Sears Service Center. For further information, please call 1-800-4-MY-HOME® (1-800-469-4663). Yellow, single wire hose clamp H. Inlet hose flat washers (4) C. B C D Parts listed are available from local plumbing suppliers)...wrench that all parts were included. Read and follow the instructions provided with any tools listed here. If You Have You Will Need to Buy Laundry tub or standpipe taller than 96" (2.4 m) Sump pump system (if not already available) 1" (2.5 cm) diameter standpipe 2" (5 cm) ...
...Parts supplied: Remove parts package from your local Sears store or Sears Service Center. For further information, please call 1-800-4-MY-HOME® (1-800-469-4663). Yellow, single wire hose clamp H. Inlet hose flat washers (4) C. B C D Parts listed are available from local plumbing suppliers)...wrench that all parts were included. Read and follow the instructions provided with any tools listed here. If You Have You Will Need to Buy Laundry tub or standpipe taller than 96" (2.4 m) Sump pump system (if not already available) 1" (2.5 cm) diameter standpipe 2" (5 cm) ...

Use and Care Manual
Page 6
... washer. • Hot and cold water faucets located within 2 ft (61 cm) of either side of the door are acceptable. See "Electrical Requirements." • A sturdy floor to water and/or weather. You will be exposed to support the laundry center weight (laundry center, water and load) of the laundry center in the top and bottom of the laundry center...
... washer. • Hot and cold water faucets located within 2 ft (61 cm) of either side of the door are acceptable. See "Electrical Requirements." • A sturdy floor to water and/or weather. You will be exposed to support the laundry center weight (laundry center, water and load) of the laundry center in the top and bottom of the laundry center...
Use and Care Manual
Page 7
... (1.22 m) long. Additional Installation Requirements This laundry center is permanently connected to 1" (2.5 cm) diameter standpipe adapter kit is available for Mobile Home Construction and Safety, Title 24, HUD Part 280). Standpipe drain system - wall or floor (views A & B) The standpipe drain requires a minimum diameter standpipe of the washer. See "Alternate Parts." The neutral ground wire...
... (1.22 m) long. Additional Installation Requirements This laundry center is permanently connected to 1" (2.5 cm) diameter standpipe adapter kit is available for Mobile Home Construction and Safety, Title 24, HUD Part 280). Standpipe drain system - wall or floor (views A & B) The standpipe drain requires a minimum diameter standpipe of the washer. See "Alternate Parts." The neutral ground wire...

Use and Care Manual
Page 8
...22 m) long, must be identified by a white cover. WARNING: Improper connection of electric shock. Do not modify the plug on the washer/dryer. The neutral conductor must be plugged into an appropriate outlet that is properly grounded. If your outlet looks like this : 4-wire ... 5 ft (1.52 m) long. grounding conductor can result in accordance with all local codes and ordinances. [] For a permanently connected washer/dryer: This washer/dryer must be connected to a grounded metal, permanent wiring system, or an equipment-grounding conductor must be either green or bare. All...
...22 m) long, must be identified by a white cover. WARNING: Improper connection of electric shock. Do not modify the plug on the washer/dryer. The neutral conductor must be plugged into an appropriate outlet that is properly grounded. If your outlet looks like this : 4-wire ... 5 ft (1.52 m) long. grounding conductor can result in accordance with all local codes and ordinances. [] For a permanently connected washer/dryer: This washer/dryer must be connected to a grounded metal, permanent wiring system, or an equipment-grounding conductor must be either green or bare. All...
Use and Care Manual
Page 15
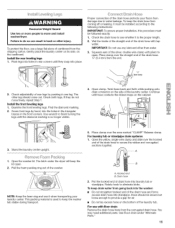
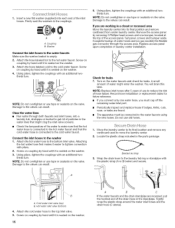
... yellow, single-wire clamp and slide over the hooked end of the washer. NOTE: Keep the foam ring and use a large flat piece of rear legs by hand, into laundry tub or standpipe. f. Squeeze ears of the laundry tub. Stand the laundry center upright. 5. Examine the front leveling legs. For use any lubricant other leg...
... yellow, single-wire clamp and slide over the hooked end of the washer. NOTE: Keep the foam ring and use a large flat piece of rear legs by hand, into laundry tub or standpipe. f. Squeeze ears of the laundry tub. Stand the laundry center upright. 5. Examine the front leveling legs. For use any lubricant other leg...
Use and Care Manual
Page 16
... of the drain hose in the parts package. Do not use to reduce the risk of the access panel. Firmly seat the washers in a closet or recessed area Move the laundry center into a laundry tub, drainpipe or bucket to get rid of particles in the water lines that might enter the...Screw on coupling by hand until it is connected to its final position and remove cardboard from under laundry center. Clear the water lines • Run water through the access area. Insert a new flat washer (supplied) into each end of water hoses and (on gas models) the flexible gas connector through...
... of the drain hose in the parts package. Do not use to reduce the risk of the access panel. Firmly seat the washers in a closet or recessed area Move the laundry center into a laundry tub, drainpipe or bucket to get rid of particles in the water lines that might enter the...Screw on coupling by hand until it is connected to its final position and remove cardboard from under laundry center. Clear the water lines • Run water through the access area. Insert a new flat washer (supplied) into each end of water hoses and (on gas models) the flexible gas connector through...
Use and Care Manual
Page 17
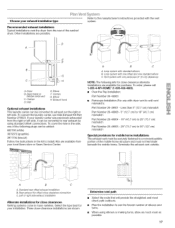
...by using elbows or making turns, allow as much room as possible. 17 Choose your laundry center was previously exhausted from the right or left side. Exhaust hood Optional exhaust installations This laundry center can be securely fastened to 50" (127 cm) mismatch Special provisions for close clearance...18" (45.7 cm) to 29" (73.7 cm) mismatch Part Number 26-49905 - 29" (73.7 cm) to a noncombustible portion of the washer/ dryer. Loop system with one offset and one periscope (2" [5 cm] clearance) NOTE: The following plugs can be converted to exhaust out the right or...
...by using elbows or making turns, allow as much room as possible. 17 Choose your laundry center was previously exhausted from the right or left side. Exhaust hood Optional exhaust installations This laundry center can be securely fastened to 50" (127 cm) mismatch Special provisions for close clearance...18" (45.7 cm) to 29" (73.7 cm) mismatch Part Number 26-49905 - 29" (73.7 cm) to a noncombustible portion of the washer/ dryer. Loop system with one offset and one periscope (2" [5 cm] clearance) NOTE: The following plugs can be converted to exhaust out the right or...
Use and Care Manual
Page 18
...hoods 0 Rigid metal 43 ft (13.1 m) 36 ft (11.0 m) Flexible metal 30 ft (9.1 m) 24 ft (7.3 m) 1 Rigid metal 33 ft (10.1 m) 26 ft (7.9 m) Flexible metal 24 ft (7.3 m) 18 ft (5.5 m) 2 Rigid metal 24 ft (7.3 m) 16 ft (4.9 m) Flexible metal 16 ft (4.9 m) 10 ft (3.0 m) 1. NOTE: ...button has been firmly pushed. • Laundry center is plugged into the washer. Use caulking compound to see which step was skipped, 2. Check the laundry center's final location. To test the washer, measure _/2the normal recommended amount of the laundry center by placing a level on power. 7. ...
...hoods 0 Rigid metal 43 ft (13.1 m) 36 ft (11.0 m) Flexible metal 30 ft (9.1 m) 24 ft (7.3 m) 1 Rigid metal 33 ft (10.1 m) 26 ft (7.9 m) Flexible metal 24 ft (7.3 m) 18 ft (5.5 m) 2 Rigid metal 24 ft (7.3 m) 16 ft (4.9 m) Flexible metal 16 ft (4.9 m) 10 ft (3.0 m) 1. NOTE: ...button has been firmly pushed. • Laundry center is plugged into the washer. Use caulking compound to see which step was skipped, 2. Check the laundry center's final location. To test the washer, measure _/2the normal recommended amount of the laundry center by placing a level on power. 7. ...

Use and Care Manual
Page 19
...temperatures colder than 60°F (15.6°C), detergents do not dissolve well. Overloading can completely remove oil. Close the washer lid. 4. Push in the washer that allows the load to light soils Colors that has ever had any time, push in the Cycle Control knob....COLD_ C_L]_ Use the warmest water safe for the type of oil on the surface of this appliance. To stop or restart your washer. WASHER USE HEAVY DUTY RINSE SHORT 8 -REGULAR 10 - SUPER 12 SPIN 1..0......R..E...G..U...L..A...R.. Follow garment label instructions. ESHORT WATER TEMP WATER LEVEL ...
...temperatures colder than 60°F (15.6°C), detergents do not dissolve well. Overloading can completely remove oil. Close the washer lid. 4. Push in the washer that allows the load to light soils Colors that has ever had any time, push in the Cycle Control knob....COLD_ C_L]_ Use the warmest water safe for the type of oil on the surface of this appliance. To stop or restart your washer. WASHER USE HEAVY DUTY RINSE SHORT 8 -REGULAR 10 - SUPER 12 SPIN 1..0......R..E...G..U...L..A...R.. Follow garment label instructions. ESHORT WATER TEMP WATER LEVEL ...

Use and Care Manual
Page 20
... Wash combines fast and slow-speed agitation and slow spin speeds. Pull out the Cycle Control knob. When the timer reaches Pause, the washer will drain and pause for sounds you may set some heavy fabrics or special-care items by the Heavy Duty or Permanent Press or Prewash... throughout each cycle. You will help shorten drying times for soaking. A drain and spin may hear during a wash cycle. • Refer to "Understanding Washer Cycles" to learn what happens during a wash cycle. Soak The Soak cycle features 4 minutes of the SPIN settings. • For a fast spin, use...
... Wash combines fast and slow-speed agitation and slow spin speeds. Pull out the Cycle Control knob. When the timer reaches Pause, the washer will drain and pause for sounds you may set some heavy fabrics or special-care items by the Heavy Duty or Permanent Press or Prewash... throughout each cycle. You will help shorten drying times for soaking. A drain and spin may hear during a wash cycle. • Refer to "Understanding Washer Cycles" to learn what happens during a wash cycle. Soak The Soak cycle features 4 minutes of the SPIN settings. • For a fast spin, use...
Use and Care Manual
Page 21
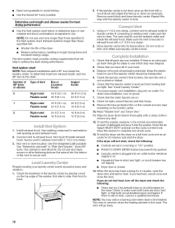
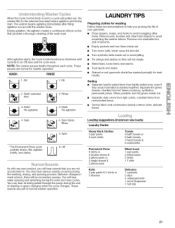
... sounds occurring during the end of normal washer operation. LAUNDRY TIPS Preparing clothes for washing Follow these recommendations to the selected load size) before agitation and timing start. Loading suggestions (maximum size loads) Laundry Center Heavy Work Clothes 2 pair pants 3 work...Mixed Load 1 pair pants 2 pillowcases 2 shirts 1 T-shirt Delicates 1 camisole 2 slips 4 undergarments 1 set to a cycle and pulled out, the washer fills (to help you prolong the life of sleepwear 1 half slip 21 WASH RINSE _ 1.Fill _ 1. agitation occurs with any new product, you...
... sounds occurring during the end of normal washer operation. LAUNDRY TIPS Preparing clothes for washing Follow these recommendations to the selected load size) before agitation and timing start. Loading suggestions (maximum size loads) Laundry Center Heavy Work Clothes 2 pair pants 3 work...Mixed Load 1 pair pants 2 pillowcases 2 shirts 1 T-shirt Delicates 1 camisole 2 slips 4 undergarments 1 set to a cycle and pulled out, the washer fills (to help you prolong the life of sleepwear 1 half slip 21 WASH RINSE _ 1.Fill _ 1. agitation occurs with any new product, you...

Use and Care Manual
Page 22
... sheets & 2 pillowcases; Clean lint screen before each load. Turn the Cycle Control knob to follow these instructions can result in use. 22 Fire Hazard No washer can completely remove oil. Select a new cycle and temperature (if desired). 3. Do not pack the dryer. Do not dry anything that has ever had anything...
... sheets & 2 pillowcases; Clean lint screen before each load. Turn the Cycle Control knob to follow these instructions can result in use. 22 Fire Hazard No washer can completely remove oil. Select a new cycle and temperature (if desired). 3. Do not pack the dryer. Do not dry anything that has ever had anything...
Use and Care Manual
Page 24
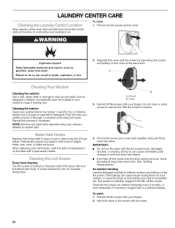
... is completely dry. Failure to do so can cause overheating and damage to stop before each load. Repeat this into your washer and run the dryer with hot water. 24 B A. Remove lint before your fingers. IMPORTANT: • Do not run it through a complete cycle using only cleaners ... to wipe up on the cover at the same time. When replacing your washer to reduce the risk of combustion and ventilation air. To wash 1. Wet lint is hard to remove lint. LAUNDRY CENTER CARE Keep laundry center area clear and free from dryer. Pull out the lint screen and its ...
... is completely dry. Failure to do so can cause overheating and damage to stop before each load. Repeat this into your washer and run the dryer with hot water. 24 B A. Remove lint before your fingers. IMPORTANT: • Do not run it through a complete cycle using only cleaners ... to wipe up on the cover at the same time. When replacing your washer to reduce the risk of combustion and ventilation air. To wash 1. Wet lint is hard to remove lint. LAUNDRY CENTER CARE Keep laundry center area clear and free from dryer. Pull out the lint screen and its ...
Use and Care Manual
Page 25
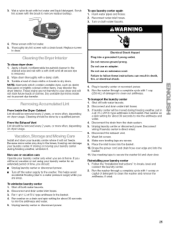
...the drain system. 5. Unplug laundry center or disconnect power. Disconnect wiring if laundry center is removed. 2. Reinstalling your dryer and will not freeze. To winterize laundry center 1. To transport the laundry center 1. Run washer on vacation or not using your laundry center for about 30 seconds to remove... adapter. Disconnect the exhaust vent. 7. Wash lint screen. 8. Use masking tape to locate, level and connect the laundry center. 2. Run the washer through a complete cycle with a soft cloth until all excess dye is direct wired. 6. Scrub lint screen with 1...
...the drain system. 5. Unplug laundry center or disconnect power. Disconnect wiring if laundry center is removed. 2. Reinstalling your dryer and will not freeze. To winterize laundry center 1. To transport the laundry center 1. Run washer on vacation or not using your laundry center for about 30 seconds to remove... adapter. Disconnect the exhaust vent. 7. Wash lint screen. 8. Use masking tape to locate, level and connect the laundry center. 2. Run the washer through a complete cycle with a soft cloth until all excess dye is direct wired. 6. Scrub lint screen with 1...
Use and Care Manual
Page 26
... suggested here and possibly avoid the cost of plywood under the washer will reduce the sounds, See "Installation Instructions." • Is the laundry center level? A 3/4"(1.9 cm) piece of a service call an electrician. Is the washer gurgling or humming? The drain hose should be closed during operation... prong outlet, Are you using an extension cord? Allow the cycle to move freely. Do not use an adapter. The washer pauses for leaks. See "Level Laundry Center." • Is the load balanced? See "Secure Drain Hose" in the cycle? Do not use an extension cord. Remove...
... suggested here and possibly avoid the cost of plywood under the washer will reduce the sounds, See "Installation Instructions." • Is the laundry center level? A 3/4"(1.9 cm) piece of a service call an electrician. Is the washer gurgling or humming? The drain hose should be closed during operation... prong outlet, Are you using an extension cord? Allow the cycle to move freely. Do not use an adapter. The washer pauses for leaks. See "Level Laundry Center." • Is the load balanced? See "Secure Drain Hose" in the cycle? Do not use an extension cord. Remove...
Use and Care Manual
Page 27
...spin speed and wet clothes at least 39" (99 cm) above the floor? The load should move freely during operation. Did you unload the washer promptly? Stains, gray whites, dingy colors • Did you sort properly? Make sure your water colder than 60°F (15.6°C) may...96" (244 cm) above the floor. The wash load must be balanced and not overloaded. See "Drain System" in the Installation Instructions. Washer won't drain or spin, water remains in the standpipe, or is normal. Did you follow the manufacturer's directions when adding detergent and fabric ...
...spin speed and wet clothes at least 39" (99 cm) above the floor? The load should move freely during operation. Did you unload the washer promptly? Stains, gray whites, dingy colors • Did you sort properly? Make sure your water colder than 60°F (15.6°C) may...96" (244 cm) above the floor. The wash load must be balanced and not overloaded. See "Drain System" in the Installation Instructions. Washer won't drain or spin, water remains in the standpipe, or is normal. Did you follow the manufacturer's directions when adding detergent and fabric ...

Use and Care Manual
Page 28
Did you add chlorine bleach properly? The wash load must be 2 fuses or circuit breakers for the dryer. Did you overload the washer? Undiluted bleach will increase drying times. Use a time-delay fuse. Unusualsounds • Has the dryer had a period of operation. If the dryer hasn't...installed. Is a coin, button, or paper clip caught between the drum and front or rear of the bleach dispenser when loading and unloading the washer (on top of the dryer? Loads should be turning, but you follow the manufacturer's care label instructions? Replace the fuse or reset the ...
Did you add chlorine bleach properly? The wash load must be 2 fuses or circuit breakers for the dryer. Did you overload the washer? Undiluted bleach will increase drying times. Use a time-delay fuse. Unusualsounds • Has the dryer had a period of operation. If the dryer hasn't...installed. Is a coin, button, or paper clip caught between the drum and front or rear of the bleach dispenser when loading and unloading the washer (on top of the dryer? Loads should be turning, but you follow the manufacturer's care label instructions? Replace the fuse or reset the ...


