Use and Care Manual
Page 2
... Laundry Center 18 Connect Vent 18 Complete Installation 18 WASHER USE 19 Starting Your Washer 19 Cycles 20 Rinse and Spin 20 Drain and Spin 20 Understanding Washer Cycles 21 Normal Sounds 21 LAUNDRY TIPS 21 Loading 21 DRYER USE 22 Starting Your Dryer 22 Stopping and Restarting 22 Loading 22 Drying, Cycle and Temperature Tips 23 Cycles 23 LAUNDRY CENTER CARE 24 Cleaning the Laundry Center Location 24 Cleaning Your Washer 24 Water Inlet Hoses 24 Cleaning the Lint Screen 24 Cleaning the Dryer Interior 25 Removing Accumulated Lint...
... Laundry Center 18 Connect Vent 18 Complete Installation 18 WASHER USE 19 Starting Your Washer 19 Cycles 20 Rinse and Spin 20 Drain and Spin 20 Understanding Washer Cycles 21 Normal Sounds 21 LAUNDRY TIPS 21 Loading 21 DRYER USE 22 Starting Your Dryer 22 Stopping and Restarting 22 Loading 22 Drying, Cycle and Temperature Tips 23 Cycles 23 LAUNDRY CENTER CARE 24 Cleaning the Laundry Center Location 24 Cleaning Your Washer 24 Water Inlet Hoses 24 Cleaning the Lint Screen 24 Cleaning the Dryer Interior 25 Removing Accumulated Lint...
Use and Care Manual
Page 3
... for free repair. Dept. 817WA, Hoffman Estates, IL 60179 Sears Canada Inc. A service technician to state. Damage to one year from the date of parts or ...instruct the user in all instructions supplied with the product. 7. Sears shall not be product repair as provided herein. SEARS WILL NOT PAY FOR: 1. This warranty applies only while this warranty applies for other rights which vary from normal use of merchantability or fitness, so these instructions and your complete model number, serial number, and purchase date. Sears, Roebuck and Co. Model number Serial number...
... for free repair. Dept. 817WA, Hoffman Estates, IL 60179 Sears Canada Inc. A service technician to state. Damage to one year from the date of parts or ...instruct the user in all instructions supplied with the product. 7. Sears shall not be product repair as provided herein. SEARS WILL NOT PAY FOR: 1. This warranty applies only while this warranty applies for other rights which vary from normal use of merchantability or fitness, so these instructions and your complete model number, serial number, and purchase date. Sears, Roebuck and Co. Model number Serial number...
Use and Care Manual
Page 4
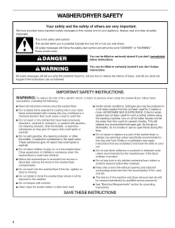
..., dry-cleaning solvents, or other flammable, or explosive substances to the washer/dryer compartments. [] Do not reach into the washer/dryer if the tub, agitator or drum is flammable, do not smoke or use an open flame during this time. [] Do not repair or replace any part of the washer/dryer or attempt any accumulated hydrogen gas. Close supervision of the machine and dryer exhaust vent...
..., dry-cleaning solvents, or other flammable, or explosive substances to the washer/dryer compartments. [] Do not reach into the washer/dryer if the tub, agitator or drum is flammable, do not smoke or use an open flame during this time. [] Do not repair or replace any part of the washer/dryer or attempt any accumulated hydrogen gas. Close supervision of the machine and dryer exhaust vent...
Use and Care Manual
Page 5
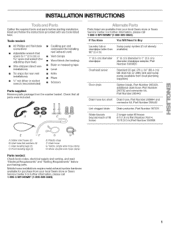
... kit, Part Number 285442 Lint clogged drain Water faucets beyond reach of fill hoses Drain protector, Part Number 367031 2 longer water fill hoses: 6 ft (1.8 m) Part Number 76314, 10 ft (3.0 m) Part Number 350008 E A. For further information, please call 1-800-4-MY-HOME® (1-800-469-4663). Tools needed : Check local codes, electrical supply and venting, and read "Electrical Requirements" and "Venting Requirements" before starting installation. B C D Parts listed are available from your local Sears store or Sears Service Center...
... kit, Part Number 285442 Lint clogged drain Water faucets beyond reach of fill hoses Drain protector, Part Number 367031 2 longer water fill hoses: 6 ft (1.8 m) Part Number 76314, 10 ft (3.0 m) Part Number 350008 E A. For further information, please call 1-800-4-MY-HOME® (1-800-469-4663). Tools needed : Check local codes, electrical supply and venting, and read "Electrical Requirements" and "Venting Requirements" before starting installation. B C D Parts listed are available from your local Sears store or Sears Service Center...

Use and Care Manual
Page 6
... operate your washer in temperatures at temperatures below 32°F (0°C). Check code requirements. See "Venting Requirements." • A separate30-amp circuit. • A grounded electrical outlet located within 4 ft (1.2 m) of the hot and cold water fill valves, and water pressure of 1" (2.5 cm) under entire laundry center. Clothes may not tumble properly and automatic sensor cycles may be 1" (2.5 cm) when house exhaust system is...
... operate your washer in temperatures at temperatures below 32°F (0°C). Check code requirements. See "Venting Requirements." • A separate30-amp circuit. • A grounded electrical outlet located within 4 ft (1.2 m) of the hot and cold water fill valves, and water pressure of 1" (2.5 cm) under entire laundry center. Clothes may not tumble properly and automatic sensor cycles may be 1" (2.5 cm) when house exhaust system is...
Use and Care Manual
Page 7
... clothes dryers. If using a power supply cord: • Use a UL listed power supply cord kit marked for use an extension cord. • If codes permit and a separate ground wire is used, it here. • This dryer is secured under the neutral terminal (center or white wire) of the standpipe must be installed using and follow the instructions provided for Mobile Home Construction and Safety, Title 24, HUD Part...
... clothes dryers. If using a power supply cord: • Use a UL listed power supply cord kit marked for use an extension cord. • If codes permit and a separate ground wire is used, it here. • This dryer is secured under the neutral terminal (center or white wire) of the standpipe must be installed using and follow the instructions provided for Mobile Home Construction and Safety, Title 24, HUD Part...

Use and Care Manual
Page 8
... listed strain relief. GROUNDING INSTRUCTIONS [] For a grounded, cord-connected washer/dryer: This washer/dryer must have a proper outlet installed by providing a path of NEMA Type 10-30R. The 3-wire power supply cord, at least 4 ft (1.22 m) long, must be either green or bare. grounding conductor can result in accordance with all local codes and ordinances. [] For a permanently connected washer/dryer: This washer/dryer...
... listed strain relief. GROUNDING INSTRUCTIONS [] For a grounded, cord-connected washer/dryer: This washer/dryer must have a proper outlet installed by providing a path of NEMA Type 10-30R. The 3-wire power supply cord, at least 4 ft (1.22 m) long, must be either green or bare. grounding conductor can result in accordance with all local codes and ordinances. [] For a permanently connected washer/dryer: This washer/dryer...
Use and Care Manual
Page 14
... all governing codes and ordinances. Box hood style The angled hood style (shown here) is in its final position. ('° (6.4 cm) • An exhaust hood should cap the vent to follow these instructions can be used. If using an existing vent system • Clean lint from entering the home. • Exhaust hood must be fully extended and supported when the laundry center is...
... all governing codes and ordinances. Box hood style The angled hood style (shown here) is in its final position. ('° (6.4 cm) • An exhaust hood should cap the vent to follow these instructions can be used. If using an existing vent system • Clean lint from entering the home. • Exhaust hood must be fully extended and supported when the laundry center is...
Use and Care Manual
Page 15
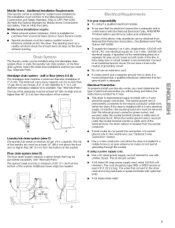
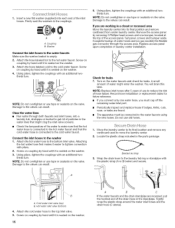
...laundry tub. IMPORTANT: Do not use it is the proper length. 2. Find the diamond marking. 2. Open the washer lid. Rotate hook to keep the drain hose from the corrugated drain hose. Hose should come out. Install the rear leveling legs 1. Check adjustability of the silver, double-wire clamp with tap water. Stand the laundry center upright. 5. Open the yellow, single-wire... floor, use with floor drain Remove the drain hose hook from coming off or leaking, it must be installed according to the following instructions: IMPORTANT: To ensure proper installation, this ...
...laundry tub. IMPORTANT: Do not use it is the proper length. 2. Find the diamond marking. 2. Open the washer lid. Rotate hook to keep the drain hose from the corrugated drain hose. Hose should come out. Install the rear leveling legs 1. Check adjustability of the silver, double-wire clamp with tap water. Stand the laundry center upright. 5. Open the yellow, single-wire... floor, use with floor drain Remove the drain hose hook from coming off or leaking, it must be installed according to the following instructions: IMPORTANT: To ensure proper installation, this ...
Use and Care Manual
Page 16
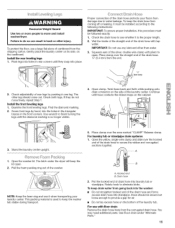
... the washer. 4. Set panel, screws and bumper aside. Turn on coupling by removing 3 Phillips-head screws and one water hose, you must cap off the remaining water inlet port. • Periodically inspect and replace hoses if bulges, kinks, cuts, wear, or leaks are working in a closet or recessed area Move the laundry center into its final location and remove any cardboard used...
... the washer. 4. Set panel, screws and bumper aside. Turn on coupling by removing 3 Phillips-head screws and one water hose, you must cap off the remaining water inlet port. • Periodically inspect and replace hoses if bulges, kinks, cuts, wear, or leaks are working in a closet or recessed area Move the laundry center into its final location and remove any cardboard used...
Use and Care Manual
Page 17
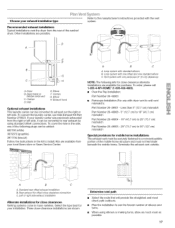
... fastened to the manufacturer's instructions provided with standard elbows B. To order, please call 1-800-4-MY-HOME ® (1-800-469-4663). • Over-the-Top Installation: Part Number 26-49900 • Periscope Installation (For use Side Exhaust Kit Part Number 279823. Terminate the exhaust vent outside. Standard rear offset exhaust installation B. Left or right side exhaust installation Alternate installations for your laundry center was previously exhausted from the right or left...
... fastened to the manufacturer's instructions provided with standard elbows B. To order, please call 1-800-4-MY-HOME ® (1-800-469-4663). • Over-the-Top Installation: Part Number 26-49900 • Periscope Installation (For use Side Exhaust Kit Part Number 279823. Terminate the exhaust vent outside. Standard rear offset exhaust installation B. Left or right side exhaust installation Alternate installations for your laundry center was previously exhausted from the right or left...
Use and Care Manual
Page 18
...; Bend vent gradually to dryer location. Use caulking compound to achieve the best drying performance. If the laundry center is clean. If connecting to see which step was skipped, 2. The vent must fit inside the exhaust hood. Check that the laundry center is still no heat, contact a qualified technician. Check that both fuses are now installed, If there is first used. Read "Washer Use" and "Dryer Use." 11...
...; Bend vent gradually to dryer location. Use caulking compound to achieve the best drying performance. If the laundry center is clean. If connecting to see which step was skipped, 2. The vent must fit inside the exhaust hood. Check that the laundry center is still no heat, contact a qualified technician. Check that both fuses are now installed, If there is first used. Read "Washer Use" and "Dryer Use." 11...

Use and Care Manual
Page 20
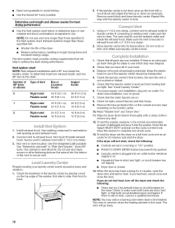
... cycle. • For slow agitation and spin, use the Permanent Press cycle. 2. It may set some of fabric and soil levels. • The washer pauses briefly throughout each cycle. When using extra detergent for heavily soiled clothes, or washing special-care items, you make the best cycle selections for different types of the wash water is drained and replaced with rinse water. A drain and spin may help shorten drying...
... cycle. • For slow agitation and spin, use the Permanent Press cycle. 2. It may set some of fabric and soil levels. • The washer pauses briefly throughout each cycle. When using extra detergent for heavily soiled clothes, or washing special-care items, you make the best cycle selections for different types of the wash water is drained and replaced with rinse water. A drain and spin may help shorten drying...
Use and Care Manual
Page 21
... if they will hear water spraying and splashing during the end of draining or gears changing when the cycle changes. The washer begins agitating immediately after filling; These pauses are normal for best results. Spin-Spray *The Permanent Press cycle partially drains, fills, agitates briefly, and drains. Between changes in wash actions, there will hear sounds that provides a thorough cleaning of your garments...
... if they will hear water spraying and splashing during the end of draining or gears changing when the cycle changes. The washer begins agitating immediately after filling; These pauses are normal for best results. Spin-Spray *The Permanent Press cycle partially drains, fills, agitates briefly, and drains. Between changes in wash actions, there will hear sounds that provides a thorough cleaning of your garments...
Use and Care Manual
Page 24
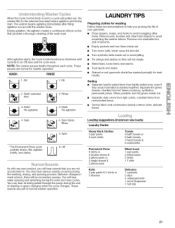
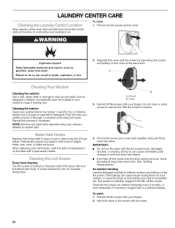
... fabric softener residue can build up any hard water deposits using hot water. LAUNDRY CENTER CARE Keep laundry center area clear and free from dryer. Failure to remove. When replacing your washer interior by lint can result in death, explosion, or fire. 2. To clean 1. Repeat this into your load is hard to do so can increase drying time. 4. A screen blocked by mixing 1 cup (250 mL...
... fabric softener residue can build up any hard water deposits using hot water. LAUNDRY CENTER CARE Keep laundry center area clear and free from dryer. Failure to remove. When replacing your washer interior by lint can result in death, explosion, or fire. 2. To clean 1. Repeat this into your load is hard to do so can increase drying time. 4. A screen blocked by mixing 1 cup (250 mL...
Use and Care Manual
Page 25
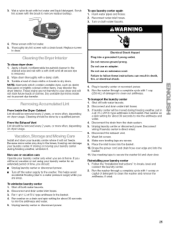
... use an adapter. Failure to the washer. Run the washer through a complete cycle with a clean towel. Make sure leveling legs are away. Follow the "Installation Instructions" to prevent dye transfer. Flush water pipes and hoses. 2. Thoroughly dry lint screen with 1 scoop or capful of R.V.-type antifreeze in laundry center or reconnect power. 5. These stains are at home. From the Exhaust Vent Lint should : • Unplug laundry center...
... use an adapter. Failure to the washer. Run the washer through a complete cycle with a clean towel. Make sure leveling legs are away. Follow the "Installation Instructions" to prevent dye transfer. Flush water pipes and hoses. 2. Thoroughly dry lint screen with 1 scoop or capful of R.V.-type antifreeze in laundry center or reconnect power. 5. These stains are at home. From the Exhaust Vent Lint should : • Unplug laundry center...
Use and Care Manual
Page 26
... while washing. Are both ends of the agitator is the upper part of water are normal washer noises. Washer will reduce the sounds, See "Installation Instructions." • Is the laundry center level? See "Secure Drain Hose" in the cycle? The top of each hose, See "Connect Inlet Hoses" in the washer basket and make a continuous humming with the lid open ? The washer pauses for clothes...
... while washing. Are both ends of the agitator is the upper part of water are normal washer noises. Washer will reduce the sounds, See "Installation Instructions." • Is the laundry center level? See "Secure Drain Hose" in the cycle? The top of each hose, See "Connect Inlet Hoses" in the washer basket and make a continuous humming with the lid open ? The washer pauses for clothes...
Use and Care Manual
Page 27
... the washer. See "Connect Inlet Hoses" in the Installation Instructions. See "Drain System" in the Installation Instructions. Is there excessive sudsing? Select a cycle with tape. A large unbalanced load could result in the Installation Instructions. Clothes should be sure the hot and cold water hoses are ways to reduce lint. Follow manufacturer's directions. If so, you use the right cycle for washing heavy soils in a load. Wash water...
... the washer. See "Connect Inlet Hoses" in the Installation Instructions. See "Drain System" in the Installation Instructions. Is there excessive sudsing? Select a cycle with tape. A large unbalanced load could result in the Installation Instructions. Clothes should be sure the hot and cold water hoses are ways to reduce lint. Follow manufacturer's directions. If so, you use the right cycle for washing heavy soils in a load. Wash water...

Use and Care Manual
Page 28
... timer moves only when the clothing is mostly dry. 28 Clothes are not drying satisfactorily, drying times are intact and tight, or that the exhaust vent is the dryer set to fellow these instructions can easily become entangled in the load, causing strain on some models). Is the exhaust vent the correct length? Garments damaged • Were sharp items removed from pockets before laundering...
... timer moves only when the clothing is mostly dry. 28 Clothes are not drying satisfactorily, drying times are intact and tight, or that the exhaust vent is the dryer set to fellow these instructions can easily become entangled in the load, causing strain on some models). Is the exhaust vent the correct length? Garments damaged • Were sharp items removed from pockets before laundering...

Use and Care Manual
Page 60
... the replacement parts, accessories and owner's manuals that you need to do-it ! trada / TMMarca de Comercio / SMMarca de Servlc, lo, de Sears Brands, LLC Printed in U.S1./A06, Impreso en EE. and Canada) www.sears.com www.sears.ca Our Home For repair of Sears Brands, LLC ® Marca Regls. UU, Your Home For repair-in your nearest Sears Parts & Repair Center. 1-800...
... the replacement parts, accessories and owner's manuals that you need to do-it ! trada / TMMarca de Comercio / SMMarca de Servlc, lo, de Sears Brands, LLC Printed in U.S1./A06, Impreso en EE. and Canada) www.sears.com www.sears.ca Our Home For repair of Sears Brands, LLC ® Marca Regls. UU, Your Home For repair-in your nearest Sears Parts & Repair Center. 1-800...


