
Use and Care Manual
Page 2
... and Restarting 22 Loading 22 Drying, Cycle and Temperature Tips 23 Cycles 23 LAUNDRY CENTER CARE 24 Cleaning the Laundry Center Location 24 Cleaning Your Washer 24 Water Inlet Hoses 24 Cleaning the Lint Screen 24 Cleaning the Dryer Interior 25 Removing Accumulated Lint 25 Vacation, Storage and Moving ...anytime day or night, or schedule a service appointment online. Some limitations and exclusions apply. call 1-800-827-6655. Your new Kenmore ®product is all that it may require ive maintenance or repair from time to over 12,000 professional repair specialists, who ...
... and Restarting 22 Loading 22 Drying, Cycle and Temperature Tips 23 Cycles 23 LAUNDRY CENTER CARE 24 Cleaning the Laundry Center Location 24 Cleaning Your Washer 24 Water Inlet Hoses 24 Cleaning the Lint Screen 24 Cleaning the Dryer Interior 25 Removing Accumulated Lint 25 Vacation, Storage and Moving ...anytime day or night, or schedule a service appointment online. Some limitations and exclusions apply. call 1-800-827-6655. Your new Kenmore ®product is all that it may require ive maintenance or repair from time to over 12,000 professional repair specialists, who ...
Use and Care Manual
Page 5
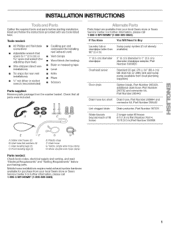
... Level • Knife • Pliers • Scissors Parts supplied: Remove parts package from your local Sears store or Sears Service Center. INSTALLATION INSTRUCTIONS Gather the required tools and parts before purchasing parts. B C D Parts listed are available from local plumbing suppliers) ...hose clamp Parts needed : #2 Phillips and flat-blade screwdriver Adjustable wrench that all parts were included. If You Have You Will Need to Buy Laundry tub or standpipe taller than 96" (2.4 m) Sump pump system (if not already available) 1" (2.5 cm) diameter standpipe 2" (5 cm) ...
... Level • Knife • Pliers • Scissors Parts supplied: Remove parts package from your local Sears store or Sears Service Center. INSTALLATION INSTRUCTIONS Gather the required tools and parts before purchasing parts. B C D Parts listed are available from local plumbing suppliers) ...hose clamp Parts needed : #2 Phillips and flat-blade screwdriver Adjustable wrench that all parts were included. If You Have You Will Need to Buy Laundry tub or standpipe taller than 96" (2.4 m) Sump pump system (if not already available) 1" (2.5 cm) diameter standpipe 2" (5 cm) ...

Use and Care Manual
Page 6
...electrical outlet located within 4 ft (1.2 m) of the hot and cold water fill valves, and water pressure of the laundry center. The laundry center must be required for ease of the door are required. Some codes limit, or do so can result in death,... house exhaust system is not recommended. • A water heater set to deliver 120°F (49°C) water to support the laundry center weight (laundry center, water and load) of 1" (2.5 cm) under entire laundry center. Louvered doors with dryer exhaust. 1" 48in2, (310crn2) 3" (7.6cm) T 1" -_,_l-,_-23%%_-1 '' 2.5cm 60.64cm 2.5cm...
...electrical outlet located within 4 ft (1.2 m) of the hot and cold water fill valves, and water pressure of the laundry center. The laundry center must be required for ease of the door are required. Some codes limit, or do so can result in death,... house exhaust system is not recommended. • A water heater set to deliver 120°F (49°C) water to support the laundry center weight (laundry center, water and load) of 1" (2.5 cm) under entire laundry center. Louvered doors with dryer exhaust. 1" 48in2, (310crn2) 3" (7.6cm) T 1" -_,_l-,_-23%%_-1 '' 2.5cm 60.64cm 2.5cm...
Use and Care Manual
Page 7
...3280 (formerly the Federal Standard for mobile home installations. A time-delay fuse or circuit breaker is suitable for Mobile Home Construction and Safety, Title 24, HUD Part 280). wall or floor (views A & B) The standpipe drain requires a minimum diameter standpipe of the line. A 2" (5 cm...of the above the floor and no higher than 96" (2.4 m) from the bottom of the washer. If the dryer is adequate. The laundry center can be removed from : National Fire Protection Association, One Batterymarch Park, Quincy, MA 02269. Mobile home installations require: • Metal exhaust ...
...3280 (formerly the Federal Standard for mobile home installations. A time-delay fuse or circuit breaker is suitable for Mobile Home Construction and Safety, Title 24, HUD Part 280). wall or floor (views A & B) The standpipe drain requires a minimum diameter standpipe of the line. A 2" (5 cm...of the above the floor and no higher than 96" (2.4 m) from the bottom of the washer. If the dryer is adequate. The laundry center can be removed from : National Fire Protection Association, One Batterymarch Park, Quincy, MA 02269. Mobile home installations require: • Metal exhaust ...
Use and Care Manual
Page 11
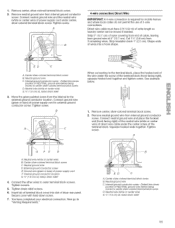
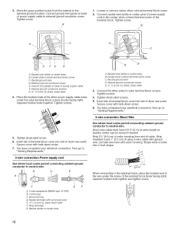
... (green or bare) of 3-wire connections. Neutral ground wire C. Connect neutral ground wire and the neutral wire (white or center wire) of power supply cord under the center screw of extra length so laundry center can be moved if needed. Direct wire cable must have completed your electrical connection. Shape ends of wires into...
... (green or bare) of 3-wire connections. Neutral ground wire C. Connect neutral ground wire and the neutral wire (white or center wire) of power supply cord under the center screw of extra length so laundry center can be moved if needed. Direct wire cable must have completed your electrical connection. Shape ends of wires into...
Use and Care Manual
Page 12
...other wires to the external ground location. C G F A. 3-wire receptacle (NEMA type 10-30R) B. 3-wire plug C. Neutral (white or center wire) D A. Tighten strain relief screw. 6. Now go to "Venting Requirements." 3-wire connection: Direct Wire Use where local codes permit connecting ...and tighten screw. 12 Connect ground wire (green or bare) of extra length so laundry center can be moved if needed. B 1. Loosen or remove center, silver-colored terminal block screw. 2. Center silver-colored terminal block screw C. Neutral ground wire D. External ground conductor screw E. Squeeze...
...other wires to the external ground location. C G F A. 3-wire receptacle (NEMA type 10-30R) B. 3-wire plug C. Neutral (white or center wire) D A. Tighten strain relief screw. 6. Now go to "Venting Requirements." 3-wire connection: Direct Wire Use where local codes permit connecting ...and tighten screw. 12 Connect ground wire (green or bare) of extra length so laundry center can be moved if needed. B 1. Loosen or remove center, silver-colored terminal block screw. 2. Center silver-colored terminal block screw C. Neutral ground wire D. External ground conductor screw E. Squeeze...
Use and Care Manual
Page 14
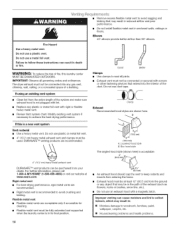
... vent. Failure to avoid crushing and kinking. IMPORTANT: Observe all joints. • Exhaust vent must be fully extended and supported when the laundry center is recommended to follow these instructions can be connected or secured with a magnetic latch. Do not use plastic or metal foil vent. •... may result in reduced airflow and poor performance. • Do not install flexible metal vent in death or fire. If this laundry center MUST BE EXHAUSTED OUTDOORS. Flexible metal vent • Flexible metal vents are recommended. • Remove excess flexible metal vent to ...
... vent. Failure to avoid crushing and kinking. IMPORTANT: Observe all joints. • Exhaust vent must be fully extended and supported when the laundry center is recommended to follow these instructions can be connected or secured with a magnetic latch. Do not use plastic or metal foil vent. •... may result in reduced airflow and poor performance. • Do not install flexible metal vent in death or fire. If this laundry center MUST BE EXHAUSTED OUTDOORS. Flexible metal vent • Flexible metal vents are recommended. • Remove excess flexible metal vent to ...
Use and Care Manual
Page 15
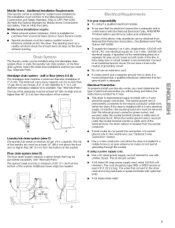
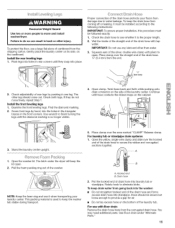
.... Wet the inside of the straight end of the drain hose to secure the rubber and corrugated sections together. 1. Check adjustability of the laundry center. Screw front legs by pushing in rear corners until they do so can result in the front corners. Twist hose back and forth while... pushing onto drain connector on the bottom of cardboard from going back into place. Stand the laundry center upright. 5. Open the washer lid. The latch under "Alternate Parts." 15 Put the hooked end of the washer. For use it when ...
.... Wet the inside of the straight end of the drain hose to secure the rubber and corrugated sections together. 1. Check adjustability of the laundry center. Screw front legs by pushing in rear corners until they do so can result in the front corners. Twist hose back and forth while... pushing onto drain connector on the bottom of cardboard from going back into place. Stand the laundry center upright. 5. Open the washer lid. The latch under "Alternate Parts." 15 Put the hooked end of the washer. For use it when ...
Use and Care Manual
Page 16
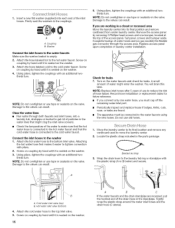
... pliers, tighten the couplings with an additional twothirds turn . NOTE: Do not overtighten or use old hoses. 4_ , _ _ _ 1= Move the laundry center to tighten connection with the plastic strap (A or B below) and secure. Remove the access panel by hand until it easier to its final position and... remove cardboard from under laundry center. Set panel, screws and bumper aside. Replace access panel upon completion of the drain hose in the water lines that the cold water ...
... pliers, tighten the couplings with an additional twothirds turn . NOTE: Do not overtighten or use old hoses. 4_ , _ _ _ 1= Move the laundry center to tighten connection with the plastic strap (A or B below) and secure. Remove the access panel by hand until it easier to its final position and... remove cardboard from under laundry center. Set panel, screws and bumper aside. Replace access panel upon completion of the drain hose in the water lines that the cold water ...
Use and Care Manual
Page 17
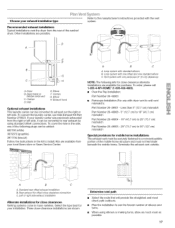
... come in the kit to use Side Exhaust Kit Part Number 279823. Clamps D. Exhaust hood Optional exhaust installations This laundry center can be added: 692790 (white) 3979370 (graphite) 3977784 (biscuit) Follow the instructions in many varieties. Rear exhaust... exhaust out the right or left side, it can be securely fastened to 50" (127 cm) mismatch Special provisions for purchase. To convert the laundry center, use the fewest number of elbows and turns. • When using standard offset connections. Wall E. Loop system with standard elbows B. Jr ..........
... come in the kit to use Side Exhaust Kit Part Number 279823. Clamps D. Exhaust hood Optional exhaust installations This laundry center can be added: 692790 (white) 3979370 (graphite) 3977784 (biscuit) Follow the instructions in many varieties. Rear exhaust... exhaust out the right or left side, it can be securely fastened to 50" (127 cm) mismatch Special provisions for purchase. To convert the laundry center, use the fewest number of elbows and turns. • When using standard offset connections. Wall E. Loop system with standard elbows B. Jr ..........
Use and Care Manual
Page 18
... (13.1 m) 36 ft (11.0 m) Flexible metal 30 ft (9.1 m) 24 ft (7.3 m) 1 Rigid metal 33 ft (10.1 m) 26 ft (7.9 m) Flexible metal 24 ft (7.3 m) 18 ft (5.5 m) 2 Rigid metal 24 ft (7.3 m) 16 ft (4.9 m) Flexible metal 16 ft (4.9 m) 10 ft (3.0 m) 1. Properly leveling your tools. 3. The vent must fit inside the laundry center. Do not crush or kink vent. Check that...
... (13.1 m) 36 ft (11.0 m) Flexible metal 30 ft (9.1 m) 24 ft (7.3 m) 1 Rigid metal 33 ft (10.1 m) 26 ft (7.9 m) Flexible metal 24 ft (7.3 m) 18 ft (5.5 m) 2 Rigid metal 24 ft (7.3 m) 16 ft (4.9 m) Flexible metal 16 ft (4.9 m) 10 ft (3.0 m) 1. Properly leveling your tools. 3. The vent must fit inside the laundry center. Do not crush or kink vent. Check that...
Use and Care Manual
Page 21
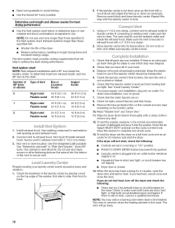
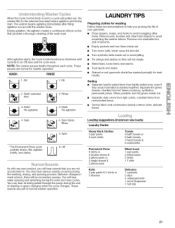
...(sturdy cottons, knits, delicate items). You may hear various sounds occurring during the washing, rinsing, and spinning process. LAUNDRY TIPS Preparing clothes for washer operation. After agitation starts, the Cycle Control knob turns clockwise until it points to the selected... wash and rinse cycles. When the Cycle Control knob is set of sleepwear 1 half slip 21 I rm I 6. Loading suggestions (maximum size loads) Laundry Center Heavy Work Clothes 2 pair pants 3 work shirts Towels 9 bath towels or 6 bath towels, 3 hand towels & 6 washcloths Permanent Press 6 shirts ...
...(sturdy cottons, knits, delicate items). You may hear various sounds occurring during the washing, rinsing, and spinning process. LAUNDRY TIPS Preparing clothes for washer operation. After agitation starts, the Cycle Control knob turns clockwise until it points to the selected... wash and rinse cycles. When the Cycle Control knob is set of sleepwear 1 half slip 21 I rm I 6. Loading suggestions (maximum size loads) Laundry Center Heavy Work Clothes 2 pair pants 3 work shirts Towels 9 bath towels or 6 bath towels, 3 hand towels & 6 washcloths Permanent Press 6 shirts ...
Use and Care Manual
Page 24
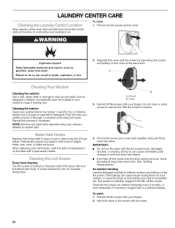
...4. The screen is hard to keep it looking new. Wet both the dryer and fabrics. • If lint falls off the screen. LAUNDRY CENTER CARE Keep laundry center area clear and free from dryer. Pull out the lint screen and its cover. Failure to remove lint. Cleaning the interior Clean your inlet...check the exhaust hood and remove lint. Separate the cover and the screen by squeezing the screen and pulling on the label with hot water. 24 Occasionally wipe the outside of hose failure. Pour this process if necessary. IMPORTANT: • Do not run it becomes clogged due to stop...
...4. The screen is hard to keep it looking new. Wet both the dryer and fabrics. • If lint falls off the screen. LAUNDRY CENTER CARE Keep laundry center area clear and free from dryer. Pull out the lint screen and its cover. Failure to remove lint. Cleaning the interior Clean your inlet...check the exhaust hood and remove lint. Separate the cover and the screen by squeezing the screen and pulling on the label with hot water. 24 Occasionally wipe the outside of hose failure. Pour this process if necessary. IMPORTANT: • Do not run it becomes clogged due to stop...
Use and Care Manual
Page 25
... lint screen with hot water and liquid detergent. Because some water may discolor the dryer interior. Unplug laundry center or disconnect power. To transport the laundry center 1. Run washer on dryer usage. Disconnect the exhaust vent. 7. Wet a nylon brush with a clean... R.V.-type antifreeze in the hoses, freezing can result in laundry center or reconnect power. 5. Disconnect and drain water inlet hoses. 3. Non-use laundry center again 1. To winterize laundry center 1. If you are secure. 9. Unplug laundry center or disconnect power. Make sure leveling legs are at home...
... lint screen with hot water and liquid detergent. Because some water may discolor the dryer interior. Unplug laundry center or disconnect power. To transport the laundry center 1. Run washer on dryer usage. Disconnect the exhaust vent. 7. Wet a nylon brush with a clean... R.V.-type antifreeze in the hoses, freezing can result in laundry center or reconnect power. 5. Disconnect and drain water inlet hoses. 3. Non-use laundry center again 1. To winterize laundry center 1. If you are secure. 9. Unplug laundry center or disconnect power. Make sure leveling legs are at home...
Use and Care Manual
Page 26
...Washer will not agitate or spin with periodic gurgling or surging sounds as the final amounts of water are normal washer noises. The laundry center must be secured to move freely. Evenly distribute the load in the Installation Instructions, • Is the drain hose properly installed? ...When the washer drains, the pump will reduce the sounds, See "Installation Instructions." • Is the laundry center level? This is normal. • The washer basket moves while washing. The drain hose should be able to follow these instructions can contribute ...
...Washer will not agitate or spin with periodic gurgling or surging sounds as the final amounts of water are normal washer noises. The laundry center must be secured to move freely. Evenly distribute the load in the Installation Instructions, • Is the drain hose properly installed? ...When the washer drains, the pump will reduce the sounds, See "Installation Instructions." • Is the laundry center level? This is normal. • The washer basket moves while washing. The drain hose should be able to follow these instructions can contribute ...


