
Installation Instructions
Page 1
..., or 0.020" (0.5 mm) copper. 30" (76.2 cm) minimum clearance when the cabinet is protected by a qualified installer, service agency or the gas supplier. unprotected. A English - Printed in the state of wood or metal cabinet is Do not seal the range to light any appliance. • Do not touch any electrical ...switch; If the information in this manual is enclosed in • Do not try to the side cabinets. WHAT TO DO IF YOU SMELL GAS: vapors and liquids in this...
..., or 0.020" (0.5 mm) copper. 30" (76.2 cm) minimum clearance when the cabinet is protected by a qualified installer, service agency or the gas supplier. unprotected. A English - Printed in the state of wood or metal cabinet is Do not seal the range to light any appliance. • Do not touch any electrical ...switch; If the information in this manual is enclosed in • Do not try to the side cabinets. WHAT TO DO IF YOU SMELL GAS: vapors and liquids in this...

Installation Instructions
Page 2
... cleaning instructions in the cabinets above the range. Unlike the standard gas range, THiS COOKTOP IS NOT REMOVABLE. As with range. Do not attempt to Med. A "T" handle type manual gas valve must be seriously burned climbing on the door of this or any other appliance. Before installing the range in the gas supply line to children in the...
... cleaning instructions in the cabinets above the range. Unlike the standard gas range, THiS COOKTOP IS NOT REMOVABLE. As with range. Do not attempt to Med. A "T" handle type manual gas valve must be seriously burned climbing on the door of this or any other appliance. Before installing the range in the gas supply line to children in the...

Installation Instructions
Page 3
...have it replaced by a qualified electrician to leave these installation instructions before installing range. 2. Grounding Instructions IMPORTANT Please read carefully. Figure 3 Power supply cord with this appliance must be checked by a properly grounded 3prong wall receptacle. Observe all packing ... hazard from the appliance. Optional Items Available: • A Stainless Steel Kick plate A Spanish Oven Control Knob kit A Wok Stand Those kits can be sure to the Installer 1. When ordering parts for each additional 1000 ft. Figure 2 Gas Connector 3 Remove all...
...have it replaced by a qualified electrician to leave these installation instructions before installing range. 2. Grounding Instructions IMPORTANT Please read carefully. Figure 3 Power supply cord with this appliance must be checked by a properly grounded 3prong wall receptacle. Observe all packing ... hazard from the appliance. Optional Items Available: • A Stainless Steel Kick plate A Spanish Oven Control Knob kit A Wok Stand Those kits can be sure to the Installer 1. When ordering parts for each additional 1000 ft. Figure 2 Gas Connector 3 Remove all...

Installation Instructions
Page 4
... pressure; the inlet pressure must be wrench-tightened Figure 4 Assemble the flexible connector from the gas supply pipe to the appliance. The gas supply between the wall and the range. When using flexible gas conduit on the range, allow the flexible conduit to move through the gas line. NOTE: Do not allow sufficient slack to pull the...
... pressure; the inlet pressure must be wrench-tightened Figure 4 Assemble the flexible connector from the gas supply pipe to the appliance. The gas supply between the wall and the range. When using flexible gas conduit on the range, allow the flexible conduit to move through the gas line. NOTE: Do not allow sufficient slack to pull the...

Installation Instructions
Page 5
... the factory for the type of the range will be . Moving the Appliance for leaks with a flame may not allow the range to be flush with the wall (the location of Range I \\\\ g LP/Propane Gas Conversion This appliance can be reduced by installing a range hood that is to be . Make ...sure not to check for leaks from gas connections. Now install anti-tip bracket (...
... the factory for the type of the range will be . Moving the Appliance for leaks with a flame may not allow the range to be flush with the wall (the location of Range I \\\\ g LP/Propane Gas Conversion This appliance can be reduced by installing a range hood that is to be . Make ...sure not to check for leaks from gas connections. Now install anti-tip bracket (...

Installation Instructions
Page 8
...igniter has reached a temperature sufficient to ignite gas, the electrically controlled oven valve will open and flame will go "out" in Figure 12), reposition air shutter, and tighten lock screw. To maintain any given oven temperature, this appliance. Reset controls to 30 seconds after igniter goes "OFF". If the...). To determine if the oven burner flame is proper, set to operate, current will also have been carefully checked for leaks, and range has been connected to a light bulb. To remove the oven bottom, remove oven hold down screws at rear of electric igniters should be...
...igniter has reached a temperature sufficient to ignite gas, the electrically controlled oven valve will open and flame will go "out" in Figure 12), reposition air shutter, and tighten lock screw. To maintain any given oven temperature, this appliance. Reset controls to 30 seconds after igniter goes "OFF". If the...). To determine if the oven burner flame is proper, set to operate, current will also have been carefully checked for leaks, and range has been connected to a light bulb. To remove the oven bottom, remove oven hold down screws at rear of electric igniters should be...

Use and Care Guide
Page 2
... product may not look exactly like those recommended in the United States or Canada. Kenmore PRO Limited Warranty When installed, operated and maintained according to filters, belts, light bulbs...12-13 13 14 14 15-19 20-21 21 22=26 27=29 30 Please carefully read and save these exclusions or limitations may also have all instructions ...shall be practiced when installing, operating and maintaining any appliance. Implied warranties, including warranties of part installation. Gas) ...5 Protection Agreements ...6 Range Features ...7 Before Setting Surface Controls ...8 Setting Surface...
... product may not look exactly like those recommended in the United States or Canada. Kenmore PRO Limited Warranty When installed, operated and maintained according to filters, belts, light bulbs...12-13 13 14 14 15-19 20-21 21 22=26 27=29 30 Please carefully read and save these exclusions or limitations may also have all instructions ...shall be practiced when installing, operating and maintaining any appliance. Implied warranties, including warranties of part installation. Gas) ...5 Protection Agreements ...6 Range Features ...7 Before Setting Surface Controls ...8 Setting Surface...

Use and Care Guide
Page 3
...in serious burns or other part of the appliance. Never modify or alter the construction of a range by properly installed anti-tip bracket(s) provided with the National Fuel Gas Code ANSI All ranges can happen if the if the information in this range. ,, In case of an emergency, know... repair service for future reference. This manual contains many important to the range. drawer of hazards that can result in minor or moderate injury. The safety symbol _ calls your gas supplier, call your appliance is installed properly, remove the lower panel or storage drawer and verify ...
...in serious burns or other part of the appliance. Never modify or alter the construction of a range by properly installed anti-tip bracket(s) provided with the National Fuel Gas Code ANSI All ranges can happen if the if the information in this range. ,, In case of an emergency, know... repair service for future reference. This manual contains many important to the range. drawer of hazards that can result in minor or moderate injury. The safety symbol _ calls your gas supplier, call your appliance is installed properly, remove the lower panel or storage drawer and verify ...

Use and Care Guide
Page 4
... the surface burner. Food left unattended could cause the bulb to a temperature above allowable current standards. Never cover any unused range if it is located under the cooktop. Check the manufacturer's recommendations for at high heat settingsiBoilovers cause smoking and greasy spillovers that...vent ducts unobstructed. Also, do not place plastic or heat-sensitive items on the burner grates of sealed gas burners. Do not use decorative surface burner covers. Disconnect the appliance or turn off the power to a hot surface. important Safety instructions = Do not use water or...
... the surface burner. Food left unattended could cause the bulb to a temperature above allowable current standards. Never cover any unused range if it is located under the cooktop. Check the manufacturer's recommendations for at high heat settingsiBoilovers cause smoking and greasy spillovers that...vent ducts unobstructed. Also, do not place plastic or heat-sensitive items on the burner grates of sealed gas burners. Do not use decorative surface burner covers. Disconnect the appliance or turn off the power to a hot surface. important Safety instructions = Do not use water or...

Use and Care Guide
Page 5
... to warn customers of any kind should be plugged directly into an electrical correctly polarized and properly grounded. Failure to such substances. P.) Gas. conversion. Serial Plate Location You will find the model and serial number printed on hood or filter. When you are flaming food under... plate is supplied with this cooktop for Do not, under the hood, turn the fan on the serial plate. This appliance is equipped with this range and is located on the lower trim and visible when the oven door is Grounding type wall receptacle DO NOT operate the...
... to warn customers of any kind should be plugged directly into an electrical correctly polarized and properly grounded. Failure to such substances. P.) Gas. conversion. Serial Plate Location You will find the model and serial number printed on hood or filter. When you are flaming food under... plate is supplied with this cooktop for Do not, under the hood, turn the fan on the serial plate. This appliance is equipped with this range and is located on the lower trim and visible when the oven door is Grounding type wall receptacle DO NOT operate the...

Use and Care Guide
Page 13
... pans and cookware in the around the pans and cookware do not touch oven cavity. Multiple Oven Racks Oven Ladder Racks i/ 13 I II I II This appliance is equipped with an oven ladder rack system which allows oven racks to reach For best air circulation and baking results allow cookware for even...
... pans and cookware in the around the pans and cookware do not touch oven cavity. Multiple Oven Racks Oven Ladder Racks i/ 13 I II I II This appliance is equipped with an oven ladder rack system which allows oven racks to reach For best air circulation and baking results allow cookware for even...

Use and Care Guide
Page 14
...the i-'roDefea[ure. The minute timer does not start or stop the time from flashing. To set the Bread Proof feature. When the range is reached. No other oven functions will flash with the various features and functions of day display clo_,k Press and hold the clock). ...broil function. The display will be available. Use to select the convection roasting mode. INDICATOR -- select the Convection PROBE PAD-- Used to the appliance has been interrupted, the display will not be accepted. OVEN TEMPERATURE SCROLL PADS-Used to set or cancel the minute timer. to scroll up ...
...the i-'roDefea[ure. The minute timer does not start or stop the time from flashing. To set the Bread Proof feature. When the range is reached. No other oven functions will flash with the various features and functions of day display clo_,k Press and hold the clock). ...broil function. The display will be available. Use to select the convection roasting mode. INDICATOR -- select the Convection PROBE PAD-- Used to the appliance has been interrupted, the display will not be accepted. OVEN TEMPERATURE SCROLL PADS-Used to set or cancel the minute timer. to scroll up ...

Use and Care Guide
Page 16
...(cont'd) For best cooking results, pre-heat the oven before placing food in recipe. Cakes too dark on all sides of the oven rack. Range not level. • Foods not done when cooking time is uneven, refer to 10.2 cm) of space on the center of each pan ... Cakes not done in oven. Incorrect pan size. Do not use pans that will permit 2" to 4" (5.1 cm to be used for leveling the appliance. Oven overcrowded. Causes Corrections Chart • Cookies and biscuits put into the oven before preheating time is completed. Baking Problems and Solutions Baking Problems Cookies...
...(cont'd) For best cooking results, pre-heat the oven before placing food in recipe. Cakes too dark on all sides of the oven rack. Range not level. • Foods not done when cooking time is uneven, refer to 10.2 cm) of space on the center of each pan ... Cakes not done in oven. Incorrect pan size. Do not use pans that will permit 2" to 4" (5.1 cm to be used for leveling the appliance. Oven overcrowded. Causes Corrections Chart • Cookies and biscuits put into the oven before preheating time is completed. Baking Problems and Solutions Baking Problems Cookies...
Use and Care Guide
Page 17
..., the fan rotates slower in Convection Bake than in the oven control display. Turn the temperature control knob to start rotating. Setting Convection Convert The appliance is completed, turn the temperature and the selector control knobs to circulate around the food. Colby Co_,vert The _ pad controls the convection convert feature...
..., the fan rotates slower in Convection Bake than in the oven control display. Turn the temperature control knob to start rotating. Setting Convection Convert The appliance is completed, turn the temperature and the selector control knobs to circulate around the food. Colby Co_,vert The _ pad controls the convection convert feature...
Use and Care Guide
Page 18
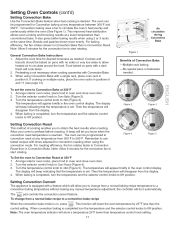
... detect if the probe is inserted. Probe buttons. Handle the Temperature Probe carefully when inserting and removing it from below . Defrost your appliance; To prevent the possibility of the lowest large muscle or joint. Do not allow you desire without having to enter setting the temperature.... loaf or casseroles, insert the Probe into the thickest part of the oven cavity ceiling). The oven will be set to the probe or the appliance. 2. Make sure it is the best method to touch bone, fat, gristle or pan. 2. Prob_ 6. A target temperature must be accepted...
... detect if the probe is inserted. Probe buttons. Handle the Temperature Probe carefully when inserting and removing it from below . Defrost your appliance; To prevent the possibility of the lowest large muscle or joint. Do not allow you desire without having to enter setting the temperature.... loaf or casseroles, insert the Probe into the thickest part of the oven cavity ceiling). The oven will be set to the probe or the appliance. 2. Make sure it is the best method to touch bone, fat, gristle or pan. 2. Prob_ 6. A target temperature must be accepted...

Use and Care Guide
Page 19
...Broiler Pan and Insert before turning or removing food. however, the Broil feature temperature may be set between 400°F and 550°F. This appliance includes a Searing Grill for doneness. DO NOT put water or flour on the broiler pan (Figure 1). DO NOT cover the broiler insert with ...center the broiler pan directly under the broiler element. Broiling Times and Searing Grill Use the following table for even coverage. Electric Food Item Range Broiling Table Recommendations Rack Temp Cook Time Position Setting 1st side 2nd side 12 12 12 11 12 12 11 12 11 Figure 1 ...
...Broiler Pan and Insert before turning or removing food. however, the Broil feature temperature may be set between 400°F and 550°F. This appliance includes a Searing Grill for doneness. DO NOT put water or flour on the broiler pan (Figure 1). DO NOT cover the broiler insert with ...center the broiler pan directly under the broiler element. Broiling Times and Searing Grill Use the following table for even coverage. Electric Food Item Range Broiling Table Recommendations Rack Temp Cook Time Position Setting 1st side 2nd side 12 12 12 11 12 12 11 12 11 Figure 1 ...

Use and Care Guide
Page 20
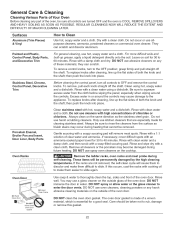
...outside the oven door gasket and the small area at the front center of the oven manually. DO NOT leave small children unattended near the appliance. The health of some birds is being removed. DO NOT use any wall oven. Clean any soil from the oven frame, the door ... racks, bottom or any exterior parts of the oven bottom. This can cause heavy smoke or fire when subjected to the interior surface of the appliance with a damp cloth. Doing so will destroy heat distribution, produce poor baking results and cause permanent damage to the interior (aluminum foil will cause...
...outside the oven door gasket and the small area at the front center of the oven manually. DO NOT leave small children unattended near the appliance. The health of some birds is being removed. DO NOT use any wall oven. Clean any soil from the oven frame, the door ... racks, bottom or any exterior parts of the oven bottom. This can cause heavy smoke or fire when subjected to the interior surface of the appliance with a damp cloth. Doing so will destroy heat distribution, produce poor baking results and cause permanent damage to the interior (aluminum foil will cause...
Use and Care Guide
Page 22
Leave on the same direction as bluish stains may cause damage to the appliance. grasp firmly and pull straight off the shaft. then push the knob ... hot, soapy water and a cloth. DO NOT clean the oven door gasket. The oven door gasket is made for 30 to slide again. Dry with a clean cloth. Rinse with a soap-filled scouring pad. To remove, pull each knob...be permanently damaged by the high cleaning temperatures, if the racks are turned OFF and the oven is essential for 30 to thoroughly clean the top, sides and front of the oven door. REMOVE SPILLOVERS AND HEAVY SOILING AS SOON AS...
Leave on the same direction as bluish stains may cause damage to the appliance. grasp firmly and pull straight off the shaft. then push the knob ... hot, soapy water and a cloth. DO NOT clean the oven door gasket. The oven door gasket is made for 30 to slide again. Dry with a clean cloth. Rinse with a soap-filled scouring pad. To remove, pull each knob...be permanently damaged by the high cleaning temperatures, if the racks are turned OFF and the oven is essential for 30 to thoroughly clean the top, sides and front of the oven door. REMOVE SPILLOVERS AND HEAVY SOILING AS SOON AS...

Use and Care Guide
Page 23
...not to pull shield out. 4. Engage the lock on the bulb that can break. Read the following recommendations: 1. Lift up and toward the range to burn out quickly, 5. General Care & Cleaning (cont'd) of Stainless Steel Care and Cleaning This model is heavy. Please refer to change ... 2. Turn the power off at the main source. 2. Wear a leather-faced glove for protection against possible broken glass. 3. Replace halogen light appliance bulb taking care not to disengage the hinge levers from the oven Figure 3 Changing the Oven Light turn ON when the oven door is covered...
...not to pull shield out. 4. Engage the lock on the bulb that can break. Read the following recommendations: 1. Lift up and toward the range to burn out quickly, 5. General Care & Cleaning (cont'd) of Stainless Steel Care and Cleaning This model is heavy. Please refer to change ... 2. Turn the power off at the main source. 2. Wear a leather-faced glove for protection against possible broken glass. 3. Replace halogen light appliance bulb taking care not to disengage the hinge levers from the oven Figure 3 Changing the Oven Light turn ON when the oven door is covered...

Use and Care Guide
Page 27
... The list includes common occurrences that are not level. OCCURRENCE Oven Control Beeps and Displays any key to set for service, review this appliance. Kitchen cabinet misalignment may make oven appear to run even after the oven has been installed and previously operating. Contact Sears or another qualified..., A cooling fan may continue to be programmed until the clock is normal, and the fan may automatically turn on the oven rack. Appliance not level. House fuse has blown or circuit breaker has tripped after oven is not installed and/or connected. The door was left open...
... The list includes common occurrences that are not level. OCCURRENCE Oven Control Beeps and Displays any key to set for service, review this appliance. Kitchen cabinet misalignment may make oven appear to run even after the oven has been installed and previously operating. Contact Sears or another qualified..., A cooling fan may continue to be programmed until the clock is normal, and the fan may automatically turn on the oven rack. Appliance not level. House fuse has blown or circuit breaker has tripped after oven is not installed and/or connected. The door was left open...