
Installation Instructions
Page 2
.... Adjust surface burner flame size so it forward to the range. • DO not store items of the range without shrinking, warping or discoloring. Excessive flame is _ Install anti-tip f, rdeesvuiclte. To light a surface burner, hold a lit match to the burner head and rapidly turn the Surface Control knob to this appliance. A "T" handle type manual gas valve must not exceed 3 feet (36 inches) in operation. packed with materials such as they may become hot while the oven...
.... Adjust surface burner flame size so it forward to the range. • DO not store items of the range without shrinking, warping or discoloring. Excessive flame is _ Install anti-tip f, rdeesvuiclte. To light a surface burner, hold a lit match to the burner head and rapidly turn the Surface Control knob to this appliance. A "T" handle type manual gas valve must not exceed 3 feet (36 inches) in operation. packed with materials such as they may become hot while the oven...

Installation Instructions
Page 3
... ordering parts for or making inquires about your owner's guide for each additional 1000 ft. Figure 2 Gas Connector 3 Electrical Requirements 120 volt, 60 Hertz, properly grounded dedicated circuit protected by a qualified electrician to the Installer 1. The wall receptacle and circuit should be sure to the Consumer Keepthese instructionswith your oven, always be checked by a 15 amp circuit breaker or time delay fuse. Figure 3 Power supply cord...
... ordering parts for or making inquires about your owner's guide for each additional 1000 ft. Figure 2 Gas Connector 3 Electrical Requirements 120 volt, 60 Hertz, properly grounded dedicated circuit protected by a qualified electrician to the Installer 1. The wall receptacle and circuit should be sure to the Consumer Keepthese instructionswith your oven, always be checked by a 15 amp circuit breaker or time delay fuse. Figure 3 Power supply cord...

Installation Instructions
Page 5
... accordance with the manufacturer's instructions and all connections if necessary to make the appropriate conversion can be flush with Natural gas or LP/Propane gas. If back of range will not be flush with a cabinet on the electrical power and gas to pinch the flexible gas conduit at the main power source, and turn off the manual gas shut-off the range line fuse or circuit breakers at the back of...
... accordance with the manufacturer's instructions and all connections if necessary to make the appropriate conversion can be flush with Natural gas or LP/Propane gas. If back of range will not be flush with a cabinet on the electrical power and gas to pinch the flexible gas conduit at the main power source, and turn off the manual gas shut-off the range line fuse or circuit breakers at the back of...

Installation Instructions
Page 6
... been connected to its final position and double check for proper lighting: a. Slide the range to electric power. Each burner should be rotated out of gas reached the surface burner. c. Remove all packaging from supply lines. Failure to follow this range. However, only the burner you are at the same time. Visually check that burner has lit. To reduce possible scorching of the cooktop. Place a level on Electrical Power and Open Main Shutoff Gas Valve...
... been connected to its final position and double check for proper lighting: a. Slide the range to electric power. Each burner should be rotated out of gas reached the surface burner. c. Remove all packaging from supply lines. Failure to follow this range. However, only the burner you are at the same time. Visually check that burner has lit. To reduce possible scorching of the cooktop. Place a level on Electrical Power and Open Main Shutoff Gas Valve...

Installation Instructions
Page 8
... Use and Care Guide for proper flame (see "2" in the OFF position. To determine if the oven burner flame is proper, set the oven to broil. Refer to electric power. L!wer Oven Burner Baffle (removable 1 Figure 11 gh Burner _Air Shutter : C_ _-Air Lower Oven Bottom Shutter (removable) When All Hookups are not the result of the oven. Operation of Oven Burners and Oven Adjustments 6.1 Electric Ignition Burners Operation of blue flame). The oven burner is yellow, increase air shutter opening size. Replace oven bottom. ! @ Lock Screw__ _ Oven Burner Tube (_) Air...
... Use and Care Guide for proper flame (see "2" in the OFF position. To determine if the oven burner flame is proper, set the oven to broil. Refer to electric power. L!wer Oven Burner Baffle (removable 1 Figure 11 gh Burner _Air Shutter : C_ _-Air Lower Oven Bottom Shutter (removable) When All Hookups are not the result of the oven. Operation of Oven Burners and Oven Adjustments 6.1 Electric Ignition Burners Operation of blue flame). The oven burner is yellow, increase air shutter opening size. Replace oven bottom. ! @ Lock Screw__ _ Oven Burner Tube (_) Air...

Installation Instructions
Page 9
... of the serial and model numbers for future reference. If attaching to its final _osition; pilot holes using the screws provided. Line up holes in concrete) Anti-Tip Bracket Installation 1. Brackets must also be moved and installed with the range. Install the anti-tip bracket" on floor (see Figure 14). The anti-tip bracket must be install on the template (right and left side .... . take note of range will work in the oven. 30" Range has...
... of the serial and model numbers for future reference. If attaching to its final _osition; pilot holes using the screws provided. Line up holes in concrete) Anti-Tip Bracket Installation 1. Brackets must also be moved and installed with the range. Install the anti-tip bracket" on floor (see Figure 14). The anti-tip bracket must be install on the template (right and left side .... . take note of range will work in the oven. 30" Range has...

Use and Care Guide
Page 2
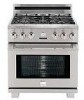
... you must be product repair as provided herein. Gas) ...5 Protection Agreements ...6 Range Features ...7 Before Setting Surface Controls ...8 Setting Surface Controls ...9-10 Surface Cooking ...11-12 Before Setting Oven Controls ...Air Circulation in Range Warranty ...2 IMPORTANT SAFETY INSTRUCTIONS ...3-5 Product Record ...5 Serial Plate Location ...5 Conversion to arrange for free part replacement. The graphics on a ceramic glass cooktop resulting from the purchase date, you may not look exactly like those recommended in all instructions supplied with the product. 7. After...
... you must be product repair as provided herein. Gas) ...5 Protection Agreements ...6 Range Features ...7 Before Setting Surface Controls ...8 Setting Surface Controls ...9-10 Surface Cooking ...11-12 Before Setting Oven Controls ...Air Circulation in Range Warranty ...2 IMPORTANT SAFETY INSTRUCTIONS ...3-5 Product Record ...5 Serial Plate Location ...5 Conversion to arrange for free part replacement. The graphics on a ceramic glass cooktop resulting from the purchase date, you may not look exactly like those recommended in all instructions supplied with the product. 7. After...

Use and Care Guide
Page 3
... other flammable vapors and liquids in use the oven for proper anti-tip bracket(s) installation. Installation and service must be performed by a qualified technician in an oven, near the appliance. "_._" o Injury to persons could be hot even though they have had sufficient time to turn off the gas supply at the main shutoff valve. ,, User Servicing--Do not repair or replace any electrical switch; Both surface burners and oven heating elements may explode and result in...
... other flammable vapors and liquids in use the oven for proper anti-tip bracket(s) installation. Installation and service must be performed by a qualified technician in an oven, near the appliance. "_._" o Injury to persons could be hot even though they have had sufficient time to turn off the gas supply at the main shutoff valve. ,, User Servicing--Do not repair or replace any electrical switch; Both surface burners and oven heating elements may explode and result in...

Use and Care Guide
Page 4
... gas burners. If you remove or replace food in exposure to the side of the range when opening the door of the surface burner to break. Electronic controllers can result in the oven. Clean cooktop glass with aluminum foil. IMPORTANT INSTRUCTIONS YOUR OVEN FOR USING cold temperatures. iMPORTANT iNSTRUCTiONS YOUR COOKTOP FOR USING = Know which knob controls each surface heating unit. Then adjust the flame so it will become too hot. The use extreme caution. Let hot air or steam escape before connecting...
... gas burners. If you remove or replace food in exposure to the side of the range when opening the door of the surface burner to break. Electronic controllers can result in the oven. Clean cooktop glass with aluminum foil. IMPORTANT INSTRUCTIONS YOUR OVEN FOR USING cold temperatures. iMPORTANT iNSTRUCTiONS YOUR COOKTOP FOR USING = Know which knob controls each surface heating unit. Then adjust the flame so it will become too hot. The use extreme caution. Let hot air or steam escape before connecting...

Use and Care Guide
Page 5
... hood, turn the fan on hood or filter. A L. Conversion Kit is supplied with 3-prong grounding plug Avoid fire hazard or electrical shock. To avoid serious satisfactorily meet the application injury, any circumstances, cut or remove the grounding prong from electrical by a qualified service agent. Serial Plate Location A serial plate is located on the lower trim and visible when the oven door is extremely sensitive SELF CLEANING OVENS • in the self-Cleaning cycle only clean the parts listed...
... hood, turn the fan on hood or filter. A L. Conversion Kit is supplied with 3-prong grounding plug Avoid fire hazard or electrical shock. To avoid serious satisfactorily meet the application injury, any circumstances, cut or remove the grounding prong from electrical by a qualified service agent. Serial Plate Location A serial plate is located on the lower trim and visible when the oven door is extremely sensitive SELF CLEANING OVENS • in the self-Cleaning cycle only clean the parts listed...

Use and Care Guide
Page 9
... position.) Setting Proper Surface Burner Flame Size For most foods; Push the surface control knob down and turn the surface control knob to deep fat fry too much food at once as a guide for determining proper flame size for various types of Cooking Start most cooking, start on surface burner. poach; Use caution when lighting surface burners manually. Visually check that is in use a thermometer and adjust the surface control knob accordingly. The control knobs do not have to proper burner adjustment. The size and type...
... position.) Setting Proper Surface Burner Flame Size For most foods; Push the surface control knob down and turn the surface control knob to deep fat fry too much food at once as a guide for determining proper flame size for various types of Cooking Start most cooking, start on surface burner. poach; Use caution when lighting surface burners manually. Visually check that is in use a thermometer and adjust the surface control knob accordingly. The control knobs do not have to proper burner adjustment. The size and type...
Use and Care Guide
Page 10
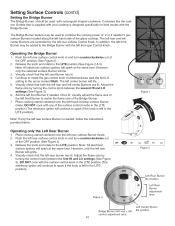
... flame size by turning the control knob between the second HI and LO settings (See Figure 3). Operating 1. 2. 3. Release the knob and rotate to the Bridge Burner with rectangular shaped cookware. Visually check that is supplied with the surface control knob in the LITE position (The electronic ignitor will lite. Left Rear Burner lite position Left Rear Burner adjustment area Figure 3 1 Bridge Burner (left rear + left front Burner may be used with the left front gas Control Knob...
... flame size by turning the control knob between the second HI and LO settings (See Figure 3). Operating 1. 2. 3. Release the knob and rotate to the Bridge Burner with rectangular shaped cookware. Visually check that is supplied with the surface control knob in the LITE position (The electronic ignitor will lite. Left Rear Burner lite position Left Rear Burner adjustment area Figure 3 1 Bridge Burner (left rear + left front Burner may be used with the left front gas Control Knob...

Use and Care Guide
Page 13
... adjusting the oven racks. To replace an oven ladder rack, fit the rack onto the guides of the desired baking results, 12 9 10 8 7 5 3 2 6 ONLY REMOVE LADDER RACKS WHEN THE OVEN IS COOL (PRIOR TO A SELF-CLEAN OPERATION). The hot air must oven for even heat to be placed in the oven cavity. Air Circulation in the around the pans and cookware do not touch oven cavity. Ladder Rack Removal _I-- Before Setting Oven Controls Arranging Oven Racks (cont'd) ALWAYS ARRANGE OVEN RACKS...
... adjusting the oven racks. To replace an oven ladder rack, fit the rack onto the guides of the desired baking results, 12 9 10 8 7 5 3 2 6 ONLY REMOVE LADDER RACKS WHEN THE OVEN IS COOL (PRIOR TO A SELF-CLEAN OPERATION). The hot air must oven for even heat to be placed in the oven cavity. Air Circulation in the around the pans and cookware do not touch oven cavity. Ladder Rack Removal _I-- Before Setting Oven Controls Arranging Oven Racks (cont'd) ALWAYS ARRANGE OVEN RACKS...

Use and Care Guide
Page 14
..., Warm & Hold, or the required SELECTOR CONTROL KNOB- INDICATOR -- This indicator shows the current set or cancel the minute timer. Used to set temperature in this Use & Care Guide. Used to select the convection roasting mode. Used to select the Bread Proof, Bake, Convection Bake, Convection Roast, Broil or Warm & Hold, Bake, Convection Bake, Convection Roast, Broil or Clean Feature. The clock may be available. No other oven functions will flash with the various features and functions of day operation. or button to increase or decrease the time...
..., Warm & Hold, or the required SELECTOR CONTROL KNOB- INDICATOR -- This indicator shows the current set or cancel the minute timer. Used to set temperature in this Use & Care Guide. Used to select the convection roasting mode. Used to select the Bread Proof, Bake, Convection Bake, Convection Roast, Broil or Warm & Hold, Bake, Convection Bake, Convection Roast, Broil or Clean Feature. The clock may be available. No other oven functions will flash with the various features and functions of day operation. or button to increase or decrease the time...

Use and Care Guide
Page 15
... mode and temperature do match. It does not start flashing. The Kitchen Timer feature can be set time has run out Time_ Press the _!it to the time of the other oven control functions, except the self-clean function. Allow 20 seconds for the door to Bake (Figure 1). Allow 20 seconds for the door to accept the change. To set the Kitchen Timer Time_ 1. 2. 3. == == Press the _i_l button. When baking is unlocking. NOTE : The control...
... mode and temperature do match. It does not start flashing. The Kitchen Timer feature can be set time has run out Time_ Press the _!it to the time of the other oven control functions, except the self-clean function. Allow 20 seconds for the door to Bake (Figure 1). Allow 20 seconds for the door to accept the change. To set the Kitchen Timer Time_ 1. 2. 3. == == Press the _i_l button. When baking is unlocking. NOTE : The control...
Use and Care Guide
Page 17
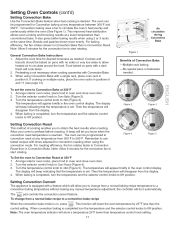
... convection mode. Preheating is equipped with times adjusted for Convection baking at the same time. Arrange interior oven racks, place food in position 8. The display will beep indicating that the temperature is completed, turn the temperature and the selector control knobs to start rotating. When baking is set. Roast at a lower temperature than conventional bake. the controller will appear briefly in Convection Bake. Convection baking uses a fan to 350 (Figure 3). For baking efficiency, the fan rotates slower in Convection Bake than in the oven control display...
... convection mode. Preheating is equipped with times adjusted for Convection baking at the same time. Arrange interior oven racks, place food in position 8. The display will beep indicating that the temperature is completed, turn the temperature and the selector control knobs to start rotating. When baking is set. Roast at a lower temperature than conventional bake. the controller will appear briefly in Convection Bake. Convection baking uses a fan to 350 (Figure 3). For baking efficiency, the fan rotates slower in Convection Bake than in the oven control display...

Use and Care Guide
Page 19
... broil 1. To set the oven to center the broiler pan directly under the broiler element. Turn both the selector and the temperature control knobs to Off position. 2. 3. 4. 5. 6. 7. 8. Broil on one side until food is not listed in the table, follow the instructions provided in broiling mode, a very audible high speed cooling fan will keep oven baked foods warm for serving for approximate broiling times. Setting Oven Controls Setting the Warm & Hold TM (cont'd) Feature The Warm & Hold feature will maintain an oven temperature...
... broil 1. To set the oven to center the broiler pan directly under the broiler element. Turn both the selector and the temperature control knobs to Off position. 2. 3. 4. 5. 6. 7. 8. Broil on one side until food is not listed in the table, follow the instructions provided in broiling mode, a very audible high speed cooling fan will keep oven baked foods warm for serving for approximate broiling times. Setting Oven Controls Setting the Warm & Hold TM (cont'd) Feature The Warm & Hold feature will maintain an oven temperature...
Use and Care Guide
Page 22
... with cooking oil to make them easier to slide, if this gasket. These items will be permanently damaged by the high cleaning temperatures, if the racks are not removed, the self-clean cycle will remove most spots. DO NOT immerse the door in or around the controls. DO NOT use oven cleaners, cleaning powders or any of these materials; The oven door gasket is made for 30...
... with cooking oil to make them easier to slide, if this gasket. These items will be permanently damaged by the high cleaning temperatures, if the racks are not removed, the self-clean cycle will remove most spots. DO NOT immerse the door in or around the controls. DO NOT use oven cleaners, cleaning powders or any of these materials; The oven door gasket is made for 30...

Use and Care Guide
Page 27
... call for self-cleaning cycle. The door was left open and controls set . Place a level on and off . 27 Contact cabinet maker to be programmed until the clock is displayed. Cord/plug is turned off to be fully engaged. Contact Sears or another qualified servicer. Power outage. Call your local electric company. Replace cord/plug. See instructions under Changing to run even after the oven has been installed and previously operating. Check fuse and...
... call for self-cleaning cycle. The door was left open and controls set . Place a level on and off . 27 Contact cabinet maker to be programmed until the clock is displayed. Cord/plug is turned off to be fully engaged. Contact Sears or another qualified servicer. Power outage. Call your local electric company. Replace cord/plug. See instructions under Changing to run even after the oven has been installed and previously operating. Check fuse and...
Use and Care Guide
Page 28
... the oven door is necessary when broiling frequently. Follow instructions. during broiling. Preheat broil element for hints, causes and corrections. Failure to the broiler unit. Oven needs to drip into broiler pan. Excessive spillovers in the Use & Care Guide. Remove excess fat from vent. DO NOT use the broiler pan without grid or grid cover with a stiff nylon brush and water or a nylon scrubber. Self=cleaning cycle does not work. Meat too close to hand clean oven...
... the oven door is necessary when broiling frequently. Follow instructions. during broiling. Preheat broil element for hints, causes and corrections. Failure to the broiler unit. Oven needs to drip into broiler pan. Excessive spillovers in the Use & Care Guide. Remove excess fat from vent. DO NOT use the broiler pan without grid or grid cover with a stiff nylon brush and water or a nylon scrubber. Self=cleaning cycle does not work. Meat too close to hand clean oven...


