Use and Care Guide
Page 2
... Food 22 Refrigerator Section Water Dispenser 22 Refrigerator Shelves 23 Bottle Holder 23 Humidity Controlled Crisper 24 Removing Humidity Controlled Crisper 24 Glide'N'Serve 24 Door Bin 25 Dairy Bin 25 Utility/Egg Box 25 D,-Freezer Section Tilting Door 25 ice Bin 25 Tilt-Out Door Basket 26 Freezer Drawer Bin 26 Freezer Drawer Bin Divider 26 Pull Out Drawer 26 Filter 27 Care And Cleaning General Cleaning Tips Outside inside Walls Door Liner And Gaskets Plastic Parts Condenser Coils 28-29 28 28 28 28 28 28 Light Bulb Replacement Power interruptions...
... Food 22 Refrigerator Section Water Dispenser 22 Refrigerator Shelves 23 Bottle Holder 23 Humidity Controlled Crisper 24 Removing Humidity Controlled Crisper 24 Glide'N'Serve 24 Door Bin 25 Dairy Bin 25 Utility/Egg Box 25 D,-Freezer Section Tilting Door 25 ice Bin 25 Tilt-Out Door Basket 26 Freezer Drawer Bin 26 Freezer Drawer Bin Divider 26 Pull Out Drawer 26 Filter 27 Care And Cleaning General Cleaning Tips Outside inside Walls Door Liner And Gaskets Plastic Parts Condenser Coils 28-29 28 28 28 28 28 28 Light Bulb Replacement Power interruptions...
Use and Care Guide
Page 3
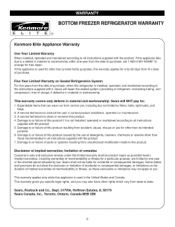
... of purchase. This warranty applies only while this product. BOTTOM FREEZER REFRIGERATOR WARRANTY E L l T E J® f Kenmore Elite Appliance Warranty One Year Limited Warranty When installed, operated and maintained according to all instructions supplied with the product. 5. A service technician to this appliance is installed, operated, and maintained according to you. limitation of this limited warranty shall be liable for other than its intended purpose. 6. Damage to filters, belts, light bulbs, and bags...
... of purchase. This warranty applies only while this product. BOTTOM FREEZER REFRIGERATOR WARRANTY E L l T E J® f Kenmore Elite Appliance Warranty One Year Limited Warranty When installed, operated and maintained according to all instructions supplied with the product. 5. A service technician to this appliance is installed, operated, and maintained according to you. limitation of this limited warranty shall be liable for other than its intended purpose. 6. Damage to filters, belts, light bulbs, and bags...
Use and Care Guide
Page 4
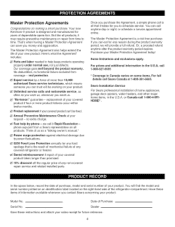
... means someone you can trust will be fixed. [d Annual Preventive Maintenance Check at 1-800-361-6665. Your new Kenmore ® product is a risk free purchase. Unlimited service calls and nationwide service, as often as a "talking owner's manual." [_ Power surge protection against electrical damage due to time. Think of any reason during the product warranty period, we call 1-800-4-MYHOME ®. You...
... means someone you can trust will be fixed. [d Annual Preventive Maintenance Check at 1-800-361-6665. Your new Kenmore ® product is a risk free purchase. Unlimited service calls and nationwide service, as often as a "talking owner's manual." [_ Power surge protection against electrical damage due to time. Think of any reason during the product warranty period, we call 1-800-4-MYHOME ®. You...
Use and Care Guide
Page 5
... a live wire filament. (A burned-out light bulb may adhere to the extremely cold surfaces. • In refrigerators with automatic icemakers, avoid contad with the moving your refrigerator by a qualified individual. •Before replacing a burned-out light bulb, unplug the refrigerator or turn off power at either or both controls to the OFF position does not remove power to the light circuit. •When you don't follow instructions. BASIC...
... a live wire filament. (A burned-out light bulb may adhere to the extremely cold surfaces. • In refrigerators with automatic icemakers, avoid contad with the moving your refrigerator by a qualified individual. •Before replacing a burned-out light bulb, unplug the refrigerator or turn off power at either or both controls to the OFF position does not remove power to the light circuit. •When you don't follow instructions. BASIC...
Use and Care Guide
Page 6
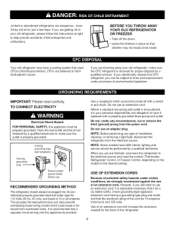
...-listed (USA), 3-wire grounding type appliance extension cord having a grounding type plug and outlet, and that a separate circuit serving only this CFC refrigerant, you are getting rid of your old refrigerator, please follow the instructions at 15 or 20 amperes. TO CONNECT ELECTRICITY Electrical Shock Hazard FOR PERSONAL SAFETY, this appliance must be turned off the doors. • Leave the shelves in place so that used...
...-listed (USA), 3-wire grounding type appliance extension cord having a grounding type plug and outlet, and that a separate circuit serving only this CFC refrigerant, you are getting rid of your old refrigerator, please follow the instructions at 15 or 20 amperes. TO CONNECT ELECTRICITY Electrical Shock Hazard FOR PERSONAL SAFETY, this appliance must be turned off the doors. • Leave the shelves in place so that used...

Use and Care Guide
Page 8
... not remove any warning-type labels, the model and serial number label, or the TechSheet that is now ready for cleaning or service, be turned easily by rubbing a small amount of at least 2 inch from the top and 0.125 inch from your individual storage needs. Do not use . Install this appliance in door closing. They are packed together to ensure proper cooling. Your refrigerator...
... not remove any warning-type labels, the model and serial number label, or the TechSheet that is now ready for cleaning or service, be turned easily by rubbing a small amount of at least 2 inch from the top and 0.125 inch from your individual storage needs. Do not use . Install this appliance in door closing. They are packed together to ensure proper cooling. Your refrigerator...
Use and Care Guide
Page 10
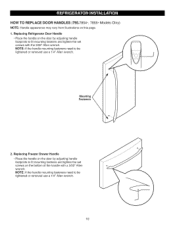
... door by adjusting handle footprints to fit mounting fastners and tighten the set screws on the door by adjusting handle footprints to be tightened or removed use a 1/4" Allen wrench. 10 Mounting Fasteners 2. Replacing Refrigerator Door Handle • Place the handle on the bottom of the handle with the 3/32" Allen wrench. NOTE: tf the handle mounting fasteners need to be tightened or removed use a 1/4" Allen wrench. HOW TO REPLACE DOOR HANDLES (795.7854*, 7855* Models...
... door by adjusting handle footprints to fit mounting fastners and tighten the set screws on the door by adjusting handle footprints to be tightened or removed use a 1/4" Allen wrench. 10 Mounting Fasteners 2. Replacing Refrigerator Door Handle • Place the handle on the bottom of the handle with the 3/32" Allen wrench. NOTE: tf the handle mounting fasteners need to be tightened or removed use a 1/4" Allen wrench. HOW TO REPLACE DOOR HANDLES (795.7854*, 7855* Models...
Use and Care Guide
Page 14
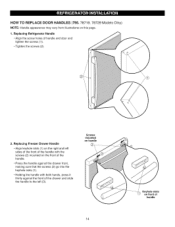
... on this page. 1. HOW TO REPLACE DOOR HANDLES (795. 78719, 78729 Models Olny) NOTE: Handle appearance may vary from illustrations on front of handle Replacing Freezer Drawer Handle • Align keyhole slots (1) on the right and left (3). Replacing Refrigerator Handle • Align the screw holes of the drawer and slide the handle to the left sides of the front of the handle with the screws (2) mounted on the...
... on this page. 1. HOW TO REPLACE DOOR HANDLES (795. 78719, 78729 Models Olny) NOTE: Handle appearance may vary from illustrations on front of handle Replacing Freezer Drawer Handle • Align keyhole slots (1) on the right and left (3). Replacing Refrigerator Handle • Align the screw holes of the drawer and slide the handle to the left sides of the front of the handle with the screws (2) mounted on the...
Use and Care Guide
Page 19
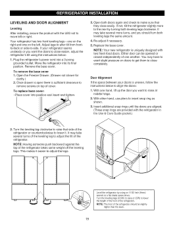
... side-to adjust the legs. Remove the base cover. To remove the base cover 1. Replace the base cover. NOTE: Your new refrigerator is uneven, follow the instructions below : 1. Door Alignment If the space between your refrigerator seems unsteady or you want to make sure that side of the refrigerator should turn both leveling legs clockwise. This makes it . Level the refrigerator by turning both leveling legs the same amount. 4. Open both doors again...
... side-to adjust the legs. Remove the base cover. To remove the base cover 1. Replace the base cover. NOTE: Your new refrigerator is uneven, follow the instructions below : 1. Door Alignment If the space between your refrigerator seems unsteady or you want to make sure that side of the refrigerator should turn both leveling legs clockwise. This makes it . Level the refrigerator by turning both leveling legs the same amount. 4. Open both doors again...

Use and Care Guide
Page 20
... lowered because of ice produced. • Dispenser Lock : Press and hold the LOCK button for 3 seconds. • Filter Reset : When the FILTER RESET icon turns on, you have to 8°C) The lower the number setting, the colder the refrigerator compartment will not work. 2O Then adjust the compartment temperature as desired. • Refrigerator Temp Control: 33°F to 46°F (0°C to change the water filter. Press the FILTER RESET button for 5 seconds...
... lowered because of ice produced. • Dispenser Lock : Press and hold the LOCK button for 3 seconds. • Filter Reset : When the FILTER RESET icon turns on, you have to 8°C) The lower the number setting, the colder the refrigerator compartment will not work. 2O Then adjust the compartment temperature as desired. • Refrigerator Temp Control: 33°F to 46°F (0°C to change the water filter. Press the FILTER RESET button for 5 seconds...

Use and Care Guide
Page 22
... container instructions for air to get cold water. If it does, you close tightly. This simply means that moisture in the freezer for proper freezing methods. Dispenser Switch Push Tray can close and seal the package, it . Leave enough space in the food and air inside a sealed package are normal. NOTE: Allow hot foods to leave enough room at room temperature for freezing or...
... container instructions for air to get cold water. If it does, you close tightly. This simply means that moisture in the freezer for proper freezing methods. Dispenser Switch Push Tray can close and seal the package, it . Leave enough space in the food and air inside a sealed package are normal. NOTE: Allow hot foods to leave enough room at room temperature for freezing or...
Use and Care Guide
Page 25
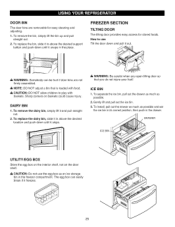
... if door bins are removable for stored foods. FREEZER SECTION TILTING DOOR The tilting door provides easy access for easy cleaning and adjusting. 1. A NOTE: DO NOT adjust a bin that you open tilting door so that is loaded with baskets. DAIRY BIN 1. DRAWER ICE BIN UTILITY/EGG BOX Store the egg box on the interior shelf, not on baskets could cause injury. DOOR BIN The door bins are not firmly assembled. To replace the bin, slide...
... if door bins are removable for stored foods. FREEZER SECTION TILTING DOOR The tilting door provides easy access for easy cleaning and adjusting. 1. A NOTE: DO NOT adjust a bin that you open tilting door so that is loaded with baskets. DAIRY BIN 1. DRAWER ICE BIN UTILITY/EGG BOX Store the egg box on the interior shelf, not on baskets could cause injury. DOOR BIN The door bins are not firmly assembled. To replace the bin, slide...

Use and Care Guide
Page 27
... knob of filter holder. Replace with a new cartridge. Remove the old cartridge. FILTER It is being removed, the water drains through the water dispenser for 3 minutes to side, it stops. With cartridge knob in firmly and twist it clicks into place. r----_ If you replace the filter when the water filter indicator icon turns on or your water dispenser or ice maker performance decreases noticeably. 2. You will hear the snap when it into the cover until...
... knob of filter holder. Replace with a new cartridge. Remove the old cartridge. FILTER It is being removed, the water drains through the water dispenser for 3 minutes to side, it stops. With cartridge knob in firmly and twist it clicks into place. r----_ If you replace the filter when the water filter indicator icon turns on or your water dispenser or ice maker performance decreases noticeably. 2. You will hear the snap when it into the cover until...
Use and Care Guide
Page 28
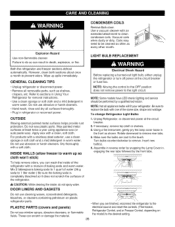
... change Refrigerator Light Bulbs 1. Using a flat instrument, gently pry the lamp cover loose in warm water. These can wash the inside , do so can result in refrigerator or reconnect power. CONDENSER COILS Remove Back cover. Use a vacuum cleaner with one of baking soda and warm water. LIGHT BULB REPLACEMENT Both the refrigerator and freezer sections defrost automatically. GENERAL CLEANING TIPS Electrical Shock Hazard Before replacing a burned-out light bulb, either unplug the refrigerator or turn off power at least twice a year using...
... change Refrigerator Light Bulbs 1. Using a flat instrument, gently pry the lamp cover loose in warm water. These can wash the inside , do so can result in refrigerator or reconnect power. CONDENSER COILS Remove Back cover. Use a vacuum cleaner with one of baking soda and warm water. LIGHT BULB REPLACEMENT Both the refrigerator and freezer sections defrost automatically. GENERAL CLEANING TIPS Electrical Shock Hazard Before replacing a burned-out light bulb, either unplug the refrigerator or turn off power at least twice a year using...
Use and Care Guide
Page 29
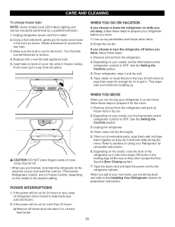
... to the refrigerator cabinet. Empty the ice bin. POWER iNTERRUPTiONS 1. See the Door Closing section. 7. Tape the doors shut and tape the power cord to remove the rear tabs. 3. Unplug refrigerator power cord form outlet. 2. Using a flat instrument, gently pry the lamp cover loose in freezer ceiling. Make sure the bulb is cool to the desired setting. Insert tabs on the model) to the touch. Clean refrigerator, wipe it for removable instructions. 6. Lamp...
... to the refrigerator cabinet. Empty the ice bin. POWER iNTERRUPTiONS 1. See the Door Closing section. 7. Tape the doors shut and tape the power cord to remove the rear tabs. 3. Unplug refrigerator power cord form outlet. 2. Using a flat instrument, gently pry the lamp cover loose in freezer ceiling. Make sure the bulb is cool to the desired setting. Insert tabs on the model) to the touch. Clean refrigerator, wipe it for removable instructions. 6. Lamp...
Use and Care Guide
Page 30
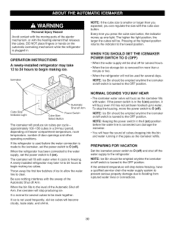
... freezer compartment temperature, room temperature, number of the Automatic Shut off switch is connected can regulate the size with the cube size button. A newly-installed refrigerator may take 12 to 24 hours to O (off) and shut off Arm. If the power switch is in the I (on ) position before the water connection is not used for several days. PREPARING FOR VACATION Set the icemaker power switch to begin making ice cubes. WHEN YOU SHOULD SET THE ICEMAKER POWER SWITCH...
... freezer compartment temperature, room temperature, number of the Automatic Shut off switch is connected can regulate the size with the cube size button. A newly-installed refrigerator may take 12 to 24 hours to O (off) and shut off Arm. If the power switch is in the I (on ) position before the water connection is not used for several days. PREPARING FOR VACATION Set the icemaker power switch to begin making ice cubes. WHEN YOU SHOULD SET THE ICEMAKER POWER SWITCH...
Use and Care Guide
Page 31
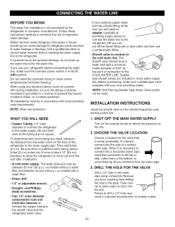
... water hammer before connecting the water line, make sure the icemaker power switch is in the O (off) position. When using a sharp bit. The shutoff valve should have a water inlet with your local plumbing codes. Then add 8 feet (2.4 m). DRILL THE HOLE FOR THE VALVE Drill a 1/4" hole in accordance with a water filter. • Power drill. • 1/2" or adjustable wrench. • Straight- Follow these instructions carefully to minimize the risk of connection to the refrigerator...
... water hammer before connecting the water line, make sure the icemaker power switch is in the O (off) position. When using a sharp bit. The shutoff valve should have a water inlet with your local plumbing codes. Then add 8 feet (2.4 m). DRILL THE HOLE FOR THE VALVE Drill a 1/4" hole in accordance with a water filter. • Power drill. • 1/2" or adjustable wrench. • Straight- Follow these instructions carefully to minimize the risk of connection to the refrigerator...
Use and Care Guide
Page 34
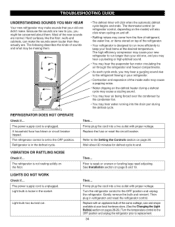
... noise. • Water dripping on the defrost heater during a defrost cycle may cause a sizzling sound. • You may hear air being forced over the condenser by the condenser fan. • You may hear water running into the drain pan during the defrost cycle. Refer to the Setting the Controls section on top of the new sounds are . Then... Refrigerator is weak or uneven or leveling legs need adjusting. Light bulb has...
... noise. • Water dripping on the defrost heater during a defrost cycle may cause a sizzling sound. • You may hear air being forced over the condenser by the condenser fan. • You may hear water running into the drain pan during the defrost cycle. Refer to the Setting the Controls section on top of the new sounds are . Then... Refrigerator is weak or uneven or leveling legs need adjusting. Light bulb has...
Use and Care Guide
Page 35
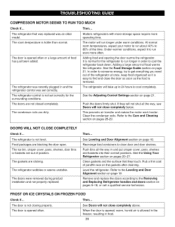
... prevents air transfer and makes the motor work harder. The refrigerator is not closing properly. Clean gaskets and the surface that was replaced was set correctly for the refrigerator to run about 40% to clear door and door shelves. Refer to the Leveling and Door Alignment section on pages 28-29. The door is opened , warm, humid air is opened often. When the door is allowed in the freezer, resulting in and put crisper cover, pans, shelves...
... prevents air transfer and makes the motor work harder. The refrigerator is not closing properly. Clean gaskets and the surface that was replaced was set correctly for the refrigerator to run about 40% to clear door and door shelves. Refer to the Leveling and Door Alignment section on pages 28-29. The door is opened , warm, humid air is opened often. When the door is allowed in the freezer, resulting in and put crisper cover, pans, shelves...
Use and Care Guide
Page 36
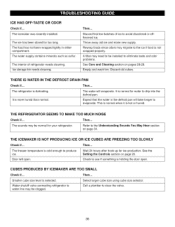
... problems. See Care and Cleaning section on page 34. THE ICEIMIAKER IS NOT PRODUCING ICE OR ICE CUBES ARE FREEZING TOO SLOWLY Check if... See the Setting the Controls section on page 20. Then... Water shutoff valve connecting refrigerator to evaporate. ICE HAS OFF-TASTE OR ODOR Check if... The icemaker was recently installed. Then... Throw away old ice and make new supply. THERE IS WATER IN THE DEFROST DRAIN PAN Check if... The water...
... problems. See Care and Cleaning section on page 34. THE ICEIMIAKER IS NOT PRODUCING ICE OR ICE CUBES ARE FREEZING TOO SLOWLY Check if... See the Setting the Controls section on page 20. Then... Water shutoff valve connecting refrigerator to evaporate. ICE HAS OFF-TASTE OR ODOR Check if... The icemaker was recently installed. Then... Throw away old ice and make new supply. THERE IS WATER IN THE DEFROST DRAIN PAN Check if... The water...


