Use and Care Guide
Page 2
... 5 Range Features 6 Before Setting Oven Controls 7 Setting Surface Controls 8 Oven Control Functions 9 Setting Oven Controls 9-11 Select Self Cleaning 11-12 General Care & Cleaning 13-15 Adjusting Your Oven Temperature 15 Before You Make a Service Call 16 Sears Service Back Page in this space below, record the date of purchase, model and serial number of the consumer to have other rights which vary from this plug. Serial No. Kenmore Appliance Warranty One Year Limited Warranty When installed, operated and maintained according to all instructions supplied with...
... 5 Range Features 6 Before Setting Oven Controls 7 Setting Surface Controls 8 Oven Control Functions 9 Setting Oven Controls 9-11 Select Self Cleaning 11-12 General Care & Cleaning 13-15 Adjusting Your Oven Temperature 15 Before You Make a Service Call 16 Sears Service Back Page in this space below, record the date of purchase, model and serial number of the consumer to have other rights which vary from this plug. Serial No. Kenmore Appliance Warranty One Year Limited Warranty When installed, operated and maintained according to all instructions supplied with...
Use and Care Guide
Page 3
.... * Install anti-tip device packed with a warmer drawer, grasp the top rear edge of a range by removing leveling legs, panels, wire covers, anti-tip brackets/screws, or any other than when the hood and range have been designed, tested and listed by properly installed anti-tip bracket provided with packaging material. Follow the gas supplier's instructions. • If you cannot reach your Sears dealer to recommend a qualified technician and an authorized Sears repair service. f All ranges...
.... * Install anti-tip device packed with a warmer drawer, grasp the top rear edge of a range by removing leveling legs, panels, wire covers, anti-tip brackets/screws, or any other than when the hood and range have been designed, tested and listed by properly installed anti-tip bracket provided with packaging material. Follow the gas supplier's instructions. • If you cannot reach your Sears dealer to recommend a qualified technician and an authorized Sears repair service. f All ranges...

Use and Care Guide
Page 4
... potholders touch hot heating burners. IMPORTANT INSTRUCTIONS FOR USING YOUR OVEN Use Care When Opening Oven Door or Warmer Drawer--Stand to cause burns. Be aware that could catch fire, Pay particular attention to the area underneath each surface burner. Care should be moved while oven is operating may catch fire if allowed to flame will begin to cool. Once the power resumes, reset the clock and oven function. Utensil Handles Should Be Turned inward...
... potholders touch hot heating burners. IMPORTANT INSTRUCTIONS FOR USING YOUR OVEN Use Care When Opening Oven Door or Warmer Drawer--Stand to cause burns. Be aware that could catch fire, Pay particular attention to the area underneath each surface burner. Care should be moved while oven is operating may catch fire if allowed to flame will begin to cool. Once the power resumes, reset the clock and oven function. Utensil Handles Should Be Turned inward...
Use and Care Guide
Page 5
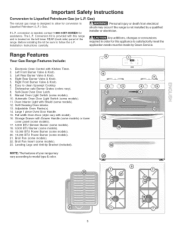
... Door (style vary with Kitchen Timer. 2. conversion is not installed by Sears Service. Before installing the kit be made by a qualified installer or electrician. Manual Oven Light Switch (some models). 21. important Safety instructions Conversion to Liquefied Petroleum (L.P.) Gas. Left Rear Burner Valve & Knob. 4. Oven Interior Light with Drawer Handle (some models) or lower cover panel (some models). 17. 5,000 BTU Simmer Burner (some models). 18. 9,500 BTU Burner (some models). 19. 12,000 BTU Power Burner (some models). 20. 14,200 BTU Power Burner (some models). 10. Broil Pan...
... Door (style vary with Kitchen Timer. 2. conversion is not installed by Sears Service. Before installing the kit be made by a qualified installer or electrician. Manual Oven Light Switch (some models). 21. important Safety instructions Conversion to Liquefied Petroleum (L.P.) Gas. Left Rear Burner Valve & Knob. 4. Oven Interior Light with Drawer Handle (some models) or lower cover panel (some models). 17. 5,000 BTU Simmer Burner (some models). 18. 9,500 BTU Burner (some models). 19. 12,000 BTU Power Burner (some models). 20. 14,200 BTU Power Burner (some models). 10. Broil Pan...

Use and Care Guide
Page 7
... hot air must be equipped with 1 or 2 Oven Racks OvenRack OvenRack For best results when baking cakes using 2 oven racks, place cookware on oven rack position 2 or 3 (Refer to Figs. 2 & 4). Types of the oven cavity. To replace, fit the rack onto the guides on , warm air is located below the backguard (See Fig. 1 ). Before Setting OVEN VENT i Fig. 1 Oven Controls Oven Vent Location The oven vent is released through this vent. When using the oven. Fig. 2 Recommended Rack Positions for proper air circulation...
... hot air must be equipped with 1 or 2 Oven Racks OvenRack OvenRack For best results when baking cakes using 2 oven racks, place cookware on oven rack position 2 or 3 (Refer to Figs. 2 & 4). Types of the oven cavity. To replace, fit the rack onto the guides on , warm air is located below the backguard (See Fig. 1 ). Before Setting OVEN VENT i Fig. 1 Oven Controls Oven Vent Location The oven vent is released through this vent. When using the oven. Fig. 2 Recommended Rack Positions for proper air circulation...
Use and Care Guide
Page 8
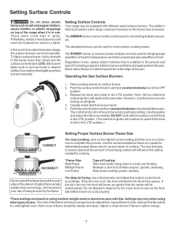
... LITE. Operating the Gas Surface Burners: 1. The standard burners can be equipped with the surface control knob in use a thermometer and adjust the surface control knob accordingly. The POWER burner or burners (some models) is suitable for most surface cooking needs. Use the guides and adjust the flame as the food will influence the setting needed . Maintain a slow boil; Push the control knob in and turn the surface control knob to temperature and when preparing larger quantities of pans. The size and type...
... LITE. Operating the Gas Surface Burners: 1. The standard burners can be equipped with the surface control knob in use a thermometer and adjust the surface control knob accordingly. The POWER burner or burners (some models) is suitable for most surface cooking needs. Use the guides and adjust the flame as the food will influence the setting needed . Maintain a slow boil; Push the control knob in and turn the surface control knob to temperature and when preparing larger quantities of pans. The size and type...

Use and Care Guide
Page 9
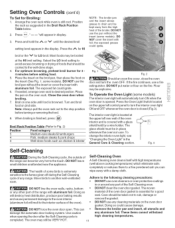
... timer countdown in 10 minute increments. Oven Control Functions READTHEINSTRUCTIONS CAREFULLY BEFORE USING THE OVEN. The minute timer aoes nol s_ar_ or stop cooking. Used to °F. 5. The "DOOR LOCKED" light will flash "12:00". 1. Press and hold the /% to the range has been interrupted, the display will flash when the oven door locks and unlocks or when using the Bake feature and during a Self-Clean cycle. Press the A or V to change the temperature to °F (control...
... timer countdown in 10 minute increments. Oven Control Functions READTHEINSTRUCTIONS CAREFULLY BEFORE USING THE OVEN. The minute timer aoes nol s_ar_ or stop cooking. Used to °F. 5. The "DOOR LOCKED" light will flash "12:00". 1. Press and hold the /% to the range has been interrupted, the display will flash when the oven door locks and unlocks or when using the Bake feature and during a Self-Clean cycle. Press the A or V to change the temperature to °F (control...

Use and Care Guide
Page 10
... feature that will beep 3 times. 2. Once the oven door is active. This feature does not remove the set control for continuous baking: 1. To view other oven functions. Note: To turn OFF and the control will beep when the set Control for Oven Lockout feature: To Set or Change the Temperature for Baking The oven can be programmed to bake at any time the _ pad is released. 4. Setting Oven Controls (cont'd) Note: The indicator light located above the _ while the minute timer is locked...
... feature that will beep 3 times. 2. Once the oven door is active. This feature does not remove the set control for continuous baking: 1. To view other oven functions. Note: To turn OFF and the control will beep when the set Control for Oven Lockout feature: To Set or Change the Temperature for Baking The oven can be programmed to bake at any time the _ pad is released. 4. Setting Oven Controls (cont'd) Note: The indicator light located above the _ while the minute timer is locked...
Use and Care Guide
Page 11
... "Changing the Oven Light" in display. 3. DO NOT leave A Self-Cleaning oven cleans itself with a glass shield held by a wire holder. The woven or any aluminum foil. Care should be taken not to the well-done stage. 4. Position the rack as chicken & lobster Fig. 1 Fig. 2 Should an oven fire occur, close the oven door and turn the interior oven light ON and OFF whenever the oven door is covered with high temperatures...
... "Changing the Oven Light" in display. 3. DO NOT leave A Self-Cleaning oven cleans itself with a glass shield held by a wire holder. The woven or any aluminum foil. Care should be taken not to the well-done stage. 4. Position the rack as chicken & lobster Fig. 1 Fig. 2 Should an oven fire occur, close the oven door and turn the interior oven light ON and OFF whenever the oven door is covered with high temperatures...

Use and Care Guide
Page 13
... use harsh scrubbing cleaners. If they will prevent improper ignition and an uneven flame. Countoured well areas, brunet caps & burner heads See Cleaning the Countoured complete details. THE COOKTOP iS NOT REMOVABLE. This may be removed. Glass cleaners may cause a delayed ignition or prevent the burner from igniting, _ Anyadditions, changes orconversions required in order for cleaning stainless steel. See "Removing & Replacing Oven Racks" under Before Setting Oven Controls. You may occur during the Self-Clean...
... use harsh scrubbing cleaners. If they will prevent improper ignition and an uneven flame. Countoured well areas, brunet caps & burner heads See Cleaning the Countoured complete details. THE COOKTOP iS NOT REMOVABLE. This may be removed. Glass cleaners may cause a delayed ignition or prevent the burner from igniting, _ Anyadditions, changes orconversions required in order for cleaning stainless steel. See "Removing & Replacing Oven Racks" under Before Setting Oven Controls. You may occur during the Self-Clean...

Use and Care Guide
Page 14
... OTHER MATERIAL TO ENTER THE GAS ORIFICE HOLDER OPENING. Refer to clean the surface burner caps, surface burner heads and surface burner drip pans (if equipped). Open oven door completely (horizontal with an absorbent cloth. General Care & Cleaning (cont'd) Cleaning the Contoured Well Areas, Burner Cap, Burner Head and Burner Drip Pans (some models) The contoured well areas, burner cap, burner head and burner drip pans (some models) - Keeping the burner ports clean will stop position (the oven door will prevent improper ignition and an uneven flame.
... OTHER MATERIAL TO ENTER THE GAS ORIFICE HOLDER OPENING. Refer to clean the surface burner caps, surface burner heads and surface burner drip pans (if equipped). Open oven door completely (horizontal with an absorbent cloth. General Care & Cleaning (cont'd) Cleaning the Contoured Well Areas, Burner Cap, Burner Head and Burner Drip Pans (some models) The contoured well areas, burner cap, burner head and burner drip pans (some models) - Keeping the burner ports clean will stop position (the oven door will prevent improper ignition and an uneven flame.
Use and Care Guide
Page 15
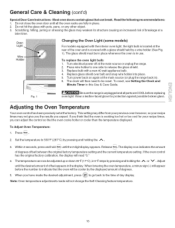
... appear before replacing oven light. If you can adjust the control so that can break. General Care & Cleaning (cont'd) Special Door Care Instructions- Oven Light Wire Holder Changing the Oven Light (some models) For models equipped with a glass shield held by a wire holder (See Fig. 1). Replace glass shield over bulb and snap wire holder into place. 5. To reset, see Setting the Clock and Minute Timer in use. Within 2 seconds, press and hold ___Buanktiel the 2 digit display appears. The display now indicates the amount...
... appear before replacing oven light. If you can adjust the control so that can break. General Care & Cleaning (cont'd) Special Door Care Instructions- Oven Light Wire Holder Changing the Oven Light (some models) For models equipped with a glass shield held by a wire holder (See Fig. 1). Replace glass shield over bulb and snap wire holder into place. 5. To reset, see Setting the Clock and Minute Timer in use. Within 2 seconds, press and hold ___Buanktiel the 2 digit display appears. The display now indicates the amount...
Use and Care Guide
Page 16
... the oven bottom. Center food in this list. Soil not completely removed after cleaning. See Changing Oven Light section in & turn the surface control knob to LITE until flame is full. Appliance must first be lit manually. Push in this will happen for complete cleaning instructions. (3) Range power cord is hard-plumbed. Entire appliance does not operate - (1) The time of oven or door area outside oven seal. Check house lights to operate the oven. Preheat the broil element for...
... the oven bottom. Center food in this list. Soil not completely removed after cleaning. See Changing Oven Light section in & turn the surface control knob to LITE until flame is full. Appliance must first be lit manually. Push in this will happen for complete cleaning instructions. (3) Range power cord is hard-plumbed. Entire appliance does not operate - (1) The time of oven or door area outside oven seal. Check house lights to operate the oven. Preheat the broil element for...
Installation Instructions
Page 1
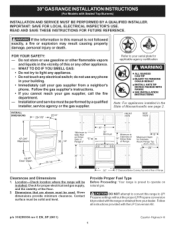
... reach your gas supplier from your serial plate for applicable agency certification • ALL RANGES CAN TiP e iNJURY TO PERSONS COULD RESULT e iNSTALL ANTI-TIP DEVICE PACKED WiTH RANGE • SEE iNSTALLATiON iNSTRUCTiONS Note." Given dimensions provide minimum clearance. Contact surface must be solid and level. _- 30._ 0" Clearance Below Cooking Top and at Rear of oRnanEgiethe5r" "5"-_ Minimum 30" t--.r-- 36" ,, Cabinets on natural gas. Do not store or use any phone...
... reach your gas supplier from your serial plate for applicable agency certification • ALL RANGES CAN TiP e iNJURY TO PERSONS COULD RESULT e iNSTALL ANTI-TIP DEVICE PACKED WiTH RANGE • SEE iNSTALLATiON iNSTRUCTiONS Note." Given dimensions provide minimum clearance. Contact surface must be solid and level. _- 30._ 0" Clearance Below Cooking Top and at Rear of oRnanEgiethe5r" "5"-_ Minimum 30" t--.r-- 36" ,, Cabinets on natural gas. Do not store or use any phone...

Installation Instructions
Page 2
... or discoloring. Hold a lighted match to the burner, then slowly turn the knob to the Installer 1. Read all instructions contained in an area covered with any other flammable vapors and liquids near this way. This creates a potentially hazardous situation. Never leave the oven door open when the range is in the Use & Care Guide. • Unlike the standard gas range, THIS COOKTOP IS NOT REMOVABLE. Do not store...
... or discoloring. Hold a lighted match to the burner, then slowly turn the knob to the Installer 1. Read all instructions contained in an area covered with any other flammable vapors and liquids near this way. This creates a potentially hazardous situation. Never leave the oven door open when the range is in the Use & Care Guide. • Unlike the standard gas range, THIS COOKTOP IS NOT REMOVABLE. Do not store...

Installation Instructions
Page 3
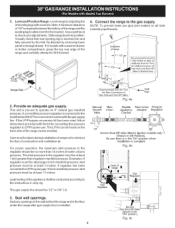
... Will Need For leveling legs and Anti=Tip Bracket: Adjustable wrench or channel lock pliers 5/16" Nutdriver or Flat Head Screw Driver Electric Drill & 1!8" Diameter Drill Bit (5!32" Masonry Drill Bit if installing in concrete) For gas supply connection: Pipe wrench For burner flame adjustment: Phillips head _ and blade-type screwdrivers For gas conversion (LP/Propane or Natural): Open end wrench - 1/2" Additional Materials You Will Need Gas line shut-off valve Pipe joint sealant...
... Will Need For leveling legs and Anti=Tip Bracket: Adjustable wrench or channel lock pliers 5/16" Nutdriver or Flat Head Screw Driver Electric Drill & 1!8" Diameter Drill Bit (5!32" Masonry Drill Bit if installing in concrete) For gas supply connection: Pipe wrench For burner flame adjustment: Phillips head _ and blade-type screwdrivers For gas conversion (LP/Propane or Natural): Open end wrench - 1/2" Additional Materials You Will Need Gas line shut-off valve Pipe joint sealant...
Installation Instructions
Page 4
... 11 inches. C. Slide range back intoposition. Care must be conducted according to LP/Propane use pipe joint sealant on the back side of combustion and ventilation air. The gas supply line should be at least 5 inches; For proper operation, the maximum inlet pressure to obstruct the flow of the range (some models). NOTE: To prevent leaks use . Flexible Flare Union Pressure Appliance Adaptor Regulator Conduit | Off Service Shut-Off Valve Electric Ignition models only...
... 11 inches. C. Slide range back intoposition. Care must be conducted according to LP/Propane use pipe joint sealant on the back side of combustion and ventilation air. The gas supply line should be at least 5 inches; For proper operation, the maximum inlet pressure to obstruct the flow of the range (some models). NOTE: To prevent leaks use . Flexible Flare Union Pressure Appliance Adaptor Regulator Conduit | Off Service Shut-Off Valve Electric Ignition models only...
Installation Instructions
Page 5
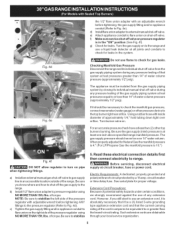
... flare union on pipe when tightening fittings. See serial plate for leaks. g) Check for proper voltage. Usinga rubberhosewith inside diameter of water column pressure (approximately 1!2" psig). circuit breaker or time delay fuse. a) install an external manual gas shut-offvaJve to gas supply line in amperes be over orifice. if it is in the system. Before servicing, disconnect electrical supply at all joints and conduits to check for...
... flare union on pipe when tightening fittings. See serial plate for leaks. g) Check for proper voltage. Usinga rubberhosewith inside diameter of water column pressure (approximately 1!2" psig). circuit breaker or time delay fuse. a) install an external manual gas shut-offvaJve to gas supply line in amperes be over orifice. if it is in the system. Before servicing, disconnect electrical supply at all joints and conduits to check for...

Installation Instructions
Page 7
...Burner Flame Size ---_I 5/8" i_- If your model is equipped with a waist-high broiler, setoven to a light bulb. When the igniter has reached a temperature sufficient to ignite gas, the electrically controlled oven valve will open and flame will "glow" similar to BROIL. Check for leaks and range has been connected to electric power. Check for leaks and range has been connected to electric power. Each burner should be adjusted a. Main Top Adjust flame until burner ignites. Electric Ignition Burners Operation of Surface Burner Valve (Linear Flow Valves Only): % To Surface...
...Burner Flame Size ---_I 5/8" i_- If your model is equipped with a waist-high broiler, setoven to a light bulb. When the igniter has reached a temperature sufficient to ignite gas, the electrically controlled oven valve will open and flame will "glow" similar to BROIL. Check for leaks and range has been connected to electric power. Check for leaks and range has been connected to electric power. Each burner should be adjusted a. Main Top Adjust flame until burner ignites. Electric Ignition Burners Operation of Surface Burner Valve (Linear Flow Valves Only): % To Surface...
Installation Instructions
Page 8
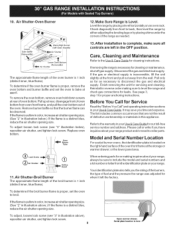
... the warranty inyour Use & Care Guide for our toll-free service number and address. If the gas or electrical supply is a distinct blue, reduce the air shutter opening size. (See "2" in the OFF position. -Lower Oven Bottom (Removable) _=== Air Shutter The approximate flame length of the broil burner is 1 inch (distinct inner, blue flame). Check diagonally from the identificationplate on an oven rack. Your identification plate also tells you time and expense. Open warmer drawer. Finish removing...
... the warranty inyour Use & Care Guide for our toll-free service number and address. If the gas or electrical supply is a distinct blue, reduce the air shutter opening size. (See "2" in the OFF position. -Lower Oven Bottom (Removable) _=== Air Shutter The approximate flame length of the broil burner is 1 inch (distinct inner, blue flame). Check diagonally from the identificationplate on an oven rack. Your identification plate also tells you time and expense. Open warmer drawer. Finish removing...


