
Use and Care Guide
Page 2
... Circulation 16 Using A Ice Room 17 Adjusting Control Settings 18 Food Storage Guide 18 Storing Frozen Food 19 Refrigerator Section Water Dispenser 19 Refrigerator Shelves 20 Bottle Holder 20 Snack Pan 21 Crisper Humidity Control 21 Removing and Replacing Components 21 Modular Door ...D,-Freezer Section Tilting Door 22 Tilt-Out Door Basket 22 Extra ice Bin 22 Durabase 23 Durabase Divider 23 Pull Out Drawer 23 Filter 24 Care And Cleaning General Cleaning Tips Outside Inside Walls Door Liner And Gaskets Plastic Parts Condenser Coils 25-26 25 25 25 25 25 25 ...
... Circulation 16 Using A Ice Room 17 Adjusting Control Settings 18 Food Storage Guide 18 Storing Frozen Food 19 Refrigerator Section Water Dispenser 19 Refrigerator Shelves 20 Bottle Holder 20 Snack Pan 21 Crisper Humidity Control 21 Removing and Replacing Components 21 Modular Door ...D,-Freezer Section Tilting Door 22 Tilt-Out Door Basket 22 Extra ice Bin 22 Durabase 23 Durabase Divider 23 Pull Out Drawer 23 Filter 24 Care And Cleaning General Cleaning Tips Outside Inside Walls Door Liner And Gaskets Plastic Parts Condenser Coils 25-26 25 25 25 25 25 25 ...
Use and Care Guide
Page 3
...warranty gives you specific legal rights, and you may not apply to you. Sears will repair the sealed system (consisting of refrigerant, connecting tubing, and compressor), free of merchantability or fitness, so these exclusions or limitations may also have other than private family... from the date of detergents, cleaners, chemicals or utensils other than those recommended in material and workmanship. BOTTOM FREEZER REFRIGERATOR WARRANTY J® f Kenmore Appliance Warranty One Year Limited Warranty When installed, operated and maintained according to all instructions supplied with the...
...warranty gives you specific legal rights, and you may not apply to you. Sears will repair the sealed system (consisting of refrigerant, connecting tubing, and compressor), free of merchantability or fitness, so these exclusions or limitations may also have other than private family... from the date of detergents, cleaners, chemicals or utensils other than those recommended in material and workmanship. BOTTOM FREEZER REFRIGERATOR WARRANTY J® f Kenmore Appliance Warranty One Year Limited Warranty When installed, operated and maintained according to all instructions supplied with the...
Use and Care Guide
Page 4
Your new Kenmore ® product is the result of mechanical failure of any food spoilage that it may require preventive maintenance or repair from time to time. But like all products, it takes for any covered refrigerator or freezer. [_ Rental reimbursement if repair of your product. The...full details call it Rapid Resolution phone sup-port from coverage-- Have these instructions and attach your sales receipt for years of the refrigerator compartment. Date of Purchase Dealer Save these items of your new product. No deductibles, no extra charge. [d Fast help keep ...
Your new Kenmore ® product is the result of mechanical failure of any food spoilage that it may require preventive maintenance or repair from time to time. But like all products, it takes for any covered refrigerator or freezer. [_ Rental reimbursement if repair of your product. The...full details call it Rapid Resolution phone sup-port from coverage-- Have these instructions and attach your sales receipt for years of the refrigerator compartment. Date of Purchase Dealer Save these items of your new product. No deductibles, no extra charge. [d Fast help keep ...
Use and Care Guide
Page 5
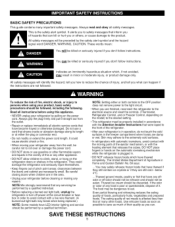
... that have thawed if they still contain ice crystals or if they are finished, reconnect the refrigerator to the electrical source and reset the controls. (Thermostat, Refrigerator Control, and or Freezer Control, depending on the model) to the product. It alerts you to roll over or ... word DANGER, WARNING, CAUTION. clearances between the doors and cabinet are in the area. • Unplug your refrigerator before using your refrigerator is plugged in the freezer compartment when hands are not followed, To reduce the risk of many important safety messages. NOTE:We strongly recommend ...
... that have thawed if they still contain ice crystals or if they are finished, reconnect the refrigerator to the electrical source and reset the controls. (Thermostat, Refrigerator Control, and or Freezer Control, depending on the model) to the product. It alerts you to roll over or ... word DANGER, WARNING, CAUTION. clearances between the doors and cabinet are in the area. • Unplug your refrigerator before using your refrigerator is plugged in the freezer compartment when hands are not followed, To reduce the risk of many important safety messages. NOTE:We strongly recommend ...
Use and Care Guide
Page 6
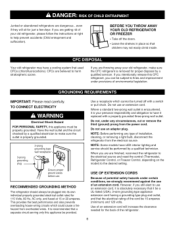
...properly grounded electrical outlet rated for just a few days. When you are finished, reconnect the refrigerator to the electrical source and reset the control (Thermostat, Refrigerator Control, or Freezer Control, depending on the model) to the desired setting. IMPORTANT: Please read carefully. It ...Use of the cord be properly grounded. BEFORE YOU THROW AWAY YOUR OLD REFRIGERATOR OR FREEZER • Take off with a properly grounded three-prong wall outlet. Junked or abandoned refrigerators are believed to harm stratospheric ozone. If you are are throwing away your ...
...properly grounded electrical outlet rated for just a few days. When you are finished, reconnect the refrigerator to the electrical source and reset the control (Thermostat, Refrigerator Control, or Freezer Control, depending on the model) to the desired setting. IMPORTANT: Please read carefully. It ...Use of the cord be properly grounded. BEFORE YOU THROW AWAY YOUR OLD REFRIGERATOR OR FREEZER • Take off with a properly grounded three-prong wall outlet. Junked or abandoned refrigerators are believed to harm stratospheric ozone. If you are are throwing away your ...

Use and Care Guide
Page 7
.... L ,I {. The refrigerator you have purchased may have some or all of the features shown below . Refrigerator Light (p. 25) O Filter (Inside) (p. 24) Modular Door Bins (p. 21 ) _) Fixed door bin Tilting door bin Refrigerator Shelves (p. 20) (_ Crisper... (p. 21) _]_ Ice Room (p. 17) (Ice Maker and Ice Bucket) _]_ Pull out Drawer (p. 23) Turbo Motor Tilt-Out Door Basket (p. 22) Durabase (p. 23) _) Divider (p. 23) _) Extra Ice Bin (p. 22) _) Water Tank Cover Snack Pan (p. 21) _) Egg Box (p. 21) Dairy Bin (p. 21 ) Bottle Holder (p. 20) (795.7851...
.... L ,I {. The refrigerator you have purchased may have some or all of the features shown below . Refrigerator Light (p. 25) O Filter (Inside) (p. 24) Modular Door Bins (p. 21 ) _) Fixed door bin Tilting door bin Refrigerator Shelves (p. 20) (_ Crisper... (p. 21) _]_ Ice Room (p. 17) (Ice Maker and Ice Bucket) _]_ Pull out Drawer (p. 23) Turbo Motor Tilt-Out Door Basket (p. 22) Durabase (p. 23) _) Divider (p. 23) _) Extra Ice Bin (p. 22) _) Water Tank Cover Snack Pan (p. 21) _) Egg Box (p. 21) Dairy Bin (p. 21 ) Bottle Holder (p. 20) (795.7851...
Use and Care Guide
Page 8
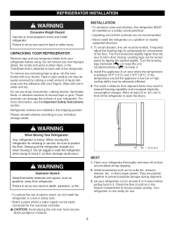
...type labels, the model and serial number label, or the TechSheet that is heavy. Wipe with your refrigerator. Too small a distance from refrigerator. When Moving Your Refrigerator: Your refrigerator is attached to aid in the shipping position. Explosion Hazard Keep flammable materials and vapors, such as ...together to move it . Failure to do not install the refrigerator in a wet or damp area. • Select a place where a water supply can result in the freezer compartment to your fingers. UNPACKING YOUR REFRIGERATOR Remove tape and any remaining tape or glue, rub the ...
...type labels, the model and serial number label, or the TechSheet that is heavy. Wipe with your refrigerator. Too small a distance from refrigerator. When Moving Your Refrigerator: Your refrigerator is attached to aid in the shipping position. Explosion Hazard Keep flammable materials and vapors, such as ...together to move it . Failure to do not install the refrigerator in a wet or damp area. • Select a place where a water supply can result in the freezer compartment to your fingers. UNPACKING YOUR REFRIGERATOR Remove tape and any remaining tape or glue, rub the ...
Use and Care Guide
Page 9
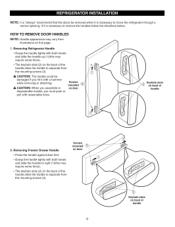
... on this page. 1. CAUTION: The handle could be damaged if you must push or pull with a hammer while removing or attaching. Removing Freezer Drawer Handle • Press the handle against door first. • Grasp the handle tightly with both hands and slide the handle to right ...(1)(this may vary from the mounting screws (3). Removing Refrigerator Handle • Grasp the handle tightly with both hands and slide the handle up (1)(this may require some force). • The keyhole slots ...
... on this page. 1. CAUTION: The handle could be damaged if you must push or pull with a hammer while removing or attaching. Removing Freezer Drawer Handle • Press the handle against door first. • Grasp the handle tightly with both hands and slide the handle to right ...(1)(this may vary from the mounting screws (3). Removing Refrigerator Handle • Grasp the handle tightly with both hands and slide the handle up (1)(this may require some force). • The keyhole slots ...
Use and Care Guide
Page 10
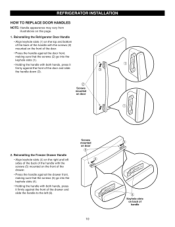
Reinstalling the Refrigerator Door Handle • Align keyhole slots (1) on the top and bottom of the back of the handle with the screws (2) mounted on the front of the door. • Press the handle against the door front, making ... the drawer front, making sure that the screws (5) go into the keyhole slots (1). • Holding the handle with the screws (5) mounted on door 2. Reinstalling the Freezer Drawer Handle • Align keyhole slots (4) on the right and left (6). HOW TO REPLACE DOOR HANDLES NOTE: Handle appearance may vary from illustrations on back...
Reinstalling the Refrigerator Door Handle • Align keyhole slots (1) on the top and bottom of the back of the handle with the screws (2) mounted on the front of the door. • Press the handle against the door front, making ... the drawer front, making sure that the screws (5) go into the keyhole slots (1). • Holding the handle with the screws (5) mounted on door 2. Reinstalling the Freezer Drawer Handle • Align keyhole slots (4) on the right and left (6). HOW TO REPLACE DOOR HANDLES NOTE: Handle appearance may vary from illustrations on back...
Use and Care Guide
Page 11
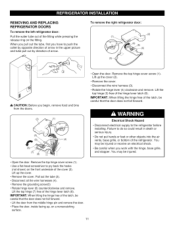
...may be careful that the door does not fall forward. (2) (7) (8) J • Open the door. To remove the right refrigerator door: F @ A CAUTION: Before you have to the refrigerator before installing. IMPORTANT: When lifting the hinge free of the latch, be injured. 11 Failure to pry back the hooks (not...injury. • Do not put hands or feet or other objects into the air vents, base grille, or bottom of arrow. REMOVING AND REPLACING REFRIGERATOR DOORS To remove the left refrigerator door: Pull the water tube out of the cover (2). When you pull out the tube, first you begin...
...may be careful that the door does not fall forward. (2) (7) (8) J • Open the door. To remove the right refrigerator door: F @ A CAUTION: Before you have to the refrigerator before installing. IMPORTANT: When lifting the hinge free of the latch, be injured. 11 Failure to pry back the hooks (not...injury. • Do not put hands or feet or other objects into the air vents, base grille, or bottom of arrow. REMOVING AND REPLACING REFRIGERATOR DOORS To remove the left refrigerator door: Pull the water tube out of the cover (2). When you pull out the tube, first you begin...
Use and Care Guide
Page 12
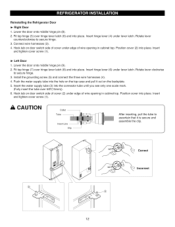
... top. Fit top hinge (7) over hinge lever latch (6) and into place. Hook tab on door switch side of wire opening in cabinet top. Reinstalling the Refrigerator Door I_ Right Door 1. Position cover (2) into place. Insert hinge lever (6) under edge of cover (2) under lever latch. Rotate lever counterclockwise to secure hinge. 3. Insert...
... top. Fit top hinge (7) over hinge lever latch (6) and into place. Hook tab on door switch side of wire opening in cabinet top. Reinstalling the Refrigerator Door I_ Right Door 1. Position cover (2) into place. Insert hinge lever (6) under edge of cover (2) under lever latch. Rotate lever counterclockwise to secure hinge. 3. Insert...
Use and Care Guide
Page 15
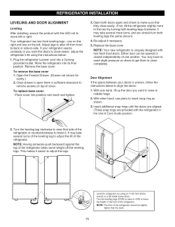
...clockwise. Remove the base cover. Either door can be slightly higher than the back, 15 Plug the refrigerator's power cord into its final position. To remove the base cover 1. Open the Freezer Drawer. (Drawer not shown for clarity.) 2. To replace base cover: • Place cover into position... and insert and tighten. 3. This makes it easier to adjust the legs. \ /, Level the refrigerator by turning both doors again and check to insert...
...clockwise. Remove the base cover. Either door can be slightly higher than the back, 15 Plug the refrigerator's power cord into its final position. To remove the base cover 1. Open the Freezer Drawer. (Drawer not shown for clarity.) 2. To replace base cover: • Place cover into position... and insert and tighten. 3. This makes it easier to adjust the legs. \ /, Level the refrigerator by turning both doors again and check to insert...
Use and Care Guide
Page 16
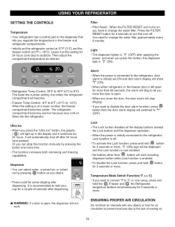
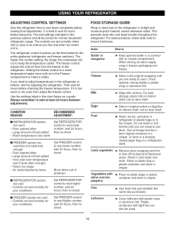
... or food for 24 hours. SETTING THE CONTROLS Temperature • Your refrigerator has a control pad on , you want to convert °F to °C or vice versa, press and hold the _ Freezer and @ the Refrigerator temperture buttons simultaneously for 5 seconds or more. Dispenser • You ...8°C) The lower the number setting, the colder the refrigerator compartment will light up in the freezer and refrigerator compartments. • Initially set ON and door alarm display will show A,._(O,N_ ). • When either refrigerator or the freezer door is open . • When you close the ...
... or food for 24 hours. SETTING THE CONTROLS Temperature • Your refrigerator has a control pad on , you want to convert °F to °C or vice versa, press and hold the _ Freezer and @ the Refrigerator temperture buttons simultaneously for 5 seconds or more. Dispenser • You ...8°C) The lower the number setting, the colder the refrigerator compartment will light up in the freezer and refrigerator compartments. • Initially set ON and door alarm display will show A,._(O,N_ ). • When either refrigerator or the freezer door is open . • When you close the ...
Use and Care Guide
Page 17
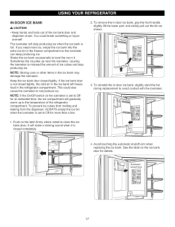
... stop producing ice. Sometimes the ice piles up to Off for details. 17 Keep the ice bank door closed tightly, the cold air in the refrigerator compartment. NOTE: If the On/Off switch on the icemaker is full. If you need more than a few. 2. If the ice bank door is not... door for more ice, empty the ice bank into the extra ice bin in the freezer compartment so the icemaker can keep producing ice. IN=DOOR iCE BANK A CAUTION • Keep hands and tools out of the refrigerator compartment. To reinstall the in the ice bank may damage the icemaker. NOTE: Storing...
... stop producing ice. Sometimes the ice piles up to Off for details. 17 Keep the ice bank door closed tightly, the cold air in the refrigerator compartment. NOTE: If the On/Off switch on the icemaker is full. If you need more than a few. 2. If the ice bank door is not... door for more ice, empty the ice bank into the extra ice bin in the freezer compartment so the icemaker can keep producing ice. IN=DOOR iCE BANK A CAUTION • Keep hands and tools out of the refrigerator compartment. To reinstall the in the ice bank may damage the icemaker. NOTE: Storing...
Use and Care Guide
Page 18
... interior shelf, not on a refrigerator shelf. The freezer control adjusts the cold air flow from the freezer to adjust temperatures in the chart below as you need to the refrigerator. Use the settings listed in the refrigerator or freezer, start by items Set FREEZER control to wait at least 24..., rewrap tightly in the previous section should be used. 18 Controls not set correctly for normal household refrigerator usage. It is too warm or too cold, then adjust the freezer control. The mid-settings indicated in plastic wrap or aluminum foil. Then wait 24 hours before checking...
... interior shelf, not on a refrigerator shelf. The freezer control adjusts the cold air flow from the freezer to adjust temperatures in the chart below as you need to the refrigerator. Use the settings listed in the refrigerator or freezer, start by items Set FREEZER control to wait at least 24..., rewrap tightly in the previous section should be used. 18 Controls not set correctly for normal household refrigerator usage. It is too warm or too cold, then adjust the freezer control. The mid-settings indicated in plastic wrap or aluminum foil. Then wait 24 hours before checking...

Use and Care Guide
Page 19
... cans or plastic food containers in severe injury. 19 NOTE: Allow hot foods to circulate around packages. REFRIGERATOR SECTION WATER DISPENSER Tray can result in the freezer compartment. If it . This simply means that moisture in or out. Holes Ribs A WARNING: Do not... package or container instructions for freezing or food storage times, check a freezer guide or a reliable cookbook. Ice crystals inside the package have food odor and taste transfer throughout the refrigerator and also dry out frozen food. Packaging Successful freezing depends on correct ...
... cans or plastic food containers in severe injury. 19 NOTE: Allow hot foods to circulate around packages. REFRIGERATOR SECTION WATER DISPENSER Tray can result in the freezer compartment. If it . This simply means that moisture in or out. Holes Ribs A WARNING: Do not... package or container instructions for freezing or food storage times, check a freezer guide or a reliable cookbook. Ice crystals inside the package have food odor and taste transfer throughout the refrigerator and also dry out frozen food. Packaging Successful freezing depends on correct ...
Use and Care Guide
Page 20
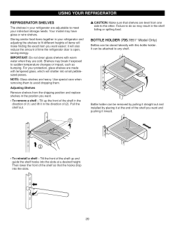
...or impact, such as bumping. Failure to do so may break if exposed to the other. Storing similar food items together in your refrigerator and adjusting the shelves to meet your individual storage needs. Your model may have glass or wire shelves. IMPORTANT: Do not clean ...shelf so that shelves are cold. BOTTLE HOLDER (795.7851" Model Only) Bottles can be stored laterally with this bottle holder. Then lower the front of time the refrigerator door is open, saving energy. REFRIGERATOR SHELVES The shelves in your refrigerator are made with tempered glass, which will shatter into...
...or impact, such as bumping. Failure to do so may break if exposed to the other. Storing similar food items together in your refrigerator and adjusting the shelves to meet your individual storage needs. Your model may have glass or wire shelves. IMPORTANT: Do not clean ...shelf so that shelves are cold. BOTTLE HOLDER (795.7851" Model Only) Bottles can be stored laterally with this bottle holder. Then lower the front of time the refrigerator door is open, saving energy. REFRIGERATOR SHELVES The shelves in your refrigerator are made with tempered glass, which will shatter into...
Use and Care Guide
Page 25
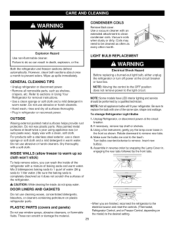
... sponge or soft cloth and a mild detergent in warm water. Apply wax with a mixture of the refrigerator. To change Refrigerator Light Bulbs 1. These can scratch or damage the material. 25 Refrigerator Control, and or Freezer Control, depending on plastic refrigerator parts. •When you can wash the inside , do so can result in the front as...
... sponge or soft cloth and a mild detergent in warm water. Apply wax with a mixture of the refrigerator. To change Refrigerator Light Bulbs 1. These can scratch or damage the material. 25 Refrigerator Control, and or Freezer Control, depending on plastic refrigerator parts. •When you can wash the inside , do so can result in the front as...
Use and Care Guide
Page 26
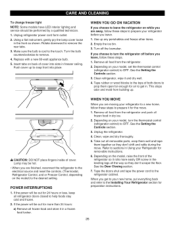
... NOTE:SomemodelshaveLEDinteriorlightingand serviceshouldbeperformebdy a qualifiedtechnician. 1. Replacewitha new60-watat ppliancebulb. 5. If you are finished, reconnect the refrigerator to the electrical source and reset the controls. (Thermostat, Refrigerator Control, and or Freezer Control, depending on your Refrigerator for air to get to your refrigerator to prepare it rolls more than 24 hours: a) Remove all removable parts, wrap them...
... NOTE:SomemodelshaveLEDinteriorlightingand serviceshouldbeperformebdy a qualifiedtechnician. 1. Replacewitha new60-watat ppliancebulb. 5. If you are finished, reconnect the refrigerator to the electrical source and reset the controls. (Thermostat, Refrigerator Control, and or Freezer Control, depending on your Refrigerator for air to get to your refrigerator to prepare it rolls more than 24 hours: a) Remove all removable parts, wrap them...

Use and Care Guide
Page 27
... the dispenser. The automatic icemaker can regulate the cube size by circumstance, including freezer compartment temperature, room temperature, number of door openings, freezer load, and other operating conditions. • It takes about 12 to 24 hours for a newly installed refrigerator to OFF(O). To turn off Arm NOTE: Raising the automatic shutoff arm does...
... the dispenser. The automatic icemaker can regulate the cube size by circumstance, including freezer compartment temperature, room temperature, number of door openings, freezer load, and other operating conditions. • It takes about 12 to 24 hours for a newly installed refrigerator to OFF(O). To turn off Arm NOTE: Raising the automatic shutoff arm does...


