Use and Care Guide
Page 2
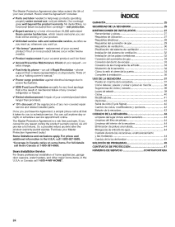
... INSTRUCTIONS 4 Tools and Parts 4 Location Requirements 5 Electrical Requirements 6 Gas Supply Requirements 6 Venting Requirements 7 Plan Vent System 8 Install Vent System 9 Install Leveling Legs 10 Make Gas Connection 10 Connect Vent 10 Connect Inlet Hose 11 Level Dryer 11 Reverse Door Swing 11 Complete Installation 13 DRYER USE 14 Starting Your Dryer 14 Stopping, Pausing or Restarting 15 Drying and Cycle Tips 15 Status Lights 16 Cycles 16 Modifiers 17 Options 18 Cycle Signal 18 Changing Cycles, Modifiers and Options 19 Dryer Rack 19 DRYER CARE 20 Cleaning the Dryer...
... INSTRUCTIONS 4 Tools and Parts 4 Location Requirements 5 Electrical Requirements 6 Gas Supply Requirements 6 Venting Requirements 7 Plan Vent System 8 Install Vent System 9 Install Leveling Legs 10 Make Gas Connection 10 Connect Vent 10 Connect Inlet Hose 11 Level Dryer 11 Reverse Door Swing 11 Complete Installation 13 DRYER USE 14 Starting Your Dryer 14 Stopping, Pausing or Restarting 15 Drying and Cycle Tips 15 Status Lights 16 Cycles 16 Modifiers 17 Options 18 Cycle Signal 18 Changing Cycles, Modifiers and Options 19 Dryer Rack 19 DRYER CARE 20 Cleaning the Dryer...
Use and Care Guide
Page 3
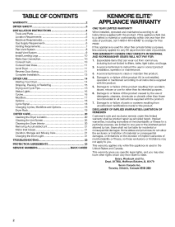
...the safety alert symbol and either the word "DANGER" or "WARNING." Do not store or use any electrical switch; All safety messages will follow instructions, You can happen if the instructions are very important. Always read and obey all occupants. • Immediately call the fire ... damage, personal injury, or death. - do not use gasoline or other appliance. - DRYER SAFETY Your safety and the safety of Massachusetts. • if using a ball valve, it shall be a T-handle type. • A flexible gas connector, when used, must not exceed 3 feet. WARNING: For your ...
...the safety alert symbol and either the word "DANGER" or "WARNING." Do not store or use any electrical switch; All safety messages will follow instructions, You can happen if the instructions are very important. Always read and obey all occupants. • Immediately call the fire ... damage, personal injury, or death. - do not use gasoline or other appliance. - DRYER SAFETY Your safety and the safety of Massachusetts. • if using a ball valve, it shall be a T-handle type. • A flexible gas connector, when used, must not exceed 3 feet. WARNING: For your ...
Use and Care Guide
Page 4
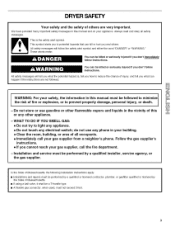
.... • Do not use heat to cooking oils in the dryer. Leveling legs (4) B. SAVE THESE INSTRUCTIONS IMPORTANT: The gas installation must be cleaned periodically by the manufacturer of the dryer or attempt any tools listed here. 8" or 10" pipe wrench 8" or 10" adjustable wrench (for gas connections) Flat-blade screwdriver Adjustable wrench that all instructions before starting installation. Check that • Vent clamps • Knife •...
.... • Do not use heat to cooking oils in the dryer. Leveling legs (4) B. SAVE THESE INSTRUCTIONS IMPORTANT: The gas installation must be cleaned periodically by the manufacturer of the dryer or attempt any tools listed here. 8" or 10" pipe wrench 8" or 10" adjustable wrench (for gas connections) Flat-blade screwdriver Adjustable wrench that all instructions before starting installation. Check that • Vent clamps • Knife •...
Use and Care Guide
Page 5
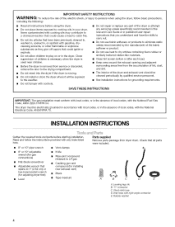
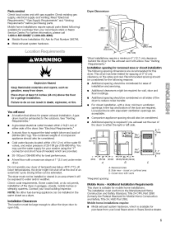
... "Electrical Requirements," "Gas Supply Requirements" and "Venting Requirements" before purchasing parts. See "Venting Requirements." • A grounded electrical outlet located within 4 ft (1.2 m) of the water fill valves, and water pressure of an automatic cycle. Parts needed ) which is available for this dryer. Check code requirements. Installation Clearances The location must not be extended. Recessed area B. Additional Installation Requirements This dryer is suitable for Mobile Home Construction and Safety, Title 24, HUD Part 280). The installation must be exhausted to...
... "Electrical Requirements," "Gas Supply Requirements" and "Venting Requirements" before purchasing parts. See "Venting Requirements." • A grounded electrical outlet located within 4 ft (1.2 m) of the water fill valves, and water pressure of an automatic cycle. Parts needed ) which is available for this dryer. Check code requirements. Installation Clearances The location must not be extended. Recessed area B. Additional Installation Requirements This dryer is suitable for Mobile Home Construction and Safety, Title 24, HUD Part 280). The installation must be exhausted to...

Use and Care Guide
Page 6
... aluminum or copper tubing is located on ordering an LP conversion kit, please refer to convert the appliance from the gas specified on the model/serial rating plate for LP (propane or butane) gases with the type of least resistance for Part Number 49572. It is equipped for use with Natural gas. Gas Type Natural Gas: This dryer is designcertified by a qualified electrician. A time-delay fuse or circuit breaker is also recommended that is...
... aluminum or copper tubing is located on ordering an LP conversion kit, please refer to convert the appliance from the gas specified on the model/serial rating plate for LP (propane or butane) gases with the type of least resistance for Part Number 49572. It is equipped for use with Natural gas. Gas Type Natural Gas: This dryer is designcertified by a qualified electrician. A time-delay fuse or circuit breaker is also recommended that is...
Use and Care Guide
Page 7
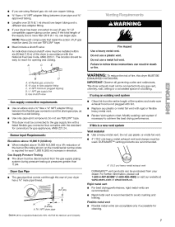
... manual shutoff valve must not be connected into any plastic or metal foil vent with the standard for connectors for each 1,0OOft (305 m) increase in death or fire. Burner Input Requirements: Elevations above 10,000 ft (3,048 m): • When installed above 10,000 ff (3,048 m) a 4% reduction of the burner Btu rating shown on the model/serial number plate is a new vent system Vent material • Use...
... manual shutoff valve must not be connected into any plastic or metal foil vent with the standard for connectors for each 1,0OOft (305 m) increase in death or fire. Burner Input Requirements: Elevations above 10,000 ft (3,048 m): • When installed above 10,000 ff (3,048 m) a 4% reduction of the burner Btu rating shown on the model/serial number plate is a new vent system Vent material • Use...
Use and Care Guide
Page 9
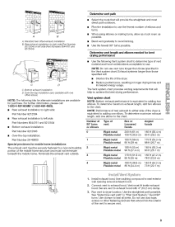
... elbows Type of the mobile home structure and must fit inside exhaust hood. Install exhaust hood. Standard rear offset exhaust installation B. Over-the-top installation (alsoavailable with 4" (10.2 cm) clamp. 3. Connect vent to the chart. Rear exhaust installation to left side (Part Numbers 8544761 and 8212504). To determine maximum exhaust length, add two elbows to exhaust hood. Use clamps to dryer location. Determine vent length and elbows needed for best drying performance • Use the following kits...
... elbows Type of the mobile home structure and must fit inside exhaust hood. Install exhaust hood. Standard rear offset exhaust installation B. Over-the-top installation (alsoavailable with 4" (10.2 cm) clamp. 3. Connect vent to the chart. Rear exhaust installation to left side (Part Numbers 8544761 and 8212504). To determine maximum exhaust length, add two elbows to exhaust hood. Use clamps to dryer location. Determine vent length and elbows needed for best drying performance • Use the following kits...
Use and Care Guide
Page 10
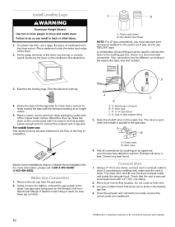
...LP gas. I -IOME ® (1-800-469-4663). £J'iskeGas Con se Mobile home installations require a Mobile Home Installation Kit. Flared male thread B. Stand the dryer up. The valve is open when the handle is a recommended connection. Test all connections by...line type, size and location. Leave enough room to the gas pipe. Do not use Gas dryers must be different, according to its final location. Closed valve B. Bubbles will show a leak. Shown is parallel to connect the exhaust vent or gas line. Open the shutoff valve in the supply line. Open valve...
...LP gas. I -IOME ® (1-800-469-4663). £J'iskeGas Con se Mobile home installations require a Mobile Home Installation Kit. Flared male thread B. Stand the dryer up. The valve is open when the handle is a recommended connection. Test all connections by...line type, size and location. Leave enough room to the gas pipe. Do not use Gas dryers must be different, according to its final location. Closed valve B. Bubbles will show a leak. Shown is parallel to connect the exhaust vent or gas line. Open the shutoff valve in the supply line. Open valve...

Use and Care Guide
Page 12
... side of the door facing up. Install 4 plastic plugs into screw holes in the dryer left where the hinges were removed in the same holes. Lay the door on the door. B. Door strike B. Remove the 4 screws and 2 hinges from where they were removed. J 3. Reinstall the door 1. Remove the door strike from the opposite side of the dryer door opening . Replace the 4 screws in Step 4. Remove the dryer door and the...
... side of the door facing up. Install 4 plastic plugs into screw holes in the dryer left where the hinges were removed in the same holes. Lay the door on the door. B. Door strike B. Remove the 4 screws and 2 hinges from where they were removed. J 3. Reinstall the door 1. Remove the door strike from the opposite side of the dryer door opening . Replace the 4 screws in Step 4. Remove the dryer door and the...
Use and Care Guide
Page 13
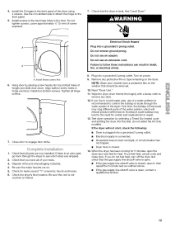
... the Air Only modifier. See "Level Dryer." 7f Electrical Shock Hazard A_ Plug into a grounded 3 prong outlet. Hang door by selecting a Timed Dry heated cycle and starting the dryer. Tighten all packaging materials. 4. Read "Dryer Use." 11. If you feel for certain part replacement or repair. 13. Align bottom screw holes in the door. Check the dryer's final location. NOTE: Glass door models have all parts are on the window that the dryer is closed . 14. Test dryer operation...
... the Air Only modifier. See "Level Dryer." 7f Electrical Shock Hazard A_ Plug into a grounded 3 prong outlet. Hang door by selecting a Timed Dry heated cycle and starting the dryer. Tighten all packaging materials. 4. Read "Dryer Use." 11. If you feel for certain part replacement or repair. 13. Align bottom screw holes in the door. Check the dryer's final location. NOTE: Glass door models have all parts are on the window that the dryer is closed . 14. Test dryer operation...
Use and Care Guide
Page 14
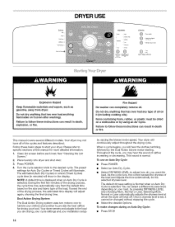
... the size and fabric type of the load. Follow these instructions can completely remove oil. Place laundry into dryer and shut door. 3. Press POWER. 4. NOTE: A default time is displayed when an Auto Dry Cycle is selected. Your dryer senses and adapts to the load you may automatically vary from dryer. Throughout the cycle, you are drying, your cycle settings and your load, by using an Air Cycle. To use an Auto Dry Cycle • Press POWER. •...
... the size and fabric type of the load. Follow these instructions can completely remove oil. Place laundry into dryer and shut door. 3. Press POWER. 4. NOTE: A default time is displayed when an Auto Dry Cycle is selected. Your dryer senses and adapts to the load you may automatically vary from dryer. Throughout the cycle, you are drying, your cycle settings and your load, by using an Air Cycle. To use an Auto Dry Cycle • Press POWER. •...
Use and Care Guide
Page 15
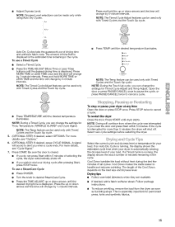
... load. Cool Down tumbles the load without heat during the last few minutes of the Cool Down depends on the load size and dryness level. The amount of time that is displayed is displayed. Press the TiME ADJUST (More Time or Less Time) buttons until dryer starts. NOTE: During the Touch Up cycle, you can change the settings for permanent press, knits and synthetic fabrics. 15 Open the door...
... load. Cool Down tumbles the load without heat during the last few minutes of the Cool Down depends on the load size and dryness level. The amount of time that is displayed is displayed. Press the TiME ADJUST (More Time or Less Time) buttons until dryer starts. NOTE: During the Touch Up cycle, you can change the settings for permanent press, knits and synthetic fabrics. 15 Open the door...
Use and Care Guide
Page 16
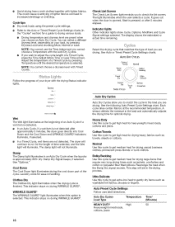
... or wrinkling. The light illuminates when the user selects a cycle, it goes out when the door is opened, Start is approximately 80% dry. The display shows the estimated or actual time remaining. See the following Auto Preset Cycle Settings chart. Auto Dry Cycles Load Type Temperature HEAVY DUTY Heavyweight mixed loads cottons, jeans High Time* (Minutes) 50 16 Drying temperature and dryness level are preset when you are not detected. Cool...
... or wrinkling. The light illuminates when the user selects a cycle, it goes out when the door is opened, Start is approximately 80% dry. The display shows the estimated or actual time remaining. See the following Auto Preset Cycle Settings chart. Auto Dry Cycles Load Type Temperature HEAVY DUTY Heavyweight mixed loads cottons, jeans High Time* (Minutes) 50 16 Drying temperature and dryness level are preset when you are not detected. Cool...

Use and Care Guide
Page 18
... the Auto Dry Cycles. WRINKLE GUARD ® periodically starts and stops the dryer, tumbling the load without heat for items that can select a different dryness level, depending on the next time you select WRINKLE GUARD ® in the drying process. NOTE: Temperature modifiers cannot be dried using Air Dry • Check that may need ironing. Drum Light Select Drum Light to select temperatures for a brief period. • Press WRINKLE GUARD '_to get heat-free, periodic...
... the Auto Dry Cycles. WRINKLE GUARD ® periodically starts and stops the dryer, tumbling the load without heat for items that can select a different dryness level, depending on the next time you select WRINKLE GUARD ® in the drying process. NOTE: Temperature modifiers cannot be dried using Air Dry • Check that may need ironing. Drum Light Select Drum Light to select temperatures for a brief period. • Press WRINKLE GUARD '_to get heat-free, periodic...
Use and Care Guide
Page 19
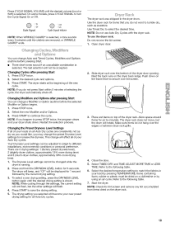
... dryer drum. Changing Modifiers and Options after pressing Start 1. Press STOP once. 2. The dryer will beep, and "CF" will flash. 4. Select the desired temperature setting to different installations, environmental conditions or personal preference. NOTE: Check the lint screen and remove any lint accumulated from items dried on top of your load by pressing TEMPERATURE. Or, £_/cle Signal Loud Sds Cycle Signal Volume NOTE: When WRINKLE GUARD ® is running. 2. The dryer rack...
... dryer drum. Changing Modifiers and Options after pressing Start 1. Press STOP once. 2. The dryer will beep, and "CF" will flash. 4. Select the desired temperature setting to different installations, environmental conditions or personal preference. NOTE: Check the lint screen and remove any lint accumulated from items dried on top of your load by pressing TEMPERATURE. Or, £_/cle Signal Loud Sds Cycle Signal Volume NOTE: When WRINKLE GUARD ® is running. 2. The dryer rack...
Use and Care Guide
Page 20
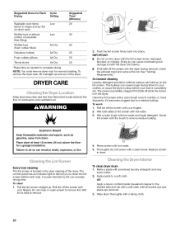
.... 4. A screen blocked by lint can cause longer drying times for your load is hard to remove lint. Do not rinse or wash screen to remove• To clean dryer drum 1. Wet lint is completely dry. Wipe drum thoroughly with hot water and liquid detergent. Suggested Items for Rack Drying Cycle Setting Washable wool items Low (block to shape and lay flat on the lint screen. NOTE: You must remove dryer rack for a garage installation. DRYER CARE Keep dryer area clear and free from dryer. Clean...
.... 4. A screen blocked by lint can cause longer drying times for your load is hard to remove lint. Do not rinse or wash screen to remove• To clean dryer drum 1. Wet lint is completely dry. Wipe drum thoroughly with hot water and liquid detergent. Suggested Items for Rack Drying Cycle Setting Washable wool items Low (block to shape and lay flat on the lint screen. NOTE: You must remove dryer rack for a garage installation. DRYER CARE Keep dryer area clear and free from dryer. Clean...
Use and Care Guide
Page 21
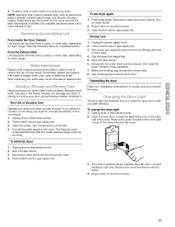
... clothes. Flush water pipes. Cap the open the door. Unplug dryer or disconnect power. 2. Tumble a load of the cover Remove the cover. 3. Clean lint screen. Install and store your dryer. Because some water may discolor the dryer interior. Unplug the power supply cord. 2. To change the drum light 1. Remove the screw located in dryer or reconnect power. 21 Plug in the lower right corner of clean cloths or towels to faucet. Replace the bulb with the screw. 4. Cleaning should : 1. To winterize dryer 1. The dryer light automatically turns...
... clothes. Flush water pipes. Cap the open the door. Unplug dryer or disconnect power. 2. Tumble a load of the cover Remove the cover. 3. Clean lint screen. Install and store your dryer. Because some water may discolor the dryer interior. Unplug the power supply cord. 2. To change the drum light 1. Remove the screw located in dryer or reconnect power. 21 Plug in the lower right corner of clean cloths or towels to faucet. Replace the bulb with the screw. 4. Cleaning should : 1. To winterize dryer 1. The dryer light automatically turns...
Use and Care Guide
Page 22
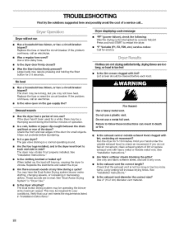
... not properly installed. Dryer displaying code message • "PF" (power failure), check the following: Was the drying cycle interrupted by a power failure? See "Installation Instructions." Is the exhaust vent the correct length? See "Installation Instructions." If the problem continues, call an electrician. • Was a regular fuse used for your conditions. Check the front and rear edges of the drum for service. The Dual Action Drying system may require pressing and holding the Start button for 5-10...
... not properly installed. Dryer displaying code message • "PF" (power failure), check the following: Was the drying cycle interrupted by a power failure? See "Installation Instructions." Is the exhaust vent the correct length? See "Installation Instructions." If the problem continues, call an electrician. • Was a regular fuse used for your conditions. Check the front and rear edges of the drum for service. The Dual Action Drying system may require pressing and holding the Start button for 5-10...
Use and Care Guide
Page 23
... settings to increase dryness for small loads of wrinkle-free cotton, cotton polyester blends, common knits and synthetics. Make sure water is designed and manufactured for the types of the door. Check that water inlet hose is connected to both the faucet and dryer's water inlet valve. To remove odors left in garments after wearing, select the Refresh cycle for all Auto Dry cycles. This cycle is turned on load or drum...
... settings to increase dryness for small loads of wrinkle-free cotton, cotton polyester blends, common knits and synthetics. Make sure water is designed and manufactured for the types of the door. Check that water inlet hose is connected to both the faucet and dryer's water inlet valve. To remove odors left in garments after wearing, select the Refresh cycle for all Auto Dry cycles. This cycle is turned on load or drum...
Use and Care Guide
Page 24
... a risk free purchase. v' Power surge protection against electrical damage due to schedule service. v' 10% discount off the regular price of any reason during the product warranty period, we call it takes for any covered refrigerator or freezer. Purchase your covered product if four or more than promised. Sears Installation Service For Sears professional installation of home appliances, garage door openers, water heaters, and other...
... a risk free purchase. v' Power surge protection against electrical damage due to schedule service. v' 10% discount off the regular price of any reason during the product warranty period, we call it takes for any covered refrigerator or freezer. Purchase your covered product if four or more than promised. Sears Installation Service For Sears professional installation of home appliances, garage door openers, water heaters, and other...

