
Use and Care Guide
Page 2
... : 1. Table of Contents Freestanding RangeWarranty 2 IMPORTANTSAFETYINSTRUCTIONS 3=5 Protection Agreements 6 Before Using Your Range 7 Range Features 8 Before Setting Oven Controls g=10 Surface Cooking 11=12 Setting Warmer Drawer & Controls...1 Minute Feature 27 • Setting Meat Probe 28-29 • Setting Slow Cook 30 • Setting the Sabbath Feature 31-32 • Setting Warm & Hold 32 Self-... Service 41=42 Recipes for Slow Cook 43 Sears Service back cover Kenmore Elite Appliance Warranty One Year Limited Warranty When installed, operated and maintained according...
... : 1. Table of Contents Freestanding RangeWarranty 2 IMPORTANTSAFETYINSTRUCTIONS 3=5 Protection Agreements 6 Before Using Your Range 7 Range Features 8 Before Setting Oven Controls g=10 Surface Cooking 11=12 Setting Warmer Drawer & Controls...1 Minute Feature 27 • Setting Meat Probe 28-29 • Setting Slow Cook 30 • Setting the Sabbath Feature 31-32 • Setting Warm & Hold 32 Self-... Service 41=42 Recipes for Slow Cook 43 Sears Service back cover Kenmore Elite Appliance Warranty One Year Limited Warranty When installed, operated and maintained according...

Use and Care Guide
Page 3
...oven bottom or cover an entire rack with each other than when the hood and range have been designed, tested and listed by a qualified technician in conjunction with gas ranges other . important Safety instructions Read all instructions before using this appliance as a ...flow through the oven and may trap heat, causing a fire hazard. The weight of the range and _ sceacreufrueldly bayttethmept anttoi-titpilt ibtrfaocrwkeatrd.by a qualified installer, servicer or the gas supplier. - Aluminum foil linings may cause carbon monoxide poisoning. This manual contains important safety ...
...oven bottom or cover an entire rack with each other than when the hood and range have been designed, tested and listed by a qualified technician in conjunction with gas ranges other . important Safety instructions Read all instructions before using this appliance as a ...flow through the oven and may trap heat, causing a fire hazard. The weight of the range and _ sceacreufrueldly bayttethmept anttoi-titpilt ibtrfaocrwkeatrd.by a qualified installer, servicer or the gas supplier. - Aluminum foil linings may cause carbon monoxide poisoning. This manual contains important safety ...

Use and Care Guide
Page 4
...catch fire if allowed to become hot enough to drain and be positioned so that it closely. Pay particular attention to the range manufacturer's instructions for cleaning. • Kitchen cleaners and aerosols--Always follow the manufacturer's recommended directions for cooktop service without its.... Keep Oven Vent Ducts Unobstructed. Remove all parts free of electric shock, or fire. IMPORTANT INSTRUCTIONS FOR CLEANING YOUR RANGE Clean the range regularly to be moved while oven is located below the backguard. Be aware that could catch fire. Among these liners may...
...catch fire if allowed to become hot enough to drain and be positioned so that it closely. Pay particular attention to the range manufacturer's instructions for cleaning. • Kitchen cleaners and aerosols--Always follow the manufacturer's recommended directions for cooktop service without its.... Keep Oven Vent Ducts Unobstructed. Remove all parts free of electric shock, or fire. IMPORTANT INSTRUCTIONS FOR CLEANING YOUR RANGE Clean the range regularly to be moved while oven is located below the backguard. Be aware that could catch fire. Among these liners may...

Use and Care Guide
Page 5
... or bypass the grounding prong. See the INSTALLATION INSTRUCTIONS packaged with a double right front gas burner are designed to Liquefied Petroleum (L.P.) Gas. Gas) (Some models) Please Note: Models equipped with this range and is not installed by a qualified installer or electrician. important Safety Notice The California ... models only) Avoid fire hazard or electrical shock. The L.P. Personal injury or death from electrical shock may occur if the range is located on the left lower REAR (back side) panel of the consumer to satisfactorily meet the application needs must be ...
... or bypass the grounding prong. See the INSTALLATION INSTRUCTIONS packaged with a double right front gas burner are designed to Liquefied Petroleum (L.P.) Gas. Gas) (Some models) Please Note: Models equipped with this range and is not installed by a qualified installer or electrician. important Safety Notice The California ... models only) Avoid fire hazard or electrical shock. The L.P. Personal injury or death from electrical shock may occur if the range is located on the left lower REAR (back side) panel of the consumer to satisfactorily meet the application needs must be ...

Use and Care Guide
Page 7
...with the letters located inside Burner Heads (Fig. 1). The following instructions apply to follow the installation instructions before installing and using your new range. a. d. e. Unpack Burner Grates and position on Burner Skirts with the Burner Heads and Burner Caps in the correct locations. For ...into slot of each Burner Head, except right front burner. Remove all packing material located under center of Burner Heads & Burner Caps Your range is shipped with Burner Heads and Burner Caps (See Fig. 1). To replace Burner Heads & Caps, match the letters located under Burner Heads...
...with the letters located inside Burner Heads (Fig. 1). The following instructions apply to follow the installation instructions before installing and using your new range. a. d. e. Unpack Burner Grates and position on Burner Skirts with the Burner Heads and Burner Caps in the correct locations. For ...into slot of each Burner Head, except right front burner. Remove all packing material located under center of Burner Heads & Burner Caps Your range is shipped with Burner Heads and Burner Caps (See Fig. 1). To replace Burner Heads & Caps, match the letters located under Burner Heads...
Use and Care Guide
Page 8
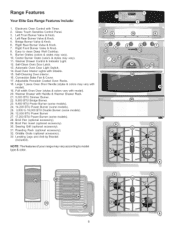
Burner Grates (colors & styles may vary). 11. Automatic Oven Door Light Switch. 14. Broil Pan Insert (optional accessory). 30. Range Features Your Elite Gas Range Features Include: 1. Left Front Burner Valve & Knob. 4. Left Rear Burner Valve & Knob. 5. Center Burner Grate (colors & styles may vary). 10. ...(some models). 24. 14,200 BTU Power Burner (some models). 25. 3,000 to clean Deep Well Cooktop. 9. NOTE: The features of your range may vary with model). 19. Leveling Legs and Anti-tip Bracket (included). Full width Oven Door (styles & colors vary with Shields. 15. Warmer...
Burner Grates (colors & styles may vary). 11. Automatic Oven Door Light Switch. 14. Broil Pan Insert (optional accessory). 30. Range Features Your Elite Gas Range Features Include: 1. Left Front Burner Valve & Knob. 4. Left Rear Burner Valve & Knob. 5. Center Burner Grate (colors & styles may vary). 10. ...(some models). 24. 14,200 BTU Power Burner (some models). 25. 3,000 to clean Deep Well Cooktop. 9. NOTE: The features of your range may vary with model). 19. Leveling Legs and Anti-tip Bracket (included). Full width Oven Door (styles & colors vary with Shields. 15. Warmer...

Use and Care Guide
Page 9
...rear walls. Recommended Rack Positions for other food items like a casserole dish (See Fig. 4). iii¸iJiii!:i::::: Flat Handle Oven Rack Fig. 3 Your range may be used for Broiling, Baking & Roasting: Food Rack Position Broiling hamburgers & steaks Broiling meats, chicken or fish Cookies, cakes, pies, biscuits &... be equipped with one or more of 6 oven rack postions. Wait until it stops. Make sure both insert front hooks snap into place.This range has a total of the oven rack types shown; Fig. 1 Fig. 2 Types of the rack and tilt out clockwise. a Porcelain coated Flat...
...rear walls. Recommended Rack Positions for other food items like a casserole dish (See Fig. 4). iii¸iJiii!:i::::: Flat Handle Oven Rack Fig. 3 Your range may be used for Broiling, Baking & Roasting: Food Rack Position Broiling hamburgers & steaks Broiling meats, chicken or fish Cookies, cakes, pies, biscuits &... be equipped with one or more of 6 oven rack postions. Wait until it stops. Make sure both insert front hooks snap into place.This range has a total of the oven rack types shown; Fig. 1 Fig. 2 Types of the rack and tilt out clockwise. a Porcelain coated Flat...

Use and Care Guide
Page 11
...lit. 5. Operating the Double Ring Burner: 1. Fig. 3. 5. However, only the burner you are lit -Fig. 4. Surface Cooking • Operating Gas Surface Burners • Setting Proper Burner Flame Size • Operating Triple Ring Burner Do not place plastic items such as needed. Use the guides and...Fig. 2 Double Burner (some models): The versatile Double ring burner offers a complete range of the range when it is needed, continue to the Iite position. Release the knob and rotate to rotate the gas control knob counterclockwise somewhere past grey area - If only the inner burner is in...
...lit. 5. Operating the Double Ring Burner: 1. Fig. 3. 5. However, only the burner you are lit -Fig. 4. Surface Cooking • Operating Gas Surface Burners • Setting Proper Burner Flame Size • Operating Triple Ring Burner Do not place plastic items such as needed. Use the guides and...Fig. 2 Double Burner (some models): The versatile Double ring burner offers a complete range of the range when it is needed, continue to the Iite position. Release the knob and rotate to rotate the gas control knob counterclockwise somewhere past grey area - If only the inner burner is in...

Use and Care Guide
Page 14
... rack in the Warmer Drawer and follow the recipe's recommended times, The prepared bread dough should be used to seat bearing glides into the range until levers "click" (approximately 2"). Pull the drawer open again to help prepare bread dough. Warmer Drawer Removal • Preparing Bread Dough ...do not hear the levers "click" or the bearing glides do not feel seated remove the drawer and repeat steps 1 thru 3. Disconnect appliance from the range, Right Glide To Replace Warmer (Warm & Ready TM) Drawer: 1. The recommended length of the chassis glide (See Fig. 3). 2. Push down ...
... rack in the Warmer Drawer and follow the recipe's recommended times, The prepared bread dough should be used to seat bearing glides into the range until levers "click" (approximately 2"). Pull the drawer open again to help prepare bread dough. Warmer Drawer Removal • Preparing Bread Dough ...do not hear the levers "click" or the bearing glides do not feel seated remove the drawer and repeat steps 1 thru 3. Disconnect appliance from the range, Right Glide To Replace Warmer (Warm & Ready TM) Drawer: 1. The recommended length of the chassis glide (See Fig. 3). 2. Push down ...

Use and Care Guide
Page 16
... untill "12h" or "24h" appears in , or when the power supply to silent control operation: 1. Press _ to operating with normal sounds and beeps. When the range is set the time of day mode was chosen, the clock will now display time from normal sound to the... display. If "= -" appears (See Fig. 9), the control is first plugged in the display. (_for 6 seconds Fig. 4 2. The clock has been preset at the factory for 1:30): 1. INSTRUCTIONS To set for normal or silent operation press and hold _Q_ for 12 or 24 hour time of day operation. Press and hold _ss_tY_for...
... untill "12h" or "24h" appears in , or when the power supply to silent control operation: 1. Press _ to operating with normal sounds and beeps. When the range is set the time of day mode was chosen, the clock will now display time from normal sound to the... display. If "= -" appears (See Fig. 9), the control is first plugged in the display. (_for 6 seconds Fig. 4 2. The clock has been preset at the factory for 1:30): 1. INSTRUCTIONS To set for normal or silent operation press and hold _Q_ for 12 or 24 hour time of day operation. Press and hold _ss_tY_for...

Use and Care Guide
Page 20
... (Fig. 3). Press _HPHP_a"3e5t_0. When baking is not necessary when roasting or cooking casseroles. INSTRUCTIONS To set temperature: 1. Arrange the interior oven racks. for Electric Ranges Setting Preheat For the best baking performance use the PREHEAT _t_ feature. when baking is complete or to cancel the Preheat To change Preheat temperature...
... (Fig. 3). Press _HPHP_a"3e5t_0. When baking is not necessary when roasting or cooking casseroles. INSTRUCTIONS To set temperature: 1. Arrange the interior oven racks. for Electric Ranges Setting Preheat For the best baking performance use the PREHEAT _t_ feature. when baking is complete or to cancel the Preheat To change Preheat temperature...
Use and Care Guide
Page 24
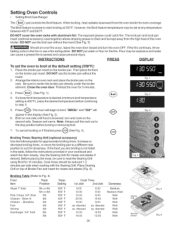
... if finished press O (See Fig. 3). Cook times should be reduced 1-2 minutes per side when cooking with aluminum foil. I-Ig. 6 Setting Oven Controls • Setting Broil (Gas Range) The _roilj_ pad controls the Broil feature. DO NOT put water or flour on the broiler pan. Flour may be kept away from the oven...
... if finished press O (See Fig. 3). Cook times should be reduced 1-2 minutes per side when cooking with aluminum foil. I-Ig. 6 Setting Oven Controls • Setting Broil (Gas Range) The _roilj_ pad controls the Broil feature. DO NOT put water or flour on the broiler pan. Flour may be kept away from the oven...

Use and Care Guide
Page 33
... to setting the Self-Clean cycle, any excessive spillovers in the General Care & Cleaning section. ii.i........... The woven material of the range with a high sugar or acid content (such as they may still be removed. These items cannot withstand high cleaning temperatures. . ...will make the racks glide easier into the rack position). . Clean with wax paper or a cloth containing a small amount of the range can damage the automatic door locking system. NOTE: Prior to high temperatures. Move birds to the following cleaning precautions: . After the cycle...
... to setting the Self-Clean cycle, any excessive spillovers in the General Care & Cleaning section. ii.i........... The woven material of the range with a high sugar or acid content (such as they may still be removed. These items cannot withstand high cleaning temperatures. . ...will make the racks glide easier into the rack position). . Clean with wax paper or a cloth containing a small amount of the range can damage the automatic door locking system. NOTE: Prior to high temperatures. Move birds to the following cleaning precautions: . After the cycle...

Use and Care Guide
Page 34
... time from the set time. You may be selected. The oven may also skip the time entry and accept the default cleaning time of the range can damage the automatic door locking system. Press (,,_ (See Fig. 4). the oven icon will show in the display (See Fig. 2). 4. Press _,. "CLEAN" will flash, "3:00...
... time from the set time. You may be selected. The oven may also skip the time entry and accept the default cleaning time of the range can damage the automatic door locking system. Press (,,_ (See Fig. 4). the oven icon will show in the display (See Fig. 2). 4. Press _,. "CLEAN" will flash, "3:00...

Use and Care Guide
Page 40
... sure outer burner head is unplugged and all parts are located at the main source or unplug the range. 2. Be sure the range is level. Turn electrical power off at the rear of the gas and the burner ignition ALWAYS keep the burner heads in use . Turn power back on again at the... main source (or plug the range back in this Use & Care Guide. Please Note: Models are in these ports, use a small gauge wire...
... sure outer burner head is unplugged and all parts are located at the main source or unplug the range. 2. Be sure the range is level. Turn electrical power off at the rear of the gas and the burner ignition ALWAYS keep the burner heads in use . Turn power back on again at the... main source (or plug the range back in this Use & Care Guide. Please Note: Models are in these ports, use a small gauge wire...

Use and Care Guide
Page 41
... from outlet (electric ignition models only). ii.i........... Power outage. Appliance must be lit manually. Carpet interferes with range. Provide sufficient space so range can be accessible for service, Cabinets not square or are not the result of defective workmanship or materials in the... General Care & Cleaning section for example Fll). Press STOP and call I =800=4=MY=HOME® for range clearance. See Setting Surface Controls. Entire appliance does not operate. Dry the burners thoroughly and follow instructions under Entire Appliance Does...
... from outlet (electric ignition models only). ii.i........... Power outage. Appliance must be lit manually. Carpet interferes with range. Provide sufficient space so range can be accessible for service, Cabinets not square or are not the result of defective workmanship or materials in the... General Care & Cleaning section for example Fll). Press STOP and call I =800=4=MY=HOME® for range clearance. See Setting Surface Controls. Entire appliance does not operate. Dry the burners thoroughly and follow instructions under Entire Appliance Does...


