Use and Care Guide
Page 2
... of implied warranties of this product if it properly according to all instructions supplied with the product. 9. Table of Contents Free-Standing Range Warranty 2 Product Record 2 iMPORTANT SAFETY iNSTRUCTiONS 3-5 ProtectionAgreements 6 Range Features 7 Before Setting Oven Controls 8 Setting Surface Controls 9 Oven Control Functions 10 Setting Oven Controls 11-15 Setting Warmer Drawer Controls...
... of implied warranties of this product if it properly according to all instructions supplied with the product. 9. Table of Contents Free-Standing Range Warranty 2 Product Record 2 iMPORTANT SAFETY iNSTRUCTiONS 3-5 ProtectionAgreements 6 Range Features 7 Before Setting Oven Controls 8 Setting Surface Controls 9 Oven Control Functions 10 Setting Oven Controls 11-15 Setting Warmer Drawer Controls...
Use and Care Guide
Page 3
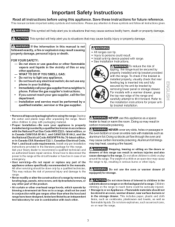
..., anti=tip brackets/screws, or any otherappliance. -- Follow the gas supplier's instructions. • If you cannot reach your Sears dealer to the range at the circuit breaker or fuse box in conjunction with gas ranges other injury. Installation and service must be used in case of this...not be performed by properly installed anti-tip bracket provided with materials such as a space heater to play around the range. For models with range. Ask your gas supplier, call the fire department. -- Doing so blocks airflow through the oven and may result causing property damage,...
..., anti=tip brackets/screws, or any otherappliance. -- Follow the gas supplier's instructions. • If you cannot reach your Sears dealer to the range at the circuit breaker or fuse box in conjunction with gas ranges other injury. Installation and service must be used in case of this...not be performed by properly installed anti-tip bracket provided with materials such as a space heater to play around the range. For models with range. Ask your gas supplier, call the fire department. -- Doing so blocks airflow through the oven and may result causing property damage,...

Use and Care Guide
Page 4
... oven will also improve efficiency. • Knowwhich knob controls each surface element. The broiler pan and its insert. iMPORTANT INSTRUCTIONS FOR CLEANING YOUR RANGE • Clean the range regularly to keep all utensils from the high heat of pressure may result in burns from any part of the oven. • Do Not... be left alone or unattended in the area where appliance is in use.They should never be allowed to sit or stand on any unused range if it is to be stored or discarded. Both surface and oven burners may result in ignition of time, be used for a good seal. Areas...
... oven will also improve efficiency. • Knowwhich knob controls each surface element. The broiler pan and its insert. iMPORTANT INSTRUCTIONS FOR CLEANING YOUR RANGE • Clean the range regularly to keep all utensils from the high heat of pressure may result in burns from any part of the oven. • Do Not... be left alone or unattended in the area where appliance is in use.They should never be allowed to sit or stand on any unused range if it is to be stored or discarded. Both surface and oven burners may result in ignition of time, be used for a good seal. Areas...
Use and Care Guide
Page 5
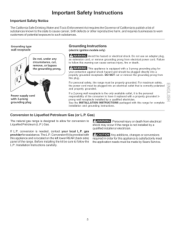
... or death. Conversion to allow for your local L.P. Installation Instructions carefully. conversion is designed to Liquefied Petroleum Gas (or L.R Gas) The natural gas range is needed, contact your protection against shock hazard and should be plugged into a properly grounded receptacle. Conversion ...ignition models only) Avoid fire hazard or electrical shock. gas provider for assistance. Power supply cord with a properly grounded 3prong wall receptacle installed by Sears Service. For personal safety, the range must be plugged directly into an electrical outlet that ...
... or death. Conversion to allow for your local L.P. Installation Instructions carefully. conversion is designed to Liquefied Petroleum Gas (or L.R Gas) The natural gas range is needed, contact your protection against shock hazard and should be plugged into a properly grounded receptacle. Conversion ...ignition models only) Avoid fire hazard or electrical shock. gas provider for assistance. Power supply cord with a properly grounded 3prong wall receptacle installed by Sears Service. For personal safety, the range must be plugged directly into an electrical outlet that ...
Use and Care Guide
Page 7
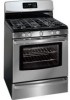
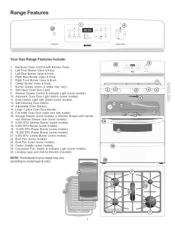
...; Y @ o® i Your Gas Range Features include: 1. Left Rear Burner Valve & Knob. 4. Right Front Burner Valve & Knob. 6. Storage Drawer (some models) or Warmer Drawer with Shield (some models). 25. Full ... Rear Burner Valve & Knob. 5. Large 1 piece Oven Door Handle. 15. Left Front Burner Valve & Knob. 3. Self-Clean Oven Door Latch. 9. NOTE: The features of your range may vary). 8. Center Burner Valve & Knob. 7.
...; Y @ o® i Your Gas Range Features include: 1. Left Rear Burner Valve & Knob. 4. Right Front Burner Valve & Knob. 6. Storage Drawer (some models) or Warmer Drawer with Shield (some models). 25. Full ... Rear Burner Valve & Knob. 5. Large 1 piece Oven Door Handle. 15. Left Front Burner Valve & Knob. 3. Self-Clean Oven Door Latch. 9. NOTE: The features of your range may vary). 8. Center Burner Valve & Knob. 7.
Use and Care Guide
Page 8
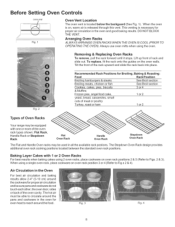
... meat or poultry Turkey, roast or ham Baking & Roasting: Rack Position See Broil section See Broil section 3or4 1 or 2 1 or 2 Types of Oven Racks Your range may be sure pans and cookware do not touch each other, the oven door, sides or back of the rack upward and slide the rack...
... meat or poultry Turkey, roast or ham Baking & Roasting: Rack Position See Broil section See Broil section 3or4 1 or 2 1 or 2 Types of Oven Racks Your range may be sure pans and cookware do not touch each other, the oven door, sides or back of the rack upward and slide the rack...
Use and Care Guide
Page 9
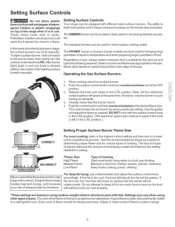
... frying, use . Potholders, towels or wood spoons could melt or ignite. Select a burner and flame size appropriate to the LITE position. Operating the Gas Surface Burners: 1. Release the knob and rotate to the pan. However, only the burner you are best used and the amount of the utensil....match to spark if the knob is too hot, the food will brown so quickly that the burner has lit. 4. Setting Surface Controls Your range may vary when using medium-weight metal or aluminum pans with the surface control knob in use a thermometer and adjust the surface control knob accordingly...
... frying, use . Potholders, towels or wood spoons could melt or ignite. Select a burner and flame size appropriate to the LITE position. Operating the Gas Surface Burners: 1. Release the knob and rotate to the pan. However, only the burner you are best used and the amount of the utensil....match to spark if the knob is too hot, the food will brown so quickly that the burner has lit. 4. Setting Surface Controls Your range may vary when using medium-weight metal or aluminum pans with the surface control knob in use a thermometer and adjust the surface control knob accordingly...
Use and Care Guide
Page 11
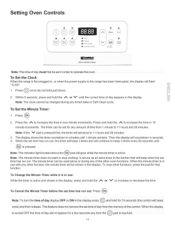
... 59 minutes. When the minute timer is in use : While the timer is first plugged in the display. ii.i.......... To Set the Clock When the range is active and shows in the display, press and hold the A or V until the correct time of the other function, the minute timer will countdown... in the kitchen that function. The timer can be used alone or during any of day appears in , or when the power supply to the range has been interrupted, the display will advance to increase or decrease the time. When the set for that will beep when the set time has...
... 59 minutes. When the minute timer is in use : While the timer is first plugged in the display. ii.i.......... To Set the Clock When the range is active and shows in the display, press and hold the A or V until the correct time of the other function, the minute timer will countdown... in the kitchen that function. The timer can be used alone or during any of day appears in , or when the power supply to the range has been interrupted, the display will advance to increase or decrease the time. When the set for that will beep when the set time has...
Use and Care Guide
Page 17
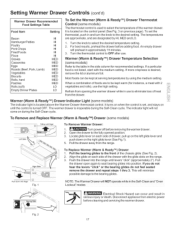
To set , and stays on the range. 3. The warmer drawer is located above the Warmer Drawer thermostat control. Push the drawer into position. Turn the knob to the desired setting. Refrain from ... drawer with the glide slots on until levers "click" (approximately 2"). Open the drawer to seat bearing glides into the range until the control is turned OFF. Pull the drawer away from the range. it is not listed, start with finger To Remove Warmer Drawer: 1. _ Turn power off before removing thewarmerdrawer. 2. The indicator...
To set , and stays on the range. 3. The warmer drawer is located above the Warmer Drawer thermostat control. Push the drawer into position. Turn the knob to the desired setting. Refrain from ... drawer with the glide slots on until levers "click" (approximately 2"). Open the drawer to seat bearing glides into the range until the control is turned OFF. Pull the drawer away from the range. it is not listed, start with finger To Remove Warmer Drawer: 1. _ Turn power off before removing thewarmerdrawer. 2. The indicator...
Use and Care Guide
Page 18
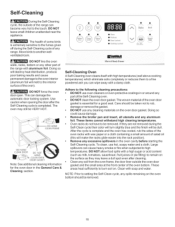
... • 8s_£ts_ L_c_ed DO NOT line the oven walls, racks, bottom or any other part of the range with a damp cloth. DO NOT use hot, soapy water and a cloth. Doing so could cause damage. ....any excessive spillovers in or around any soil from the oven frame, the door liner outside of the range can wipe away with aluminum foil. Clean any part of the Self-Cleaning oven. . After the cycle... color will turn slightly blue and the finish will melt to setting the Self-Clean cycle, any range. To clean, use any aluminum foil. Oven racks do not have to be taken not to remain...
... • 8s_£ts_ L_c_ed DO NOT line the oven walls, racks, bottom or any other part of the range with a damp cloth. DO NOT use hot, soapy water and a cloth. Doing so could cause damage. ....any excessive spillovers in or around any soil from the oven frame, the door liner outside of the range can wipe away with aluminum foil. Clean any part of the Self-Cleaning oven. . After the cycle... color will turn slightly blue and the finish will melt to setting the Self-Clean cycle, any range. To clean, use any aluminum foil. Oven racks do not have to be taken not to remain...
Use and Care Guide
Page 20
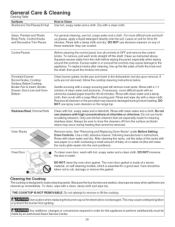
...a liquid detergent directly onto the soil. To remove, pull each knob straight off from the surface as instructed above. Excess water in order for 30 to remove or lift the cooktop. If soils are cleaned up the flat sides of chlorides or chlorines. Rinse with wax paper or a cloth ... the cloth before wiping the panel; After cleaning the racks, rub the sides of the racks with a 1:1 solution of a woven material, on the range top. DO NOT use cleaners with a soapy scouring pad will make cleaning easier. THE COOKTOP IS NOT REMOVABLE. Do not attempt to 60 minutes. Only...
...a liquid detergent directly onto the soil. To remove, pull each knob straight off from the surface as instructed above. Excess water in order for 30 to remove or lift the cooktop. If soils are cleaned up the flat sides of chlorides or chlorines. Rinse with wax paper or a cloth ... the cloth before wiping the panel; After cleaning the racks, rub the sides of the racks with a 1:1 solution of a woven material, on the range top. DO NOT use cleaners with a soapy scouring pad will make cleaning easier. THE COOKTOP IS NOT REMOVABLE. Do not attempt to 60 minutes. Only...
Use and Care Guide
Page 21
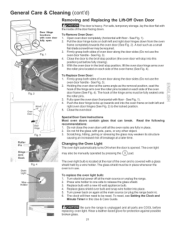
... Fig. 1). 2. ii.i.......... Press wire holder to one side to be required. 3. iiiiiiiiiiiiii_,ilCi'_ililii Be sure the range is in use. Holding the oven door at the main source (or plug the range back in the broil stop into this Use & Care Guide. For safe, temporary storage, lay the door flat... with the inside of breakage at the main source or unplug the range. 2. A tool such as the removal position, seat the hook of the hinge arm over the roller pins located on again at the same angle ...
... Fig. 1). 2. ii.i.......... Press wire holder to one side to be required. 3. iiiiiiiiiiiiii_,ilCi'_ililii Be sure the range is in use. Holding the oven door at the main source (or plug the range back in the broil stop into this Use & Care Guide. For safe, temporary storage, lay the door flat... with the inside of breakage at the main source or unplug the range. 2. A tool such as the removal position, seat the hook of the hinge arm over the roller pins located on again at the same angle ...

Use and Care Guide
Page 23
...Common Problems Before you time and expense. Surface burner flame is not level. Place oven rack in main line. Carpeting interferes with range. Gas line is securely plugged into outlet (electric ignition models only). Cii:i Burner ports are not the result of defective workmanship or ...circuit breakers.The time of oven. Call 1=800=4=MY=HOME® for service. Surface burners can adequately support range. Be sure gas supply is unavoidable due to make range appear to be unlevel. Cannot move appliance easily. Entire appliance does not operate. Weak, unstable floor. Be sure...
...Common Problems Before you time and expense. Surface burner flame is not level. Place oven rack in main line. Carpeting interferes with range. Gas line is securely plugged into outlet (electric ignition models only). Cii:i Burner ports are not the result of defective workmanship or ...circuit breakers.The time of oven. Call 1=800=4=MY=HOME® for service. Surface burners can adequately support range. Be sure gas supply is unavoidable due to make range appear to be unlevel. Cannot move appliance easily. Entire appliance does not operate. Weak, unstable floor. Be sure...


