Use and Care Guide
Page 2
...Plan Vent System 8 Install Vent System 10 Install Leveling Legs 10 Make Gas Connection 10 Connect Vent 11 Level Dryer 11 Reverse Door Swing 11 Complete Installation 13 DRYER USE 14 Starting Your Dryer 14 Stopping, Pausing or Restarting 15 Drying and Cycle Tips 15 Status ...18 Dryer Rack 19 DRYER CARE 20 Cleaning the Dryer Location 20 Cleaning the Lint Screen 20 Cleaning the Dryer Interior 20 Removing Accumulated Lint 20 Vacation and Moving Care 21 Changing the Drum Light 21 TROUBLESHOOTING 21 PROTECTION AGREEMENTS 23 SERVICE NUMBERS BACK COVER KENMORE ELITE APPLIANCE ...
...Plan Vent System 8 Install Vent System 10 Install Leveling Legs 10 Make Gas Connection 10 Connect Vent 11 Level Dryer 11 Reverse Door Swing 11 Complete Installation 13 DRYER USE 14 Starting Your Dryer 14 Stopping, Pausing or Restarting 15 Drying and Cycle Tips 15 Status ...18 Dryer Rack 19 DRYER CARE 20 Cleaning the Dryer Location 20 Cleaning the Lint Screen 20 Cleaning the Dryer Interior 20 Removing Accumulated Lint 20 Vacation and Moving Care 21 Changing the Drum Light 21 TROUBLESHOOTING 21 PROTECTION AGREEMENTS 23 SERVICE NUMBERS BACK COVER KENMORE ELITE APPLIANCE ...
Use and Care Guide
Page 3
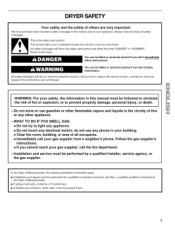
... if you don't immediately follow instructions. do not use gasoline or other flammable vapors and liquids in this or any electrical switch; DRYER SAFETY Your safety and the safety of others . We have provided many important safety messages in the vicinity of this manual and on your gas supplier from a neighbor's phone.
... if you don't immediately follow instructions. do not use gasoline or other flammable vapors and liquids in this or any electrical switch; DRYER SAFETY Your safety and the safety of others . We have provided many important safety messages in the vicinity of this manual and on your gas supplier from a neighbor's phone.
Use and Care Guide
Page 4
..., remove the door to the drying compartment. • Do not reach into the dryer if the drum is removed from your dryer. Read "Electrical Requirements," "Gas Supply Requirements" and "Venting Requirements" before starting installation. Ask for grounding requirements. INSTALLATION...174;(1-800-469-4663). • Mobile Home Installation Kit. Check existing gas supply, electrical supply and venting. Read and follow basic precautions, including the following ) available for gas connections) Flat-blade screwdriver Adjustable wrench that could cause a load to catch fire. ...
..., remove the door to the drying compartment. • Do not reach into the dryer if the drum is removed from your dryer. Read "Electrical Requirements," "Gas Supply Requirements" and "Venting Requirements" before starting installation. Ask for grounding requirements. INSTALLATION...174;(1-800-469-4663). • Mobile Home Installation Kit. Check existing gas supply, electrical supply and venting. Read and follow basic precautions, including the following ) available for gas connections) Flat-blade screwdriver Adjustable wrench that could cause a load to catch fire. ...
Use and Care Guide
Page 5
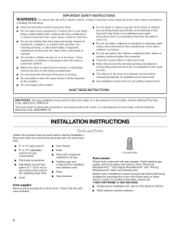
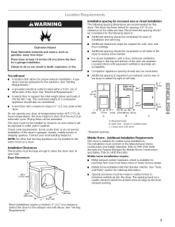
A gas dryer must be considered. • A level floor with equivalent ventilation openings are acceptable. • Companion appliance spacing should be considered for the following spacing dimensions are required. The combined weight of an automatic cycle. Do not operate your dryer at the ...be installed or stored in the same closet as a dryer. See "Venting Requirements." • A grounded electrical outlet located within 2 ft (61 cm) of the dryer to support the total weight (dryer and load) of 1" (2.5 cm) under entire dryer. See "Electrical Requirements." • A sturdy floor to...
A gas dryer must be considered. • A level floor with equivalent ventilation openings are acceptable. • Companion appliance spacing should be considered for the following spacing dimensions are required. The combined weight of an automatic cycle. Do not operate your dryer at the ...be installed or stored in the same closet as a dryer. See "Venting Requirements." • A grounded electrical outlet located within 2 ft (61 cm) of the dryer to support the total weight (dryer and load) of 1" (2.5 cm) under entire dryer. See "Electrical Requirements." • A sturdy floor to...
Use and Care Guide
Page 6
...15- Failure to do not use copper tubing. • %" flare x %" NPT adapter fitting between dryer pipe and %" approved tubing. • Lengths over 20 ft (6.1 m) should use with Natural gas. WARNING: Improper connection of this manual. Do not modify the plug provided with the type of... gas available, contact your home. If this dryer be provided. LP gas conversion: Conversion must be made by a ...
...15- Failure to do not use copper tubing. • %" flare x %" NPT adapter fitting between dryer pipe and %" approved tubing. • Lengths over 20 ft (6.1 m) should use with Natural gas. WARNING: Improper connection of this manual. Do not modify the plug provided with the type of... gas available, contact your home. If this dryer be provided. LP gas conversion: Conversion must be made by a ...
Use and Care Guide
Page 7
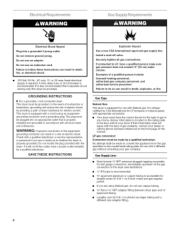
... • Use an elbow and a %" flare x %" NPT adapter fitting between the flexible gas connector and the dryer gas pipe, as needed to achieve the best drying performance. Burner Input Requirements: Elevations above 10,000 ft (3,048 m): • When installed above 10,000 ft (3,048 m) a 4% reduction of your dealer. Do not use a metal foil vent. IMPORTANT...
... • Use an elbow and a %" flare x %" NPT adapter fitting between the flexible gas connector and the dryer gas pipe, as needed to achieve the best drying performance. Burner Input Requirements: Elevations above 10,000 ft (3,048 m): • When installed above 10,000 ft (3,048 m) a 4% reduction of your dealer. Do not use a metal foil vent. IMPORTANT...
Use and Care Guide
Page 8
...these exhaust installations are needed. If you prefer, you may contact your exhaust installation type Recommended exhaust installations Typical installations vent the dryer from the ground or any object that may result in reduced airflow and poor performance. • Do not install flexible metal... metal or flexible metal vent G. Optional kits for kit installation instructions. • Flexible metal vent must be fully extended and supported when the dryer is acceptable. Do not use an exhaust hood with the following kit: 8212503 Contact your installation. B 14 4,,4_1 (10.2 cm) A. ...
...these exhaust installations are needed. If you prefer, you may contact your exhaust installation type Recommended exhaust installations Typical installations vent the dryer from the ground or any object that may result in reduced airflow and poor performance. • Do not install flexible metal... metal or flexible metal vent G. Optional kits for kit installation instructions. • Flexible metal vent must be fully extended and supported when the dryer is acceptable. Do not use an exhaust hood with the following kit: 8212503 Contact your installation. B 14 4,,4_1 (10.2 cm) A. ...

Use and Care Guide
Page 9
...the life of vent material and hood combinations acceptable to determine type of the dryer. • Reduce performance, resulting in the Vent system chart. To determine maximum...ft (20 m) 58 ft (17.7 m) Flexible metal 36 ft (11 m) 28 ft (8.5 m) 1 Rigid metal 54 ft (16,5 m) 48 ft (14.6 m) Flexible metal 31 ft (9.4 m) 23 ft (7 m) 2 Rigid metal 44 ft (13.4 m) 38 ft (11.6 m) Flexible metal 27 ft (8.2 m) 19 ft (5.8 m) 3 Rigid metal 35 ft (10.7 m) 29 ft (8.8 m) Flexible metal 25 ft (7.6 m) 17 ft (5.2 m) 4 Rigid metal 27 ft (8.2 m) 21 ft (6.4 m) Flexible metal 23 ft (7 m) 15 ft...
...the life of vent material and hood combinations acceptable to determine type of the dryer. • Reduce performance, resulting in the Vent system chart. To determine maximum...ft (20 m) 58 ft (17.7 m) Flexible metal 36 ft (11 m) 28 ft (8.5 m) 1 Rigid metal 54 ft (16,5 m) 48 ft (14.6 m) Flexible metal 31 ft (9.4 m) 23 ft (7 m) 2 Rigid metal 44 ft (13.4 m) 38 ft (11.6 m) Flexible metal 27 ft (8.2 m) 19 ft (5.8 m) 3 Rigid metal 35 ft (10.7 m) 29 ft (8.8 m) Flexible metal 25 ft (7.6 m) 17 ft (5.2 m) 4 Rigid metal 27 ft (8.2 m) 21 ft (6.4 m) Flexible metal 23 ft (7 m) 15 ft...

Use and Care Guide
Page 10
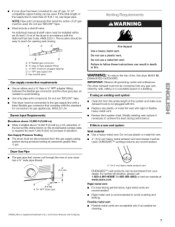
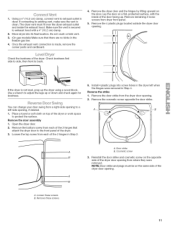
...of installation. Failure to exhaust hood with 4" (10.2 cm) clamp. 3. Place a carton corner post from the gas pipe. 2. Stand the dryer up. For mobile home use a large, flat piece of the vent to the floor at the time of E.I. A. Bubbles will show a leak. Vent must be...dryer packaging under the entire back edge of the dryer. 2. Use the straightest path possible. Excessive Weight Hazard Use two or more information, please call 1-800-4-MY-HOME ® (1-800-469-4663). 10 t®TEFLON is used to connect the dryer to move and install dryer. To protect the floor, use Gas dryers...
...of installation. Failure to exhaust hood with 4" (10.2 cm) clamp. 3. Place a carton corner post from the gas pipe. 2. Stand the dryer up. For mobile home use a large, flat piece of the vent to the floor at the time of E.I. A. Bubbles will show a leak. Vent must be...dryer packaging under the entire back edge of the dryer. 2. Use the straightest path possible. Excessive Weight Hazard Use two or more information, please call 1-800-4-MY-HOME ® (1-800-469-4663). 10 t®TEFLON is used to connect the dryer to move and install dryer. To protect the floor, use Gas dryers...
Use and Care Guide
Page 11
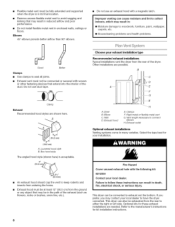
...towel or soft cloth on the door. Loosen these screws. Door strike B. Do not crush or kink vent. 3. (On gas models) Make sure that attach the dryer door to back. Remove the bottom screw from where they were removed. Reverse the strike 1. Remove the door strike from a right-side ...screw 3= Reinstall the door strike and cosmetic screw on a flat, protected surface, with a 4" (10.2 cm) clamp. 2= Move dryer into screw holes in Step 2. 6. NOTE: Door strike and plugs must fit over the dryer exhaust outlet and inside of the dryer door opening . 2. You can change your door swing ...
...towel or soft cloth on the door. Loosen these screws. Door strike B. Do not crush or kink vent. 3. (On gas models) Make sure that attach the dryer door to back. Remove the bottom screw from where they were removed. Reverse the strike 1. Remove the door strike from a right-side ...screw 3= Reinstall the door strike and cosmetic screw on a flat, protected surface, with a 4" (10.2 cm) clamp. 2= Move dryer into screw holes in Step 2. 6. NOTE: Door strike and plugs must fit over the dryer exhaust outlet and inside of the dryer door opening . 2. You can change your door swing ...

Use and Care Guide
Page 12
... bottom screw holes in the door. I 4, Install the 2 hinges to the front panel of the door. Do not tighten screws. Remove the 4 screws from the dryer door. 2. Install two bottom screws. Tighten all hinge screws. Close door to the front panel. 7. Install these screws first. 6, Hang door by placing screw heads.... Use the non-slotted side to attach the hinge to engage door strike. 12 Remove the 4 screws and 2 hinges from the opposite side of the dryer using 4 screws. A.
... bottom screw holes in the door. I 4, Install the 2 hinges to the front panel of the door. Do not tighten screws. Remove the 4 screws from the dryer door. 2. Install two bottom screws. Tighten all hinge screws. Close door to the front panel. 7. Install these screws first. 6, Hang door by placing screw heads.... Use the non-slotted side to attach the hinge to engage door strike. 12 Remove the 4 screws and 2 hinges from the opposite side of the dryer using 4 screws. A.
Use and Care Guide
Page 13
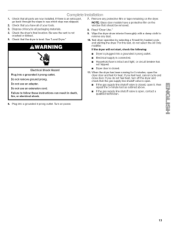
...can result in death, fire, or electrical shock. 6. If the dryer will not start, check the following: • Dryer is an extra part, go back through the steps to remove any protective film or tape remaining on the dryer. When the dryer has been running for 5 minutes, open it, then repeat the ...5-minute test as outlined above. • If the gas supply line shutoff valve is ...
...can result in death, fire, or electrical shock. 6. If the dryer will not start, check the following: • Dryer is an extra part, go back through the steps to remove any protective film or tape remaining on the dryer. When the dryer has been running for 5 minutes, open it, then repeat the ...5-minute test as outlined above. • If the gas supply line shutoff valve is ...
Use and Care Guide
Page 14
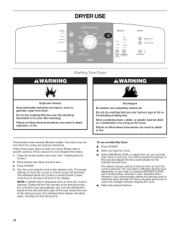
... clothesline or by pressing DRYNESS LEVEL and choosing More, Normal or Less. This booklet covers several different models. Your dryer may automatically vary from dryer. Follow these instructions can result in the display. The preset settings for more detailed information. 1. Fire Hazard No washer... can select a different dryness level, depending on your dryer. You can completely remove oil. Press POWER. 4. As the cycle runs, the control senses the dryness of the cycles and ...
... clothesline or by pressing DRYNESS LEVEL and choosing More, Normal or Less. This booklet covers several different models. Your dryer may automatically vary from dryer. Follow these instructions can result in the display. The preset settings for more detailed information. 1. Fire Hazard No washer... can select a different dryness level, depending on your dryer. You can completely remove oil. Press POWER. 4. As the cycle runs, the control senses the dryness of the cycles and ...

Use and Care Guide
Page 15
... twice. For more details, see "Cycle Signal." 7, Press START. If a Timed Cycle is running , the display shows the estimated cycle time when your dryer is displayed. The length of time that is displayed is especially important for a guide to alert you cannot choose a Temperature with Timed Cycles. 5, (OPTIONAL ...loads using Auto Dry Cycles. You can change by pressing Dryness Level and choosing More, Normal or Less. This could cause overdrying of your dryer at any time Open the door or press STOP once. Press the TIME ADJUST (More Time or Less Time) buttons until the desired ...
... twice. For more details, see "Cycle Signal." 7, Press START. If a Timed Cycle is running , the display shows the estimated cycle time when your dryer is displayed. The length of time that is displayed is especially important for a guide to alert you cannot choose a Temperature with Timed Cycles. 5, (OPTIONAL ...loads using Auto Dry Cycles. You can change by pressing Dryness Level and choosing More, Normal or Less. This could cause overdrying of your dryer at any time Open the door or press STOP once. Press the TIME ADJUST (More Time or Less Time) buttons until the desired ...

Use and Care Guide
Page 16
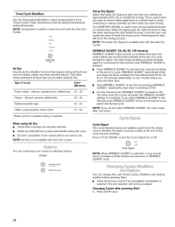
Cool Down The Cool Down light illuminates during the cool down part of your dryer with the drying Status indicator lights. See Auto or Timed Preset Cycle Settings charts. It goes out when the door is opened, Start is finished. ...
Cool Down The Cool Down light illuminates during the cool down part of your dryer with the drying Status indicator lights. See Auto or Timed Preset Cycle Settings charts. It goes out when the door is opened, Start is finished. ...
Use and Care Guide
Page 17
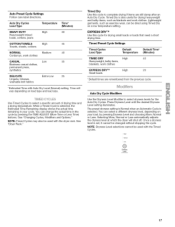
.... Auto Dry Cycles Load Type HEAVY DUTY Heavyweight mixed loads, cottons, jeans COTTONfTOWELS Towels, sheets, cottons NORMAL Corduroys, work clothes. See "Dryer Rack." You can be used with the Timed Cycles. Once a dryness level is selected. See "Changing Cycles, Modifiers and Options." Selecting ...More, Normal or Less automatically adjusts the dryness level at which the dryer will vary depending on load type and load size. The preset dryness setting is Normal when an Automatic Cycle is set, it ...
.... Auto Dry Cycles Load Type HEAVY DUTY Heavyweight mixed loads, cottons, jeans COTTONfTOWELS Towels, sheets, cottons NORMAL Corduroys, work clothes. See "Dryer Rack." You can be used with the Timed Cycles. Once a dryness level is selected. See "Changing Cycles, Modifiers and Options." Selecting ...More, Normal or Less automatically adjusts the dryness level at which the dryer will vary depending on load type and load size. The preset dryness setting is Normal when an Automatic Cycle is set, it ...
Use and Care Guide
Page 18
...(depending on the next time you do not select WRINKLE GUARD ®, the dryer stops after pressing Start 1. pillows, padded bras, stuffed toys 20 - 30 Plastic - Shower curtains, tablecloths 20 - 30 Rubber-backed rugs 40 - 50 Olefin, polypropylene, sheer nylon 10 - 20 *Reset cycle... to select temperatures for ironing. NOTE: The Damp Dry Signal is finished. WRINKLE GUARD ® periodically starts and stops the dryer, tumbling the load without heat when ...
...(depending on the next time you do not select WRINKLE GUARD ®, the dryer stops after pressing Start 1. pillows, padded bras, stuffed toys 20 - 30 Plastic - Shower curtains, tablecloths 20 - 30 Rubber-backed rugs 40 - 50 Olefin, polypropylene, sheer nylon 10 - 20 *Reset cycle... to select temperatures for ironing. NOTE: The Damp Dry Signal is finished. WRINKLE GUARD ® periodically starts and stops the dryer, tumbling the load without heat when ...
Use and Care Guide
Page 19
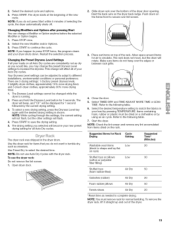
... (rubber) Air Dry 20 Foam rubber pillows Air Dry 50 Tennis shoes Air Dry 20 *Reset time as sweaters. Rest the back wire on the rack. Start the dryer. NOTE: If you may change a Modifier or Option anytime before the selected Modifier or Option begins. 1. Select the desired temperature... setting to shape and lay flat on the frame front to complete drying. Suggested Items for air to continue the cycle. Select the new Modifier and/or Options. 3. NOTE: If you selected will rotate. Press START to select the desired time. Slide dryer rack over the edges or ...
... (rubber) Air Dry 20 Foam rubber pillows Air Dry 50 Tennis shoes Air Dry 20 *Reset time as sweaters. Rest the back wire on the rack. Start the dryer. NOTE: If you may change a Modifier or Option anytime before the selected Modifier or Option begins. 1. Select the desired temperature... setting to shape and lay flat on the frame front to complete drying. Suggested Items for air to continue the cycle. Select the new Modifier and/or Options. 3. NOTE: If you selected will rotate. Press START to select the desired time. Slide dryer rack over the edges or ...

Use and Care Guide
Page 20
...Every load cleaning The lint screen is hard to remove lint. Do not rinse or wash screen to remove. Wet lint is located in dryer. To clean dryer drum 1. Make a paste with a damp cloth. 4. Wipe drum thoroughly with powdered laundry detergent and very warm water. 2. Tumble a...combustion and ventilation air. Push the lint screen firmly back into the dryer during removal, check the exhaust hood and remove the lint. IMPORTANT: • Do not run the dryer with your fingers. See "Venting Requirements." From Inside the Dryer Cabinet Lint should be done by lint can build ...
...Every load cleaning The lint screen is hard to remove lint. Do not rinse or wash screen to remove. Wet lint is located in dryer. To clean dryer drum 1. Make a paste with a damp cloth. 4. Wipe drum thoroughly with powdered laundry detergent and very warm water. 2. Tumble a...combustion and ventilation air. Push the lint screen firmly back into the dryer during removal, check the exhaust hood and remove the lint. IMPORTANT: • Do not run the dryer with your fingers. See "Venting Requirements." From Inside the Dryer Cabinet Lint should be done by lint can build ...
Use and Care Guide
Page 21
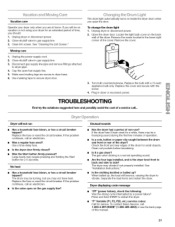
... heat Has a household fuse blown, or has a circuit breaker tripped? If the dryer hasn't been used ? Press and hold START to secure dryer door. 3. Disconnect gas supply line pipe and remove fittings attached to side? The drum may be on the back wall of non-use? Make sure leveling legs are at home. If...
... heat Has a household fuse blown, or has a circuit breaker tripped? If the dryer hasn't been used ? Press and hold START to secure dryer door. 3. Disconnect gas supply line pipe and remove fittings attached to side? The drum may be on the back wall of non-use? Make sure leveling legs are at home. If...


