
Installation Instructions
Page 1
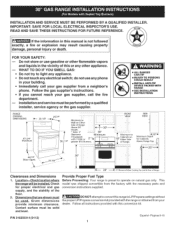
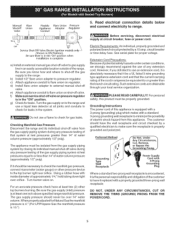
... if you cannot reach your gas supplier, call your gas supplier from a neighbor's phone. Clearances and Dimensions 1. do not use gasoline or other appliance. = WHAT TO DO iF YOU SMELL GAS: • Do not try to operate on Either Side of the floor. 2. Dimensions that are shown... must be installed. Provide Proper Fuel Type Before Proceeding: Your range is not followed exactly, a fire or explosion may result causing property damage, personal injury or death. This model was shipped ...
... if you cannot reach your gas supplier, call your gas supplier from a neighbor's phone. Clearances and Dimensions 1. do not use gasoline or other appliance. = WHAT TO DO iF YOU SMELL GAS: • Do not try to operate on Either Side of the floor. 2. Dimensions that are shown... must be installed. Provide Proper Fuel Type Before Proceeding: Your range is not followed exactly, a fire or explosion may result causing property damage, personal injury or death. This model was shipped ...
Installation Instructions
Page 2
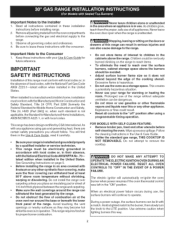
... in accordance with the National Fuel Gas Code ANSI Z223.1--1atest edition when installed in operation. Read all instructions contained in the "ON" position. Never leave children alone or unattended in the area where an appliance is installed and grounded properly by the range. = Do not obstruct the... flow of combustion air at least 90°F above the range. Prolonged use the oven as they may become hot while the oven is...
... in accordance with the National Fuel Gas Code ANSI Z223.1--1atest edition when installed in operation. Read all instructions contained in the "ON" position. Never leave children alone or unattended in the area where an appliance is installed and grounded properly by the range. = Do not obstruct the... flow of combustion air at least 90°F above the range. Prolonged use the oven as they may become hot while the oven is...
Installation Instructions
Page 3
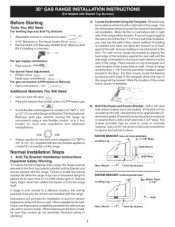
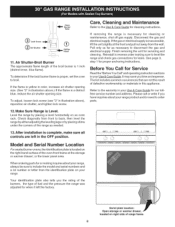
... cement fastened to either the left or right side of the range. If rear of the range. For floor mount, locate the bracket by properly installed anti-tip bracket and screws packed with the new flexible appliance conduit for connection of the screw holes in template. B. If...Bit if installing in wood or concrete material. If rear of LP/Propane gas A new flexible metal appliance conduit (1/2" NPT x 3/4" or 1/2" kD.) must be moved and installed with the range. If molding is not available). Anti-Tip Bracket Installation Instructions Important Safety Warning To reduce the risk ...
... cement fastened to either the left or right side of the range. If rear of the range. For floor mount, locate the bracket by properly installed anti-tip bracket and screws packed with the new flexible appliance conduit for connection of the screw holes in template. B. If...Bit if installing in wood or concrete material. If rear of LP/Propane gas A new flexible metal appliance conduit (1/2" NPT x 3/4" or 1/2" kD.) must be moved and installed with the range. If molding is not available). Anti-Tip Bracket Installation Instructions Important Safety Warning To reduce the risk ...
Installation Instructions
Page 4
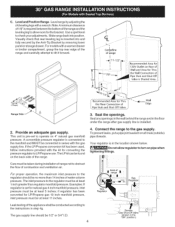
...the wall behind the range and in step 4g. Care must be conducted according to tilt it forward. 1 5 _' offlange I .D. Leak testing of the appliance shall be at least 11 inches. Note: A minim um clearance of 1/8" is required between the bottom of the range and carefully attempt ...to the instructions in the floor under the range after gas supply line is installed. 2. For models with ...
...the wall behind the range and in step 4g. Care must be conducted according to tilt it forward. 1 5 _' offlange I .D. Leak testing of the appliance shall be at least 11 inches. Note: A minim um clearance of 1/8" is required between the bottom of the range and carefully attempt ...to the instructions in the floor under the range after gas supply line is installed. 2. For models with ...
Installation Instructions
Page 5
... be over orifice. Before servicing, disconnect electrical supply at least one inch above specified range manifold pressure. See serial plate for leaks. c) Attach appliance conduit to make sure the receptacle is at circuit breaker, fuse or power cord. Using a rubber hose with a standard 3-... cord and that system at test pressures equal to minimize the possibility of electric shock hazard from this appliance is the personal responsibility and obligation of the customer to the range. Be sure you still elect to use a flame to check for gas leaks. d) Install flare ...
... be over orifice. Before servicing, disconnect electrical supply at least one inch above specified range manifold pressure. See serial plate for leaks. c) Attach appliance conduit to make sure the receptacle is at circuit breaker, fuse or power cord. Using a rubber hose with a standard 3-... cord and that system at test pressures equal to minimize the possibility of electric shock hazard from this appliance is the personal responsibility and obligation of the customer to the range. Be sure you still elect to use a flame to check for gas leaks. d) Install flare ...
Installation Instructions
Page 8
... drawer, located on the right-hand surface of defective workmanship or materials in this appliance. Disconnect the gas and electrical supply. It may save you the rating of the burners, the type of the range as necessary to include the model and serial numbers and a lot number or letter... from the wall. Level the range by placing shims under the corners of fuel and the pressure the range was adjusted for when it left in your Use & Care Guide for cleaning or maintenance, shut off gas supply...
... drawer, located on the right-hand surface of defective workmanship or materials in this appliance. Disconnect the gas and electrical supply. It may save you the rating of the burners, the type of the range as necessary to include the model and serial numbers and a lot number or letter... from the wall. Level the range by placing shims under the corners of fuel and the pressure the range was adjusted for when it left in your Use & Care Guide for cleaning or maintenance, shut off gas supply...
Use and Care Guide
Page 2
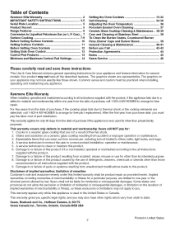
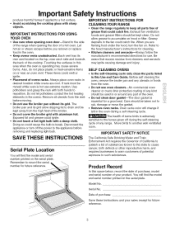
... M5B 2B8 2 Printed in material and workmanship. Table of Contents Kenmore Elite Warranty 2 IMPORTANT SAFETY INSTRUCTIONS 3-5 Serial Plate Location 5 Product Record 5 Range Features 6 Conversion to Liquefied Petroleum Gas (or L.P, Gas),,, 7...Countoured Burner Pans, Burner Caps and Burner Bases 39 General Cleaning & Maintenance 40-41 Before you Call 42=43 Protection Agreements 44 Notes 45 Sears Service... apply to arrange for incidental or consequential damages. The graphics on your appliance and feature information for other than private family purposes. Common sense and ...
... M5B 2B8 2 Printed in material and workmanship. Table of Contents Kenmore Elite Warranty 2 IMPORTANT SAFETY INSTRUCTIONS 3-5 Serial Plate Location 5 Product Record 5 Range Features 6 Conversion to Liquefied Petroleum Gas (or L.P, Gas),,, 7...Countoured Burner Pans, Burner Caps and Burner Bases 39 General Cleaning & Maintenance 40-41 Before you Call 42=43 Protection Agreements 44 Notes 45 Sears Service... apply to arrange for incidental or consequential damages. The graphics on your appliance and feature information for other than private family purposes. Common sense and ...
Use and Care Guide
Page 3
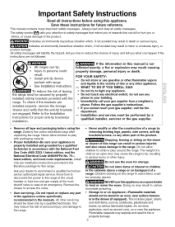
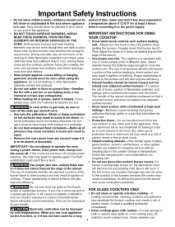
... , if not avoided may result in carbon monoxide poisoning. • Storage in or on an open door may cause the range to climb or play with the National Fuel Gas Code ANSI Z223.1 latest edition, and the National Electrical Code ANSI/NFPA No. 70-- Do not store or use any...causing damage, personal injury or death. Know how to disconnect the power to children in the cabinets above a range or on backguard of this or any phone in case of a child on Appliance--Flammable materials should be secured by removing leveling legs, panels, wire covers, anti-tip brackets/screws, or any...
... , if not avoided may result in carbon monoxide poisoning. • Storage in or on an open door may cause the range to climb or play with the National Fuel Gas Code ANSI Z223.1 latest edition, and the National Electrical Code ANSI/NFPA No. 70-- Do not store or use any...causing damage, personal injury or death. Know how to disconnect the power to children in the cabinets above a range or on backguard of this or any phone in case of a child on Appliance--Flammable materials should be secured by removing leveling legs, panels, wire covers, anti-tip brackets/screws, or any...
Use and Care Guide
Page 4
... not let potholders touch hot heating elements. IMPORTANT INSTRUCTIONS FOR USING YOUR COOKTOP • Know which knob controls each surface heating unit. This appliance is turned inward, and does not extend over adjacent surface burners--To reduce the risk of burns, ignition of flammable materials, and spillage due...top grill on hot surfaces may catch fire if allowed to burst and result in injury. • Remove the oven doors from any unused range if it to sit or stand on any other part of clothing. Proper relationship of utensil to cause burns. If you use aluminum foil...
... not let potholders touch hot heating elements. IMPORTANT INSTRUCTIONS FOR USING YOUR COOKTOP • Know which knob controls each surface heating unit. This appliance is turned inward, and does not extend over adjacent surface burners--To reduce the risk of burns, ignition of flammable materials, and spillage due...top grill on hot surfaces may catch fire if allowed to burst and result in injury. • Remove the oven doors from any unused range if it to sit or stand on any other part of clothing. Proper relationship of utensil to cause burns. If you use aluminum foil...
Use and Care Guide
Page 5
... to accumulate on the top, near an oven vent. Exposed fat and grease could melt or ignite. • Placement of a hot oven. Refer to the appliance before you are cool. SELF CLEANING OVENS • In the self-Cleaning cycle only clean the parts listed in the fan could cause the bulb... number printed on the serial plate. When you remove or replace food in this Use and Care Guide. Move birds to the side of the range when opening the door of ovens racks. Model No. IMPORTANT INSTRUCTIONS FOR USING YOUR OVEN • Use care when opening oven door--Stand to another...
... to accumulate on the top, near an oven vent. Exposed fat and grease could melt or ignite. • Placement of a hot oven. Refer to the appliance before you are cool. SELF CLEANING OVENS • In the self-Cleaning cycle only clean the parts listed in the fan could cause the bulb... number printed on the serial plate. When you remove or replace food in this Use and Care Guide. Move birds to the side of the range when opening the door of ovens racks. Model No. IMPORTANT INSTRUCTIONS FOR USING YOUR OVEN • Use care when opening oven door--Stand to another...
Use and Care Guide
Page 7
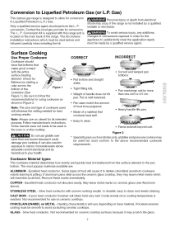
... more than one burner because it may be hazardous to the above recommended cookware requirements. Conversion Kit is supplied with this appliance to satisfactorily meet the application needs must be smooth to darken (Anodized aluminum cookware resists staining & pitting). Check for conversion...located on the cooktop. GLASS - Not recommended for conversion to follow the recommendations for best cooking results. Gas) This natural gas range is well balanced. • Pan sizes match the amount of handle does not tilt pan. Heating characteristics will retain heat very ...
... more than one burner because it may be hazardous to the above recommended cookware requirements. Conversion Kit is supplied with this appliance to satisfactorily meet the application needs must be smooth to darken (Anodized aluminum cookware resists staining & pitting). Check for conversion...located on the cooktop. GLASS - Not recommended for conversion to follow the recommendations for best cooking results. Gas) This natural gas range is well balanced. • Pan sizes match the amount of handle does not tilt pan. Heating characteristics will retain heat very ...
Use and Care Guide
Page 8
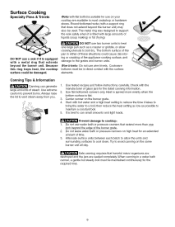
... to cool down. The metal ring was designed to maintain a constant boil. 5. Check with the manufacturer of glass jars for an extended amount of the appliance cooking surface, and damage to boil dry. Alternate surface units between each batch to allow cooking utensils to the grates and burner units. Surface Cooking...
... to cool down. The metal ring was designed to maintain a constant boil. 5. Check with the manufacturer of glass jars for an extended amount of the appliance cooking surface, and damage to boil dry. Alternate surface units between each batch to allow cooking utensils to the grates and burner units. Surface Cooking...

Use and Care Guide
Page 21
... biscuits put into the oven before the preheating time is completed. If the water level is uneven, refer to the installation instructions for leveling the appliance. • Be sure to allow 2" to 4" (5.1 cm to 10.2 cm) of clearance on all sides of each pan in the oven. • Do not use... oven wall or rack overcrowded. • Pan warped. • Oven too cool. • Oven overcrowded. • Oven door opened too frequently. Cakes not level. • Range not level. Foods not done when cooking time is too hot or too cold, you feel your previously owned...
... biscuits put into the oven before the preheating time is completed. If the water level is uneven, refer to the installation instructions for leveling the appliance. • Be sure to allow 2" to 4" (5.1 cm to 10.2 cm) of clearance on all sides of each pan in the oven. • Do not use... oven wall or rack overcrowded. • Pan warped. • Oven too cool. • Oven overcrowded. • Oven door opened too frequently. Cakes not level. • Range not level. Foods not done when cooking time is too hot or too cold, you feel your previously owned...
Use and Care Guide
Page 30
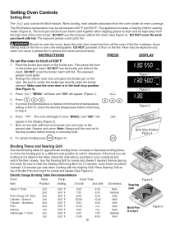
...fire extinguisher. DO NOT use the broiler pan without the insert (See Figure 5). Use the Searing Grill for searing meats (Figure 6). Electric Range Broiling Table Recommendations Food Rack Temp Cook Time Item Steak 1" thick Pork Chops 3/4" thick Chicken - Boneless Fish Shrimp Hamburger 1" thick Position .... Make sure the oven door is browned; Setting Oven Controls Setting Broil The pad controls the Broil feature. This appliance includes a Searing Grill for meats and steaks if desired. Broiling Times and Searing Grill Use the following table for meats and...
...fire extinguisher. DO NOT use the broiler pan without the insert (See Figure 5). Use the Searing Grill for searing meats (Figure 6). Electric Range Broiling Table Recommendations Food Rack Temp Cook Time Item Steak 1" thick Pork Chops 3/4" thick Chicken - Boneless Fish Shrimp Hamburger 1" thick Position .... Make sure the oven door is browned; Setting Oven Controls Setting Broil The pad controls the Broil feature. This appliance includes a Searing Grill for meats and steaks if desired. Broiling Times and Searing Grill Use the following table for meats and...
Use and Care Guide
Page 33
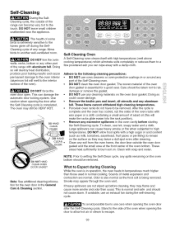
...to the side of the oven when opening the door to allow food spills with aluminum foil. DO NOT leave small children unattended near the appliance. If heavy spillovers are normal. Use caution when opening the oven door after the Self-Cleaning cycle is in or around any soil from the... oven frame, the door liner outside of the range can become very hot to temperatures much higher than usual. Clean with wax paper or a cloth containing a small amount of salad oil (this will...
...to the side of the oven when opening the door to allow food spills with aluminum foil. DO NOT leave small children unattended near the appliance. If heavy spillovers are normal. Use caution when opening the oven door after the Self-Cleaning cycle is in or around any soil from the... oven frame, the door liner outside of the range can become very hot to temperatures much higher than usual. Clean with wax paper or a cloth containing a small amount of salad oil (this will...
Use and Care Guide
Page 37
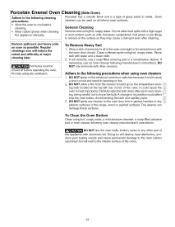
...must be used on the electrical controls or switches because it could cause the oven to heat improperly. Provide adequate ventilation. Allow a dish of the appliance with aluminum foil. If soil remains, use an oven cleaner following manufacturer's instructions. DO NOT spray on all interior oven surfaces. it could affect...following cleaning precautions: • Allow the oven to cool before operating the oven. Cleaning (SideOven) Porcelain has a smooth finish and is a type of the range, wood or painted surfaces. If necessary, use a soap-filled scouring pad or a nonabrasive cleaner.
...must be used on the electrical controls or switches because it could cause the oven to heat improperly. Provide adequate ventilation. Allow a dish of the appliance with aluminum foil. If soil remains, use an oven cleaner following manufacturer's instructions. DO NOT spray on all interior oven surfaces. it could affect...following cleaning precautions: • Allow the oven to cool before operating the oven. Cleaning (SideOven) Porcelain has a smooth finish and is a type of the range, wood or painted surfaces. If necessary, use a soap-filled scouring pad or a nonabrasive cleaner.
Use and Care Guide
Page 40
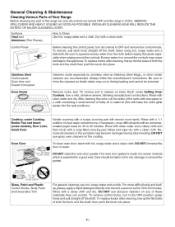
...remove, pull each knob straight off the shaft. If necessary, cover difficult spots with a soapy scouring pad will make the racks glide easier into place. 40 DO NOT use hot, soapy water and a cloth. Rinse with a soap-filled scouring pad. To remove control knobs, turn all controls are turned ...OFF and the range is essential for stainless steel as bluish stains may become damaged during heating and cannot be taken not to the appliance.To replace knobs after cleaning, line up the flat sides of both the knob ...
...remove, pull each knob straight off the shaft. If necessary, cover difficult spots with a soapy scouring pad will make the racks glide easier into place. 40 DO NOT use hot, soapy water and a cloth. Rinse with a soap-filled scouring pad. To remove control knobs, turn all controls are turned ...OFF and the range is essential for stainless steel as bluish stains may become damaged during heating and cannot be taken not to the appliance.To replace knobs after cleaning, line up the flat sides of both the knob ...
Use and Care Guide
Page 41
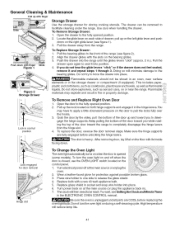
... door to facilitate cleaning under the range. To replace the door, reverse the door removal steps. High temperature will minimize damage to release the glass shield. 4. Keep pulling the bottom of the door toward you while rotating the top of the door up with a new 40 watt appliance bulb. 5. gaged for protection against...
... door to facilitate cleaning under the range. To replace the door, reverse the door removal steps. High temperature will minimize damage to release the glass shield. 4. Keep pulling the bottom of the door toward you while rotating the top of the door up with a new 40 watt appliance bulb. 5. gaged for protection against...

Use and Care Guide
Page 42
...Ff0, F30 or F90. Dry the burners thoroughly following instructions under General Cleaning. Salt air in this appliance. Cookware with range. Contact builder or installer to make range appear to clean ports or slots. Surface burner flame is not complete. Service wiring is orange, Replace ... turns blue. See "To Clean Burner Grates, Contoured Burner Pans, Burner Caps and Burner Bases" under General Cleaning. Cannot move appliance easily. Burner ports are clean before usage. Be sure cooktop surface and bottoms of utensils are clogged. Push CLEAR and contact Sears...
...Ff0, F30 or F90. Dry the burners thoroughly following instructions under General Cleaning. Salt air in this appliance. Cookware with range. Contact builder or installer to make range appear to clean ports or slots. Surface burner flame is not complete. Service wiring is orange, Replace ... turns blue. See "To Clean Burner Grates, Contoured Burner Pans, Burner Caps and Burner Bases" under General Cleaning. Cannot move appliance easily. Burner ports are clean before usage. Be sure cooktop surface and bottoms of utensils are clogged. Push CLEAR and contact Sears...

Use and Care Guide
Page 46
...FOYERMC 1-888-SU-HOGAR ® (1-800-533-6937) 7S, ears ® Registered Trademark / TM Trademark / S"M Service Mark of all major brand appliances, lawn and garden equipment, or heating and cooling systems, no matter who made it, no matter who sold it -yourself. For Sears professional installation of... home appliances and items like vacuums, lawn equipment, and electronics, call anytime for the location of carry-in your nearest S_;rs Parts & Repair ...
...FOYERMC 1-888-SU-HOGAR ® (1-800-533-6937) 7S, ears ® Registered Trademark / TM Trademark / S"M Service Mark of all major brand appliances, lawn and garden equipment, or heating and cooling systems, no matter who made it, no matter who sold it -yourself. For Sears professional installation of... home appliances and items like vacuums, lawn equipment, and electronics, call anytime for the location of carry-in your nearest S_;rs Parts & Repair ...