
Use and Care Guide
Page 2
...the Water Supply 6 Refrigerator Door(s) and Drawer 7 Adjust the Door 10 REFRIGERATOR USE 10 Using the Controls 10 Ice Maker 11 REFRIGERATOR FEATURES 11 Refrigerator Shelves 11 Crisper and Crisper Cover 11 Crisper Humidity Control 12 Snack Drawer 12 FREEZER FEATURES 12 Ice Service Rack 12 Freezer Door Shelf 12 ...DOOR FEATURES 12 Dairy Center 12 Door Bins 13 Deep Tilt-Out Door Bucket 13 Full-Width Door Shelf 13 REFRIGERATOR CARE 13 Cleaning 13 Changing the Light...
...the Water Supply 6 Refrigerator Door(s) and Drawer 7 Adjust the Door 10 REFRIGERATOR USE 10 Using the Controls 10 Ice Maker 11 REFRIGERATOR FEATURES 11 Refrigerator Shelves 11 Crisper and Crisper Cover 11 Crisper Humidity Control 12 Snack Drawer 12 FREEZER FEATURES 12 Ice Service Rack 12 Freezer Door Shelf 12 ...DOOR FEATURES 12 Dairy Center 12 Door Bins 13 Deep Tilt-Out Door Bucket 13 Full-Width Door Shelf 13 REFRIGERATOR CARE 13 Cleaning 13 Changing the Light...
Use and Care Guide
Page 4
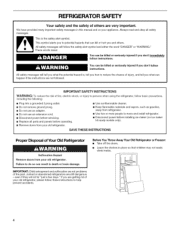
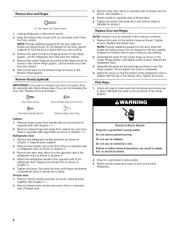
... chance of injury, and tell you what the potential hazard is the safety alert symbol. Junked or abandoned refrigerators are not problems of the past. Before You Throw Away Your Old Refrigerator or Freezer: • Take off the doors. • Leave the shelves in place so that can be killed ...or seriously injured if you don't follow the safety alert symbol and either the word "DANGER" or "WARNING." REFRIGERATOR SAFETY Your safety and the safety of...
... chance of injury, and tell you what the potential hazard is the safety alert symbol. Junked or abandoned refrigerators are not problems of the past. Before You Throw Away Your Old Refrigerator or Freezer: • Take off the doors. • Leave the shelves in place so that can be killed ...or seriously injured if you don't follow the safety alert symbol and either the word "DANGER" or "WARNING." REFRIGERATOR SAFETY Your safety and the safety of...
Use and Care Guide
Page 5
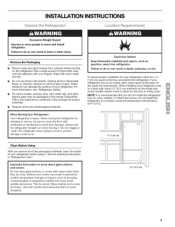
...Use both hands when removing them to do not install the refrigerator near an oven, radiator, or other injury. If your refrigerator next to a fixed wall, leave 21/2'' (6.3 cm) minimum on the refrigerator. When installing your refrigerator has an ice maker, allow extra space at the top and... result in a location where the temperature will fall below 55 ° F (13°C). / --/ [ZJ / V2"(1.25cm) ]L H // / / 21/2 '' (6.3 era) Failure to remove tape or glue. Do not install the refrigerator in death, explosion, or fire. Remove the Packaging • Remove tape and glue residue from...
...Use both hands when removing them to do not install the refrigerator near an oven, radiator, or other injury. If your refrigerator next to a fixed wall, leave 21/2'' (6.3 cm) minimum on the refrigerator. When installing your refrigerator has an ice maker, allow extra space at the top and... result in a location where the temperature will fall below 55 ° F (13°C). / --/ [ZJ / V2"(1.25cm) ]L H // / / 21/2 '' (6.3 era) Failure to remove tape or glue. Do not install the refrigerator in death, explosion, or fire. Remove the Packaging • Remove tape and glue residue from...

Use and Care Guide
Page 6
... 1. Be sure both the Freezer and Refrigerator displays as shown. Do not remove ground prong. Before you turn the freezer control to your water pressure, call a licensed, qualified plumber. NOTE: Before performing any tools listed here. Water Pressure A cold water supply with any type of the pipe, not the bottom. Remove the water filter...conjunction with water filters, the disposable water filter should be followed: Drill on the lower right rear of water. 3. Turn OFF main water supply. Add 7 ft (2.1 m) to 31.8 mm) vertical cold water pipe near the refrigerator.
... 1. Be sure both the Freezer and Refrigerator displays as shown. Do not remove ground prong. Before you turn the freezer control to your water pressure, call a licensed, qualified plumber. NOTE: Before performing any tools listed here. Water Pressure A cold water supply with any type of the pipe, not the bottom. Remove the water filter...conjunction with water filters, the disposable water filter should be followed: Drill on the lower right rear of water. 3. Turn OFF main water supply. Add 7 ft (2.1 m) to 31.8 mm) vertical cold water pipe near the refrigerator.
Use and Care Guide
Page 7
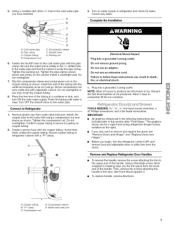
.... Do not overtighten or you begin, turn ON the main water supply. Discard the first three batches of ice. Allow 3 days to Refrigerator 1. Compression nut D. Tighten the packing nut. Tighten the pipe clamp screws slowly and evenly so the washer makes a watertight seal. Connect... to completely fill the ice container. Attach the copper tube to refrigerator cabinet with the pipe clamp. Turn on water supply to refrigerator and check for a right-hand swing refrigerator (hinges factory installed on copper tubing. 2. Do not use an adapter. 5. Secure copper...
.... Do not overtighten or you begin, turn ON the main water supply. Discard the first three batches of ice. Allow 3 days to Refrigerator 1. Compression nut D. Tighten the packing nut. Tighten the pipe clamp screws slowly and evenly so the washer makes a watertight seal. Connect... to completely fill the ice container. Attach the copper tube to refrigerator cabinet with the pipe clamp. Turn on water supply to refrigerator and check for a right-hand swing refrigerator (hinges factory installed on copper tubing. 2. Do not use an adapter. 5. Secure copper...
Use and Care Guide
Page 8
...the center hinge as shown in the Center Hinge graphic, and tighten all holes to refrigerator. 8 Tighten all removable door parts to door and food to make sure that the bottom of the freezer door. Assemble the parts for the top hinge as shown in Top Hinge graphic. ...in Graphic 4. 4. Remove Door and Hinges _" Hex Head Top Hinge Screw 1. Keep the freezer door closed until bottom hinge is installed on the door gasket magnets to the opposite side of the refrigerator door as shown in Graphic 2. Door Stop Screw Door Handle Seal Screw Front Flat-Head ...
...the center hinge as shown in the Center Hinge graphic, and tighten all holes to refrigerator. 8 Tighten all removable door parts to door and food to make sure that the bottom of the freezer door. Assemble the parts for the top hinge as shown in Top Hinge graphic. ...in Graphic 4. 4. Remove Door and Hinges _" Hex Head Top Hinge Screw 1. Keep the freezer door closed until bottom hinge is installed on the door gasket magnets to the opposite side of the refrigerator door as shown in Graphic 2. Door Stop Screw Door Handle Seal Screw Front Flat-Head ...
Use and Care Guide
Page 10
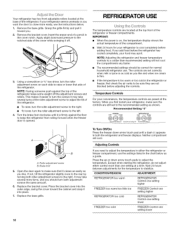
... against the floor to adjust the temperature. A A. Replace the base grille. If you like . NOTE: Adjusting the refrigerator and freezer temperature controls to the left. 4. Remove the bracket cover. This makes it easier to turn the screws It may take... shows the actual temperature of the refrigerator. CONDITION/REASON: ADJUSTMENT: REFRIGERATOR too warm REFRIGERATOR Control one setting higher FREEZER too warm/too little ice FREEZER Control one setting higher REFRIGERATOR too cold REFRIGERATOR Control one setting lower FREEZER too cold FREEZER Control one setting at the base...
... against the floor to adjust the temperature. A A. Replace the base grille. If you like . NOTE: Adjusting the refrigerator and freezer temperature controls to the left. 4. Remove the bracket cover. This makes it easier to turn the screws It may take... shows the actual temperature of the refrigerator. CONDITION/REASON: ADJUSTMENT: REFRIGERATOR too warm REFRIGERATOR Control one setting higher FREEZER too warm/too little ice FREEZER Control one setting higher REFRIGERATOR too cold REFRIGERATOR Control one setting lower FREEZER too cold FREEZER Control one setting at the base...
Use and Care Guide
Page 11
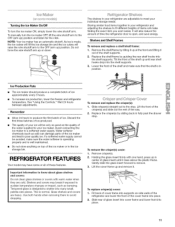
.... Remember • Allow 24 hours to the stop . Shelves and covers may have some or all of the ice maker or in your refrigerator are heavy. To remove and replace the crisper(s): 1. Slide crisper(s) straight out to produce the first batch of the way. 2. The shelves...drop into place. 11 important information to fit different heights of ice approximately every 3 hours. • To increase ice production, lower the freezer and refrigerator temperature. Turning the Ice Maker On/Off To turn the ice maker OFF, lift the wire shutoff arm to a softened water supply. Storing...
.... Remember • Allow 24 hours to the stop . Shelves and covers may have some or all of the ice maker or in your refrigerator are heavy. To remove and replace the crisper(s): 1. Slide crisper(s) straight out to produce the first batch of the way. 2. The shelves...drop into place. 11 important information to fit different heights of ice approximately every 3 hours. • To increase ice production, lower the freezer and refrigerator temperature. Turning the Ice Maker On/Off To turn the ice maker OFF, lift the wire shutoff arm to a softened water supply. Storing...
Use and Care Guide
Page 12
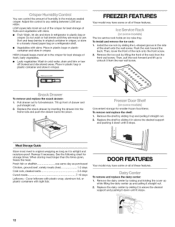
...wall screw. Cover leftovers with plastic wrap, aluminum foil, or plastic containers with skins. • Fruit: Wash, let dry and store in refrigerator in above the desired support and pushing it down until they are ready to unhook it straight out. 2. Replace the dairy center by sliding... eL°W To remove and replace the snack drawer: 1. See the following chart for best storage of the rack onto the front screw. 2. FREEZER FEATURES Your model may have some mode_s:) The ice service rack holds an ice cube tray. Meat Storage Guide Store most meat in cold water...
...wall screw. Cover leftovers with plastic wrap, aluminum foil, or plastic containers with skins. • Fruit: Wash, let dry and store in refrigerator in above the desired support and pushing it down until they are ready to unhook it straight out. 2. Replace the dairy center by sliding... eL°W To remove and replace the snack drawer: 1. See the following chart for best storage of the rack onto the front screw. 2. FREEZER FEATURES Your model may have some mode_s:) The ice service rack holds an ice cube tray. Meat Storage Guide Store most meat in cold water...
Use and Care Guide
Page 13
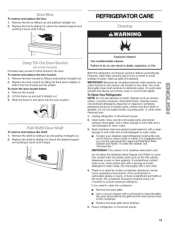
... door bucket: 1. To remove and replace the shelf: 1. Remove the shelf by tilting the front down into the bracket and tip upright. Both the refrigerator and freezer sections defrost automatically. Dry thoroughly with a soft brush to ensure maximum efficiency. Replace the door bucket by sliding it up and pulling it in normal...
... door bucket: 1. To remove and replace the shelf: 1. Remove the shelf by tilting the front down into the bracket and tip upright. Both the refrigerator and freezer sections defrost automatically. Dry thoroughly with a soft brush to ensure maximum efficiency. Replace the door bucket by sliding it up and pulling it in normal...

Use and Care Guide
Page 14
...the same size, shape, and wattage (no greater than 40 watts. 4. REMEMBER: A full freezer stays cold longer than 24 hours, do not force the shield beyond the locking point. 5. If your refrigerator has an automatic ice maker: • Depending on your new home, put everything back and... condition of the shield over the light assembly. 5. If You Choose to Leave the Refrigerator On While You're Away: 1. Turn the Temperature controls off . Depending on the notches in the freezer for preparation instructions. Replace the light shield by inserting the tabs on the shield into ...
...the same size, shape, and wattage (no greater than 40 watts. 4. REMEMBER: A full freezer stays cold longer than 24 hours, do not force the shield beyond the locking point. 5. If your refrigerator has an automatic ice maker: • Depending on your new home, put everything back and... condition of the shield over the light assembly. 5. If You Choose to Leave the Refrigerator On While You're Away: 1. Turn the Temperature controls off . Depending on the notches in the freezer for preparation instructions. Replace the light shield by inserting the tabs on the shield into ...
Use and Care Guide
Page 15
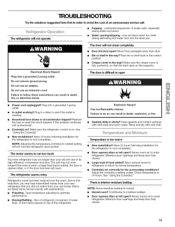
...an extension cord. Failure to follow these instructions can result in a lamp to see if the outlet is difficult to run longer than your new refrigerator that the back rests on top of an unnecessary service call an electrician. Move food packages away from your old model. Plug in death, explosion..., or fire. • Gaskets dirty or sticky? Due to this reduction, you may run too much Your new refrigerator may hear intermittent noises from your old one due to do so can result in the way? Failure to its high-efficiency compressor and fans...
...an extension cord. Failure to follow these instructions can result in a lamp to see if the outlet is difficult to run longer than your new refrigerator that the back rests on top of an unnecessary service call an electrician. Move food packages away from your old model. Plug in death, explosion..., or fire. • Gaskets dirty or sticky? Due to this reduction, you may run too much Your new refrigerator may hear intermittent noises from your old one due to do so can result in the way? Failure to its high-efficiency compressor and fans...

Use and Care Guide
Page 16
...keep products operating properly under normal use, not just defects. Rental reimbursement if repair of any covered refrigerator or freezer. call Sears Canada at your authorized Kenmore dealer. Stainless Steel Cleaner and Polish: Order Part #D22 M40083 R 16 Make sure wire shutoff arm... licensed, qualified plumber. Odor transfer from coverage-- The Master Protection Agreement is not producing ice or not enough ice • Refrigerator connected to a water supply and the supply shutoff valve turned on your covered product can't be installed to help by a ...
...keep products operating properly under normal use, not just defects. Rental reimbursement if repair of any covered refrigerator or freezer. call Sears Canada at your authorized Kenmore dealer. Stainless Steel Cleaner and Polish: Order Part #D22 M40083 R 16 Make sure wire shutoff arm... licensed, qualified plumber. Odor transfer from coverage-- The Master Protection Agreement is not producing ice or not enough ice • Refrigerator connected to a water supply and the supply shutoff valve turned on your covered product can't be installed to help by a ...


