
Owners Manual
Page 2
... AGREEMENTS 35 SERVICE NUMBERS Back Cover FULL ONE YEAR WARRANTY ON ROOM AIR CONDITIONER For one year from the date of purchase, when this air conditioner is operated and maintained for normal room cooling according to the instructions in this owner's manual, Sears will repair this air conditioner, free of charge, if defective in material or workmanship. FULL...
... AGREEMENTS 35 SERVICE NUMBERS Back Cover FULL ONE YEAR WARRANTY ON ROOM AIR CONDITIONER For one year from the date of purchase, when this air conditioner is operated and maintained for normal room cooling according to the instructions in this owner's manual, Sears will repair this air conditioner, free of charge, if defective in material or workmanship. FULL...
Owners Manual
Page 3
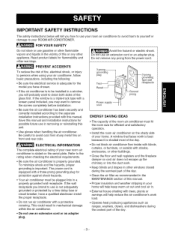
... to the rating when checking the electrical requirements. • Be sure the air conditioner is stated on the serial plate. Read product labels for efficient and satisfactory operation. • Install the room air conditioner on front and rear coils. If the window is a triple-track type... your home. grounding plug Test __L__ 3"pr°ng grounding trYPceptlWiea_ Power su cord ENERGY SAVINGIDEAS • The capacity of the room air conditioner must be installed in removing or reinstalling this manual. Do not use in a window, you have a qualified electrician install the ...
... to the rating when checking the electrical requirements. • Be sure the air conditioner is stated on the serial plate. Read product labels for efficient and satisfactory operation. • Install the room air conditioner on front and rear coils. If the window is a triple-track type... your home. grounding plug Test __L__ 3"pr°ng grounding trYPceptlWiea_ Power su cord ENERGY SAVINGIDEAS • The capacity of the room air conditioner must be installed in removing or reinstalling this manual. Do not use in a window, you have a qualified electrician install the ...

Owners Manual
Page 4
... tested on the plug case. If the TEST button does not trip or if the RESET button will not stay engaged, discontinue use of the air conditioner and contact a qualified service technician. A test and reset button is recommended.Use a dedicated circuit, serving only this appliancemustbegrounded. For 230/208volt 60 Hz,AC only...
... tested on the plug case. If the TEST button does not trip or if the RESET button will not stay engaged, discontinue use of the air conditioner and contact a qualified service technician. A test and reset button is recommended.Use a dedicated circuit, serving only this appliancemustbegrounded. For 230/208volt 60 Hz,AC only...
Owners Manual
Page 5
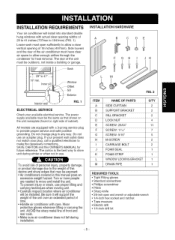
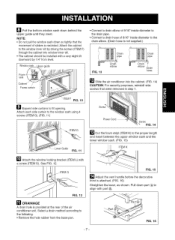
The rear of the unit must be outdoors, not inside a building or garage. INSTALLATION HARDWARE B C DE F GH I JK __J__/.-... Sash 18"min. _/ Inner sillL [ _ ,_"_J"J Side louvers and the rear of the air conditioner must have clear air space to allow enough airflow through the condenser for heat removal. INSTALLATION REQUIREMENTS Your air conditioner will install into standard double hung windows with actual clear opening widths of 29 to 41 inches (737mm to 1041mm) (FIG. 1) Lower sash must open sufficiently to allow a clear vertical opening of 18 inches (457mm).
The rear of the unit must be outdoors, not inside a building or garage. INSTALLATION HARDWARE B C DE F GH I JK __J__/.-... Sash 18"min. _/ Inner sillL [ _ ,_"_J"J Side louvers and the rear of the air conditioner must have clear air space to allow enough airflow through the condenser for heat removal. INSTALLATION REQUIREMENTS Your air conditioner will install into standard double hung windows with actual clear opening widths of 29 to 41 inches (737mm to 1041mm) (FIG. 1) Lower sash must open sufficiently to allow a clear vertical opening of 18 inches (457mm).
Owners Manual
Page 6
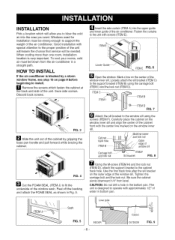
.... Cut the FOAM SEAL (ITEM J) to install. Be sure the cabinet slants downward 1/4" from the air conditioner in Fig. 5. CAUTION: Do not drill a hole in bottom pan. To cool your rooms, cold air must be strong enough to the window sill using the carriage bolt (ITEM I ' /.. Tighten the ...carriage bolt and the lock nut. HOW TO INSTALL If the air conditioner is very important. Save side screws. FIG. 3 I_'_ Slide...
.... Cut the FOAM SEAL (ITEM J) to install. Be sure the cabinet slants downward 1/4" from the air conditioner in Fig. 5. CAUTION: Do not drill a hole in bottom pan. To cool your rooms, cold air must be strong enough to the window sill using the carriage bolt (ITEM I ' /.. Tighten the ...carriage bolt and the lock nut. HOW TO INSTALL If the air conditioner is very important. Save side screws. FIG. 3 I_'_ Slide...
Owners Manual
Page 7
... step 1. Window sash Ipper guide • Connect a drain elbow of 9/16" inside diameter to the drain pipe. • Connect a drain hose of the air conditioner unit. ITEMF FIG. 10 _1 Expand side curtains to the drain elbow. (Drain hose is provided at the rear of 9/16" inside diameter to fill... opening. Ill DRAINAGE A drain hole is not supplied.) FIG. 13 elbow Drain hose Frame curtain _"_ Slide the air conditioner into window inner sill. • The cabinet should be installed with a very slight tilt downward by 1/4" from the base-pan.
... step 1. Window sash Ipper guide • Connect a drain elbow of 9/16" inside diameter to the drain pipe. • Connect a drain hose of the air conditioner unit. ITEMF FIG. 10 _1 Expand side curtains to the drain elbow. (Drain hose is provided at the rear of 9/16" inside diameter to fill... opening. Ill DRAINAGE A drain hole is not supplied.) FIG. 13 elbow Drain hose Frame curtain _"_ Slide the air conditioner into window inner sill. • The cabinet should be installed with a very slight tilt downward by 1/4" from the base-pan.
Owners Manual
Page 8
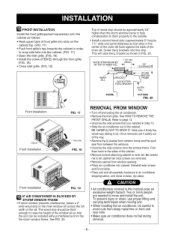
... sill across the full width of the sill. Two or more people are removed. • Remove cabinet from window opening. • Place air conditioner into cabinet. Refer to move and install the unit. The wood strip should be approximately 3/4" higher than the storm window frame to help condensation... the screw (ITEM E) through the front grille. (FIG. 18) • Close inlet grille. (FIG. 19) Top of wood strip should be thick enough to avoid cuts from sharp metal fins on front and rear coils. • Make sure air conditioner does not fall once screws are needed to page 13. &#...
... sill across the full width of the sill. Two or more people are removed. • Remove cabinet from window opening. • Place air conditioner into cabinet. Refer to move and install the unit. The wood strip should be approximately 3/4" higher than the storm window frame to help condensation... the screw (ITEM E) through the front grille. (FIG. 18) • Close inlet grille. (FIG. 19) Top of wood strip should be thick enough to avoid cuts from sharp metal fins on front and rear coils. • Make sure air conditioner does not fall once screws are needed to page 13. &#...
Owners Manual
Page 9
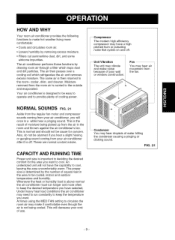
..., drier, and cleaner. This is the result of moisture being cooled. The proper size is above normal the air conditioner must run longer and more comfortable: • Cools and circulates room air. • Lowers humidity by removing excess moisture. • Filters out summertime dust, dirt, and some airborne...motor and compressor sounds coming from your cost of use. This is not being picked up from the room air is carried to the outside and evaporated. The air conditioner performs these functions by the number of square feet in deciding the desired comfort for concern. HOW AND...
..., drier, and cleaner. This is the result of moisture being cooled. The proper size is above normal the air conditioner must run longer and more comfortable: • Cools and circulates room air. • Lowers humidity by removing excess moisture. • Filters out summertime dust, dirt, and some airborne...motor and compressor sounds coming from your cost of use. This is not being picked up from the room air is carried to the outside and evaporated. The air conditioner performs these functions by the number of square feet in deciding the desired comfort for concern. HOW AND...
Owners Manual
Page 10
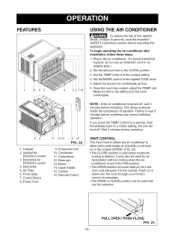
... the FAN position. • The OPEN position removes stale air from the room and exhausts it to a cooler setting, the unit will shut off , wait 3 minutes before restarting. NOTE : If the air conditioner is set in the air conditioner. (To prevent electrical hazards, do not use an extension cord...CLOSE position. 3. Once the room has cooled, adjust the TEMP and Mode Control to equalize. This allows pressure inside air (CLOSE) or exhaust air te the outside . If you find most comfortable. VENT CONTROL The Vent Control allows the air conditioner to either recirculate inside the compressor...
... the FAN position. • The OPEN position removes stale air from the room and exhausts it to a cooler setting, the unit will shut off , wait 3 minutes before restarting. NOTE : If the air conditioner is set in the air conditioner. (To prevent electrical hazards, do not use an extension cord...CLOSE position. 3. Once the room has cooled, adjust the TEMP and Mode Control to equalize. This allows pressure inside air (CLOSE) or exhaust air te the outside . If you find most comfortable. VENT CONTROL The Vent Control allows the air conditioner to either recirculate inside the compressor...
Owners Manual
Page 11
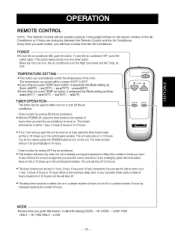
...8226; The timer function can be set the unit to come on at 5 pm pressthe timer buttontwice so that a '3' shows up in either turn the air conditioner ON, push the button. LOW, FAN ONLY - In failure of electric power, the unit runs as flows: • ooo (64°F) _ o•...be usedto eitherturn on or turn off at nightand you can automatically control the temperature of the room. at 70 F. • If it on automaticallyin 10 hours. -Timer function for yurningON the air conditioner: • With the POWERoff, press the timer button to the number of hours you push ...
...8226; The timer function can be set the unit to come on at 5 pm pressthe timer buttontwice so that a '3' shows up in either turn the air conditioner ON, push the button. LOW, FAN ONLY - In failure of electric power, the unit runs as flows: • ooo (64°F) _ o•...be usedto eitherturn on or turn off at nightand you can automatically control the temperature of the room. at 70 F. • If it on automaticallyin 10 hours. -Timer function for yurningON the air conditioner: • With the POWERoff, press the timer button to the number of hours you push ...
Owners Manual
Page 13
... operate properly if strong light shines on the sensor window of the room. LOW. -13 - Every time you push button, you can automatically control the temperature of the Air Conditioner or if there are obstacles between the Remote Control and the Air Conditioner. HI, FAN ONLY - To turn off . • The delay timer functions to...
... operate properly if strong light shines on the sensor window of the room. LOW. -13 - Every time you push button, you can automatically control the temperature of the Air Conditioner or if there are obstacles between the Remote Control and the Air Conditioner. HI, FAN ONLY - To turn off . • The delay timer functions to...
Owners Manual
Page 14
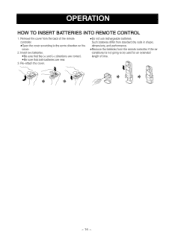
eOpen the cover according to be used for an extended length of the remote controller. oBe sure that the (+) and (-) directions are new. 3. oDe not use rechargeable batteries. eRemove the batteries from standard dry cells in shape, dimensions, and performance. eBe sure that both batteries are correct. Such batteries differ from the remote controller if the air conditioner is not going to the arrow direction on the cover. 2. Insert two batteries. Re-attach the cover. Remove the cover from the back of time. -14 - HOW TO INSERT BATTERIES INTO REMOTE CONTROL 1.
eOpen the cover according to be used for an extended length of the remote controller. oBe sure that the (+) and (-) directions are new. 3. oDe not use rechargeable batteries. eRemove the batteries from standard dry cells in shape, dimensions, and performance. eBe sure that both batteries are correct. Such batteries differ from the remote controller if the air conditioner is not going to the arrow direction on the cover. 2. Insert two batteries. Re-attach the cover. Remove the cover from the back of time. -14 - HOW TO INSERT BATTERIES INTO REMOTE CONTROL 1.
Owners Manual
Page 15
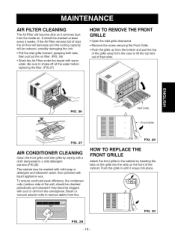
... vacuum exterior coils to remove debris from the inside air. FIG. 26 Inlet Grille FIG. 27 AIR CONDITIONER CLEANING Clean the front grille and inlet grille by ...inserting the tabs on the front of the cabinet. FIG. 29 HOW TO REPLACE THE FRONT GRILLE Attach the front grille to lift the top tabs out of dust, the air...unit. • Pull the inlet grille forward, grasping both tabs, then pull out the air filter. (FIG. 26) • Wash the Air Filter under the faucet with liquid appliance wax. FIG. 28 -15- FIG. 30 It...
... vacuum exterior coils to remove debris from the inside air. FIG. 26 Inlet Grille FIG. 27 AIR CONDITIONER CLEANING Clean the front grille and inlet grille by ...inserting the tabs on the front of the cabinet. FIG. 29 HOW TO REPLACE THE FRONT GRILLE Attach the front grille to lift the top tabs out of dust, the air...unit. • Pull the inlet grille forward, grasping both tabs, then pull out the air filter. (FIG. 26) • Wash the Air Filter under the faucet with liquid appliance wax. FIG. 28 -15- FIG. 30 It...
Owners Manual
Page 16
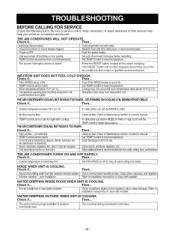
... use of owner's manual. Temperature sensing tube touching evaporator coil, located behind front grille. TEMP Control set at HI. Air distributionis restricted. THE AIR CONDITIONER TURNS ON AND OFF RAPIDLY. WATER DRIPPING INSIDE ROOM WHEN UNIT IS COOLING. Tiltianisrtcaollnadtiniotsinotrnuecrstiloignhsotlyr tocthecowkuithsiidnesttoalalellro,wwaterdrainage.Referto WATER DRIPPING OUTSIDE WHEN UNIT IS COOLING. This is triped Press the...
... use of owner's manual. Temperature sensing tube touching evaporator coil, located behind front grille. TEMP Control set at HI. Air distributionis restricted. THE AIR CONDITIONER TURNS ON AND OFF RAPIDLY. WATER DRIPPING INSIDE ROOM WHEN UNIT IS COOLING. Tiltianisrtcaollnadtiniotsinotrnuecrstiloignhsotlyr tocthecowkuithsiidnesttoalalellro,wwaterdrainage.Referto WATER DRIPPING OUTSIDE WHEN UNIT IS COOLING. This is triped Press the...


