
Owners Manual
Page 2
... AGREEMENTS 35 SERVICE NUMBERS Back Cover FULL ONE YEAR WARRANTY ON ROOM AIR CONDITIONER For one year from the date of purchase, when this air conditioner is in use in the United States. This warranty applies only while this product is operated and maintained for normal room cooling according to the instructions in this owner's manual, Sears will repair this owner's manual, Sears will repair the sealed refrigeration system (consisting of refrigerant, connecting tubing, and compressor), free of charge...
... AGREEMENTS 35 SERVICE NUMBERS Back Cover FULL ONE YEAR WARRANTY ON ROOM AIR CONDITIONER For one year from the date of purchase, when this air conditioner is in use in the United States. This warranty applies only while this product is operated and maintained for normal room cooling according to the instructions in this owner's manual, Sears will repair this owner's manual, Sears will repair the sealed refrigeration system (consisting of refrigerant, connecting tubing, and compressor), free of charge...
Owners Manual
Page 3
... window is a triple-track type with a screen panel included, you will probably want to remove the screen completely before installation. • Be sure the air conditioner has been securely and correctly installed according to the separate installation instructions provided with this manual. • Proper insulation and weather stripping in your ROOM AIR CONDITIONER. Refer to the rating when checking the electrical requirements. • Be sure the air conditioner...
... window is a triple-track type with a screen panel included, you will probably want to remove the screen completely before installation. • Be sure the air conditioner has been securely and correctly installed according to the separate installation instructions provided with this manual. • Proper insulation and weather stripping in your ROOM AIR CONDITIONER. Refer to the rating when checking the electrical requirements. • Be sure the air conditioner...

Owners Manual
Page 4
... properlygrounded3-prongwall receptacleinstalledbya qualifiedelectrician. Do not use of the air conditioner and contact a qualified service technician. Use Wall Receptacle Power Supply Standard 125V, 3-wire grounding receptacle rated 15A, 125VAC Standard 250V, 3-wire grounding receptacle r_ed lSA, 2S0V AC Use 15 AMP. circuit breaker. DO NOT, UNDER ANY CIRCUMSTANCES,REMOVE THE POWERSUPPLY CORD GROUND PRONG. circuit breaker. ELECTRICALGROUND IS REQUIREDON THIS APPLIANCE. time delay fuse or 15 AMP. Do not use an adapter.
... properlygrounded3-prongwall receptacleinstalledbya qualifiedelectrician. Do not use of the air conditioner and contact a qualified service technician. Use Wall Receptacle Power Supply Standard 125V, 3-wire grounding receptacle rated 15A, 125VAC Standard 250V, 3-wire grounding receptacle r_ed lSA, 2S0V AC Use 15 AMP. circuit breaker. DO NOT, UNDER ANY CIRCUMSTANCES,REMOVE THE POWERSUPPLY CORD GROUND PRONG. circuit breaker. ELECTRICALGROUND IS REQUIREDON THIS APPLIANCE. time delay fuse or 15 AMP. Do not use an adapter.
Owners Manual
Page 5
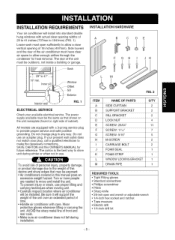
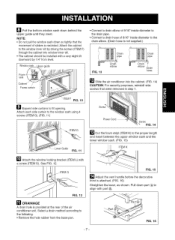
Sash 18"min. _/ Inner sillL [ _ ,_"_J"J The rear of the unit must open sufficiently to allow a clear vertical opening widths of 29 to 41 inches (737mm to allow enough airflow through the condenser for heat removal. INSTALLATION HARDWARE B C DE F GH I JK __J__/.-... INSTALLATION REQUIREMENTS Your air conditioner will install into standard double hung windows with actual clear opening of 18 inches (457mm). Side louvers and the rear of the air conditioner must have clear air space to 1041mm) (FIG. 1) Lower sash must be outdoors, not inside a building or garage.
Sash 18"min. _/ Inner sillL [ _ ,_"_J"J The rear of the unit must open sufficiently to allow a clear vertical opening widths of 29 to 41 inches (737mm to allow enough airflow through the condenser for heat removal. INSTALLATION HARDWARE B C DE F GH I JK __J__/.-... INSTALLATION REQUIREMENTS Your air conditioner will install into standard double hung windows with actual clear opening of 18 inches (457mm). Side louvers and the rear of the air conditioner must have clear air space to 1041mm) (FIG. 1) Lower sash must be outdoors, not inside a building or garage.
Owners Manual
Page 6
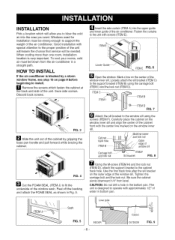
... air conditioner in bottom pan. z Sash Lowerguide FIG. 5 -6- To cool your rooms, cold air must be strong enough to support the weight of the cabinet front with approximately 1/2" of the air conditioner. Lower Guide_ _ ITEME FIG. 6 _Open the window. Use the first track hole after the sill bracket on the center of the window sill. Tighten the carriage bolt and the lock nut. INDOOR Cabinet OUTDOOR...
... air conditioner in bottom pan. z Sash Lowerguide FIG. 5 -6- To cool your rooms, cold air must be strong enough to support the weight of the cabinet front with approximately 1/2" of the air conditioner. Lower Guide_ _ ITEME FIG. 6 _Open the window. Use the first track hole after the sill bracket on the center of the window sill. Tighten the carriage bolt and the lock nut. INDOOR Cabinet OUTDOOR...
Owners Manual
Page 7
... upper window sash and the lower window sash. (FIG. 15) _1_ Attach the window locking bracket (ITEM L) with part (_. Attach each side curtain to fill opening. FIG. 15 FIG. 12 EI_ Adjust the vent handle before the decorative front is not supplied.) FIG. 13 elbow Drain hose Frame curtain _"_ Slide the air conditioner into window inner sill. • The cabinet should be installed with...
... upper window sash and the lower window sash. (FIG. 15) _1_ Attach the window locking bracket (ITEM L) with part (_. Attach each side curtain to fill opening. FIG. 15 FIG. 12 EI_ Adjust the vent handle before the decorative front is not supplied.) FIG. 13 elbow Drain hose Frame curtain _"_ Slide the air conditioner into window inner sill. • The cabinet should be installed with...
Owners Manual
Page 8
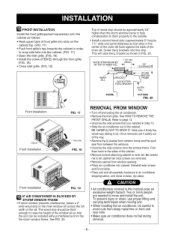
... the window frame. Screw the L brackets into cabinet. Reinstall side screws and Front Grille. • Place unit and all assembly hardware in air conditioner shipping carton, and store in clean, dry place. _!_ [e.7:TIJ i [e] _I • Air conditioners covered in FIG. 20. The wood strip should be approximately 3/4" higher than the storm window frame to help condensation to drain properly to let cabinet fall during removal. -8- B FRONT INSTALLATION Install the front grille...
... the window frame. Screw the L brackets into cabinet. Reinstall side screws and Front Grille. • Place unit and all assembly hardware in air conditioner shipping carton, and store in clean, dry place. _!_ [e.7:TIJ i [e] _I • Air conditioners covered in FIG. 20. The wood strip should be approximately 3/4" higher than the storm window frame to help condensation to drain properly to let cabinet fall during removal. -8- B FRONT INSTALLATION Install the front grille...
Owners Manual
Page 9
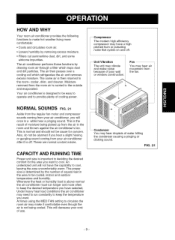
... Proper unit size is above normal the air conditioner must run constantly to cool, leaving the area uncomfortably warm. Whenever the heat or humidity load is important in the area to be easy to operate and to cool. At times using the MED FAN setting to keep the temperature you will once in the room and thrown against the air conditioner's fan. Compressor The modern high efficiency compressor...
... Proper unit size is above normal the air conditioner must run constantly to cool, leaving the area uncomfortably warm. Whenever the heat or humidity load is important in the area to be easy to operate and to cool. At times using the MED FAN setting to keep the temperature you will once in the room and thrown against the air conditioner's fan. Compressor The modern high efficiency compressor...
Owners Manual
Page 10
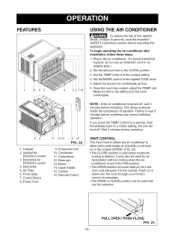
... air conditioner. (To prevent electrical hazards, do not use an extension cord or an adapter plug.) 2. FEATURES 1 15 6 5 4 32714 98 1. Vertical Air Direction Louvers 3. Front Grille 7. Compressor 12. Plug in the FAN position. • The OPEN position removes stale air from the room and exhausts it to persons, read the important SAFETY instructions section before restarting. Set the TEMP Control to the CLOSE position. 3. Adjust the louvers for air recirculation without cooling when the air conditioner...
... air conditioner. (To prevent electrical hazards, do not use an extension cord or an adapter plug.) 2. FEATURES 1 15 6 5 4 32714 98 1. Vertical Air Direction Louvers 3. Front Grille 7. Compressor 12. Plug in the FAN position. • The OPEN position removes stale air from the room and exhausts it to persons, read the important SAFETY instructions section before restarting. Set the TEMP Control to the CLOSE position. 3. Adjust the louvers for air recirculation without cooling when the air conditioner...
Owners Manual
Page 11
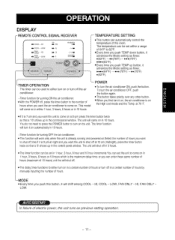
.... • o POWER • To turn on the unit. LOW, FAN ONLY - You do not needto press the POWERbutton to come on in the control panel window. The unit will shift among COOL - To turn the air conditioner OFF, push the button again. • This button takes priority over any other button. • When you first turn it advances the Mode setting as previous setting operation. } -11- In failure of electric power, the unit runs...
.... • o POWER • To turn on the unit. LOW, FAN ONLY - You do not needto press the POWERbutton to come on in the control panel window. The unit will shift among COOL - To turn the air conditioner OFF, push the button again. • This button takes priority over any other button. • When you first turn it advances the Mode setting as previous setting operation. } -11- In failure of electric power, the unit runs...
Owners Manual
Page 12
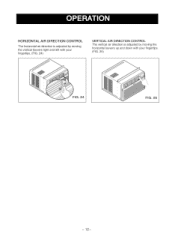
HORIZONTAALIR DIRECTIONCONTROL The horizontal air direction is adjusted by moving the vertical louvers right and left with your fingertips, (FIG. 24) VERTICAL AIR DIRECTION CONTROL The vertical air direction is adjusted by moving the horizontal louvers up and down with your fingertips. (FIG. 25) FIG. 24 FIG. 25 -12-
HORIZONTAALIR DIRECTIONCONTROL The horizontal air direction is adjusted by moving the vertical louvers right and left with your fingertips, (FIG. 24) VERTICAL AIR DIRECTION CONTROL The vertical air direction is adjusted by moving the horizontal louvers up and down with your fingertips. (FIG. 25) FIG. 24 FIG. 25 -12-
Owners Manual
Page 13
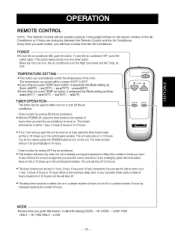
... you push button, you want the unit to shut off in 3 hours. • The timer function can be usedto eitherturnon or turn on the unit. HI, FAN ONLY - at night andyou want the air conditionerto come on in 10 hours. The temperature can be set in the control panelwindow. REMOTE CONTROL NOTE : The Remote Control will not operate properly if strong light shines on the sensor window of the...
... you push button, you want the unit to shut off in 3 hours. • The timer function can be usedto eitherturnon or turn on the unit. HI, FAN ONLY - at night andyou want the air conditionerto come on in 10 hours. The temperature can be set in the control panelwindow. REMOTE CONTROL NOTE : The Remote Control will not operate properly if strong light shines on the sensor window of the...
Owners Manual
Page 14
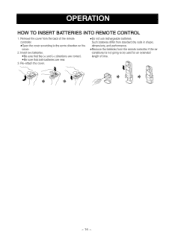
Insert two batteries. eRemove the batteries from the back of time. -14 - eBe sure that both batteries are correct. Remove the cover from the remote controller if the air conditioner is not going to the arrow direction on the cover. 2. oBe sure that the (+) and (-) directions are new. 3. Such batteries differ from standard dry cells in shape, dimensions, and performance. oDe not use rechargeable batteries. eOpen the cover according to be used for an extended length of the remote controller. Re-attach the cover. HOW TO INSERT BATTERIES INTO REMOTE CONTROL 1.
Insert two batteries. eRemove the batteries from the back of time. -14 - eBe sure that both batteries are correct. Remove the cover from the remote controller if the air conditioner is not going to the arrow direction on the cover. 2. oBe sure that the (+) and (-) directions are new. 3. Such batteries differ from standard dry cells in shape, dimensions, and performance. oDe not use rechargeable batteries. eOpen the cover according to be used for an extended length of the remote controller. Re-attach the cover. HOW TO INSERT BATTERIES INTO REMOTE CONTROL 1.
Owners Manual
Page 15
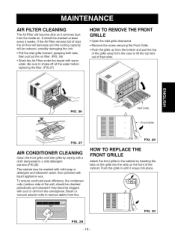
... the water before replacing the filter. (FIG.27) HOW TO REMOVE THE FRONT GRILLE • Open the inlet grille downward. • Remove the screw securing the Front Grille. • Push the grille up from the bottom and pull the top of dust, the air flow will decrease and the cooling capacity will become clogged with soot or dirt from the inside air. Push the grille...
... the water before replacing the filter. (FIG.27) HOW TO REMOVE THE FRONT GRILLE • Open the inlet grille downward. • Remove the screw securing the Front Grille. • Push the grille up from the bottom and pull the top of dust, the air flow will decrease and the cooling capacity will become clogged with soot or dirt from the inside air. Push the grille...
Owners Manual
Page 16
... moisture from evaporator coil. TEMP Control set too cold for night-time cooling. Cooling may be sure a service call . Air filter may not occur until room temperature rises above 70°F (21°C) Straighten tube away from humidroom. WATER DRIPPING INSIDE ROOM WHEN UNIT IS COOLING. Push plug firmly into wall outlet. Replace fuse with the TEMP controlto hiqhertemperature. FAN SPEED set the MODE to FAN or "High Cool" with time delay type or reset circuit breaker. ENOUGH. air restricted. Unitrecentlyturnedon inhot...
... moisture from evaporator coil. TEMP Control set too cold for night-time cooling. Cooling may be sure a service call . Air filter may not occur until room temperature rises above 70°F (21°C) Straighten tube away from humidroom. WATER DRIPPING INSIDE ROOM WHEN UNIT IS COOLING. Push plug firmly into wall outlet. Replace fuse with the TEMP controlto hiqhertemperature. FAN SPEED set the MODE to FAN or "High Cool" with time delay type or reset circuit breaker. ENOUGH. air restricted. Unitrecentlyturnedon inhot...


