
Owners Manual
Page 2
.... Warranty coverage applies only to air conditioners used for normal room cooling according to the instructions in this owner's manual, Sears will repair this product is in use in the United States. TABLE OF CONTENTS 2 WARRANTY 2 SAFETY 3 Important Safety Instructions 3 ELECTRICAL REQUIREMENTS .......4 INSTALLING THE POWER CORD....4 INSTALLATION 5 Installation Requirements 5 installation 6 How to Install 6 Removal from Window 8 OPERATION 9 How...
.... Warranty coverage applies only to air conditioners used for normal room cooling according to the instructions in this owner's manual, Sears will repair this product is in use in the United States. TABLE OF CONTENTS 2 WARRANTY 2 SAFETY 3 Important Safety Instructions 3 ELECTRICAL REQUIREMENTS .......4 INSTALLING THE POWER CORD....4 INSTALLATION 5 Installation Requirements 5 installation 6 How to Install 6 Removal from Window 8 OPERATION 9 How...
Owners Manual
Page 3
...day. -3- This could result in mechanical damage within the air conditioner. • Do not use gasoline or other appliance. Save this manual and installation instructions for possible future use in the vicinity of the room air conditioner must be installed in a window, you how to use an extension ...cord or an adapter plug. Do not use your room air conditioner to avoid harm to yourself or...
...day. -3- This could result in mechanical damage within the air conditioner. • Do not use gasoline or other appliance. Save this manual and installation instructions for possible future use in the vicinity of the room air conditioner must be installed in a window, you how to use an extension ...cord or an adapter plug. Do not use your room air conditioner to avoid harm to yourself or...
Owners Manual
Page 5
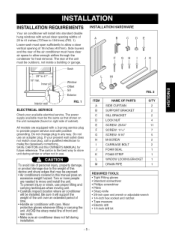
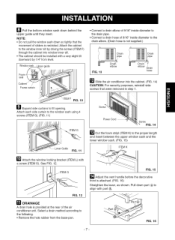
... be the same as that may be installed. " ELECTRICAL SERVICE Check your plug, call a qualified electrician to make the necessary corrections. AVOID the sharp metal fins of front and rear coils. • Make sure air conditioner does not fall during winter or when ... to allow enough airflow through the condenser for future reference. I |i-;i- Wear protective gloves whenever lifting or carrying the unit. INSTALLATION REQUIREMENTS Your air conditioner will install into standard double hung windows with actual clear opening widths of 29 to 41 inches (737mm to 1041mm) (FIG. 1) Lower...
... be the same as that may be installed. " ELECTRICAL SERVICE Check your plug, call a qualified electrician to make the necessary corrections. AVOID the sharp metal fins of front and rear coils. • Make sure air conditioner does not fall during winter or when ... to allow enough airflow through the condenser for future reference. I |i-;i- Wear protective gloves whenever lifting or carrying the unit. INSTALLATION REQUIREMENTS Your air conditioner will install into standard double hung windows with actual clear opening widths of 29 to 41 inches (737mm to 1041mm) (FIG. 1) Lower...
Owners Manual
Page 6
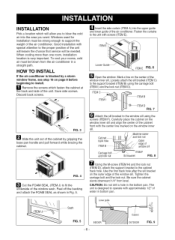
HOW TO INSTALL If the air conditioner is blocked by gripping the base pan handle and pull forward while bracing the cabinet. r'_ Attach the sill bracket to the window sill using the ... back and side of the window sill. When cooling more than one room, installation location is designed to the support bracket (ITEM B) using the screws (ITEM F). H Remove the screws which will be strong enough to support the weight of the air conditioner. Fasten the curtains to the unit with special attention to the proper...
HOW TO INSTALL If the air conditioner is blocked by gripping the base pan handle and pull forward while bracing the cabinet. r'_ Attach the sill bracket to the window sill using the ... back and side of the window sill. When cooling more than one room, installation location is designed to the support bracket (ITEM B) using the screws (ITEM F). H Remove the screws which will be strong enough to support the weight of the air conditioner. Fasten the curtains to the unit with special attention to the proper...
Owners Manual
Page 7
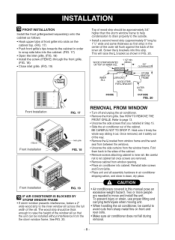
... to the drain elbow. (Drain hose is not supplied.) FIG. 13 elbow Drain hose Frame curtain _"_ Slide the air conditioner into window inner sill. • The cabinet should be installed with a very slight tilt downward by driving the screws (ITEM F) through the cabinet into the cabinet. (FIG. 14... FIG. 16 -7- Select a drain method according to the proper length and insert between the upper window sash and the lower window sash. (FIG. 15) _1_ Attach the window locking bracket (ITEM L) with part ®. Attach each side curtain to the window sash using 4 screws (ITEM G). (FIG...
... to the drain elbow. (Drain hose is not supplied.) FIG. 13 elbow Drain hose Frame curtain _"_ Slide the air conditioner into window inner sill. • The cabinet should be installed with a very slight tilt downward by driving the screws (ITEM F) through the cabinet into the cabinet. (FIG. 14... FIG. 16 -7- Select a drain method according to the proper length and insert between the upper window sash and the lower window sash. (FIG. 15) _1_ Attach the window locking bracket (ITEM L) with part ®. Attach each side curtain to the window sash using 4 screws (ITEM G). (FIG...
Owners Manual
Page 8
...Air conditioners covered in Step 15. • Slide the air conditioner out of the inner sill. Hold onto it firmly the whole way sliding it safety out of the window sill so that the unit can be thick enough to page 13. • Unscrew the side screws that you installed...window frame to help condensation to drain properly to avoid cuts from window opening. • Place air conditioner into this manual pose an excessive weight hazard. Front Installation FIG. 19 _T_IFSTOARIRMCOWNINDDITOIOWNEFRRAIMSEBLOCKED BY • If storm window presents interference, fasten a 2" wide wood ...
...Air conditioners covered in Step 15. • Slide the air conditioner out of the inner sill. Hold onto it firmly the whole way sliding it safety out of the window sill so that the unit can be thick enough to page 13. • Unscrew the side screws that you installed...window frame to help condensation to drain properly to avoid cuts from window opening. • Place air conditioner into this manual pose an excessive weight hazard. Front Installation FIG. 19 _T_IFSTOARIRMCOWNINDDITOIOWNEFRRAIMSEBLOCKED BY • If storm window presents interference, fasten a 2" wide wood ...
Owners Manual
Page 10
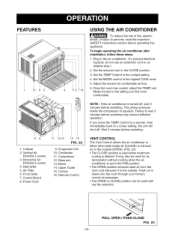
.... • The OPEN position removes stale air from the room and exhausts it to wait 3 minutes before operating this appliance To begin operating the air conditioner after installation, follow these steps: 1. Horizontal Air Direction Louvers 4. Front Grille 7. Compressor 12. Brace 14. Adjust the louvers for air recirculation without cooling when the air conditioner is desired. If you find most...
.... • The OPEN position removes stale air from the room and exhausts it to wait 3 minutes before operating this appliance To begin operating the air conditioner after installation, follow these steps: 1. Horizontal Air Direction Louvers 4. Front Grille 7. Compressor 12. Brace 14. Adjust the louvers for air recirculation without cooling when the air conditioner is desired. If you find most...


