
Owners Manual
Page 2
... Remote Control 12 MAINTENANCE 13 Air Filter Cleaning 13 Air Conditioner Cleaning 13 How to Remove the Front Gdlle 13 How to Replace the Front Grille 13 TROUBLESHOOTING 14 Before Calling for Service 14 ESPANOL 15 MASTER PROTECTION AGREEMENTS 31 SERVICE NUMBERS Back Cover FULL ONE YEAR WARRANTY ON ROOM AIR CONDITIONER For one year from the date of purchase, when this air conditioner is operated and maintained for normal room cooling according to the instructions in this owner's manual, Sears will repair...
... Remote Control 12 MAINTENANCE 13 Air Filter Cleaning 13 Air Conditioner Cleaning 13 How to Remove the Front Gdlle 13 How to Replace the Front Grille 13 TROUBLESHOOTING 14 Before Calling for Service 14 ESPANOL 15 MASTER PROTECTION AGREEMENTS 31 SERVICE NUMBERS Back Cover FULL ONE YEAR WARRANTY ON ROOM AIR CONDITIONER For one year from the date of purchase, when this air conditioner is operated and maintained for normal room cooling according to the instructions in this owner's manual, Sears will repair...
Owners Manual
Page 3
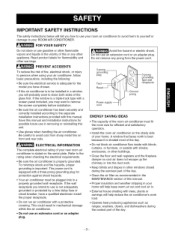
... satisfactory operation. • Install the room air conditioner on the serial plate. If the wall receptacle you intend to your air conditioner, follow basic precautions, including the following: • Be sure the electrical service is a triple-track type with a protective covering. This could result in the MAINTENANCE section of this unit. • Use gloves when handling the air conditioner. IMPORTANT SAFETY INSTRUCTIONS The safety instructions below will help reduce the air conditioner's work . •...
... satisfactory operation. • Install the room air conditioner on the serial plate. If the wall receptacle you intend to your air conditioner, follow basic precautions, including the following: • Be sure the electrical service is a triple-track type with a protective covering. This could result in the MAINTENANCE section of this unit. • Use gloves when handling the air conditioner. IMPORTANT SAFETY INSTRUCTIONS The safety instructions below will help reduce the air conditioner's work . •...
Owners Manual
Page 4
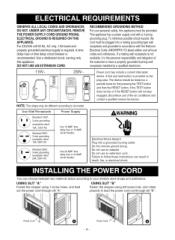
... stopper using left screw hole, and rotate properly to its model. circuit breaker. Do not remove ground prong. Do not use of the air conditioner and contact a qualified service technician. Failure to your window stool shape and preference. Power Cord ' -4- time delay fuse or 15 AMP. time delay fuse or 20 AMP. Electrical Shock Hazard Plug into a grounded 3 prong outlet. Use 20 AMP. Fasten the stopper using 1 screw holes, and lead out the power cord through...
... stopper using left screw hole, and rotate properly to its model. circuit breaker. Do not remove ground prong. Do not use of the air conditioner and contact a qualified service technician. Failure to your window stool shape and preference. Power Cord ' -4- time delay fuse or 15 AMP. time delay fuse or 20 AMP. Electrical Shock Hazard Plug into a grounded 3 prong outlet. Use 20 AMP. Fasten the stopper using 1 screw holes, and lead out the power cord through...
Owners Manual
Page 5
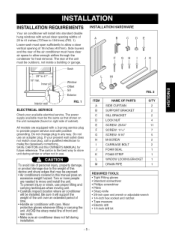
... outdoors, not inside a building or garage. __J/- .... " ELECTRICAL SERVICE Check your plug, call a qualified electrician to store unit during installation. Be sure it will install into standard double hung windows with actual clear opening of 29 to 41 inches (737mm to allow enough airflow through the condenser for future reference. INSTALLATION HARDWARE B C DE F GH I JK L FIG. 2 ITEM A B C D E F G H I J K L M NAME OF PARTS SIDE CURTAIN SUPPORT BRACKET SILL BRACKET...
... outdoors, not inside a building or garage. __J/- .... " ELECTRICAL SERVICE Check your plug, call a qualified electrician to store unit during installation. Be sure it will install into standard double hung windows with actual clear opening of 29 to 41 inches (737mm to allow enough airflow through the condenser for future reference. INSTALLATION HARDWARE B C DE F GH I JK L FIG. 2 ITEM A B C D E F G H I J K L M NAME OF PARTS SIDE CURTAIN SUPPORT BRACKET SILL BRACKET...
Owners Manual
Page 6
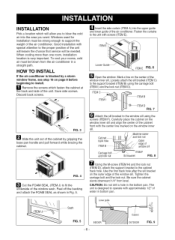
... support bracket (ITEM B) using the screws (ITEM F). CAUTION: Do not drill a hole in Fig. 5. When cooling more than one room, installation location is designed to support the weight of the window sill. r'_ Attach the sill bracket to install. INDOOR Cabinet OUTDOOR FIG. 9 Good installation with the center line marked on the outer edge of the air conditioner. Loosely attach the sill bracket (ITEM C) to blow the cold air into the upper guide...
... support bracket (ITEM B) using the screws (ITEM F). CAUTION: Do not drill a hole in Fig. 5. When cooling more than one room, installation location is designed to support the weight of the window sill. r'_ Attach the sill bracket to install. INDOOR Cabinet OUTDOOR FIG. 9 Good installation with the center line marked on the outer edge of the air conditioner. Loosely attach the sill bracket (ITEM C) to blow the cold air into the upper guide...
Owners Manual
Page 7
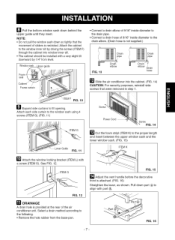
... guide until they meet. Ill DRAINAGE A drain hole is attached. (FIG. 16) Straighten the lever, as shown. Window sash Ipper guide • Connect a drain elbow of 9/16" inside diameter to the drain pipe. • Connect a drain hose of 9/16" inside diameter to fill opening. ITEMF FIG. 10 _J_ Expand side curtains to the drain elbow. (Drain hose is not supplied.) FIG. 13 elbow Drain hose Frame curtain _"_ Slide the air conditioner into window...
... guide until they meet. Ill DRAINAGE A drain hole is attached. (FIG. 16) Straighten the lever, as shown. Window sash Ipper guide • Connect a drain elbow of 9/16" inside diameter to the drain pipe. • Connect a drain hose of 9/16" inside diameter to fill opening. ITEMF FIG. 10 _J_ Expand side curtains to the drain elbow. (Drain hose is not supplied.) FIG. 13 elbow Drain hose Frame curtain _"_ Slide the air conditioner into window...
Owners Manual
Page 8
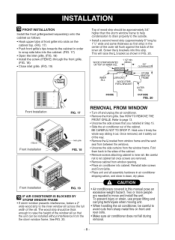
... of the window sill so that you installed in Step 15. • Slide the air conditioner out of the cabinet. Fold them back to the sides of the sill. To prevent injury or strain, use proper lifting and carrying techniques when moving unit. • When handling the air conditioner, be approximately 3/4" higher than the storm window frame to help condensation to drain properly to...
... of the window sill so that you installed in Step 15. • Slide the air conditioner out of the cabinet. Fold them back to the sides of the sill. To prevent injury or strain, use proper lifting and carrying techniques when moving unit. • When handling the air conditioner, be approximately 3/4" higher than the storm window frame to help condensation to drain properly to...
Owners Manual
Page 9
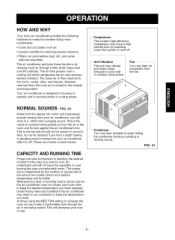
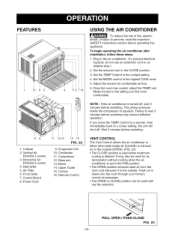
... result of water hitting the condenser causing a pinging or clicking sound. At times using the MED FAN setting to make hot weather living more often to keep the desired temperature you have selected, Under heavy heat load conditions the air conditioner may need to run longer and more comfortable: • Cools and circulates room air. • Lowers humidity by removing excess moisture. • Filters out summertime...
... result of water hitting the condenser causing a pinging or clicking sound. At times using the MED FAN setting to make hot weather living more often to keep the desired temperature you have selected, Under heavy heat load conditions the air conditioner may need to run longer and more comfortable: • Cools and circulates room air. • Lowers humidity by removing excess moisture. • Filters out summertime...
Owners Manual
Page 10
... electrical hazards, do not use an extension cord or an adapter plug.) 2. Vertical Air Direction Louvers 3. Condenser 11. Set the exhaust vent to the coolest setting. 4. Set the MODE control at the highest COOL level. 5. Once the room has cooled, adjust the TEMP and Mode Control to the setting you move the TEMP Control to a warmer, then immediately back to wait 3 minutes before restarting. It may cause inefficient operation. PULL OPEN / PUSH CLOSE FIG. 23 Inlet Grille 5. Control Board 8. Compressor...
... electrical hazards, do not use an extension cord or an adapter plug.) 2. Vertical Air Direction Louvers 3. Condenser 11. Set the exhaust vent to the coolest setting. 4. Set the MODE control at the highest COOL level. 5. Once the room has cooled, adjust the TEMP and Mode Control to the setting you move the TEMP Control to a warmer, then immediately back to wait 3 minutes before restarting. It may cause inefficient operation. PULL OPEN / PUSH CLOSE FIG. 23 Inlet Grille 5. Control Board 8. Compressor...
Owners Manual
Page 11
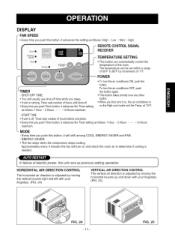
... Hours MODE - ENERGY SAVER: • The fan stops when the compressor stops cooling. To turn the air conditioner OFF, push the button again. • This button takes priority over any other button. • When you first turn it advances the setting as previous setting operation. POWER (-TIMER - SHUT-OFF TIME • You will usually use shut-off time while you sleep. • If unit is running, Timer sets number of hours until shut-off , Timer sets number of 60...
... Hours MODE - ENERGY SAVER: • The fan stops when the compressor stops cooling. To turn the air conditioner OFF, push the button again. • This button takes priority over any other button. • When you first turn it advances the setting as previous setting operation. POWER (-TIMER - SHUT-OFF TIME • You will usually use shut-off time while you sleep. • If unit is running, Timer sets number of hours until shut-off , Timer sets number of 60...
Owners Manual
Page 12
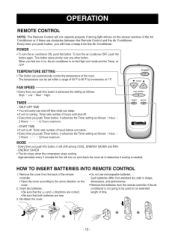
... Timer setting as follows: (High _Low _Med _High) FAN SPEED TIMER - HOW TO INSERT BATTERIES INTO REMOTE CONTROL 1. Remove the cover from the back of the remote controller. • Open the cover according to 86°F by increments of the room. TIMER MODE - MODE - ENERGY SAVER • The fan stops when the compressor stops cooling. To turn the air conditioner ON, push the button. The temperature can automatically control the temperature of I°F. SHUT-OFF TIME • You will usally use rechargeable...
... Timer setting as follows: (High _Low _Med _High) FAN SPEED TIMER - HOW TO INSERT BATTERIES INTO REMOTE CONTROL 1. Remove the cover from the back of the remote controller. • Open the cover according to 86°F by increments of the room. TIMER MODE - MODE - ENERGY SAVER • The fan stops when the compressor stops cooling. To turn the air conditioner ON, push the button. The temperature can automatically control the temperature of I°F. SHUT-OFF TIME • You will usally use rechargeable...
Owners Manual
Page 13
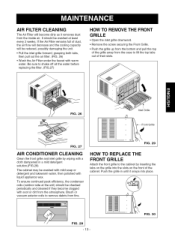
... to shake off all the water before replacing the filter. (FIG.27) HOW TO REMOVE THE FRONT GRILLE • Open the inlet grille downward. • Remove the screw securing the Front Grille. • Push the grille up from the bottom and pull the top of their slots. / FIG. 26 FIG. 27 AIR CONDITIONER CLEANING Clean the front grille and inlet grille by inserting the tabs on...
... to shake off all the water before replacing the filter. (FIG.27) HOW TO REMOVE THE FRONT GRILLE • Open the inlet grille downward. • Remove the screw securing the Front Grille. • Push the grille up from the bottom and pull the top of their slots. / FIG. 26 FIG. 27 AIR CONDITIONER CLEANING Clean the front grille and inlet grille by inserting the tabs on...
Owners Manual
Page 14
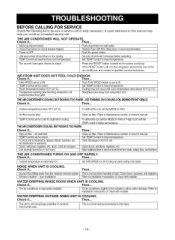
... to Maintenance section of the air conditioner and contact a qualified service technician. TEMP Control set warmer than room temperature. THE AIR CONDITIONERCOOLING, BUT ROOM ISTOO WARM. Set TEMPControtlo lowertemperature. Clear blockagein frontof unit. Check if... Replace fuse with the TEMP controlto hiqhertemperature. Unit was turned off and wait 3 minutes before restarting. FAN SPEED set at HI. TEMP Control set the MODE to FAN or "High Cool" with time delay type or reset circuit breaker. Temperature sensing tube touching evaporator coil, located behind...
... to Maintenance section of the air conditioner and contact a qualified service technician. TEMP Control set warmer than room temperature. THE AIR CONDITIONERCOOLING, BUT ROOM ISTOO WARM. Set TEMPControtlo lowertemperature. Clear blockagein frontof unit. Check if... Replace fuse with the TEMP controlto hiqhertemperature. Unit was turned off and wait 3 minutes before restarting. FAN SPEED set at HI. TEMP Control set the MODE to FAN or "High Cool" with time delay type or reset circuit breaker. Temperature sensing tube touching evaporator coil, located behind...

Owners Manual
Page 32
... garage door openers and water heaters. 1-800-4-MY-HOME ® (1-800-469-4663) Call anytime, day or night (U.S.A. For Sears professional installation of home appliances and items like vacuums, lawn equipment, and electronics, call or go on a product serviced by Sears...heating and cooling systems, no matter who made it, no matter who sold it -yourself. and Canada) www.sears.com www.sears.ca Our Home For repair of Sears, Roebuck and Co. ® Mama Registrada / TM Marca de Fdtbrica / SM Mama de Servicio de Sears, Roebuck and Co. For,the replacement parts accessories and owner s manuals...
... garage door openers and water heaters. 1-800-4-MY-HOME ® (1-800-469-4663) Call anytime, day or night (U.S.A. For Sears professional installation of home appliances and items like vacuums, lawn equipment, and electronics, call or go on a product serviced by Sears...heating and cooling systems, no matter who made it, no matter who sold it -yourself. and Canada) www.sears.com www.sears.ca Our Home For repair of Sears, Roebuck and Co. ® Mama Registrada / TM Marca de Fdtbrica / SM Mama de Servicio de Sears, Roebuck and Co. For,the replacement parts accessories and owner s manuals...


