
Owners Manual
Page 2
..."-"6 Casement Window Installation 8 Removal From Window 8 OPERATION 9 How and Why 9 Normal Sounds 9 Capacity and Running Time 9 Features 10 Using the Air Conditioner 10 Display 11 Air Direction Adjustment 11 Remote Control 12 How To Insert Batteries Into Remote Control ...12 MAINTENANCE 13 Air Filter Cleaning 13 Air Conditioner Cleaning 13 How to Remove the Front Grille 13 How to Replace the Front Grille 13 TROUBLESHOOTING 14 Before Calling for Service 14 ESPANOL 16 SERVICE NUMBERS Back Cover FULL ONE YEAR WARRANTY ON ROOM AIR CONDITIONER For one year from...
..."-"6 Casement Window Installation 8 Removal From Window 8 OPERATION 9 How and Why 9 Normal Sounds 9 Capacity and Running Time 9 Features 10 Using the Air Conditioner 10 Display 11 Air Direction Adjustment 11 Remote Control 12 How To Insert Batteries Into Remote Control ...12 MAINTENANCE 13 Air Filter Cleaning 13 Air Conditioner Cleaning 13 How to Remove the Front Grille 13 How to Replace the Front Grille 13 TROUBLESHOOTING 14 Before Calling for Service 14 ESPANOL 16 SERVICE NUMBERS Back Cover FULL ONE YEAR WARRANTY ON ROOM AIR CONDITIONER For one year from...
Owners Manual
Page 3
... power cord. ELECTRICAL INFORMATION The complete electrical rating of your new room air conditioner is to be plugged into the duct work load. • Operate heat producing appliances such as ranges, washers, dryers, and dishwashers during the sunniest part of the day. • Clean the air filter as recommended in your ROOM AIR CONDITIONER. Read product labels for the model you intend to the rating when checking the electrical requirements. • Be sure the air conditioner...
... power cord. ELECTRICAL INFORMATION The complete electrical rating of your new room air conditioner is to be plugged into the duct work load. • Operate heat producing appliances such as ranges, washers, dryers, and dishwashers during the sunniest part of the day. • Clean the air filter as recommended in your ROOM AIR CONDITIONER. Read product labels for the model you intend to the rating when checking the electrical requirements. • Be sure the air conditioner...
Owners Manual
Page 4
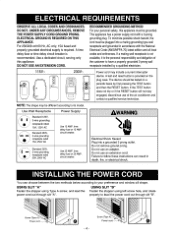
... air conditioner and contact a qualified service technician. NOTE: The shape may include a current interrupter device. DO NOT, UNDER ANY CIRCUMSTANCES,REMOVE THE POWERSUPPLY CORD GROUND PRONG. Use Wall Receptacle Power Supply Standard 125V, 3-wire grounding receptacle rated 15A, t 25V AC Standard 250V, 3-wire grounding receptacle rated 15A,250V AC Standard 250V, 3-wire grounding receptacle rated 20A, 250V AC Use 15 AMP, time delay fuse or 15 AMP, circuit breaker. Use 20 AMP...
... air conditioner and contact a qualified service technician. NOTE: The shape may include a current interrupter device. DO NOT, UNDER ANY CIRCUMSTANCES,REMOVE THE POWERSUPPLY CORD GROUND PRONG. Use Wall Receptacle Power Supply Standard 125V, 3-wire grounding receptacle rated 15A, t 25V AC Standard 250V, 3-wire grounding receptacle rated 15A,250V AC Standard 250V, 3-wire grounding receptacle rated 20A, 250V AC Use 15 AMP, time delay fuse or 15 AMP, circuit breaker. Use 20 AMP...
Owners Manual
Page 5
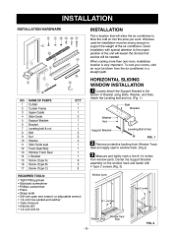
... when not in use. Horizontal sliding window Casement window To avoid risk of personal injury, property damage, or product damage due to the weight of the air conditioner must be installed. Close the inlet grille. If your present wall outlet does not match your available electrical service. Open the inlet grille downward and remove the air filter. 2. Inlet Grille -5- All models are equipped with care. ELECTRICAL SERVICE Check your plug, call a qualified...
... when not in use. Horizontal sliding window Casement window To avoid risk of personal injury, property damage, or product damage due to the weight of the air conditioner must be installed. Close the inlet grille. If your present wall outlet does not match your available electrical service. Open the inlet grille downward and remove the air filter. 2. Inlet Grille -5- All models are equipped with care. ELECTRICAL SERVICE Check your plug, call a qualified...
Owners Manual
Page 6
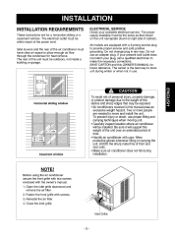
... lightly mark a line 8-1/4 inches from the air conditioner in a straight path. To cool your rooms, cold air must be needed. When cooling more than one room, installation location is very important. Attach the Leveling bolt and nut. (Fig. 1) Bolt Bracket Washer Support Br ' Bolt & Nut FIG. 1 _ Remove protective backing from Window Track Seal and apply seal to support the weight of Bracket using Bolts, Washer, and Nuts. Good installation with 4 Type...
... lightly mark a line 8-1/4 inches from the air conditioner in a straight path. To cool your rooms, cold air must be needed. When cooling more than one room, installation location is very important. Attach the Leveling bolt and nut. (Fig. 1) Bolt Bracket Washer Support Br ' Bolt & Nut FIG. 1 _ Remove protective backing from Window Track Seal and apply seal to support the weight of Bracket using Bolts, Washer, and Nuts. Good installation with 4 Type...
Owners Manual
Page 7
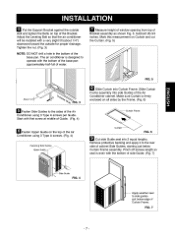
... side Guides of the Bracket. Subtract 20-3/4 inches. Start with a very slight tilt (about 1/4") downward toward the outside wall and tighten the Bolts on top of the Air Conditioner cabinet. Adjust the Leveling Bolt so that the air conditioner will be installed with first screw at middle of the Air Conditioner using 3 Type A screws per Guide. I_1 Measure height of window opening from top of Curtain Frame...
... side Guides of the Bracket. Subtract 20-3/4 inches. Start with a very slight tilt (about 1/4") downward toward the outside wall and tighten the Bolts on top of the Air Conditioner cabinet. Adjust the Leveling Bolt so that the air conditioner will be installed with first screw at middle of the Air Conditioner using 3 Type A screws per Guide. I_1 Measure height of window opening from top of Curtain Frame...
Owners Manual
Page 8
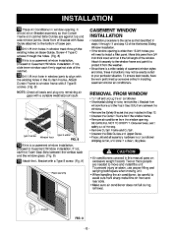
... Curtain Frame from the window frame. * Remove air coadrtioner from 3/4 inch thick wood and run it safely out of Bracket with the existing holes in installing casement window air conditioners. _ti] Place Air Conditioner in window opening . Mate front of the way. * Remove Curtain Frame and Curtain. * Unscrewthe Side Guidesand Upper Guide. * Place unit and all seals and plug any remaining air gaps with a suitable weatherproof caulk, _'L_'l]lfthis is a casement window installation, proceed to Casement Window Installation.
... Curtain Frame from the window frame. * Remove air coadrtioner from 3/4 inch thick wood and run it safely out of Bracket with the existing holes in installing casement window air conditioners. _ti] Place Air Conditioner in window opening . Mate front of the way. * Remove Curtain Frame and Curtain. * Unscrewthe Side Guidesand Upper Guide. * Place unit and all seals and plug any remaining air gaps with a suitable weatherproof caulk, _'L_'l]lfthis is a casement window installation, proceed to Casement Window Installation.
Owners Manual
Page 9
... air conditioner is determined by the number of poor wall the fan. This is normal and should not be cooled, indoor and outdoor temperature and humidity. The proper size is designed to be alarmed if you want , At times using the MED FAN setting to circulate the room air may need to run longer and more comfortable: ,*Cools and circulates room air. ,*Lowers humidity by drawing room air through a filter which refrigerates the air...
... air conditioner is determined by the number of poor wall the fan. This is normal and should not be cooled, indoor and outdoor temperature and humidity. The proper size is designed to be alarmed if you want , At times using the MED FAN setting to circulate the room air may need to run longer and more comfortable: ,*Cools and circulates room air. ,*Lowers humidity by drawing room air through a filter which refrigerates the air...
Owners Manual
Page 10
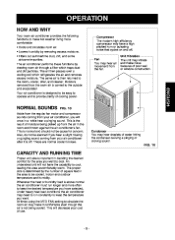
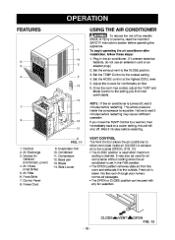
...) 4, Air Intake (inlet Grille) 5, Air Filter 6, Front Grille 7, Control Panel 8, Power Cord 8 FIG. 1 1 g. Base pan 13. Plug in the FAN position. * The OPEN position removes stale air from the room and exhausts it to a cooler setting, the unit will shut off , wait 3 minutes before restarting may also be used with any fan selection, CLOSE-LVENTJLOPEN -10- Set the MODE control at the highest COOL level, 5. Adjust the louvers for air recirculation without cooling when the air conditioner is turned...
...) 4, Air Intake (inlet Grille) 5, Air Filter 6, Front Grille 7, Control Panel 8, Power Cord 8 FIG. 1 1 g. Base pan 13. Plug in the FAN position. * The OPEN position removes stale air from the room and exhausts it to a cooler setting, the unit will shut off , wait 3 minutes before restarting may also be used with any fan selection, CLOSE-LVENTJLOPEN -10- Set the MODE control at the highest COOL level, 5. Adjust the louvers for air recirculation without cooling when the air conditioner is turned...
Owners Manual
Page 11
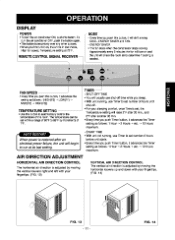
...: ._HIGH(F3_). POWER To turnthe air cond_ionerON, push thisbutton.To turnthe air conditioner OFF, push the button again. ,,This button _:es priori_ over any other buttons. ,,When you first turn on , the uNt is sef, ihe Ternperature setting will checkthe room air to determine [" coolingis needed. ENERGY SAVER * The'an stops when the compressor stopscooling, Approximately every 3 minutes the fan will turn _ on and the unit will raise 2°...
...: ._HIGH(F3_). POWER To turnthe air cond_ionerON, push thisbutton.To turnthe air conditioner OFF, push the button again. ,,This button _:es priori_ over any other buttons. ,,When you first turn on , the uNt is sef, ihe Ternperature setting will checkthe room air to determine [" coolingis needed. ENERGY SAVER * The'an stops when the compressor stopscooling, Approximately every 3 minutes the fan will turn _ on and the unit will raise 2°...
Owners Manual
Page 12
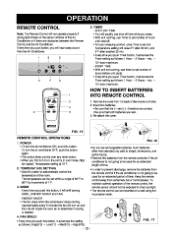
... the remote control, the remote sensor should not be exposedto dtteot sunlight. • The remote control can be mounted on , the unit is set, the Temperaturesetting will raise 2"F after 30 rain, and 2°F after aco_er 30 rain. • Every time you will shift among COOL, ENERGY SAVER and FAN. • Do not use timer to prevent discharge, remove the batteries from the remote control if the air conditioner is needed. 4, FAN SPEED...
... the remote control, the remote sensor should not be exposedto dtteot sunlight. • The remote control can be mounted on , the unit is set, the Temperaturesetting will raise 2"F after 30 rain, and 2°F after aco_er 30 rain. • Every time you will shift among COOL, ENERGY SAVER and FAN. • Do not use timer to prevent discharge, remove the batteries from the remote control if the air conditioner is needed. 4, FAN SPEED...
Owners Manual
Page 13
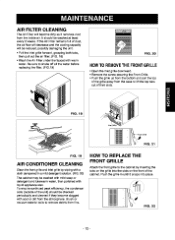
.... AIR FILTER CLEANING The Air Filter will become clogged with soot or dirt from the atmosphere, Brush or vacuum exterior coils to remove debris from the inside air, It should be reduced, possibly damaging the unit, • Pull the inlet grille forward, grasping both tabs, then pull out the air filter. (FIG. 18) • Wash the Air Filter under the faucet with warm water. Push the grille...
.... AIR FILTER CLEANING The Air Filter will become clogged with soot or dirt from the atmosphere, Brush or vacuum exterior coils to remove debris from the inside air, It should be reduced, possibly damaging the unit, • Pull the inlet grille forward, grasping both tabs, then pull out the air filter. (FIG. 18) • Wash the Air Filter under the faucet with warm water. Push the grille...
Owners Manual
Page 14
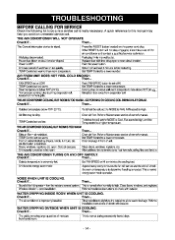
... unneeded service call. AIR FROM UNIT DOES NOT FEEL COLD Check if,,, Press the RESET button[ooctedon the pewor cord plug If 81eRESETbutton willnot stay engaged,disocntinue use of ownor'srrlanocl. "TEMPCenb'osl _ too warm. Coolingmay notoccurunSmI orntornperaturerisesabsso70=F(21°C), StraighLontubea_',_yfrom ovaperatercoil. Todefrost_; Unitiscot to m[nirnizothococlingIocd. Soul_doffal__-_ing_ator- frorrlthomoisturenercovsa,lf_el_. Sot"[EMPCestarotel a lowernumber. PushFANSPEEDb_Lt_ntosot at LOW. coil,setth_ MODEto FAN...
... unneeded service call. AIR FROM UNIT DOES NOT FEEL COLD Check if,,, Press the RESET button[ooctedon the pewor cord plug If 81eRESETbutton willnot stay engaged,disocntinue use of ownor'srrlanocl. "TEMPCenb'osl _ too warm. Coolingmay notoccurunSmI orntornperaturerisesabsso70=F(21°C), StraighLontubea_',_yfrom ovaperatercoil. Todefrost_; Unitiscot to m[nirnizothococlingIocd. Soul_doffal__-_ing_ator- frorrlthomoisturenercovsa,lf_el_. Sot"[EMPCestarotel a lowernumber. PushFANSPEEDb_Lt_ntosot at LOW. coil,setth_ MODEto FAN...

Owners Manual
Page 32
... replacement parts, accessories and owner's manuals that you need to do-it ! For Sears professional installation of home appliances and items like vacuums, lawn equipment, and electronics, call or go on a product serviced by Sears: 1-800-827-6655 (U.S.A.) 1-800-361-6665 (Canada) Para pedir servicio de re_)araciSn a domicilio, y para ordenar _)iezas: 1-888-SU-HOGAR "_ (1-888-784-6427) Au Canada I)our service...
... replacement parts, accessories and owner's manuals that you need to do-it ! For Sears professional installation of home appliances and items like vacuums, lawn equipment, and electronics, call or go on a product serviced by Sears: 1-800-827-6655 (U.S.A.) 1-800-361-6665 (Canada) Para pedir servicio de re_)araciSn a domicilio, y para ordenar _)iezas: 1-888-SU-HOGAR "_ (1-888-784-6427) Au Canada I)our service...


